DIY Hologram Foil Ornaments

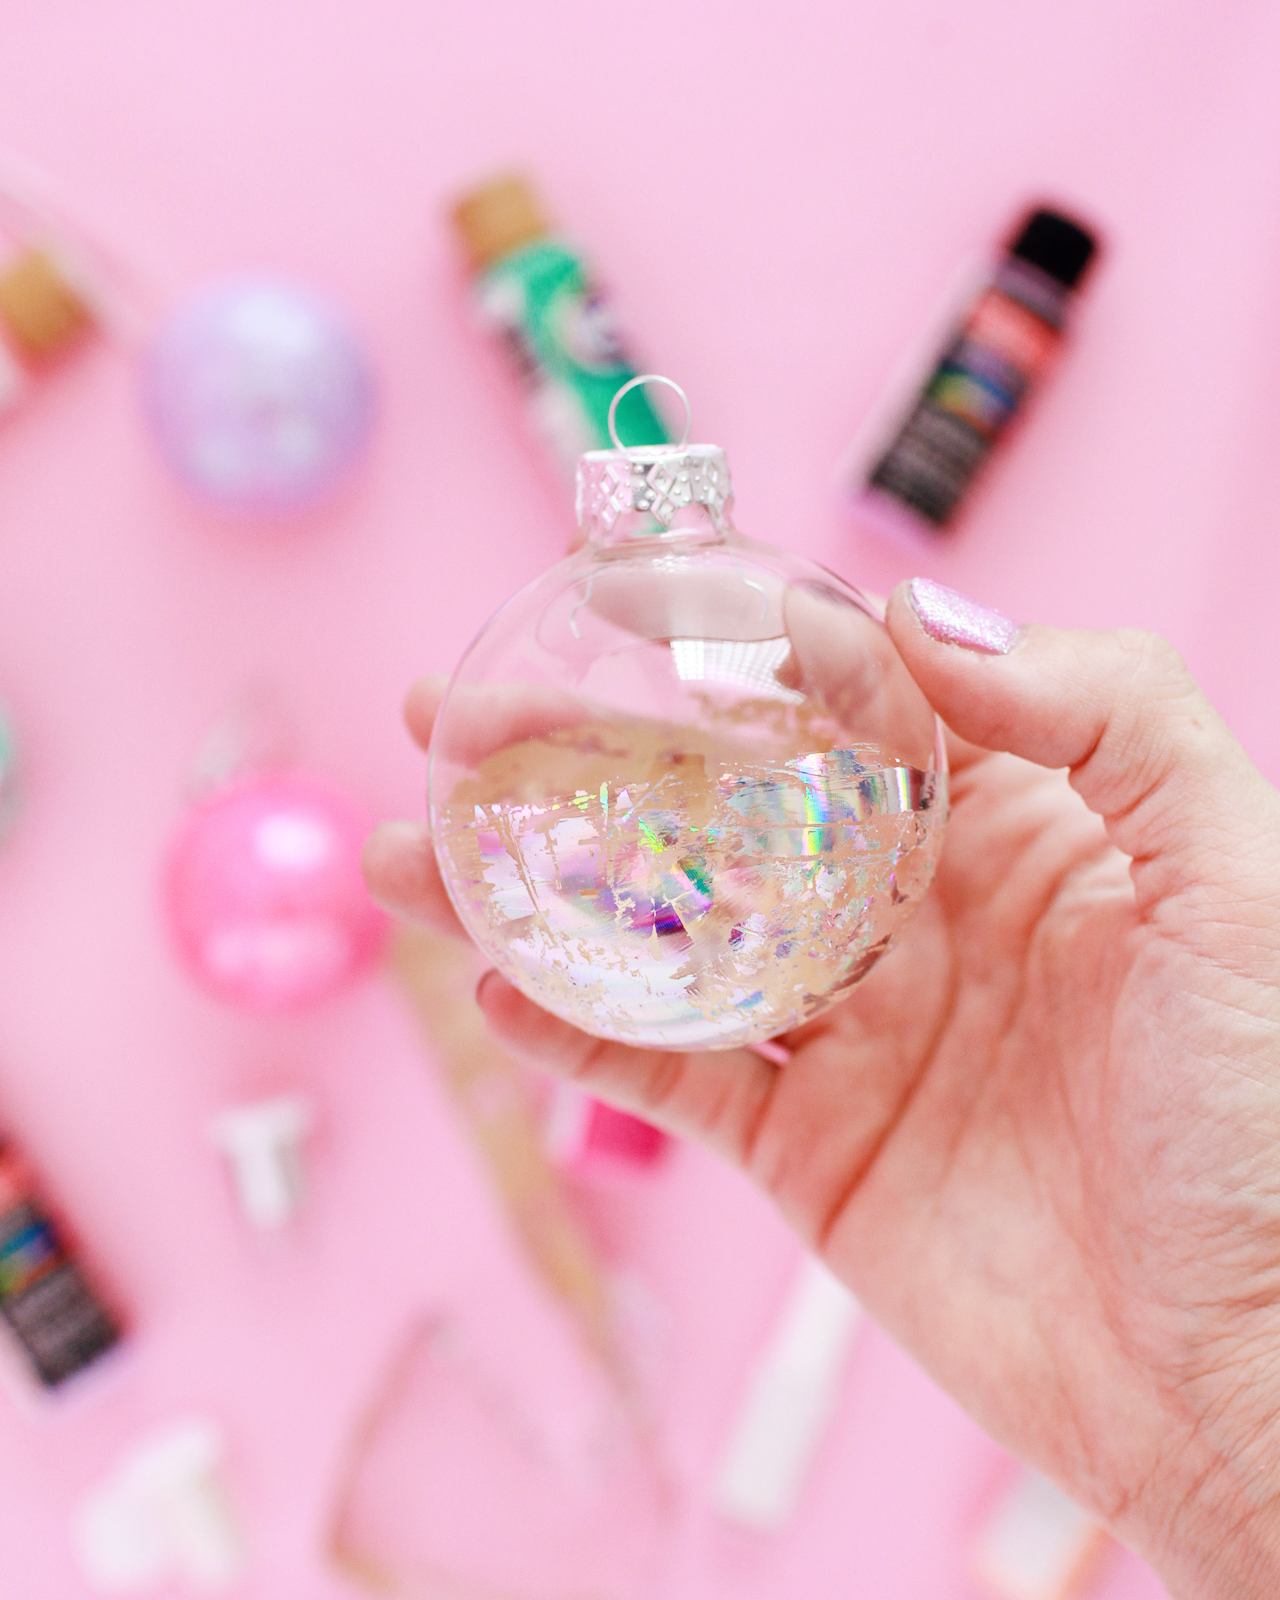
So apparently my brain works best on a really tight deadline. Here’s my brain: a week to go until Christmas? Great! Here are five DIY christmas ornament ideas! So for those of you looking for some fun non-traditional DIY ornament ideas, I’ve got a couple of ideas to share with you this week! First up, DIY hologram foil ornaments! You might remember these DIY hologram Easter eggs that I made last Spring, and I couldn’t resist making a set of Christmas ornaments from these amazing iridescent and hologram nail foils!

DIY Hologram Foil Ornaments

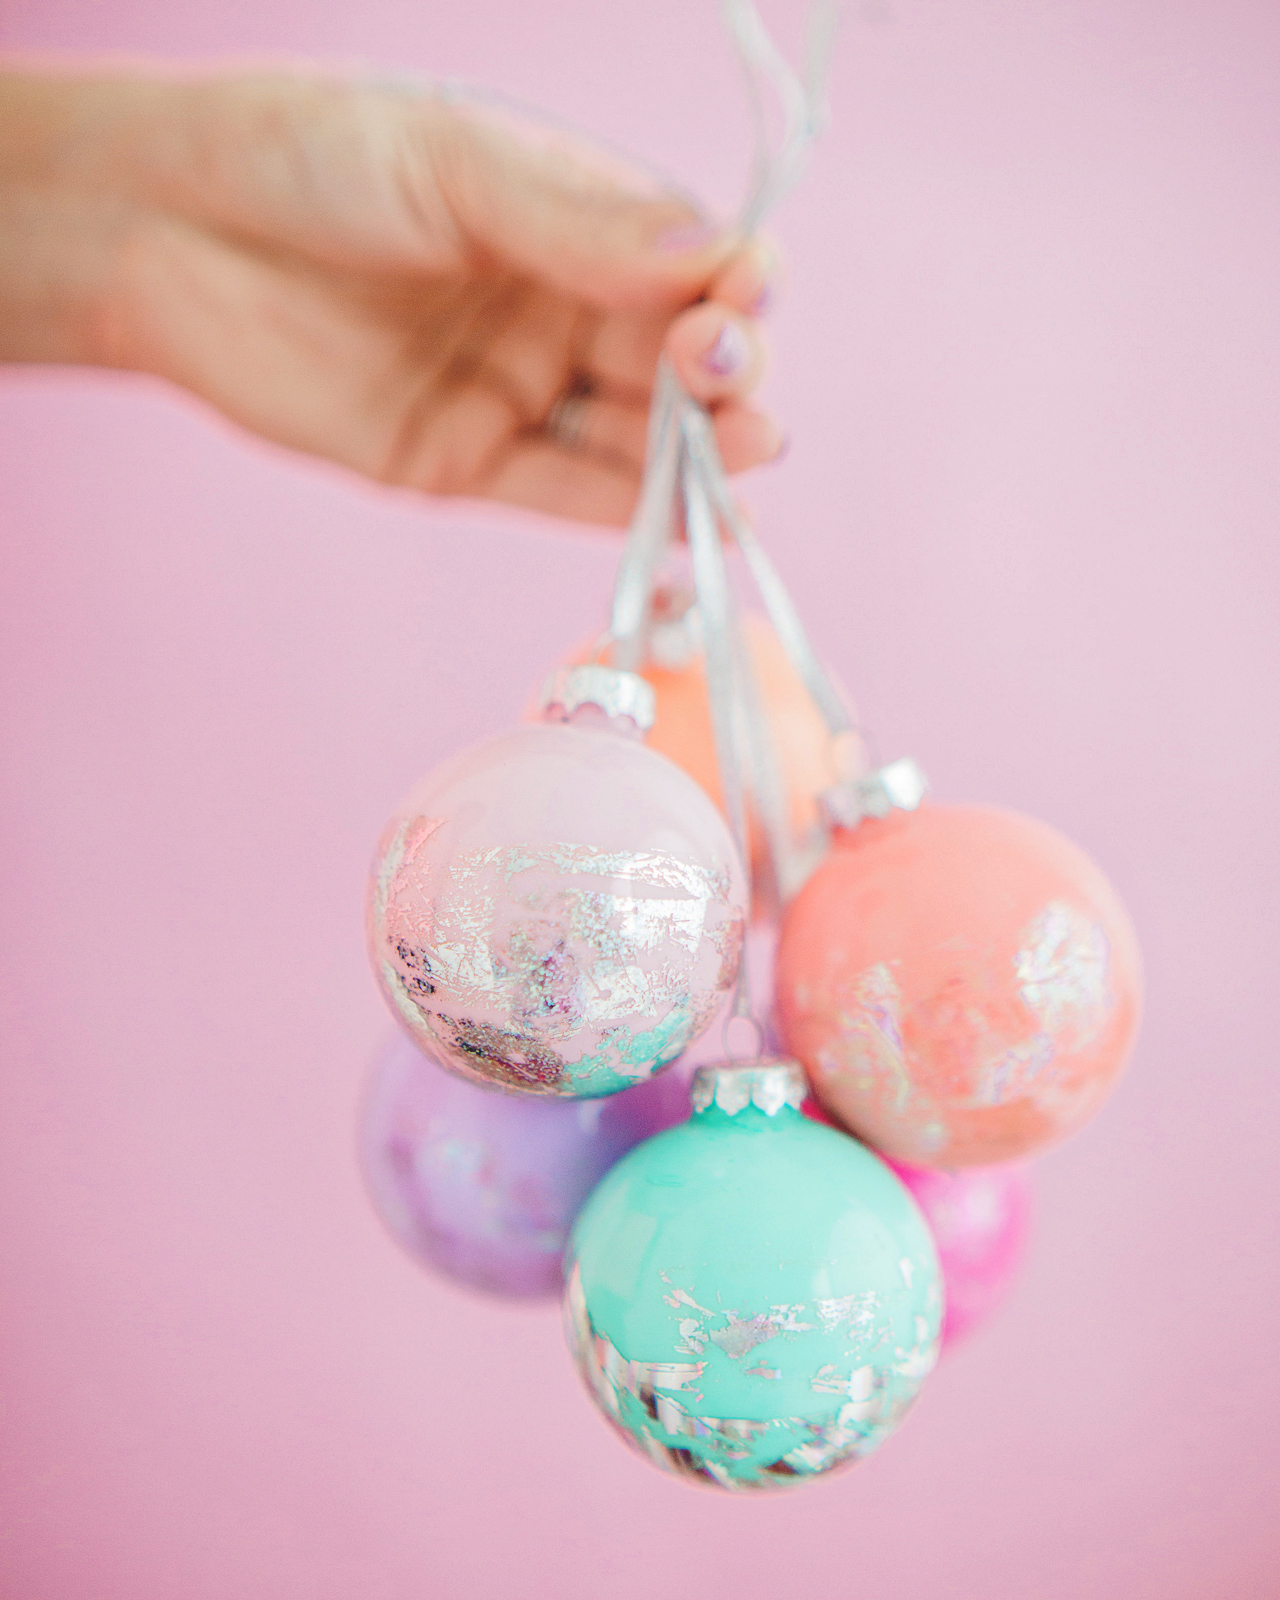
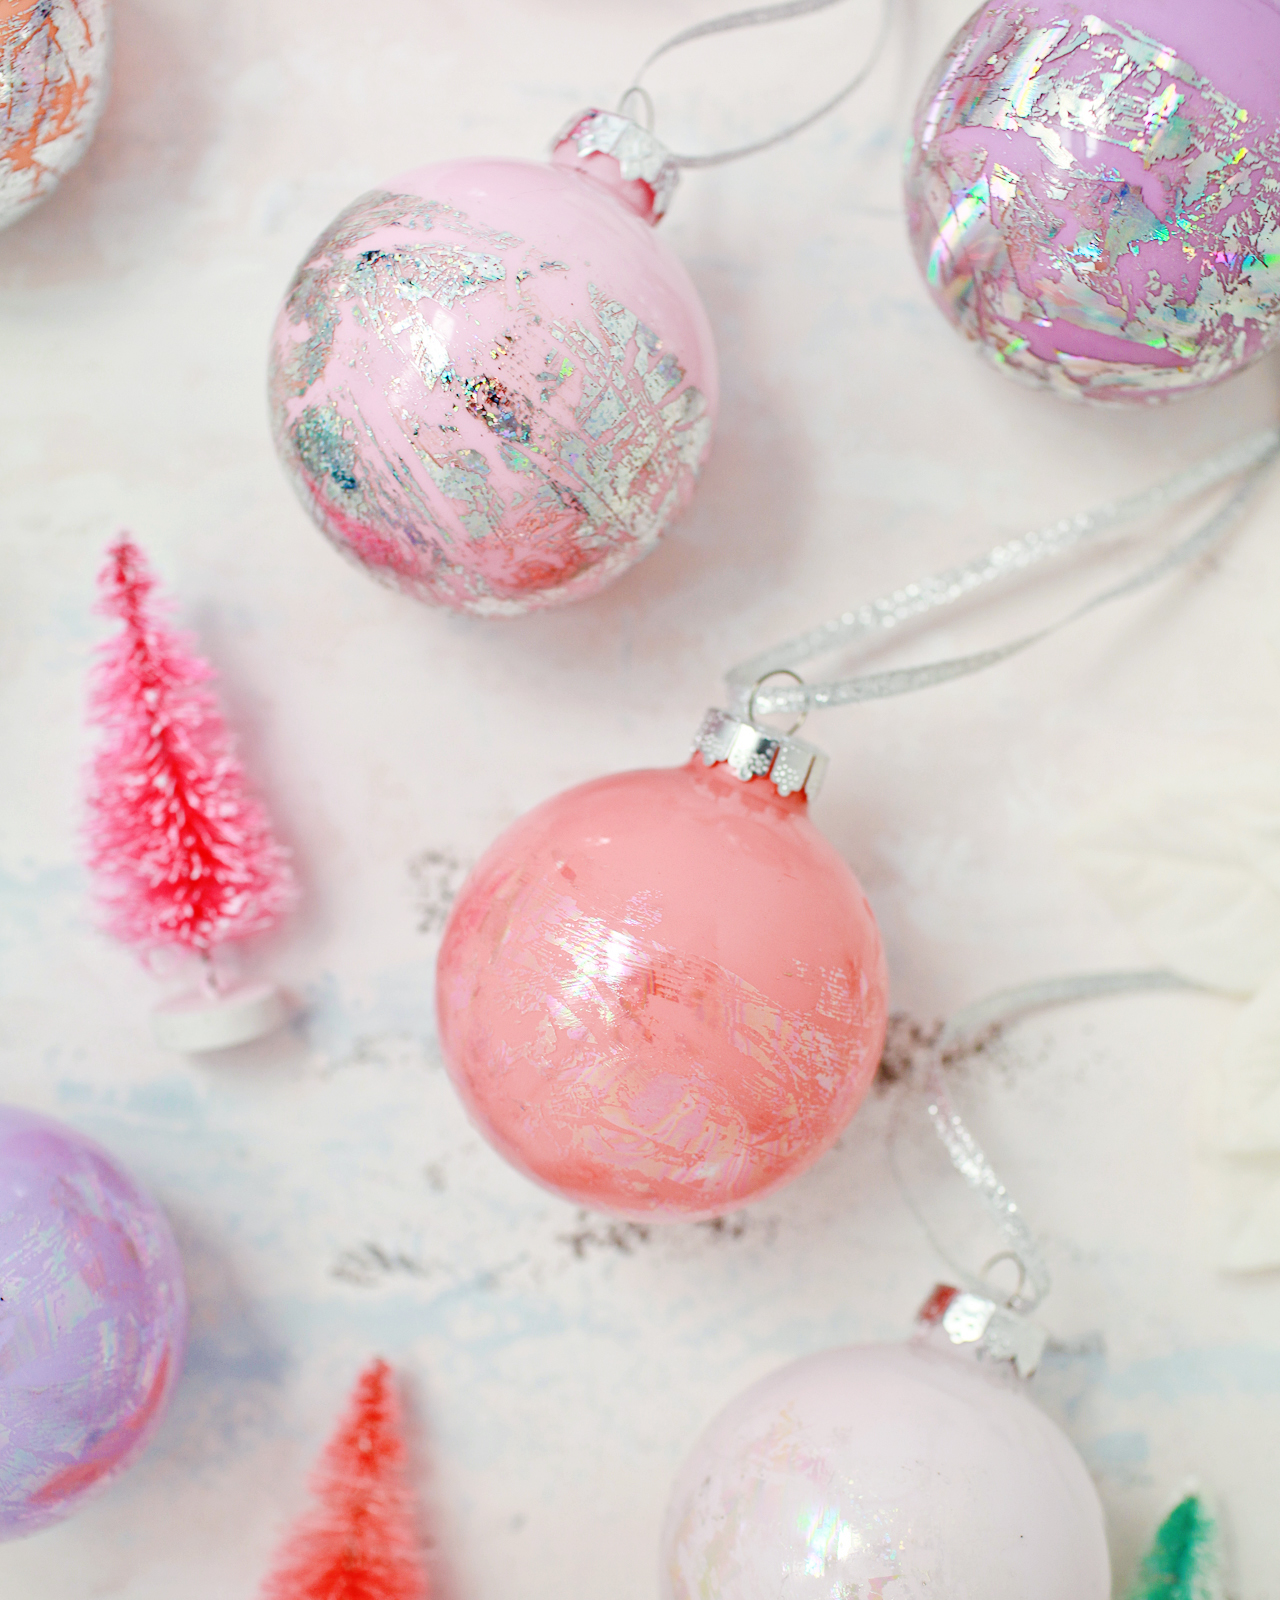
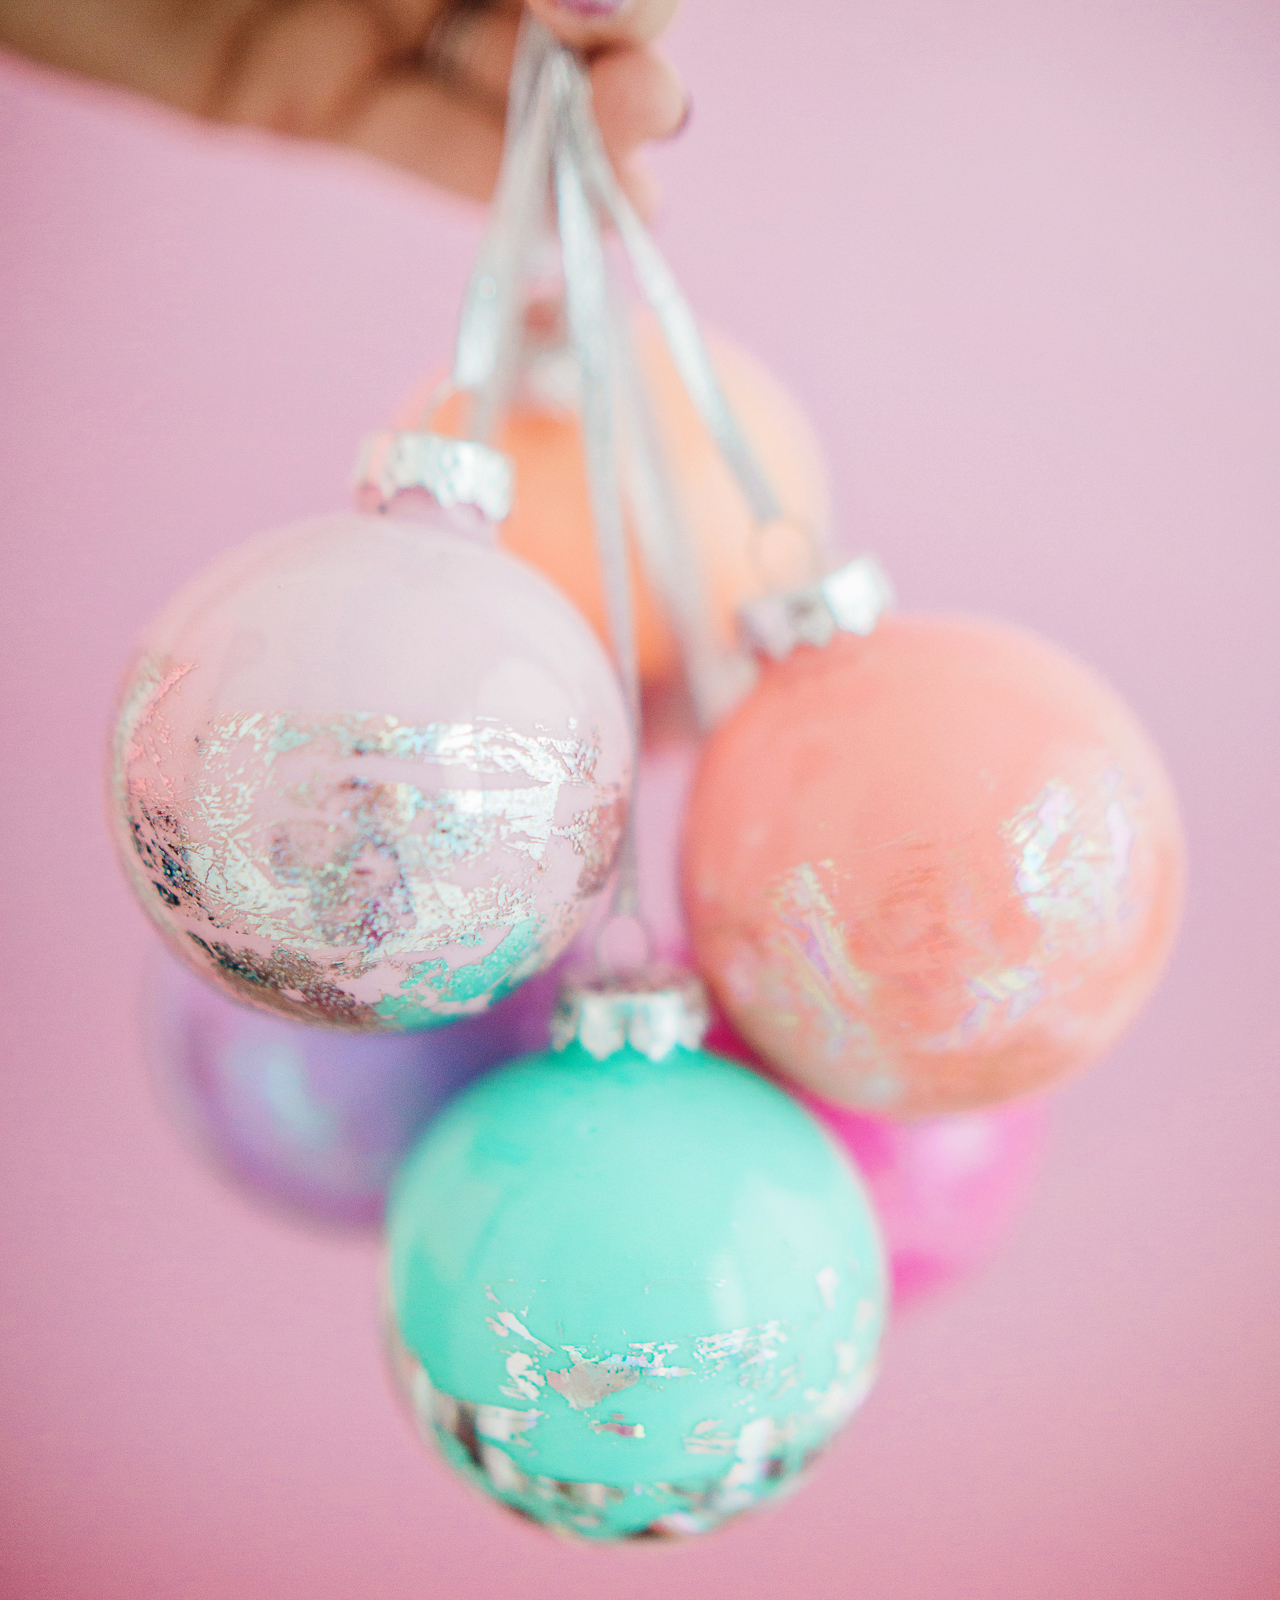
I know pastels are on the non-traditional side for Christmas, but I just couldn’t resist! I used clear glass ornaments and filled them in with a few colors of craft paint that I had on hand, but you could definitely pick more traditional colors. Or use existing solid color ornaments – either glass or plastic. The hologram nail foils stick to pretty much anything!

DIY Hologram Foil Ornaments

DIY Hologram Foil Ornaments

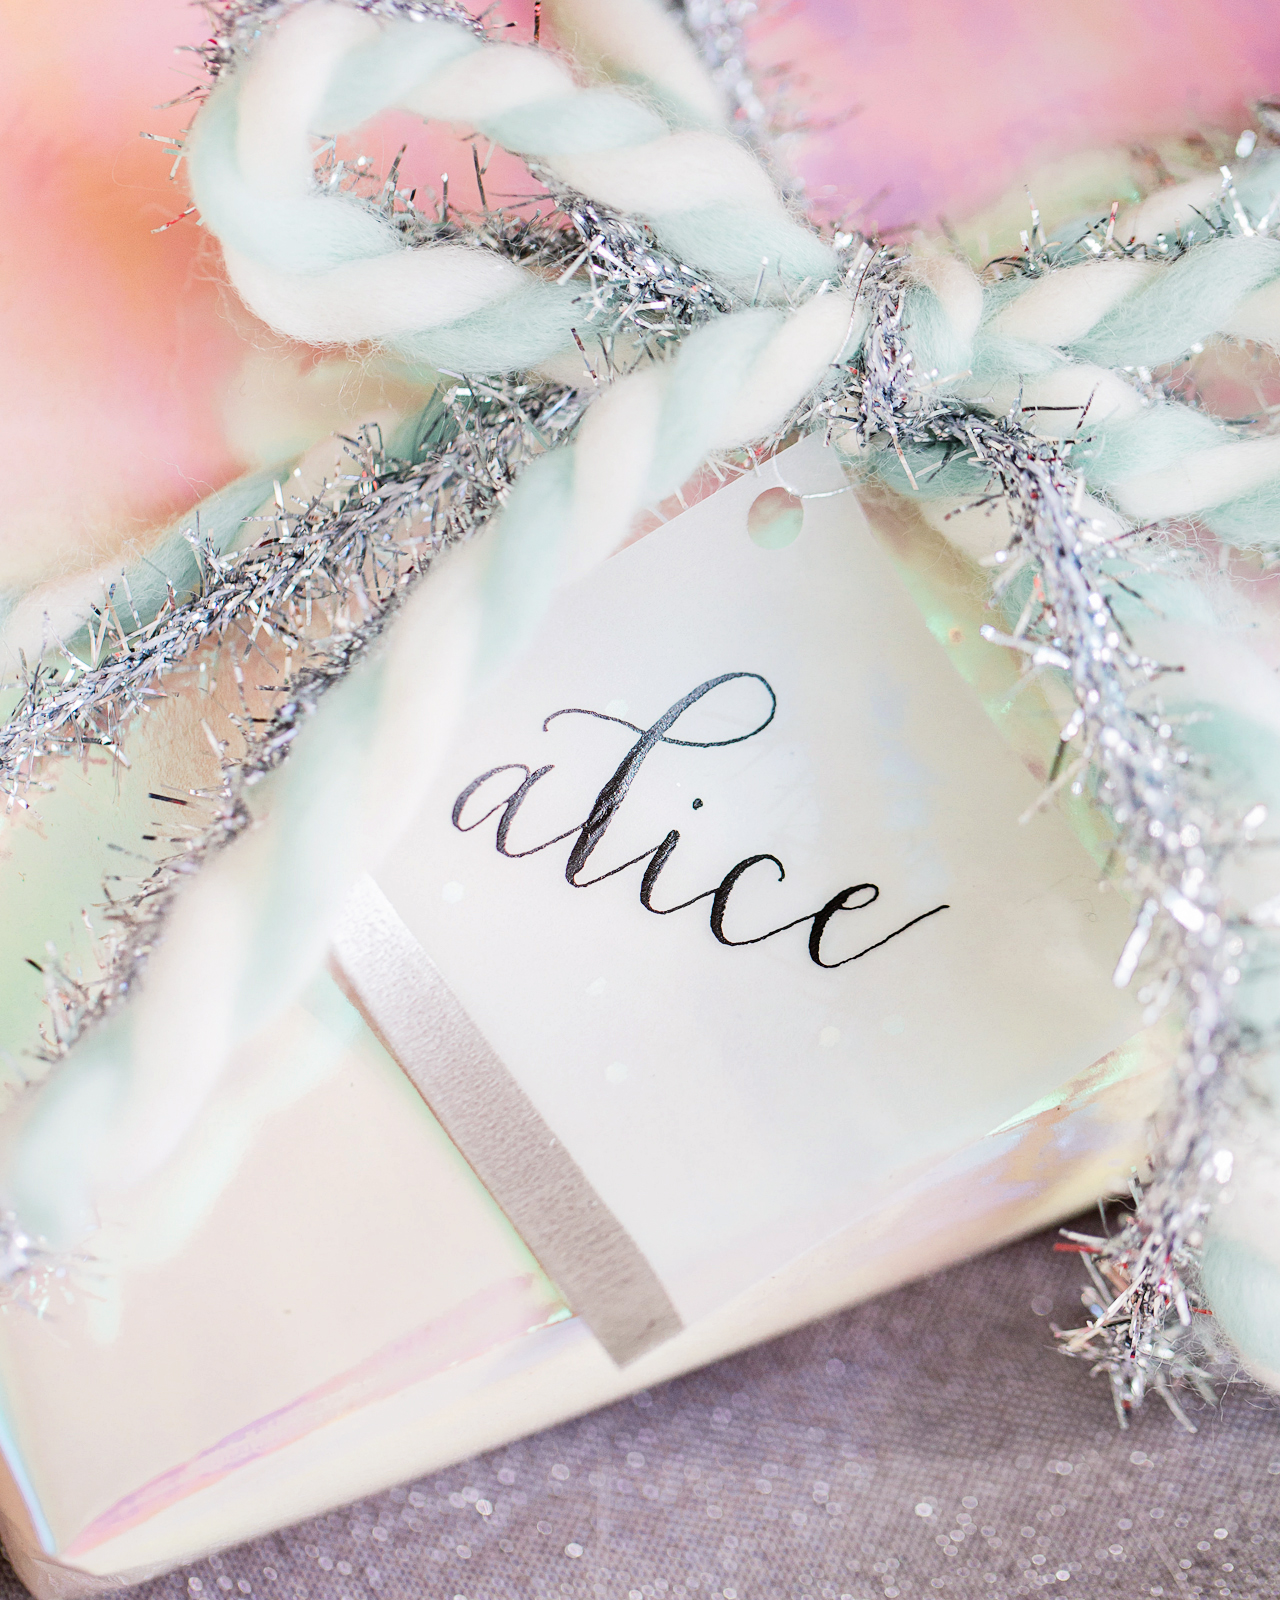
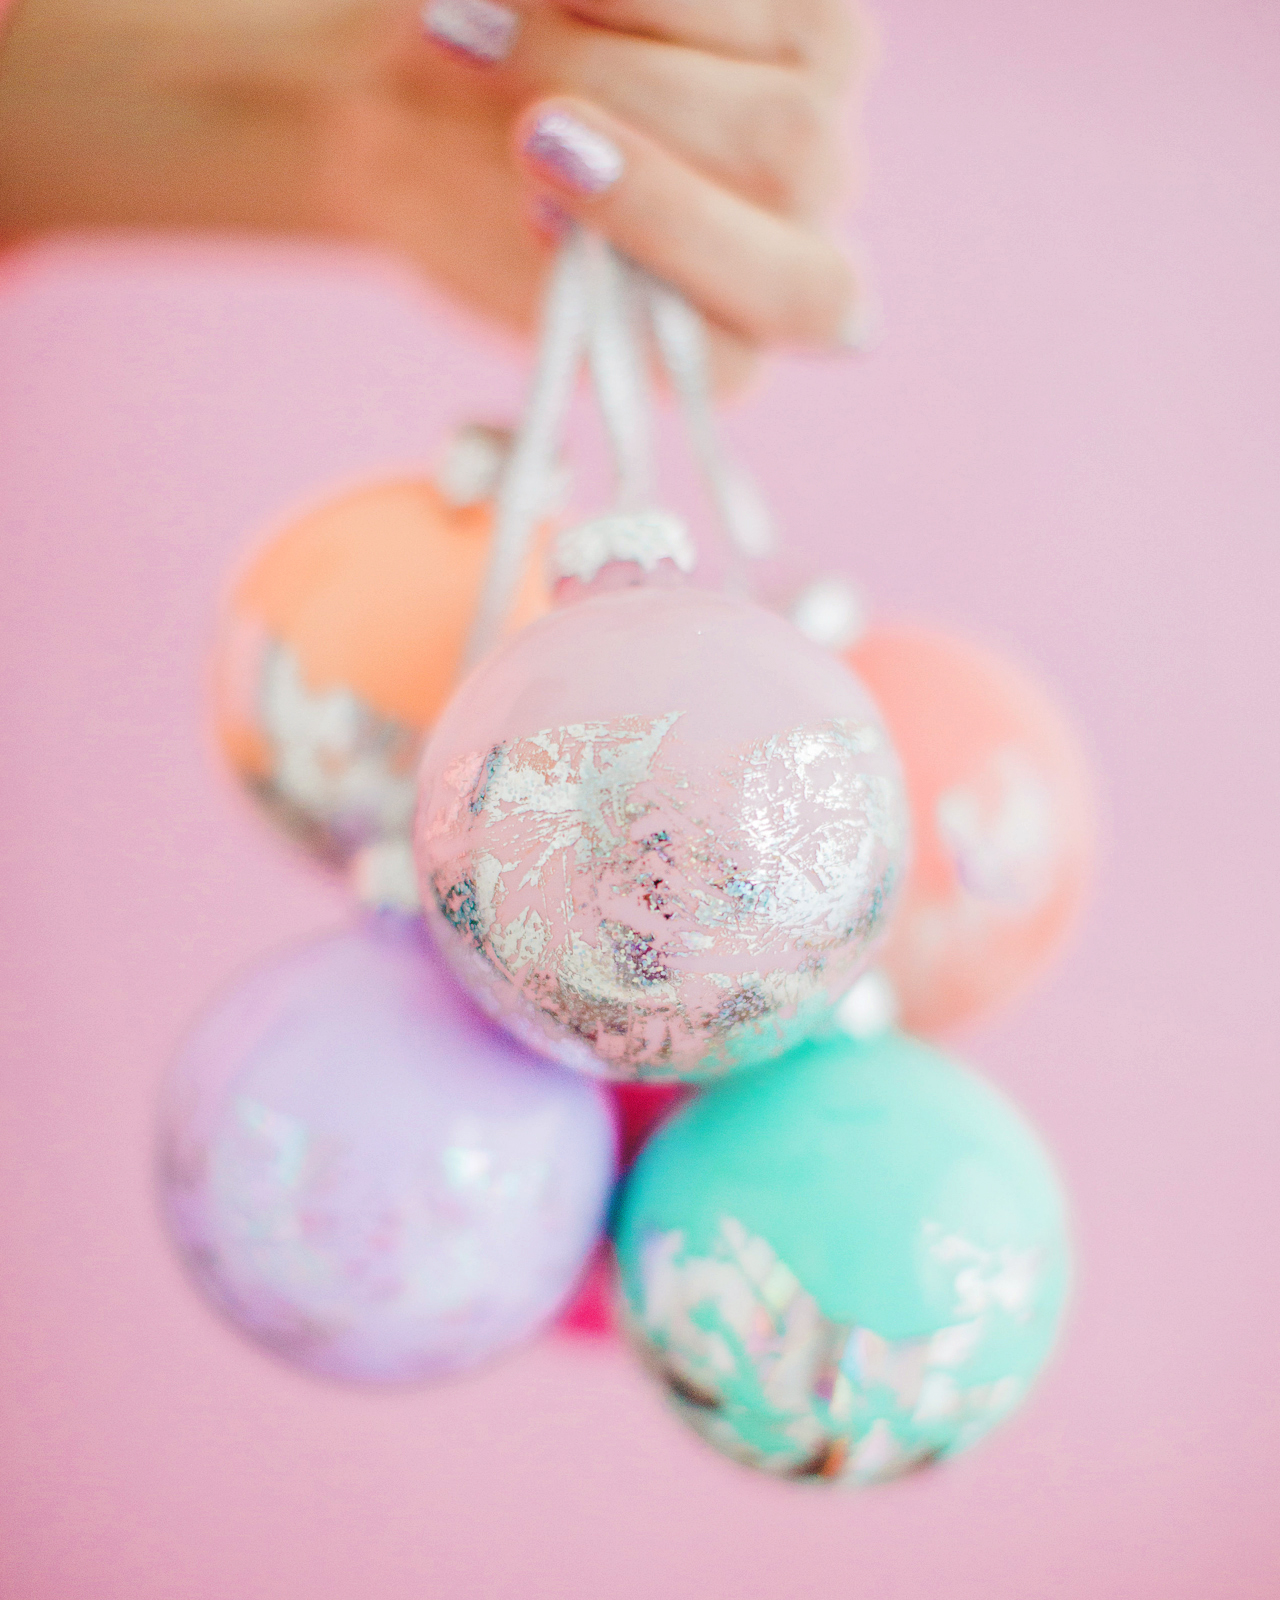
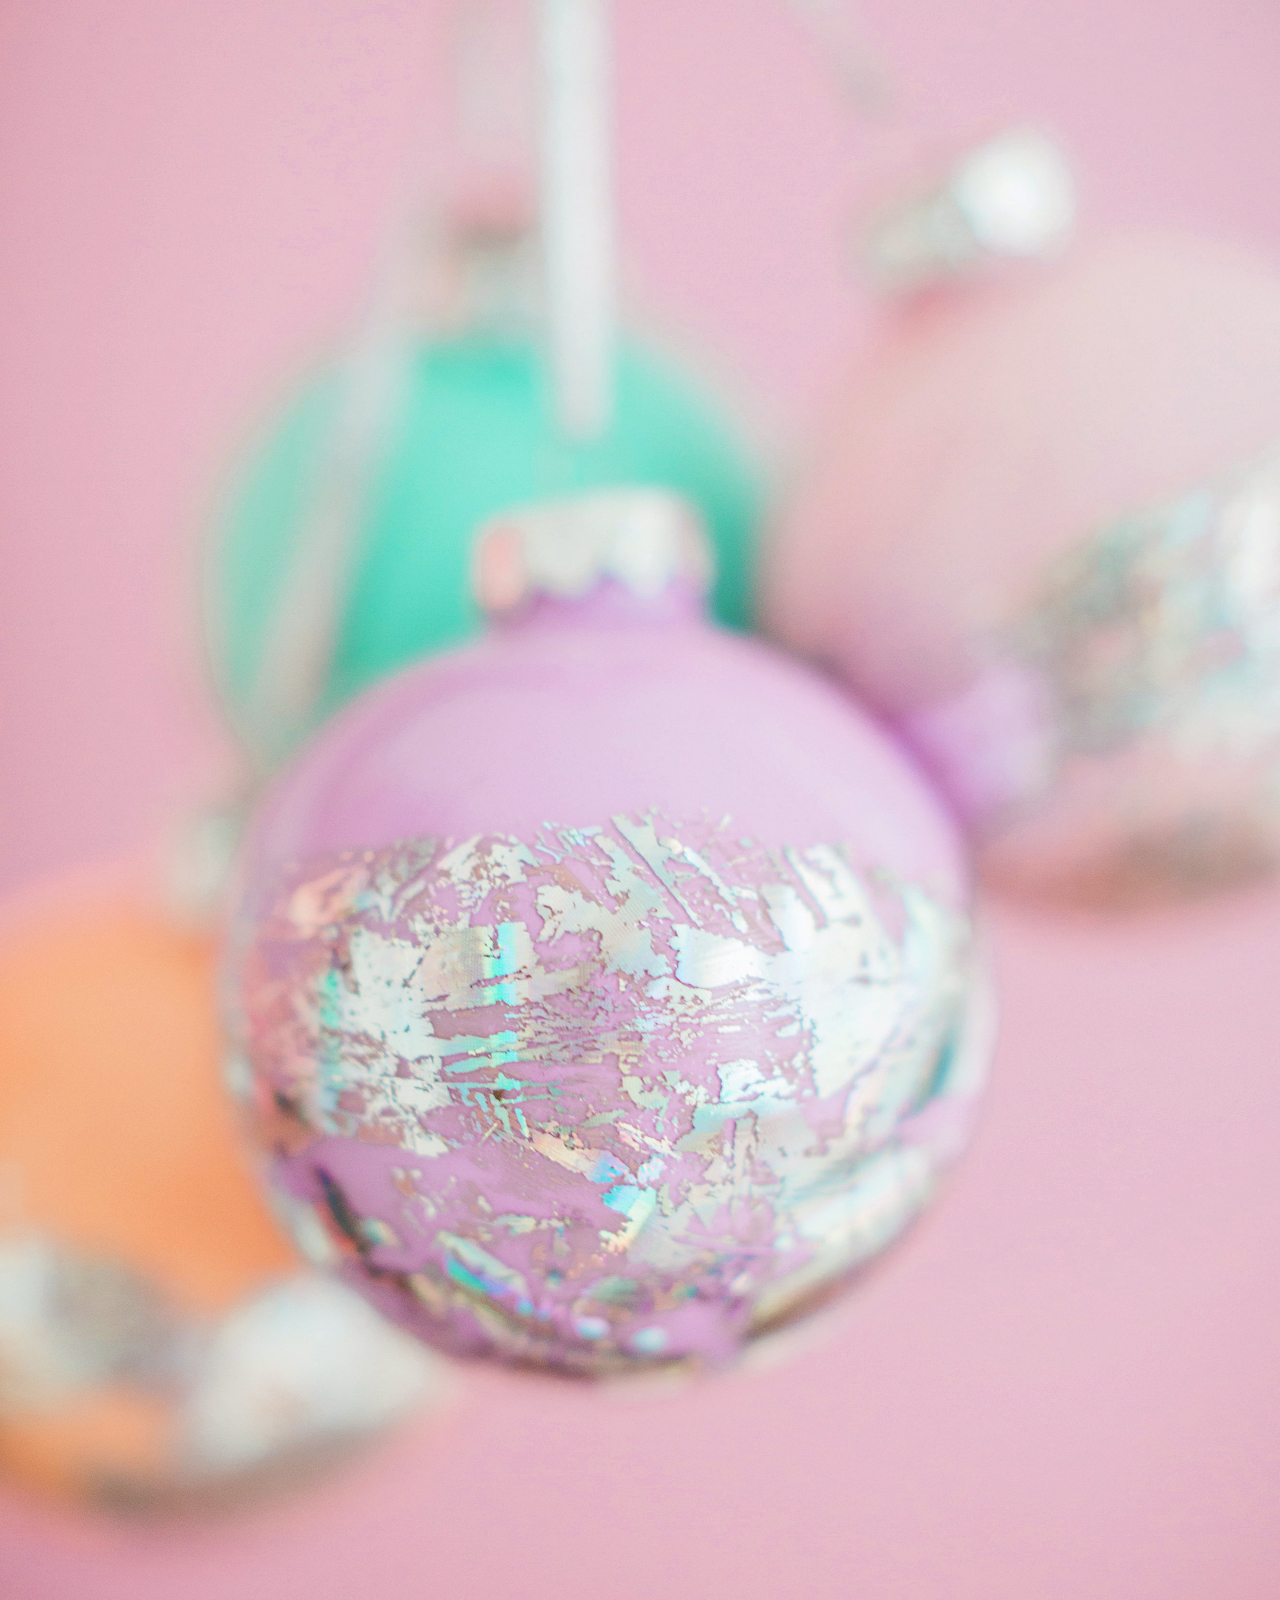
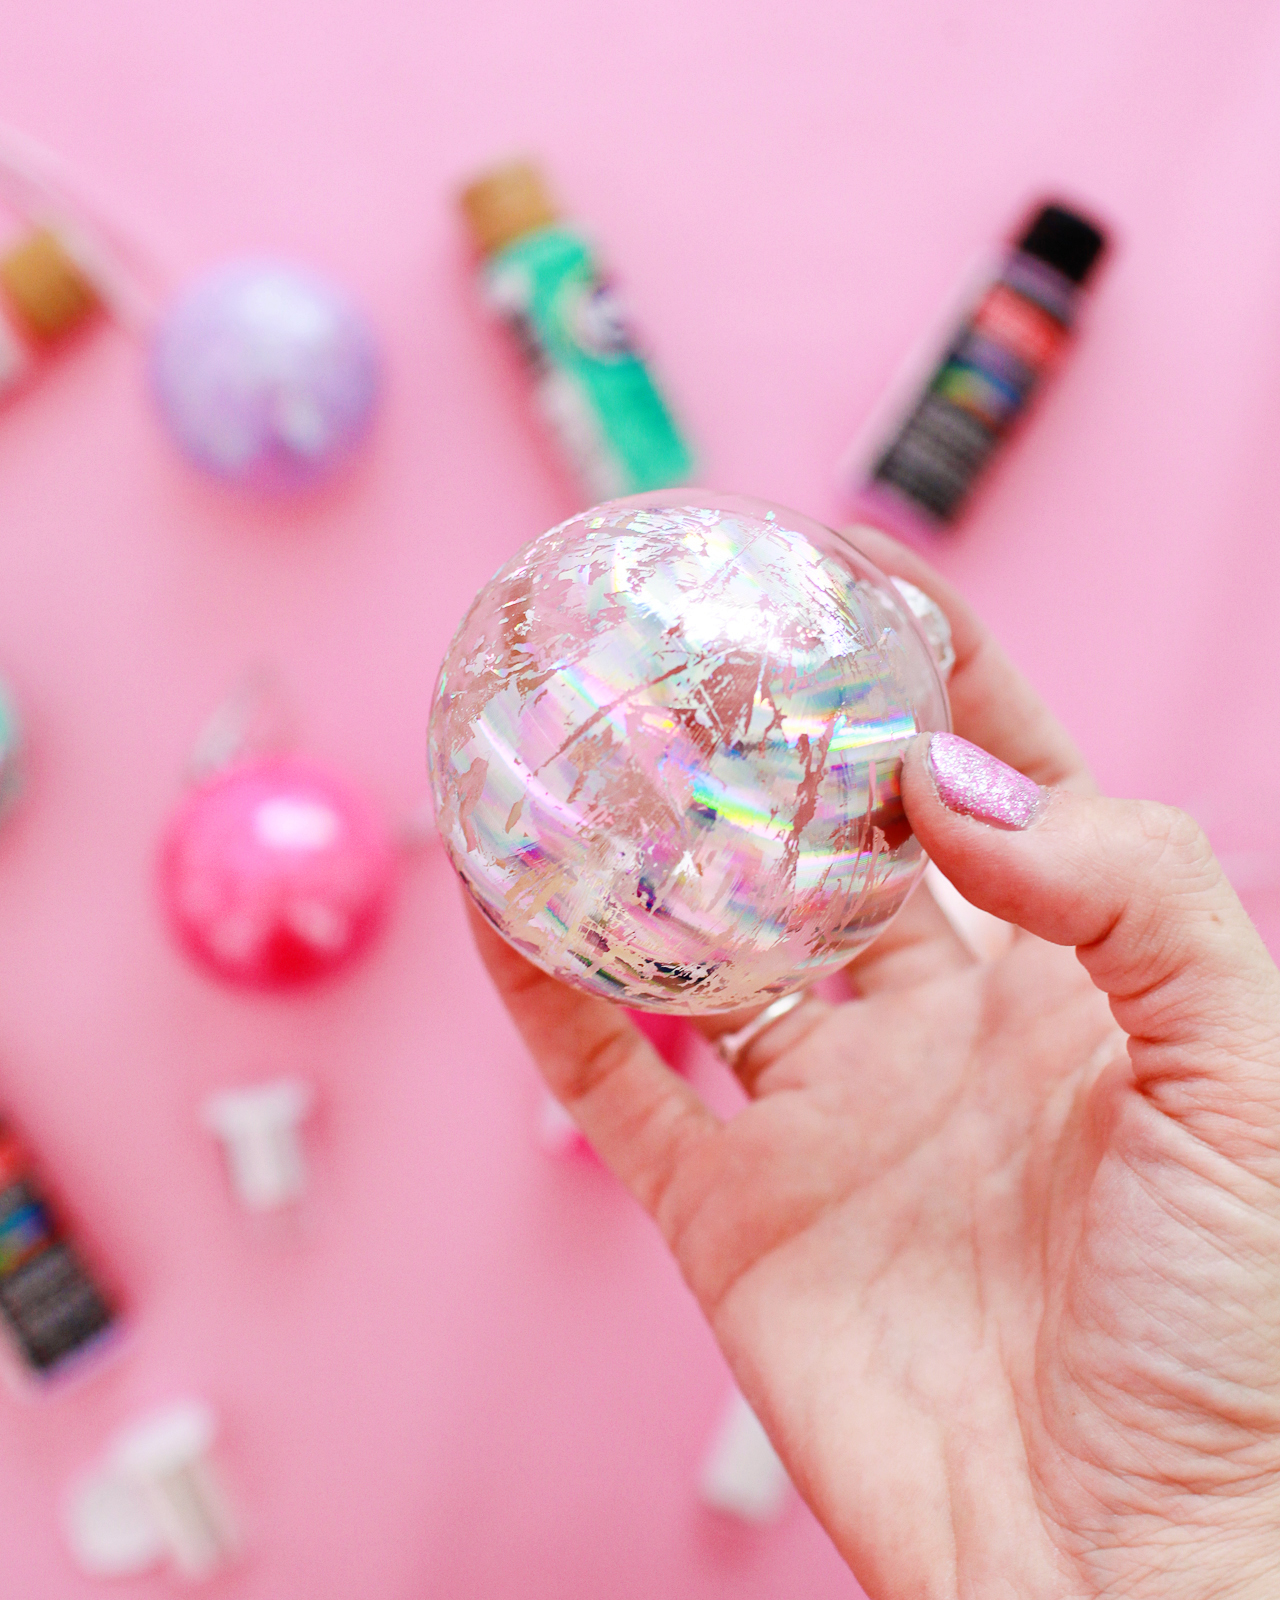
The silver hologram foil really stands out, while the clear iridescent foil makes for a more subtle shimmer – but both are just totally gorgeous in person. That lavender and iridescent opal swirl is such a dreamy combination!

DIY Hologram Foil Ornaments

DIY Hologram Foil Ornaments

DIY Hologram Foil Ornaments

Supplies

Plastic or glass ornaments

Nail foil in your choice of color – I used Silver Spectrum, Silver Dots, Opal Glitter, and Opal Swirl. I bought all my nail foils here, but you can also find some fun colors and patterns on Amazon.

Nail foil transfer adhesive

Thin ribbon

Craft paint in assorted colors (optional)

DIY Hologram Foil Ornaments

To make the DIY hologram foil ornaments:

Step 1. Start by cutting several lengths of nail foil in your chosen colors. I usually needed one 5-inch piece to wrap around the middle of the ornament, then a few 3-inch pieces to fill in the rest of the ornament. The foiling process moves pretty quickly, so it’s helpful to have a bunch of pre-cut pieces ready to apply ahead of time. 

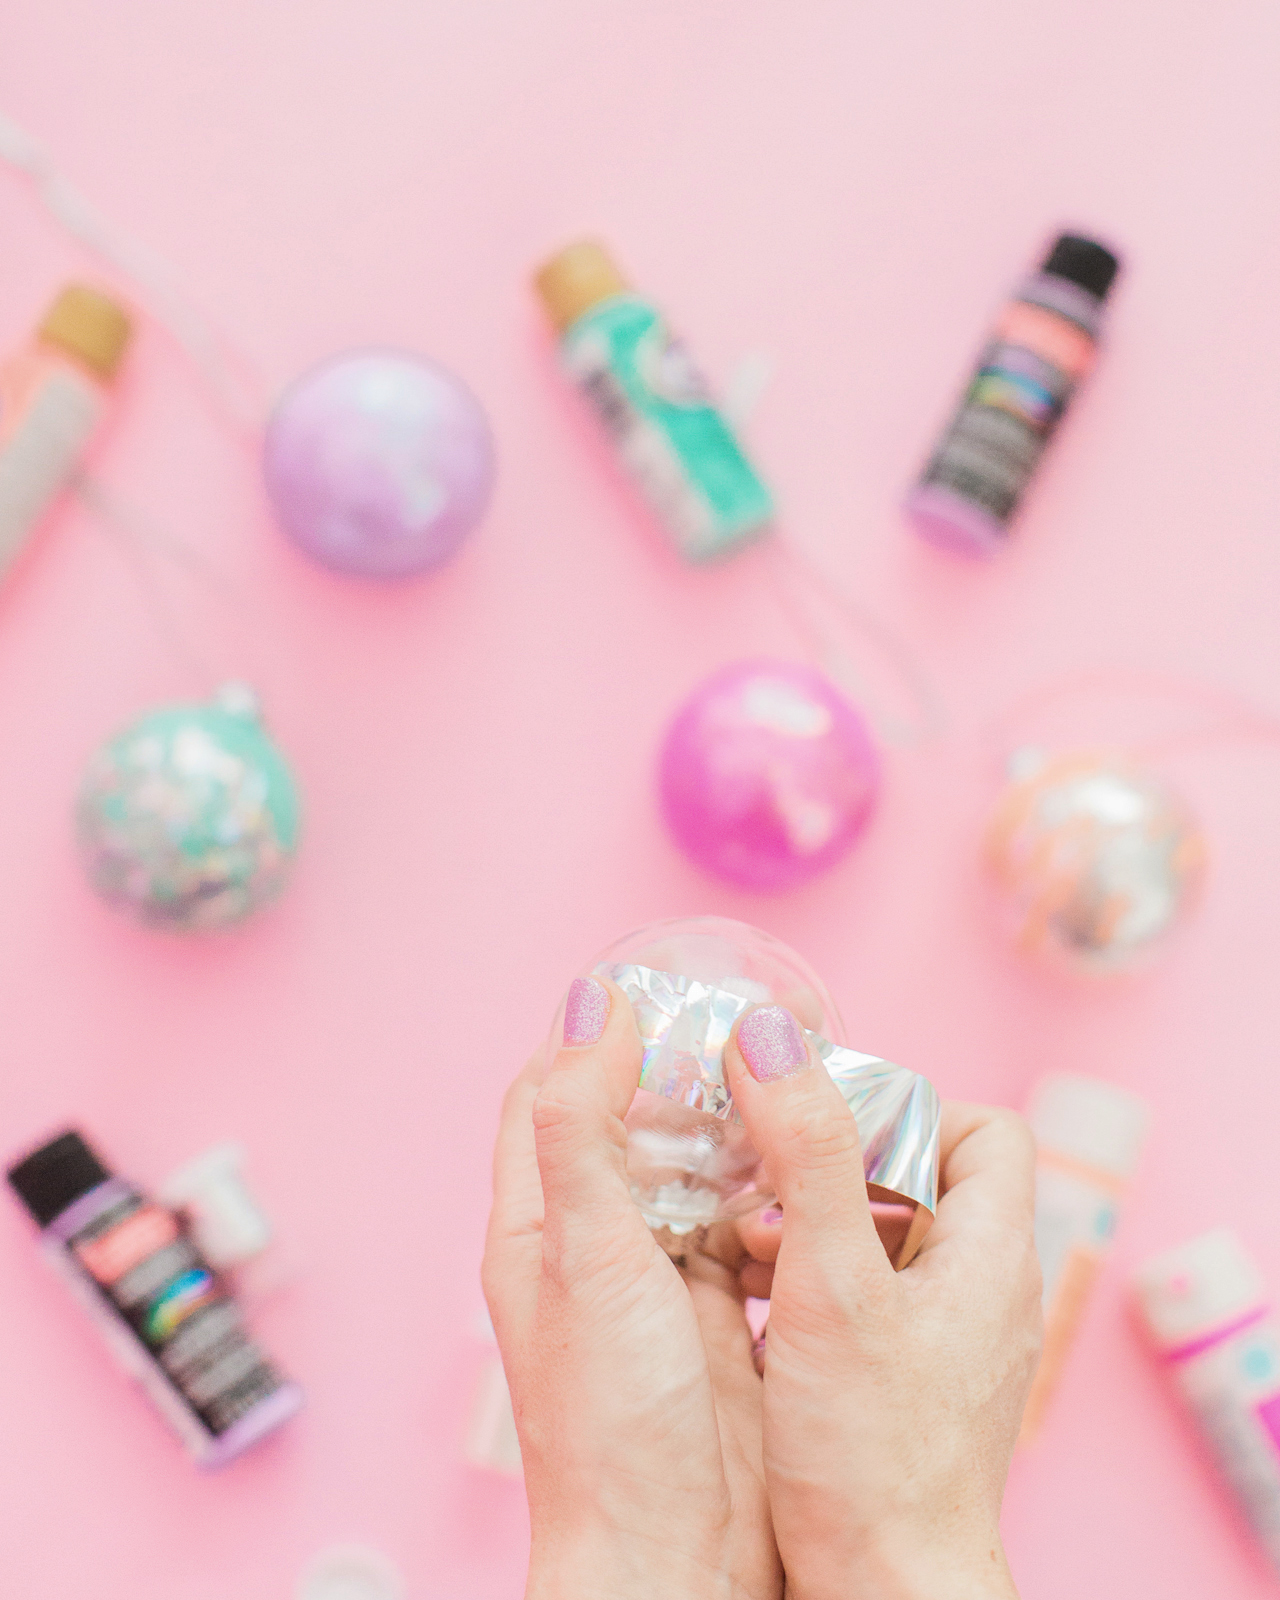
Step 2. Apply the nail foil transfer adhesive to the bottom half of your ornament. Allow the adhesive to dry until it becomes clear and tacky (usually 2-3 minutes).

Step 3. Once the adhesive is clear, apply the hologram foil to the ornament, pressing the foil down over the adhesive and smoothing it down with your fingers. Smooth the foil down for 10-20 seconds, then remove the foil. Continue applying the nail foils over all parts of the ornament where you applied the adhesive until you’re satisfied with the amount of coverage.

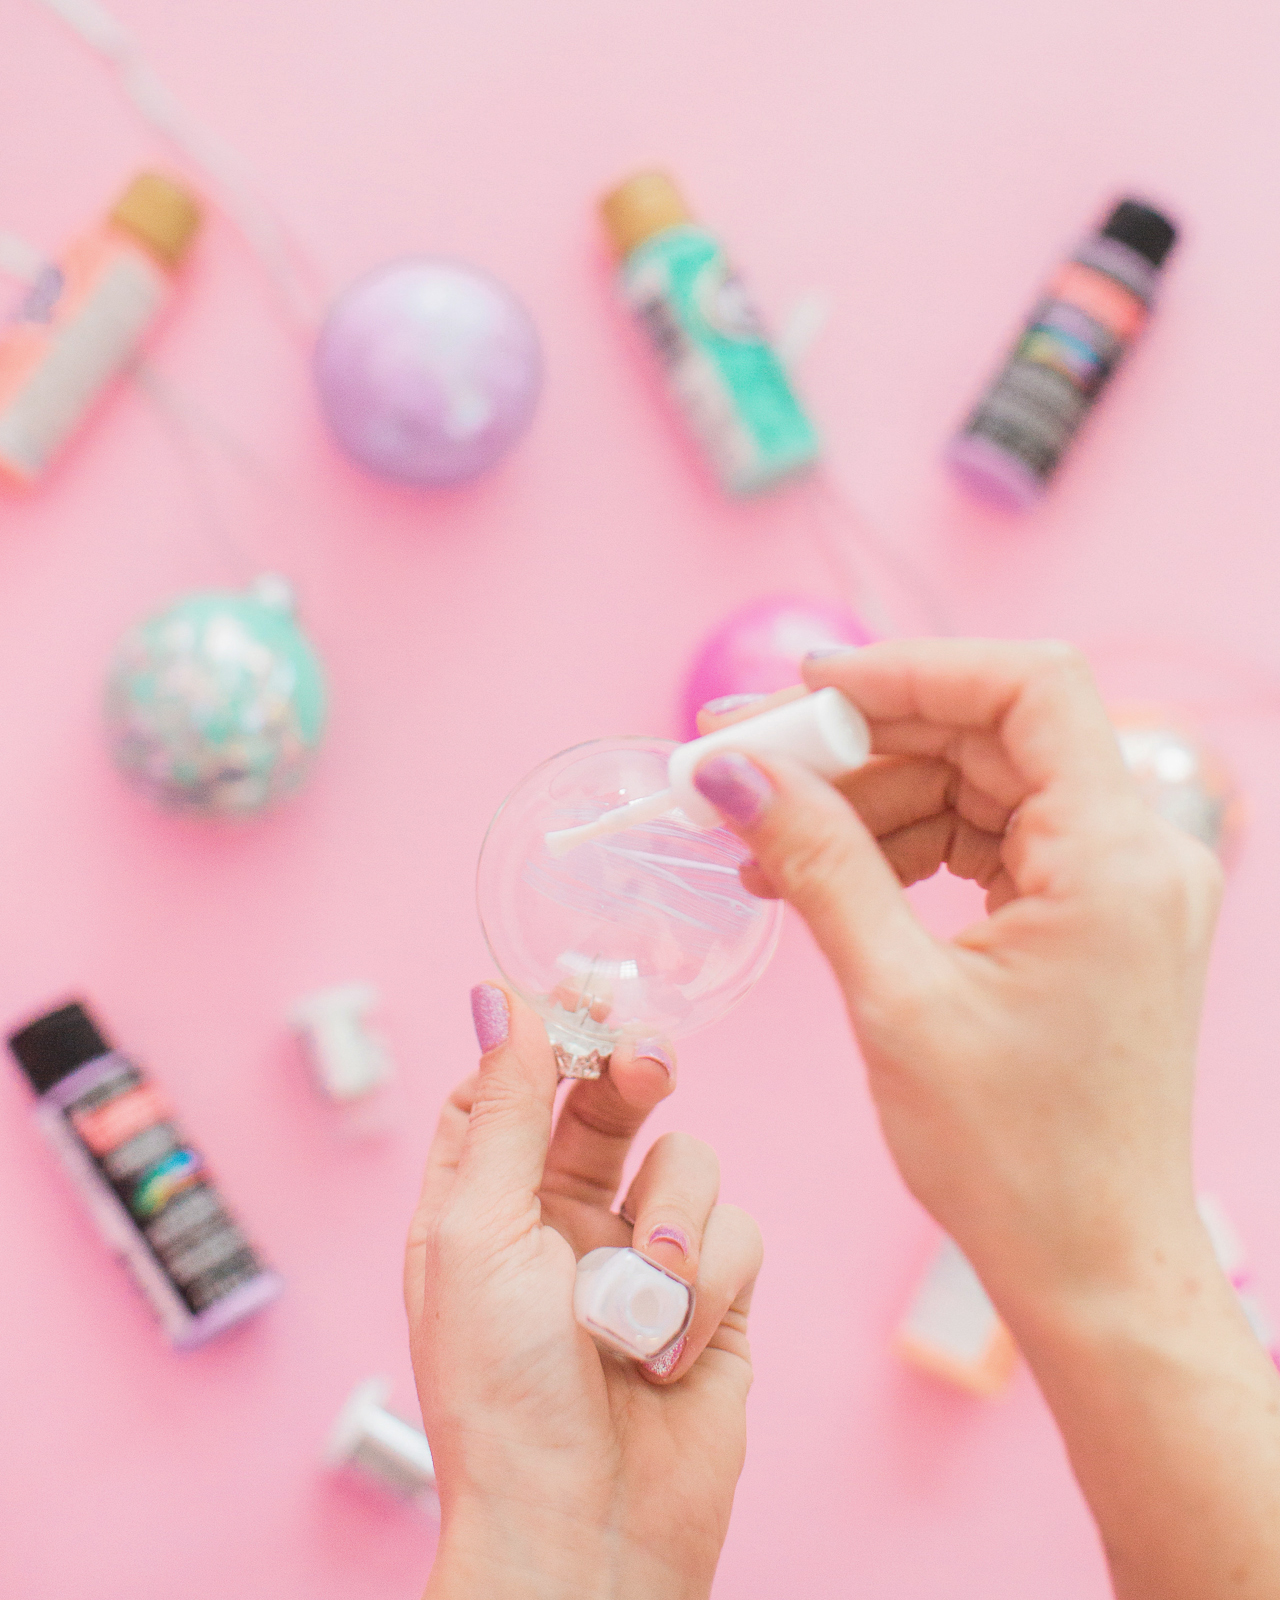
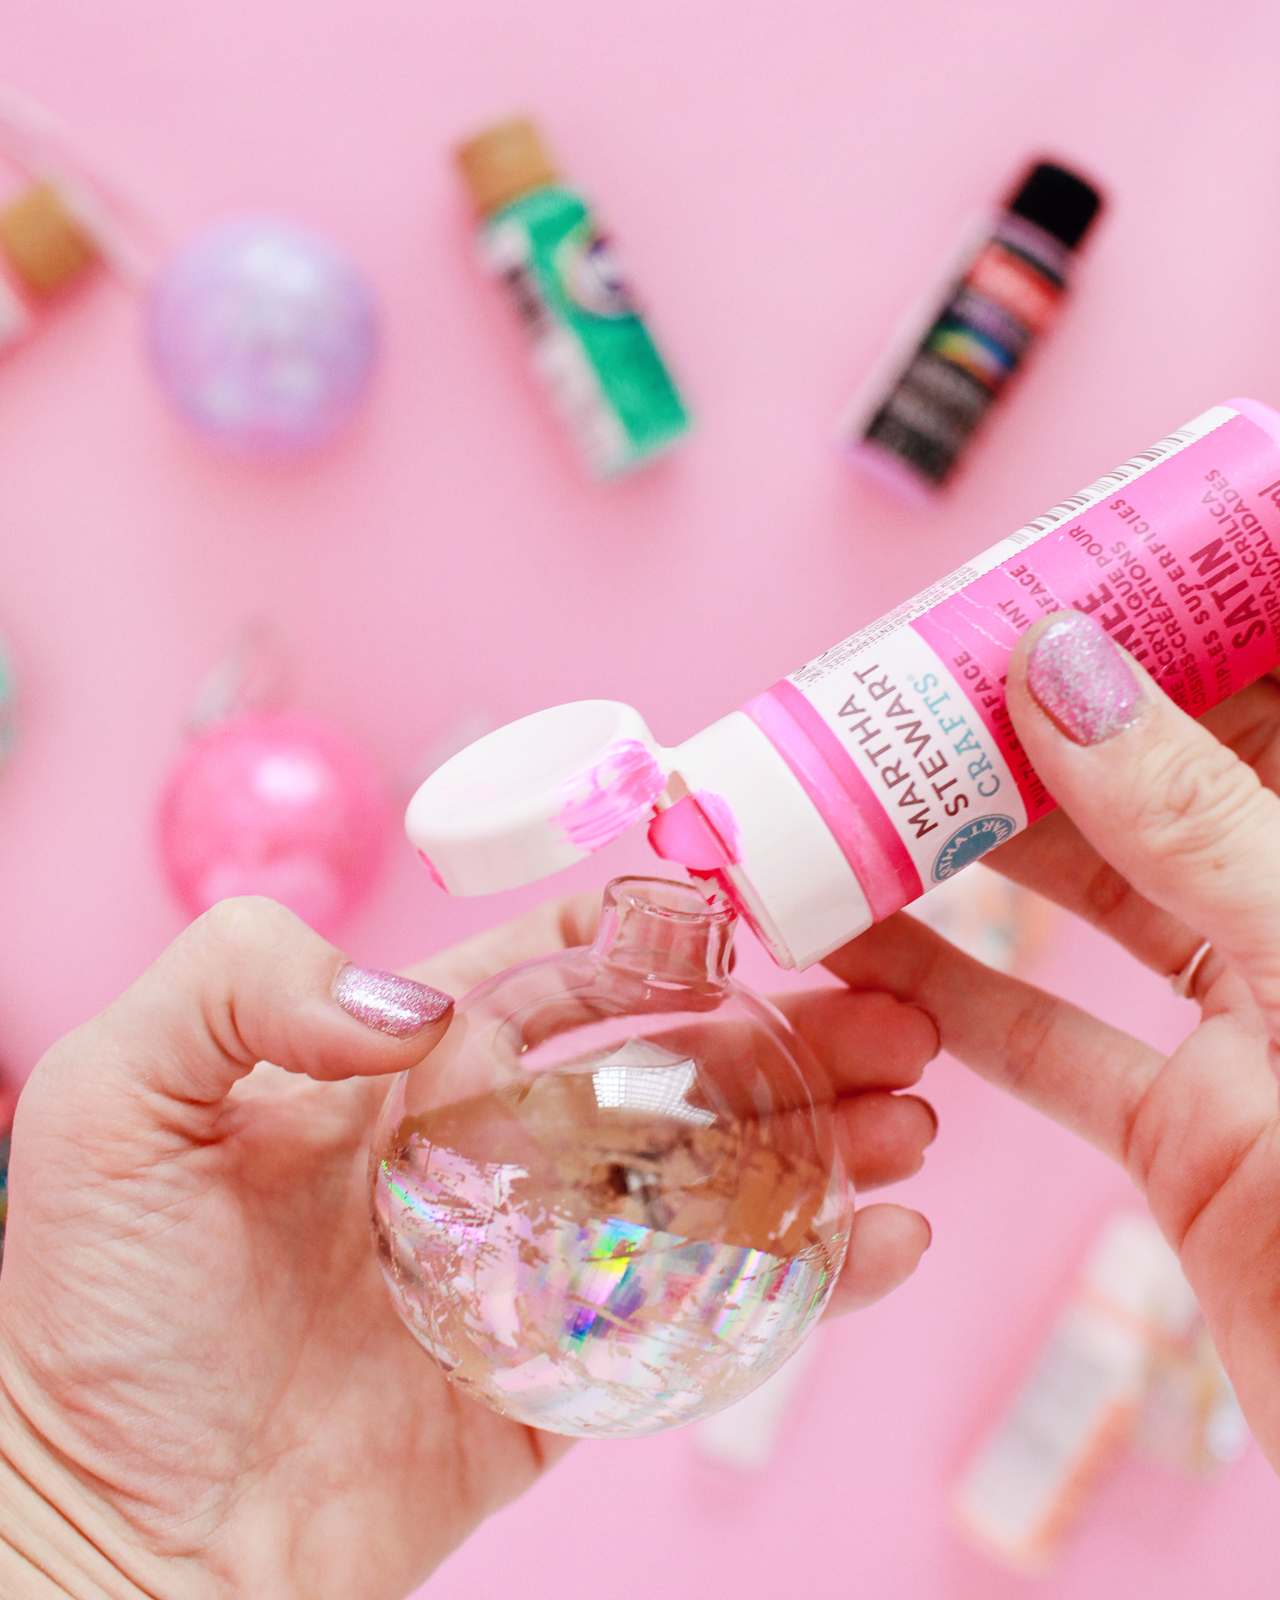
Step 4. If using clear glass ornaments, remove the top of each ornament, then fill the ornaments with craft paint in your chosen colors. With your finger (and maybe a paper towel) over the open end, shake the ornament until the paint covers the entire inside of the ornament. Allow the paint to dry completely (ideally overnight), then replace the ornament top. If using solid color ornaments, you can skip this step entirely!

Step 5. Cut a length of thin ribbon and string it through the ornament – and it’s ready to hang!

DIY Hologram Foil Ornaments

DIY Hologram Foil Ornaments

DIY Hologram Foil Ornaments

DIY Hologram Foil Ornaments

DIY Hologram Foil Ornaments

DIY Hologram Foil Ornaments

DIY Hologram Foil Ornaments


DIY Hologram Foil Ornaments

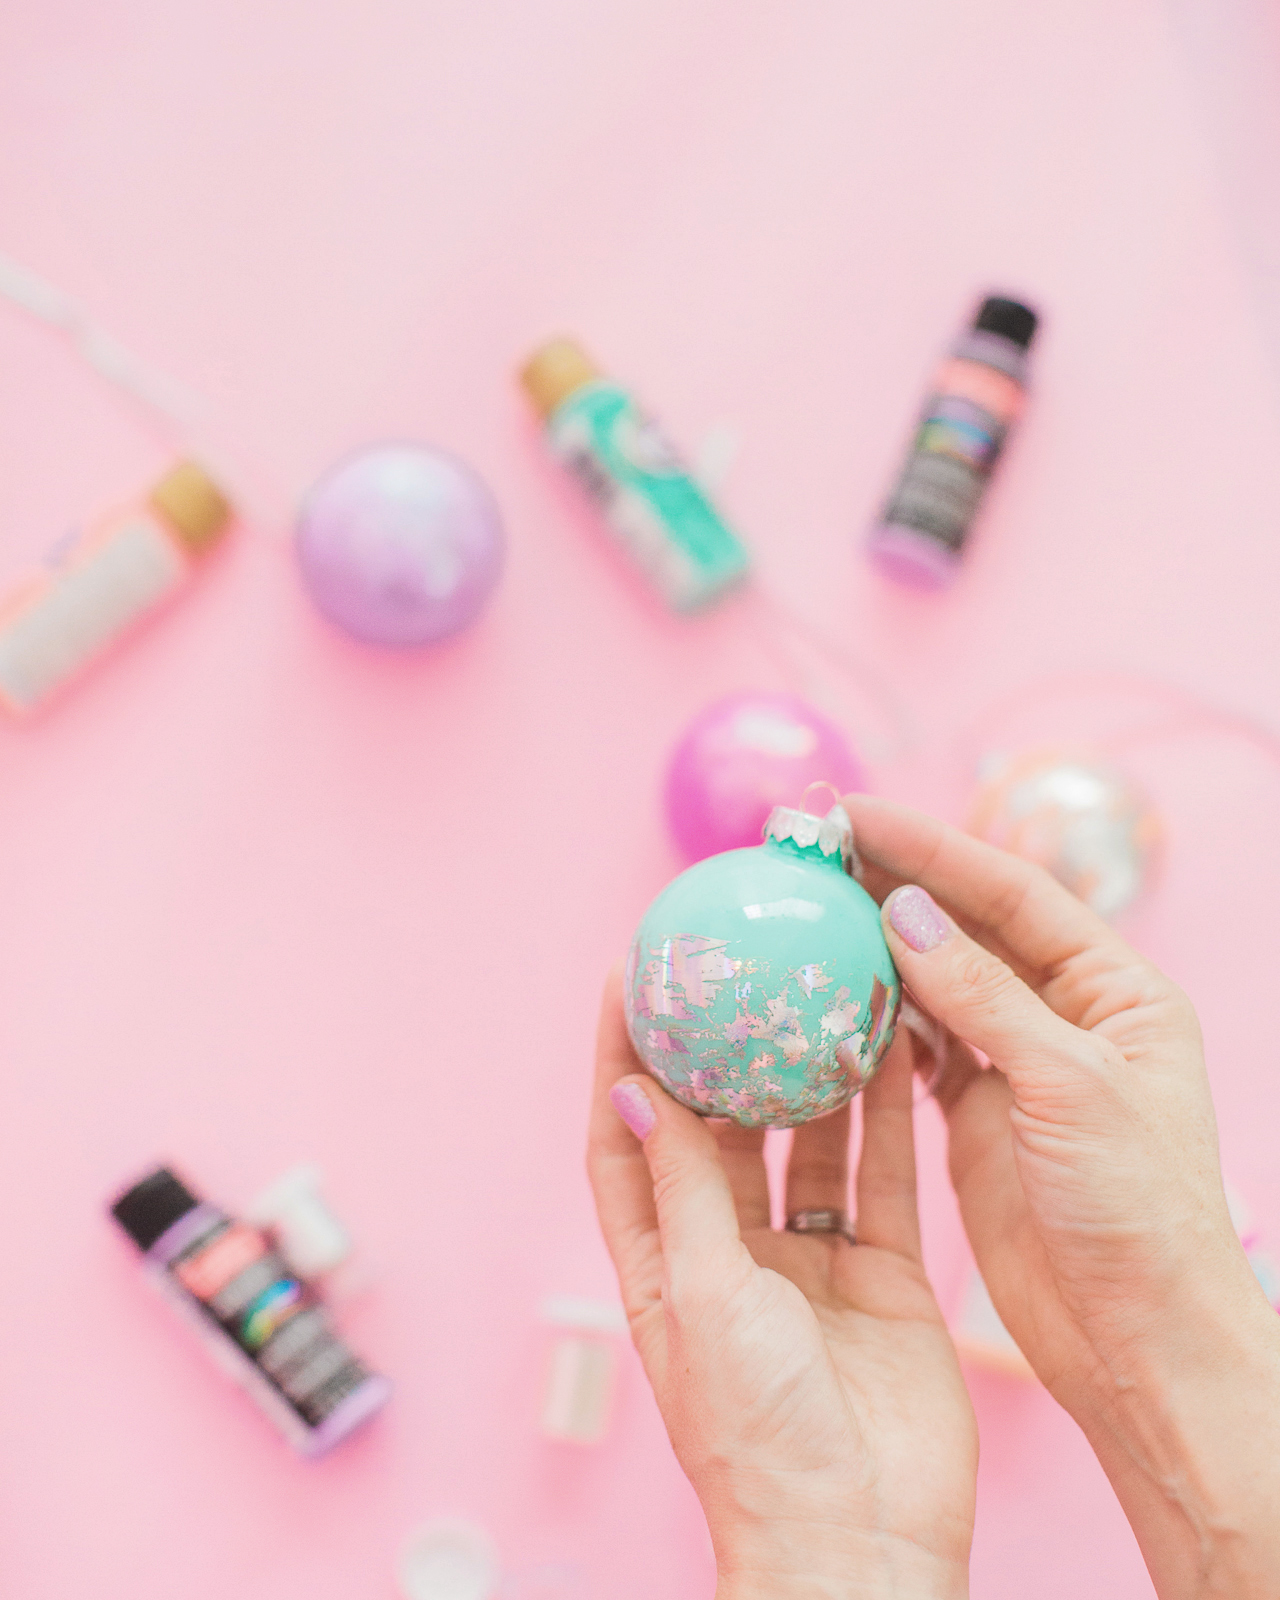
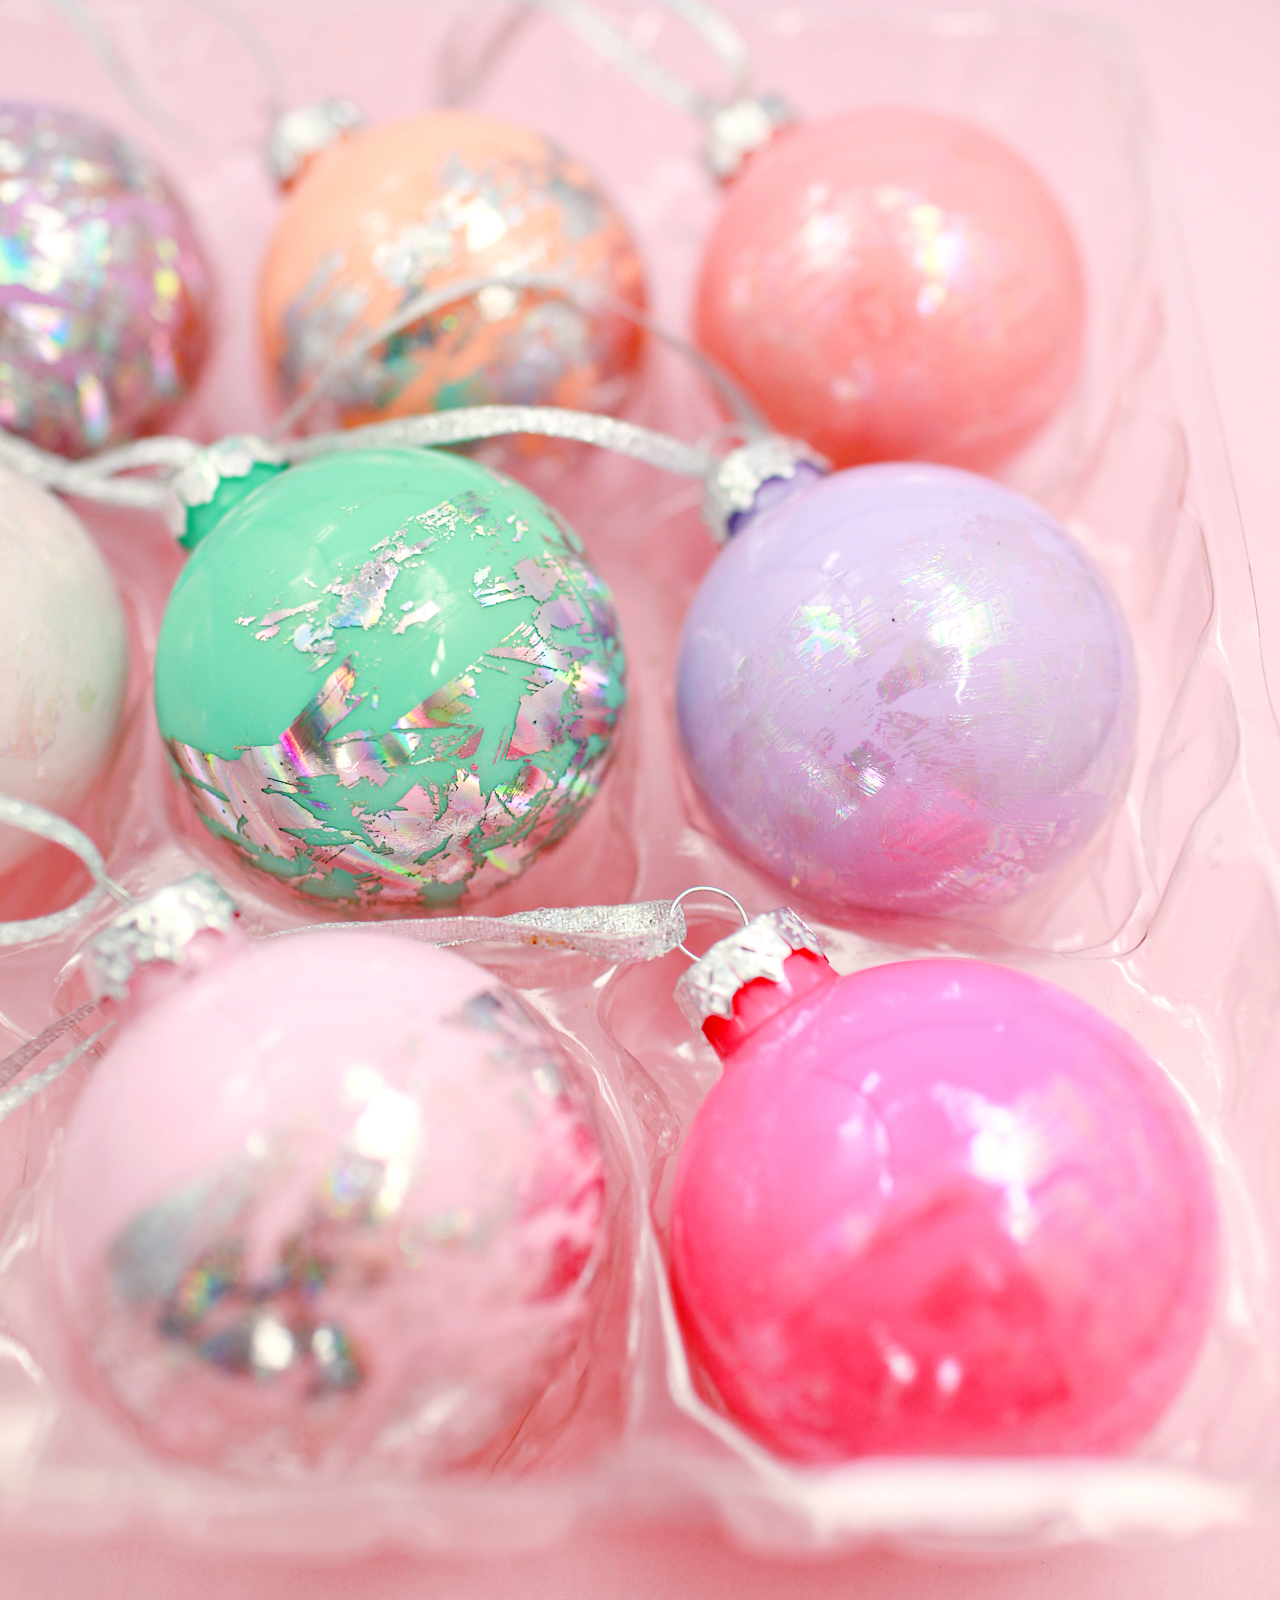
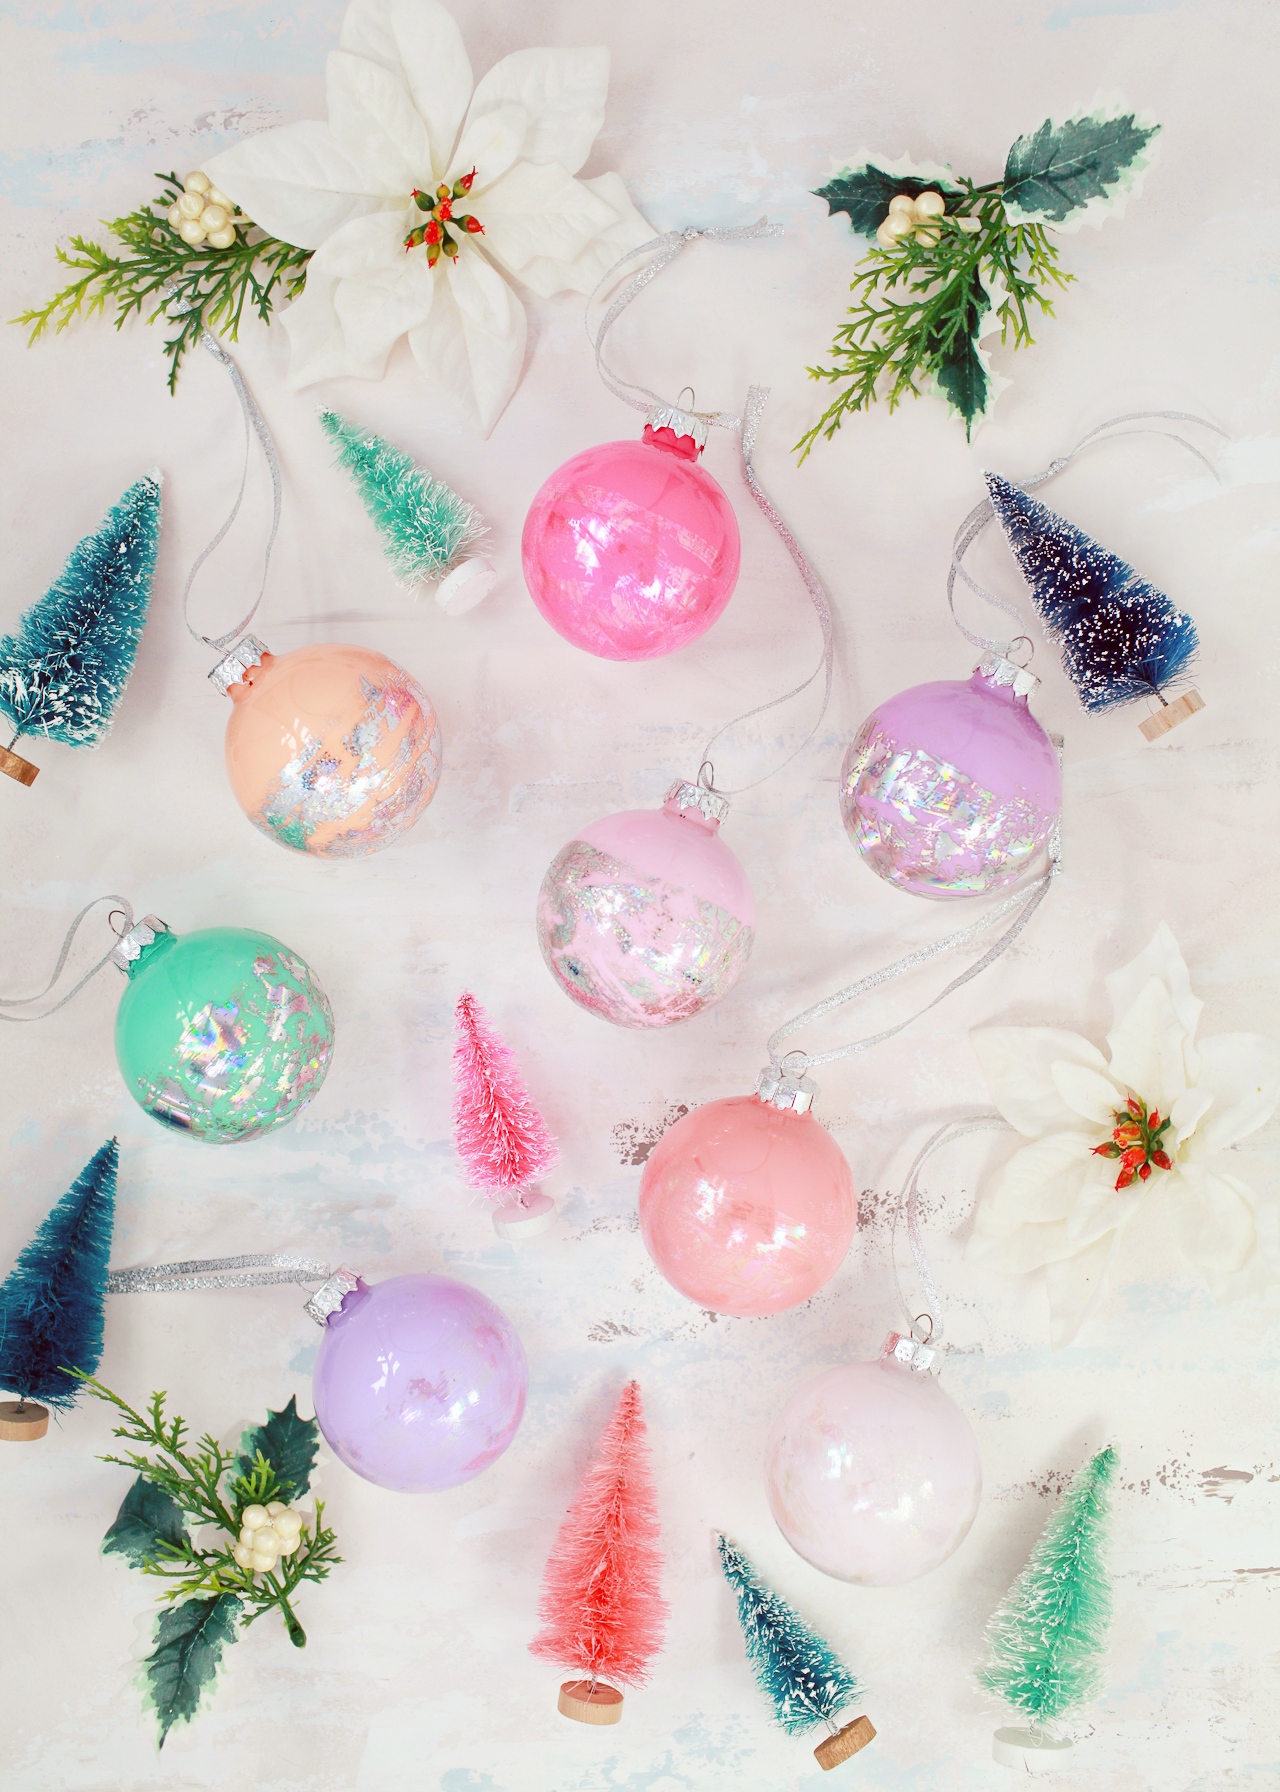
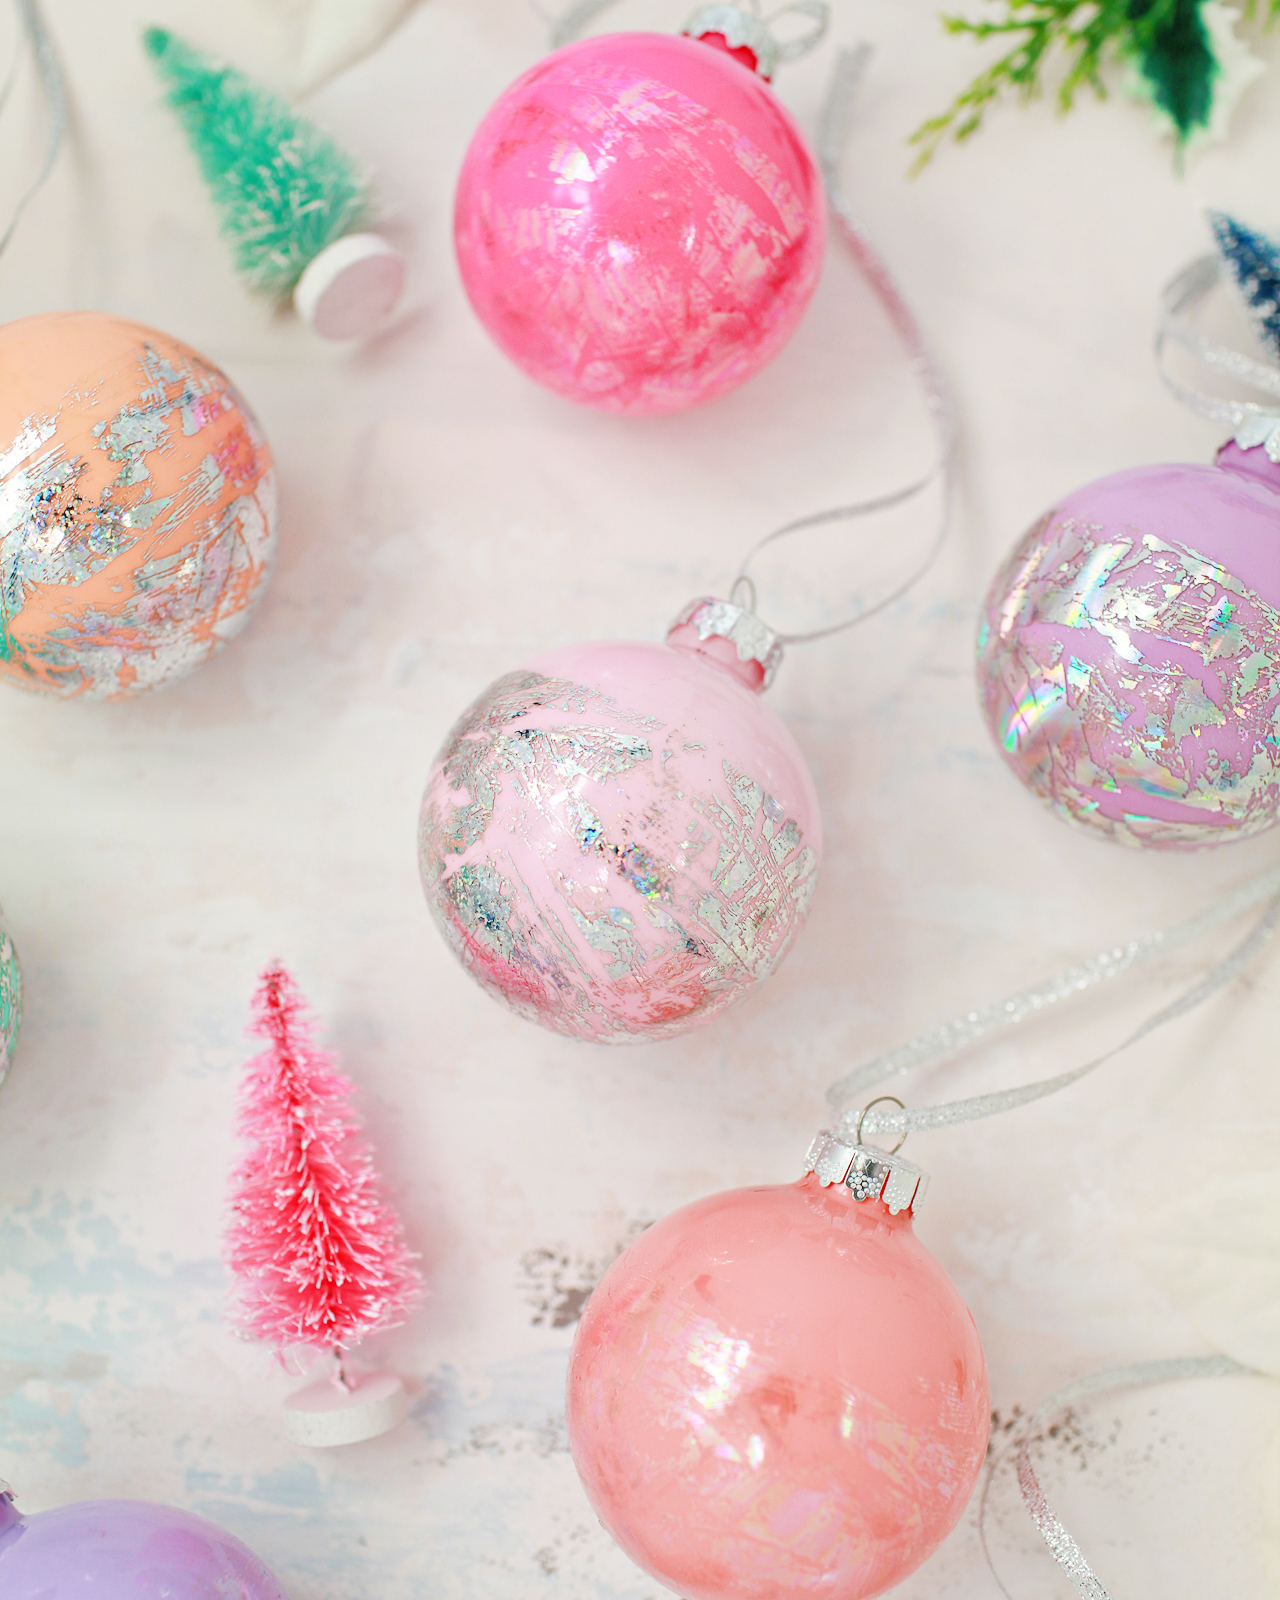
So much hologram and iridescent sparkle! Gah, I just love these ornaments SO much – and my girls are absolutely crazy about them! I think it also helped that I used their favorite colors to fill the inside of the glass ornaments. I’m loving all the pastel prettiness of these ornaments, but I also want to give this a try on some darker tones like navy blue and green!

DIY Hologram Foil Ornaments

DIY Hologram Foil Ornaments

DIY Hologram Foil Ornaments

DIY Hologram Foil Ornaments

What do YOU think?? Will you be making DIY hologram foil ornaments this year? If you do, I hope you’ll share a photo on Instagram with the hashtag #madewithosbp â€“ I want to see your craftiness in action!

p.s. DIY hologram foil Easter eggs and my favorite holiday gift wrap pairings

Photo Credits: Meghan Marie Photography and Nole Garey for Oh So Beautiful Paper

DIY Vellum Gift Tags

Yesterday I shared how I’m mixing and matching my holiday gift wrap pairings this year. You may have noticed the subtle vellum gift tags peeking through the ribbon and trim, and today I’m sharing the DIY tutorial with you! It’s no secret that I’ve been loving the vellum trend over the last couple of years, so I wanted to turn this gorgeous translucent material into quick and easy DIY vellum gift tags for the holidays. Seriously, these gift tags take approximately 30 seconds to make and look SO dreamy on any gift. Are you ready??

DIY Vellum Gift Tags with Gold and Silver Leaf

I always prefer smaller gift tags in simple shapes (squares, circles, even hexagons!) over larger gift tags in the traditional shape that you often see in stores. These gift tags are just simple vellum squares with a hole punched in one corner, then a quick swipe of gold or silver (or even copper!) liquid leaf on the bottom. Traditional gold or silver leaf (the kind that comes in sheets) would also work on vellum, but it tends to be a lot more time intensive, so I decided to stick with the liquid version to keep things simple.

DIY Vellum Gift Tags with Gold and Silver Leaf

DIY Vellum Gift Tags with Gold and Silver Leaf

Let’s start with the supplies that you’ll need to make these DIY vellum gift tags!

DIY Vellum Gift Tags with Gold and Silver Leaf

Supplies

Vellum (I like this iridescent vellum, and this variety pack has lots of fun colors)

Liquid Gold Leaf

Liquid Silver Leaf

Small Paint Brush

Gift Tag Maker with Built-in Eyelet Setter or 3/16″ Circle Punch

Paper Trimmer

Gold or Silver Thread

DIY Vellum Gift Tags with Gold and Silver Leaf

DIY Vellum Gift Tags with Gold and Silver Leaf

To make the DIY vellum gift tags:

Step 1. Using your paper trimmer, cut a sheet of letter-sized vellum into 2″ strips, then cut the strips into 2″ squares. Pro tip: because vellum is fairly thin, you can stack 3-4 vellum strips and cut them into squares all at once! Makes things so much faster.

Step 2. Punch a 3/16″ hole in one corner of the gift tag. This is where you’ll eventually string your thread or ribbon. You can either use the eyelet hole punch on a gift tag maker, or just a stand alone 3/16″ hole punch. And yep, you can also stack several vellum squares and punch them all at the same time. 

Step 3. Paint a thin strip of gold or silver leaf on the bottom edge of each square. I recommend placing a paper towel, sheet of newspaper, or even wax paper under the gift tags to protect your work surface, since gold and silver leaf can be difficult to clean up. If you’re using both gold and silver, you’ll need to use a different brush for each color – or thoroughly wash and dry the brush before moving from one to the other.

Step 4. After the metallic leaf has fully dried, write the name of the recipient on each gift tag. You could use gold or silver extra-fine paint markers to match the liquid leaf, or these archival black pens. Use gold or silver thread to attach the gift tags to the gift, and you’re all done!

DIY Vellum Gift Tags with Gold and Silver Leaf

DIY Vellum Gift Tags with Gold and Silver Leaf

DIY Vellum Gift Tags with Gold and Silver Leaf

DIY Vellum Gift Tags with Gold and Silver Leaf

DIY Vellum Gift Tags with Gold and Silver Leaf

I love the way these gift tags are both elegant and modern at the same time, don’t you? The quick stripe of gold or silver adds just the perfect amount of shimmer, while the vellum makes everything feel fresh and modern. I used iridescent and pink vellum since that’s what I had on hand, but you can use whatever colors work for your holiday style. I’d love to try this with a dark green or navy blue vellum next!

DIY Vellum Gift Tags with Gold and Silver Leaf

DIY Vellum Gift Tags with Gold and Silver Leaf

DIY Vellum Gift Tags with Gold and Silver Leaf


DIY Vellum Gift Tags with Gold and Silver Leaf

Gift Tag Calligraphy: Meant to Be Calligraphy

p.s. How I’m wrapping my holiday gifts this year!

Photo Credits: Meghan Marie Photography and Nole Garey for Oh So Beautiful Paper

Envelope Inspiration

I realized that I often share envelope inspiration from the #dailydoseofpaper hashtag on Instagram – but I don’t really share those envelopes here. So today I’m fixing that! It’s such a joy to open up our mailboxes and find a hand addressed envelope – even if you don’t have the skills of a professional calligrapher – among all the bills, junk mail, and catalogues. Any time I see a colorful envelope, I know it’s going to be something good! And even when I’m browsing through envelopes on Instagram, I’m probably more likely to stop and comment on an envelope post than any other type of image. Envelopes jump out at me for different reasons: sometimes it’s color palette, sometimes it’s the gorgeously curated vintage stamps, sometimes it’s the lettering style, or even something else completely. Today I’m definitely noticing a color theme in this round up, from terra cotta envelopes (so obsessed with this color right now) and brown walnut ink to deep navy and dark green. So much pretty!

Envelope Inspiration: White Envelopes with Walnut Ink by Hello Maurelle

Gorgeous walnut ink on handmade paper envelopes – just look at those deckled edges! – by Hello Maurelle

Envelope Inspiration: Terra Cotta Envelopes by Bare Ink Co.

Ooooh copper envelopes with white brush lettering by Bare Ink Co.

Envelope Inspiration: Green Brush Lettered Envelopes by Mary Kate Moon

Gorgeous green brush lettering with floral stamps for these baby shower invitations by Mary Kate Moon

Envelope Inspiration: Navy Blue Envelopes with Lilac Calligraphy by Sincerely Jackie Paper and Alison Vaz Designs

Navy blue and lilac has to be one of my all-time favorite color combinations – and that wax seal! Calligraphy by Alison Vaz Designs with art direction by Sincerely, Jackie Paper

Envelope Inspiration: Black and White Envelopes by Willow Wynn Co.

A modern take on classic black and white from Willow Wynn

Envelope Inspiration: White Envelopes with Blue Ink and Vintage Stamps by Mary Kate Moon

When the postage stamps become artwork by Mary Kate Moon

Envelope Inspiration: Dusty Blue Envelopes by Bare Ink Co.

Loving this gorgeous dusty navy blue with white ink by Bare Ink Co.

Envelope Inspiration: Hunter Green Envelopes by PCO Design Studio

This hunter green is an unusual envelope color choice – and is just so, so stunning – by P + Co. Design Studio

Envelope Inspiration: Navy and Gold Envelopes by Twinkle & Toast

Gold ink on dark blue envelopes is always a good idea – by Twinkle & Toast

What color envelopes are you loving right now???

p.s. Vellum Inspiration and Creative Wedding Menu Ideas

Winter Wedding Stationery Ideas

Even though it’s cold outside, there are so many ways to make sure your winter wedding is warm and inviting. Winter weddings can be wonderfully cozy: think burgundy place cards, gold velvet ribbon, rustic wood details, and touches of evergreen. Oh, and don’t forget to offer something warm to drink! From place cards to wedding signs, here are a few winter wedding stationery ideas to help get you started! –Annie

Winter Wedding Stationery Ideas

Simple calligraphy escort cards tied with gold velvet ribbon pop against the evergreen. | Photography: Alicia King Photography, Event Design: Monica Relyea Events, Calligraphy: Coppola Creative via Ruffled

Winter Wedding Stationery Ideas

Love this vignette, especially the chalkboard schedule. | Photography: Alicia King Photography, Event Design: Monica Relyea Events, Calligraphy: Coppola Creative via Ruffled Wedding Blog

Winter Wedding Stationery Ideas

Garnet calligraphy that perfectly matches the glassware. | Photography: Lani Elias Fine Art Photography, Styling and Art Direction: Ashley Nicole, Calligrapher: Julie Doan via Once Wed

Winter Wedding Stationery Ideas

Add a festive touch to personalized favors with a sprig of greenery and red twine. | via Evermine Weddings

Winter Wedding Stationery Ideas

Don’t be afraid to get punny. 😉 | via Evermine Weddings

Winter Wedding Stationery Ideas

This modern wreath and calligraphy banner are gorgeous! | Photography: Two if By Sea Charleston, Event Design: MOD Events, Calligraphy Banner: The Petal Report via Rustic Wedding Chic

Winter Wedding Stationery Ideas

Burgundy place cards with gold calligraphy? Yes, please. | Photography:Lauren Fair Photography, Concept & Styling: Lauren Fair Photography, Paper Goods: Sandpiper & Co via Green Wedding Shoes

Winter Wedding Stationery Ideas

Love this creative use of moss for displaying escort cards! | Photography: Jamie Beth Photography, Paper: Whimsy Design Studio, Floral Design: The Orchid Princess via Rocky Mountain Bride

Winter Wedding Stationery Ideas

Navy and gold are a perfect combination. And that white calligraphy? Swoon. | Calligraphy: Wildflowers Calligraphy, Event Design: Laura Bravi for BiancoAntico, Photography: Sebastien Boudot via Sebastien Boudot

Winter Wedding Stationery Ideas

Embrace natural textures, like this wooden calligraphy sign. | Photography: Shannon Elizabeth Photography, Calligraphy: Wildfield Paper Co. via Green Wedding Shoes

Anyone out there planning a winter wedding? Let us know in the comments below!

Happy Weekend!

Happy Friday everyone! Guess what?? If you’re in the DC area, we’re doing a special pop up with our friends Brief Assembly this Saturday from 2-5 pm! We’ll have some of our Liquorary vintage glassware and barware for sale, and I’ll even be there with some of our #OSBPxMonVoir art prints! Plus, we’ll have some brand new (!!) curated cocktail kits with our favorite syrups and bitters! (they make excellent holiday gifts, just FYI 😉) It would be so fun to meet you in person, and you can knock all of your holiday shopping out in one spot! If you can’t make the pop up in person, you can grab your own art print right here and our curated cocktail kits right here, but I really hope you’ll stop by if you’re in the area! Details are below – see you there! But in the meantime…

OSBP x Liquorary x Brief Assembly Pop-Up!

…a few links for your weekend!

Loving this sweater – especially in pale lavender and that deep teal green!

Great ideas for using paper flowers in your wedding

I’m totally doing this next year: DIY ornament advent calendar

A geology birthday party! SUCH a great idea!

An historical way of looking at trickle-down economics

Attacks on hospitals led to the Geneva Conventions 153 years ago. It is the original war crime. Since 2011, the Syrian regime has conducted more than 450 attacks on Syrian hospitals, including NICUs, nurseries, and emergency medicine.


This week on Oh So Beautiful Paper:

Gift Guides! We’ve done four gift guides so far: Home + Style Gift Ideas, Gift Guide for Creatives, Gift Ideas for Kids, and Cocktail + Entertaining Gifts. 

Gorgeous and classic ocean-inspired wedding invitations

Navy and gold foil agate-inspired wedding invitations

Behind the Stationery with bi-coastal stationery duo Anne + Kate

A thank you card round up to help prepare for post-holiday thank you cards!


That’s it for me this week! I hope you have a fantastic weekend and I’ll see you back here on Monday! xoxo