Seasonal Stationery: Mother’s Day Cards for Grandmothers, Step-moms, and other Moms

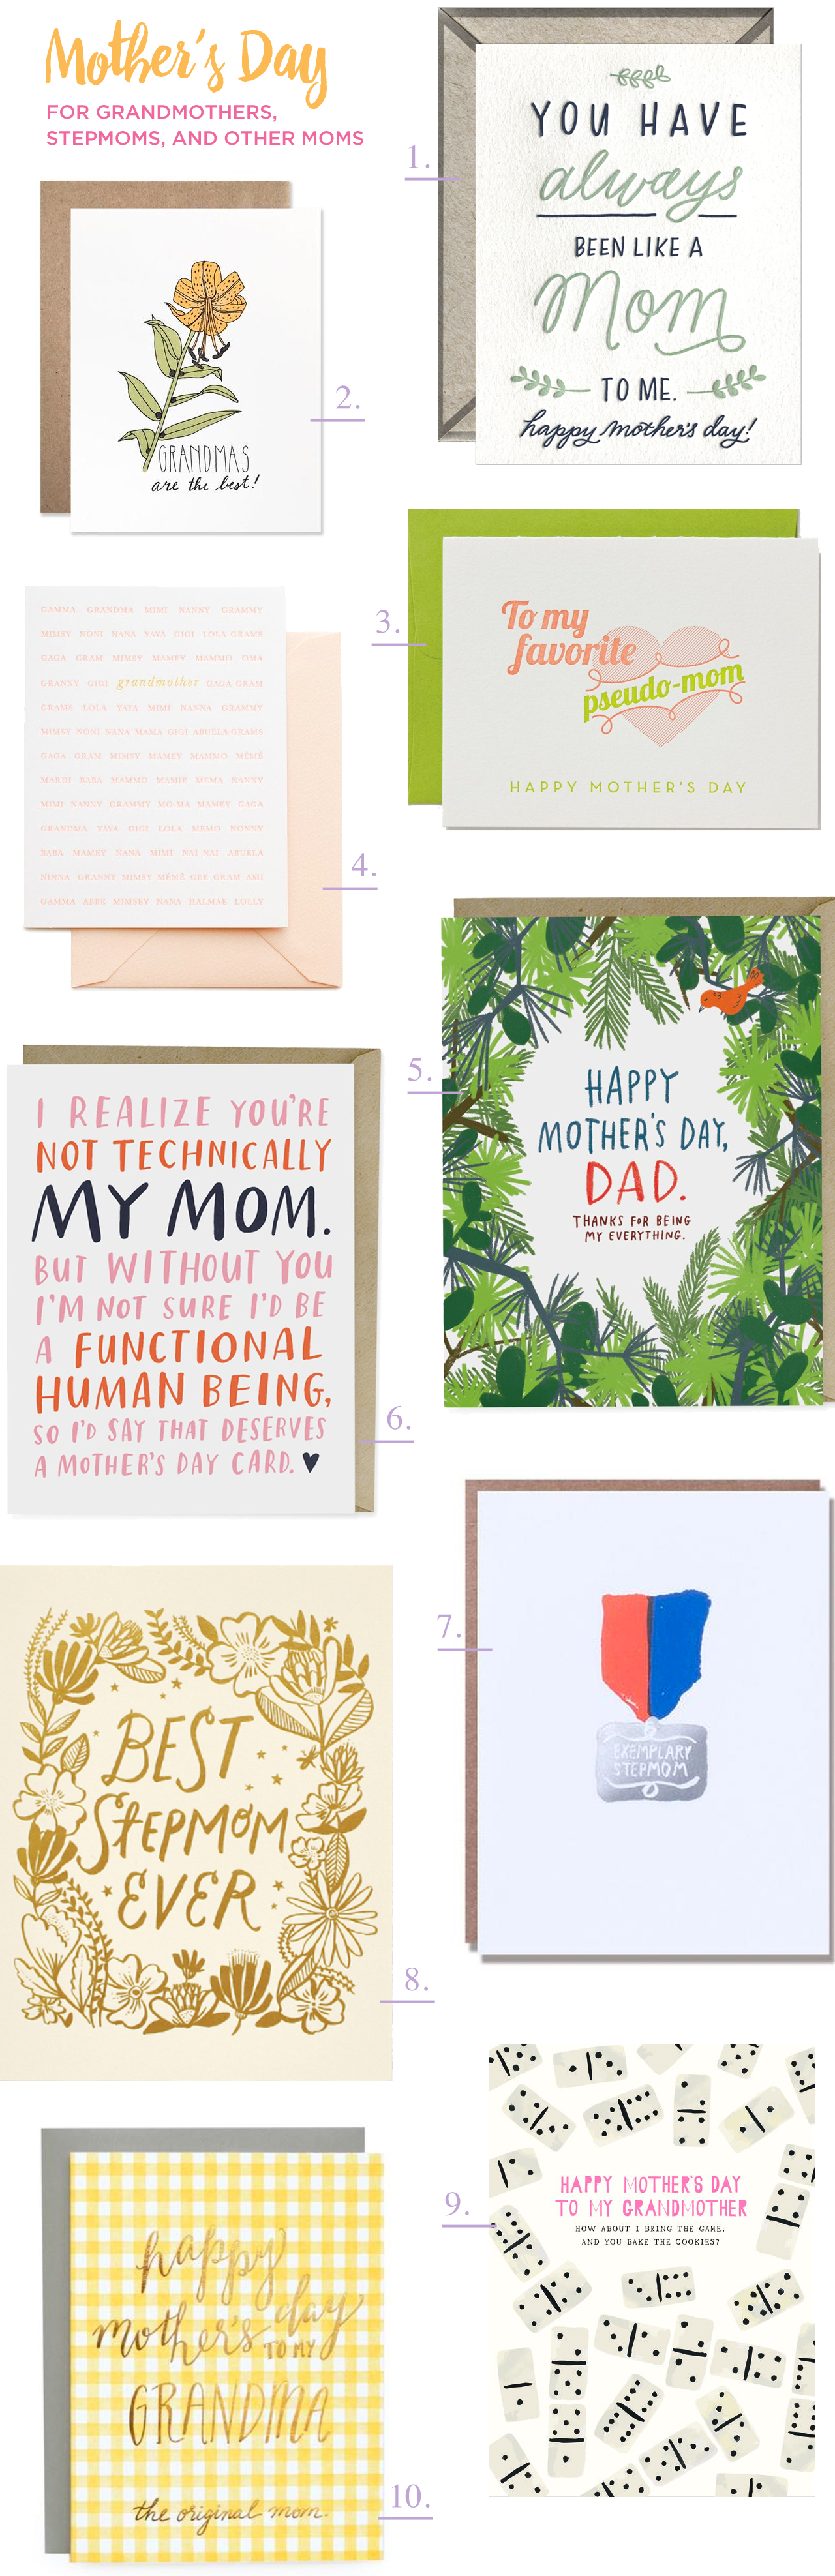
Last week, we featured a roundup of our favorite Mother’s Day cards for moms. But what about all the other amazing mothers or mother figures in your life? I’m talking about grandmothers, step-moms, and women that have been like a mom to you. Today we’re rounding up a few Mother’s Day Cards for grandmothers, step-moms, and other moms. If they’re important to you, they deserve a sincere gesture of appreciation for all their support and encouragement over the years. There’s even a shout-out for dads that took on both roles!

Mother's Day Cards for Grandmothers, Step-Moms, and Other Moms

 From top right:

1. Maybe she isn’t your mom, but she provided a shoulder to cry on and taught you important life lessons. Send her this card from Ink Meets Paper!

2. Grandmas ARE the best! Send this charming floral illustration from Hartland Brooklyn to your own grandma – or, if you have your own kids, to your mom to show how much you value her love for your kids. (Side note: Be sure to check out our recent feature and behind the scenes with Emily here!)

3. If your sense of humor runs towards snarky, check out the Mother’s Day selection from Farewell Paperie. We love this card for your favorite pseudo-mom!

4. Grammy, Mémé, Nana, Gramma. Whatever you call her, treat your grandmother to some delicious sugar-filled snacks and this elegant pink card from Sugar Paper.

5. Maybe you were raised by a super hero single dad (like me!). Or maybe you have two dads (lucky you!). Send him (or them) this jungle-inspired design from acclaimed wordsmith Emily McDowell.

6. Also from Emily McDowell, this is the perfect card for expressing your thanks to a woman who might not be your biological mom but definitely helped you become who you are today.

7. Step-moms can get a bad rap. Show your amazing step-mom how much she means to you with this silver foil medal card from Egg Press.

8. Loving all the elements of this ode to step-moms from Hello!Lucky â€“ from the gold foil to the whimsical hand lettering and floral illustrations.

9. The cutest illustrated dominoes from Mr. Boddington’s Studio in this Mother’s Day card for Grandma.

10. Grandma – the original mom! Love this sunny yellow gingham design from Wild Ink Press.

p.s. Mother’s Day cards for your mom here!

DIY Illustrated Temporary Tattoo Easter Eggs

Today I’m sharing one final DIY Easter egg decorating idea – and this one involves temporary tattoos featuring illustrations by Courtney of Swiss Cottage Designs! These illustrations are so adorable I can’t even stand it. And the best part is that you can use ’em to decorate Easter eggs to your heart’s content, then use any leftovers as regular old temporary tattoos!

DIY Illustrated Temporary Tattoo Easter Eggs

Every kid I know is obsessed with temporary tattoos (including my own kids), and it’s such a fun way to decorate Easter eggs. After making these tissue paper tropical leaf Easter eggs last year, I knew I wanted to give tattoo paper a try this year. I’ll also happily jump at any opportunity to team up with Courtney from Swiss Cottage Designs, and I absolutely love all the Easter-inspired illustrations she created for these tattoos. An adorable bunny! A sweet baby chick! Tiny Easter eggs! And the cutest little carrots I’ve ever seen. I couldn’t decide if I liked the color version or the black and white version of the illustrations better, so I decided to make them both available to all of you below. Let’s make some eggs!

DIY Illustrated Temporary Tattoo Easter Eggs

DIY Illustrated Temporary Tattoo Easter Eggs

Supplies

Hard boiled eggs*

Printable templates (we made two versions: color and black + white)

Temporary tattoo paper

Ink jet printer

Scissors

Paper towels

Water

*A couple quick notes about the eggs: I personally love the idea of using plain white eggs for these temporary tattoos, but you can totally use them with pre-dyed eggs, too! The temporary tattoos work best on fully dry, room temperature eggs, so if you plan to dye your eggs first, just make sure you give them enough time to dry before applying the tattoos. Similarly, hard boiled eggs stored in the refrigerator may form condensation after they are first taken out of the fridge, which will prevent the tattoos from sticking to the eggs.

DIY Illustrated Temporary Tattoo Easter Eggs

To make the DIY illustrated temporary tattoo Easter eggs:

Step 1. Print our templates (you can choose COLOR or BLACK + WHITE – or both!) onto temporary tattoo paper, and apply the clear adhesive liner according to the package instructions.

Step 2. Once the adhesive liner has been applied, use scissors or a paper trimmer to cut out the individual tattoos. Each sheet of tattoo paper yields 28 tattoos. I recommend cutting as close to the printed tattoo area as possible, which makes it a bit easier to apply the tattoos to the eggs.

Step 3. Peel the clear liner off the tattoo paper and apply it to the egg sticky side down. Press a wet paper towel to the back of the tattoo, making sure that you cover the entire area of the tattoo, until the image is successfully transferred to the egg and the paper easily slides off. Continue applying tattoos to the remaining eggs. The entire process takes about 10-20 seconds per egg.

DIY Illustrated Temporary Tattoo Easter Eggs

DIY Illustrated Temporary Tattoo Easter Eggs

DIY Illustrated Temporary Tattoo Easter Eggs

Aaaaaahhhh! So cute! I’m beyond obsessed with these adorable illustrations. And don’t worry – if you don’t have tattoo paper handy, you can still totally make these illustrated Easter eggs. Just follow this tutorial to print the designs onto a sheet of white tissue paper and apply them to hard boiled eggs using Mod Podge. It’s actually way easier than it sounds!

DIY Illustrated Temporary Tattoo Easter Eggs

DIY Illustrated Temporary Tattoo Easter Eggs

I hope you’ve enjoyed all of our Easter egg tutorials this year! If you make any of our eggs this year, please share photos on Instagram using the hashtag #madewithosbp so I can see them! And just in case you missed the previous ideas, here they are!

DIY hologram foil Easter eggs

DIY marbled hologram “galaxy” Easter eggs

DIY hologram and iridescent glitter-dipped Easter eggs

All artwork © 2017 Swiss Cottage Designs created exclusively for Oh So Beautiful Paper. All artwork is made available for personal use only. By downloading the patterns you agree to the terms of use.

Photos by Nole Garey for Oh So Beautiful Paper

DIY Hologram Glitter Dipped Easter Eggs

Easter is this weekend! Did it sneak up on you? Or do you already have all of your egg decorating activities planned out? So far this season, I’ve gone all in on my love for all things hologram and sparkly with these DIY marbled hologram galaxy Easter eggs and these DIY hologram foil Easter eggs. This week, I’m sharing a couple of last-minute Easter egg ideas that can easily be pulled off with a quick trip to your local craft store – and today we’re starting with these fun DIY hologram glitter dipped Easter eggs!

DIY Hologram Glitter Dipped Easter Eggs

The general idea behind these hologram glitter dipped eggs is roughly the same as the hologram foil eggs – but a whole lot easier to execute. Only three steps! They’re easy enough to do with tiny decorators, and if your kids love sparkly things as much as mine do, they’re pretty much guaranteed to be a crowd pleaser. Let’s make some!

DIY Hologram Glitter Dipped Easter Eggs

Supplies

Pre-dyed hardboiled eggs or faux eggs

Hologram glitter and iridescent glitter

Mod Podge or school glue

Paint brush

Non-aerosol Hairspray (optional)

DIY Hologram Glitter Dipped Easter Eggs

To make the DIY hologram glitter dipped Easter eggs:

Step 1. If you’re using hard boiled eggs, start by dyeing your eggs in your chosen color palette. I used a mix of deep blue, light pink, and lavender hard boiled eggs. The deep blue eggs were naturally dyed with red cabbage (I like this tutorial for cabbage dyed eggs) and left in the dye bath for several hours to achieve that deep blue hue. The lavender and pink eggs were dyed with liquid food coloring. Allow the eggs to dry completely.

Step 2. Pour some of the glitter into a small bowl or paper plate. Paint a layer of Mod Podge or glue onto one half of an egg. Holding the egg by the opposite end, roll the glue-covered portion of the egg in the glitter until you’re satisfied with the amount of coverage. Set the egg onto a drying rack or sheet of wax paper and allow it to dry completely. Repeat this process for each egg.

Step 3. Once all the eggs are covered in glitter and fully dry, take them outside and spray them with non-aerosol hair spray to seal the glitter on the egg. Revel in your ability to touch the glitter dipped egg without getting glitter everywhere. Yay!

DIY Hologram Glitter Dipped Easter Eggs

DIY Hologram Glitter Dipped Easter Eggs

I used a food safe hologram and iridescent glitter to make my eggs, but if you’re not worried about using a food safe version you can easily find hologram glitter at Michael’s and other craft stores. And if you’re worried about getting glitter everywhere making these eggs, don’t be! Seriously, hair spray is like magic when it comes to sealing microscopic pieces of glitter without compromising the sparkle factor. Just give the entire glitter-covered area a nice coat of hair spray and everything will stay put. I picked up the cheapest bottle of non-aerosol hairspray that I could find at my local grocery store and it worked like a charm!

DIY Hologram Glitter Dipped Easter Eggs

DIY Hologram Glitter Dipped Easter Eggs

Just look at all that sparkle! The iridescent glitter is translucent, which creates a really beautiful tone-on-tone glitter effect with dyed eggs. But I still just can’t get over those rainbow sparkles from the hologram glitter. So pretty!

Photos by Nole Garey for Oh So Beautiful Paper

OSBP at Home: Kitchen Inspiration

Oh man, you guys. I think I’ve been bitten by the renovation bug! Ever since we renovated our bathroom a year ago, I’ve been itching to finally do something with our kitchen. And since we’re in the kitchen every. single. day I think about renovating ALL the time. As I mentioned here, the kitchen layout is super awkward, with high gloss cabinets and frosted glass fronts (not to mention the corrugated cardboard “metallic” backsplash) that feel out of place with the overall aesthetic of our home. We’re still in the inspiration-gathering phase, and today I thought I’d share some of my favorite kitchen inspiration images with you today!

Kitchen Inspiration: Qanuk Interiors Kitchen via House & Home / Photo Credit: Donna Griffith Photography

Design: Qanūk Interiors / Photo Credit: Donna Griffith for House & Home Kitchens & Baths Fall 2013

We knew we wanted to renovate the kitchen from the day we moved in four years ago, but we wanted to live with our kitchen for a while to figure out the best layout for our needs. And I’ve honestly been stumped for most of the last four years! The kitchen is one of the largest rooms in our home, but the layout is so bad that we constantly feel pressed for prep space and accessible storage. (If you’re curious, I did a rough (and definitely not to scale) layout of our current kitchen layout that you can see here.) The cabinets and appliances are on opposite walls, with eight or so feet of empty space in the middle (where our dining table now sits), so we can’t easily go back and forth between counters and the stove or sink while we’re cooking. But I just couldn’t figure out where or how to move things around – until I saw the image above from House & Home Kitchens and Baths!

Kitchen Inspiration: Crystal Anne Interiors via Instagram

Design and Photo Credit: Crystal Ann Interiors

We’re now pretty settled on moving everything over to one side of the kitchen in a slight “c” shape, with either a built-in dining nook on the other side of the kitchen or floor-to-ceiling cabinets with an island in the middle. (You can see my rough layout here.) The layout would start with a refrigerator enclosed in cabinets at one end, then wrap around the wall towards a short peninsula at the other end. The wall between the kitchen and living room isn’t load bearing, so we’d open up that wall to create the peninsula and make the entire floor plan feel much more open. We would have lower cabinets for closed storage on the bottom, and a mix of upper cabinets and open shelving above. This would hopefully solve all the wasted space in our kitchen without compromising on storage.

Kitchen Inspiration: Melissa Lee Kitchen via Design Sponge / Photo Credit: Ty Cole Photography

Design: Melissa Lee / Photo Credit: Ty Cole Photography via Design Sponge

In terms of color and style, our kitchen sits in the middle of our home (a 1920s rowhouse) and doesn’t get much natural light, so my dream of a bright white kitchen probably won’t work. I’m loving the combination of navy lower cabinets, white walls, marble tile, and wood in the kitchen above.

Jersey Ice Cream Co. Kitchen via Remodelista

Design and Photo Credit: Jersey Ice Cream Co. via Remodelista

Butcher block counters with marble tile is also an excellent combination. And like everyone else in the world, we’re in love with the plaster walls that Jersey Ice Cream Co. did for Beth Kirby’s kitchen below. Although if I wasn’t worried about selling the house down the road I’d totally go with the pink plaster version instead.

Jersey Ice Cream Co. Kitchen for Local Milk via Remodelista

Design: Jersey Ice Cream Co. / Photo Credit: Beth Kirby via Remodelista

Sarah Sherman Samuel Cabin Kitchen

Design and Photo Credit: Sarah Sherman Samuel

Wit + Delight Kitchen / Photo Credit: Canary Grey for Domino

Design: Wit + Delight / Photo Credit: Canary Grey for Domino

I’ve got the color combination for the cabinets, countertops, and walls, but what to do about the floor? I love the cement tile that Kate used in her kitchen, but I worry that it’s too modern for our 1920s home. But maybe not? I don’t think we’ll be able to match the wide plank wood flooring from the rest of the house, so I’m definitely leaning towards some type of tile. Old school hexagon tile? I love the way the tile meets the wood floors in the kitchen below!

Royal Roulotte Kitchen via My Domaine

Design: Royal Roulotte via My Domaine

Alright everyone, throw it at me! We’ve only been through a bathroom renovation before, which I’m sure is a piece of cake compared to a kitchen renovation. What do I need to know? Any advice for renovating a kitchen with two small kids at home? I’m all ears!

Make it Pop! Non-alcoholic Winter Citrus Punch

As a mother of two young children, my party world mostly revolves around kid parties. Birthday parties, preschool holiday parties, even the occasional outdoor picnic party when the weather calls for it. Serving punch in a big punch bowl is one of my favorite party tricks – it makes any party feel glamorous (especially for a group of kids!), and you can make it ahead of time so you aren’t rushing to get everything done on the day of the party. Today I’m excited to share a kid friendly, non-alcoholic Winter Citrus Punch recipe in partnership with Glad’s brand new Kitchen Pro trash bags. As any mom knows, post party clean up can be NO JOKE. But with 53% more bag, ForceFlex strength, LeakGuard Technology, and Febreeze Odor Control, Kitchen Pro is Glad’s biggest and strongest kitchen trash bag – making it even easier to clean up after a major event like a birthday party!

Non-alcoholic Winter Citrus Punch with Glad Kitchen Pro

When my girls turned two and four last September, we threw a Rainbow Unicorn birthday party in our backyard, with plenty of rainbow balloons, rainbow tissue tassel garlands with iridescent sparkle, rainbow plates, napkins, and cups – and cupcakes with the cutest little unicorn picks! We also set up a craft table where our little guests could decorate their own paper unicorn with glitter glue and colorful rhinestones. The party was SO much fun, but also made a big, big mess – as you might expect from a party with fifteen little kids and their parents!

Glad Kitchen Pro Trash Bags

Luckily, big party messes are no match for Glad’s new Kitchen Pro trash bags! Kitchen Pro trash bags offer 53% more bag for cleaning up messes, from fun party messes to regular everyday messes around the house. With an inner layer of ForceFlex and an outer layer of LeakGuard, Glad Kitchen Pro bags are both stretchable and protect against leaks, so you can even toss in those half-empty cups or leftover ice without any problems. And if you’re looking for a new everyday trash bag, the stretchable strength, leak protection, and odor neutralization mean you can take your trash out less. Which is definitely something I appreciate for my little family of four (plus five cats)!

Non-alcoholic Winter Citrus Punch with Glad Kitchen Pro

Non-alcoholic Winter Citrus Punch with Glad Kitchen Pro

Make it Pop Non-alcoholic Winter Citrus Punch Recipe

Non-alcoholic Winter Citrus Punch with Glad Kitchen Pro

Okay, back to the punch! It’s the perfect balance of tart citrus juice and fizzy bubbles – such a fun and special treat! We used Cara Cara oranges and blood oranges since they happen to be in season right now, but this punch would easily work with regular naval oranges, or even pineapple juice later in the summer. You can make the simple syrup and squeeze the citrus juices the day before, then add the ginger ale or sparkling grape juice in a punch bowl on the day of the party.

For an adult version of this punch, consider swapping the ginger ale for champagne or sparkling wine and adding a cup of brandy. You could also add a couple rosemary sprigs to the simple syrup for a savory rosemary citrus punch. So many possibilities!

Non-alcoholic Winter Citrus Punch with Glad Kitchen Pro

Non-alcoholic Winter Citrus Punch with Glad Kitchen Pro

Non-alcoholic Winter Citrus Punch with Glad Kitchen Pro

You can pick the new Glad Kitchen Pro trash bags up at your local Target – and for those of you with the Cartwheel app, you can snag a special 10% off Cartwheel deal from now through February 28!

Non-alcoholic Winter Citrus Punch with Glad Kitchen Pro

Photo Credits: Nole Garey for Oh So Beautiful Paper

This post is a sponsored conversation written by me on behalf of Glad. All content and opinions are my own. Thank you for supporting the sponsors that make Oh So Beautiful Paper possible!