DIY Spray Painted Gift Wrap

When it comes to DIY supplies, I tend to play favorites: paint pens, paper (naturally), gold leaf, and acrylic paint are all at the top of my go-to supply list. Also at the top of that list? Spray paint! I’m completely addicted to making these DIY spray painted acrylic signs for parties (like this year’s Paper Party!), and I’ve spray painted many a chair and table for home DIY projects. So when The Home Depot asked me to create DIY wrapping paper as part of their annual Holiday Style Challenge, I knew I wanted to use spray paint as part of my project!

DIY Spray Painted Gift Wrap / Oh So Beautiful Paper

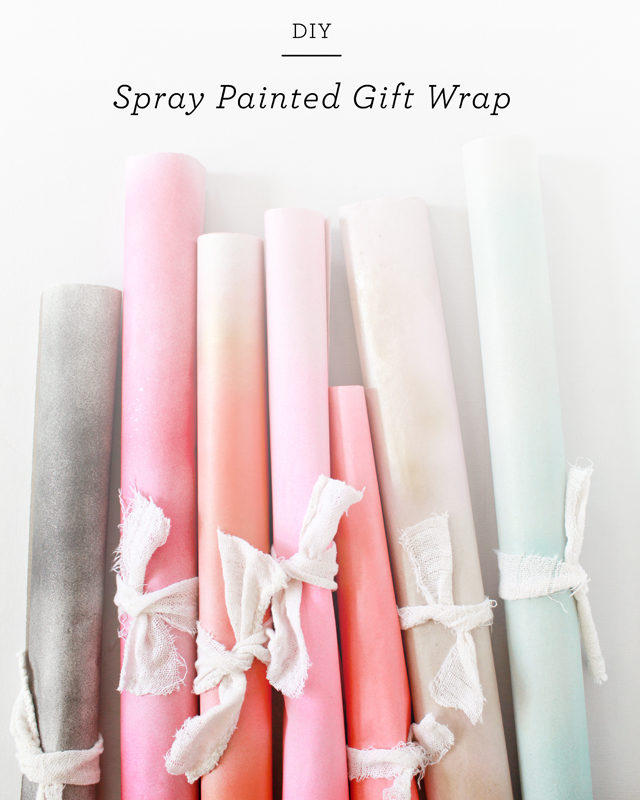
The final DIY spray painted gift wrap project incorporates newsprint packing paper, various shades of Rust-Oleum spray paint, copper wire, nylon neon twine, and gift tags made from paint chips! So basically, I raided the paint aisle to create my ideal subtle, whimsical, shimmery, painterly-meets-ombré wrapping paper! You can find the full tutorial over on The Home Depot blog right here – and of course all of the materials used are available right at The Home Depot!

DIY Spray Painted Gift Wrap / Oh So Beautiful Paper

DIY Spray Painted Gift Wrap / Oh So Beautiful Paper

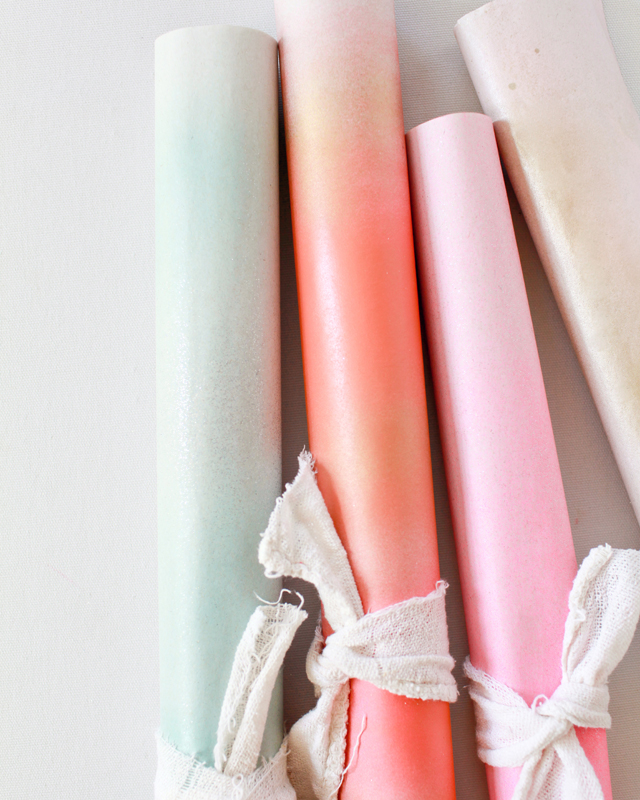
I tried at least a dozen different color combinations, each combining one or two color spray paints with a metallic spray paint. The pink versions are my favorite; I love the subtle ombré from mixing shades of pink with the metallic spray paint! But I also love the high contrast black and shimmery pastel blue. I found that a thin layer of metallic spray paint over any color helped blend everything together, and my favorite metallic ended up being this subtle pearl spray paint called Champagne Mist. It left the perfect amount of shimmer without changing the color of the wrapping paper. Another favorite combination involved bright coral and gold spray paint. So many great options!

DIY Spray Painted Gift Wrap / Oh So Beautiful Paper

DIY Spray Painted Gift Wrap / Oh So Beautiful Paper

The paint chip gift tags also received a layer of metallic spray paint, which is really lovely in person but kind of subtle in photos. Next time I’d love to try pairing two bright colors together for more contrast! I wrapped the gift boxes with the spray painted gift wrap and copper hobby wire with the paint chip gift tags. For smaller gift boxes I also used ribbons made of strips ripped from cotton painter’s rags. I love the additional texture of the loose cotton weave and frayed edges!

DIY Spray Painted Gift Wrap / Oh So Beautiful Paper

DIY Spray Painted Gift Wrap / Oh So Beautiful Paper

A huge thanks to The Home Depot for inviting me to be part of this year’s Holiday Style Challenge! I had a BLAST! You can find the full tutorial for this DIY Spray Painted Gift Wrap here, and more holiday ideas on The Home Depot’s Holiday Style Challenge Pinterest board!

Photo Credits: Nole Garey for Oh So Beautiful Paper

Happy Thanksgiving!

Happy Thanksgiving Eve! For those of you traveling, I wish you all safe and uneventful travels. And for everyone I wish a happy, relaxing, and wonderful weekend filled with good food, great company, and tons of pie. I’ll see you back here next Monday! But in the meantime…

Knot & Bow / Oh So Beautiful Paper

Photo (and rainbow beeswax candles) by Knot & Bow via Instagram

…a few links for your weekend!

This week on Oh So Beautiful Paper:

xoxo

Mulled Winter Sangria Recipe

Since the holidays are all about getting together with family and friends, I figured we should offer a recipe for a holiday-appropriate drink that can be made in large batches and enjoyed by large groups of people. What could be better than sangria? We normally think of sangria as a summer drink, but add in seasonal pears, citrus, and some mulling spice syrup and you’ve got the perfect drink that can be just as good in cold weather! Enjoy this Mulled Winter Sangria recipe over ice – or heat it up for a more traditional mulled wine!

Mulled Winter Sangria Recipe / Oh So Beautiful Paper

The most important element of a Mulled Winter Sangria is the Mulling Spice Syrup. Luckily, most of us already have most of these ingredients at home: cinnamon sticks, allspice berries, cloves, and whole nutmeg. Let these ingredients simmer in a simple syrup made with brown sugar and your whole house will smell amazing!

Mulling Spices

Mulled Winter Sangria

1 bottle of Dry Red Wine
1 Orange, thinly sliced
1 Lemon, thinly sliced
1 Red Anjou Pear, diced
2 oz Orange Liqueur
2 oz Spiced Rum
6 oz Mulling Spice Syrup
1 cup Apple Cider

To make the mulling spice syrup, combine a cup of brown sugar and a cup of water in a sauce pan over low heat, stirring frequently. Add two cinnamon sticks, a heaping teaspoon each of allspice berries and cloves, and two whole nutmegs, all crushed with a muddler or pestle. Stir over heat until all the sugar is melted into the syrup, then remove from heat and cover the sauce pan. Let it sit for at least twenty minutes to infuse. Using cheesecloth or a fine-mesh sieve, strain out all the solids. Bottle and refrigerate.

To make the sangria, combine all of your ingredients in a pitcher and let it sit, preferably overnight in the refrigerator, to let all of the flavors combine. To serve, pour over ice and garnish with fresh pear slices. 

This sangria is sweet and fruity, but has lots of warm baking spice flavors that make this a cold-weather treat. This sangria would also be pretty great heated in a pot and turned into a more traditional mulled wine. Just take the fruit out first – you can always add it back in later.

Mulled Winter Sangria Recipe / Oh So Beautiful Paper

p.s. How to make a Classic Old Fashioned and a Rosé 75 recipe that is perfect for New Year’s!

This post was created in partnership with eBay. All content and opinions are my own. Thank you for supporting the sponsors that make Oh So Beautiful Paper possible!

Bourbon Pear Vanilla Bean Smash

It’s nearly Thanksgiving, and I’m thinking about cocktails I’d like to drink during my most favorite of all holidays. Fruit, spice, and the warmth of bourbon – all those woodsy and caramel and vanilla notes – that’s what I’m looking for right now. So I decided to – literally – smash all those together in one really fantastic drink that I hope you try this turkey day. – Andrew

Bourbon Pear Vanilla Bean Smash Cocktail Recipe / Liquorary for Oh So Beautiful Paper

Vanilla-Pear Bourbon Smash

2 oz Bourbon Whiskey
1/2 oz Simple Syrup
1/2 oz Lemon Juice
1/4 of a Pear, Diced
1 piece of Vanilla Bean, about an inch long
Perry (optional)

In a dry cocktail shaker, grind up the vanilla bean with a muddler, then add the pear and muddle that too. Add the bourbon, simple syrup, and lemon juice. Put a few big pieces of ice in the shaker and shake well. Strain into a glass filled with fresh cracked ice. Enjoy!

Bourbon Pear Vanilla Bean Smash Cocktail Recipe / Liquorary for Oh So Beautiful Paper

This drinks works just fine like this, with lots of fruit and warm vanilla spice flavors, and just enough tart zing from the lemon to balance out the sweetness of the pears and bourbon. But I also really like it topped with a splash of perry, an alcoholic drink made from fermented pears the way (hard) cider is made from apples. The perry adds an edge of crisp, dry fruit and a sparkling fizz that really peps up the drink.

Bourbon Pear Vanilla Bean Smash Cocktail Recipe / Liquorary for Oh So Beautiful Paper

But look: this is Thanksgiving. There’s no need to stress about the drinks.

(Don’t forget to follow us on Instagram, where we’ve been posting our experiments before they make their way onto this column!)

Glassware by Liquorary

Photo Credits: Nole Garey for Oh So Beautiful Paper

DIY Paper Flower Advent Calendar

You guys! I’m SO excited to share today’s DIY post! I’ve been wanting to make an advent calendar for years, but I never really found something that felt quite like “me.” Well, along came my favorite Heidi Swapp Minc foil applicator and all of a sudden it just clicked! I shared a couple of DIY projects over the summer involving the Minc, but if you want to create your own DIY projects with the Minc you need access to a laser printer or copier since it works with toner ink. Well, for those of us that might not have regular access to a laser printer or copier, Heidi Swapp offers a few ready made DIY kits – including these amazing 3D flowers! I decided to pair the 3D flowers with some gold hexagon favor boxes from the Oh Happy Day party shop to create a DIY paper flower advent calendar of my dreams!

DIY Paper Flower Advent Calendar / Oh So Beautiful Paper

DIY Paper Flower Advent Calendar / Oh So Beautiful Paper

DIY Paper Flower Advent Calendar / Oh So Beautiful Paper

The Minc has easily become my favorite DIY tool in the last few months. You can find the Minc at Michael’s and craft stores, or pick one up right here. This was my first time experimenting with one of the readymade kits and I’m now completely obsessed with these 3D flowers. They come flat in sheets with pre-printed toner ink, so you just run them through the Minc to apply the foil – then pop them out and assemble the layers into beautiful flowers! I kind of want to do an entire backdrop using these gorgeous metallic flowers! But I’m getting ahead of myself. The holidays are just around the corner: advent calendars first!

DIY Paper Flower Advent Calendar / Oh So Beautiful Paper

DIY Paper Flower Advent Calendar / Oh So Beautiful Paper

DIY Paper Flower Advent Calendar / Oh So Beautiful Paper

To make the DIY paper flower advent calendar:

Step 1. Cut sheets of foil just big enough to fit over each flower sheet. We chose light pink, hot pink, gold, and silver hologram foil, and we were able to fit three sheets of flowers at a time in the Minc folder. Run the flowers through the Minc foil applicator on high heat (at least the “4” setting).

Step 2. Pop the foiled flowers out of each sheet and assemble flowers according to package instructions. You’ll want a total of twenty-five flowers with a nice mix of large, medium, and small flowers for the advent calendar.

Step 3. Print the advent calendar number template on text weight paper and cut out each number. Place a number under each flower, then adhere to the gold hexagon boxes using double-sided tape or removable mounting squares.

Step 4. Fill each box with candy or small trinkets! You can use removable mounting squares to mount the boxes to the wall, or just set them out on a side table to open and enjoy!

DIY Paper Flower Advent Calendar / Oh So Beautiful Paper

DIY Paper Flower Advent Calendar / Oh So Beautiful Paper

DIY Paper Flower Advent Calendar / Oh So Beautiful Paper

DIY Paper Flower Advent Calendar / Oh So Beautiful Paper

DIY Paper Flower Advent Calendar / Oh So Beautiful Paper

DIY Paper Flower Advent Calendar / Oh So Beautiful Paper

I can’t wait to start the advent calendar tradition with Sophie – she already spotted the flowers on my desk and she’s so excited to open all the little boxes! Are any of you planning to do an advent calendar this year?

This post was created in partnership with American Crafts. All content and opinions are my own. Thank you for supporting the sponsors that make Oh So Beautiful Paper possible!

Photos by Nole Garey for Oh So Beautiful Paper