Jill + Joe’s Rustic Colorado Wedding Invitations

We’re lucky to have the ladies of Antiquaria Design Studio here every couple of weeks to share fantastic DIY tutorials and ideas – and today I’m thrilled to share one of their beautiful custom design projects! Bailey and Emma recently worked with a couple planning a wedding in the Colorado mountains. They designed an elegant and rustic invitation suite with vintage-inspired details and hand drawn illustrations – including the iconic Colorado aspen leaf!

Rustic-Colorado-Wedding-Invitations-Antiquaria

From Bailey and Emma: Jill and Joe came to us for a custom invitation suite that reflected their special love for the mountains (and their wedding location). They got married in Beaver Creek, Colorado in September. The invitation suite we created for them is rustic yet sophisticated with vintage-inspired fonts, hand drawn mountain illustrations, vintage postcards, and green accents.

Rustic-Colorado-Wedding-Invitations-Antiquaria5Rustic-Colorado-Wedding-Invitations-Antiquaria6

The invitation suite was letterpress printed in charcoal gray ink and accompanied by a reproduction of a vintage postcard that included additional wedding invitation on the reverse side. Accents of moss green and chartreuse were brought in as accent envelopes for the thank you card and rehearsal dinner invitation.

Rustic-Colorado-Wedding-Invitations-Antiquaria3

An aspen leaf motif was carried through all the pieces, from the reply card to the chalet inspired monogram. We also carried the mountain imagery through to the day-of paper with program booklets (designed to fit inside the coat pockets of male guests), menus, and escort cards. 

Rustic-Colorado-Wedding-Invitations-Antiquaria7

Thanks Bailey and Emma!

Antiquaria Design Studio is a member of the Designer Rolodex – check out more of their beautiful work right here!  For DIY inspiration, you can also see their DIY tutorials here.

Photo Credits: Antiquaria Design Studio

DIY Tutorial: Rubber Stamp Clay Save the Dates

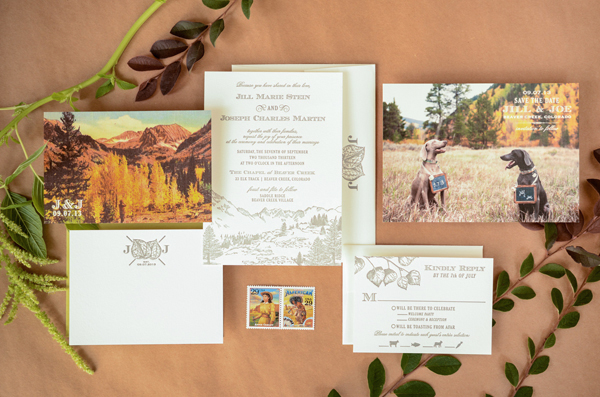
Texture is subtle but boy does it make a huge impact! When we found some paper clay at the art store a while back, we knew it would make a great DIY but we weren’t quite sure what to do with it. After obsessing over textured clay pottery now for ages, we decided that a “pottery” save the date was in order. The natural off-white color of the paper clay comes alive when paired with a mix of floral patterns and a unique lilac, eggplant, and ochre color palette! – Bailey and Emma of Antiquaria

DIY Tutorial: Rubber Stamp Paper Clay Save the Dates by Antiquaria for Oh So Beautiful Paper

DIY Tutorial: Rubber Stamp Paper Clay Save the Dates by Antiquaria for Oh So Beautiful Paper

DIY Tutorial: Rubber Stamp Paper Clay Save the Dates by Antiquaria for Oh So Beautiful Paper

Step One: Gather your paper clay supplies: bag of clay, wooden cutting board (you don’t want any texture in your rolling surface – unless it’s the look you’re going for), clear plastic wrap, and a rolling pen. Break your paper clay into approximately 2 oz pieces. There will be scraps that you can re-roll together.

DIY Tutorial: Rubber Stamp Paper Clay Save the Dates by Antiquaria for Oh So Beautiful Paper

Step Two: Squish the paper clay into a small rectangle with your fingers (this doesn’t need to be precise). Place it in the middle of your plastic wrap and fold the other end of the wrap over the top. Now, you’ll start rolling! It’s basically like rolling out a pie crust or cookies – just keep the thickness even and it will be good. We suggest a thickness of around â…›” or maybe a little less. Remember: it does need to fit in an envelope!

DIY Tutorial: Rubber Stamp Paper Clay Save the Dates by Antiquaria for Oh So Beautiful Paper

Step Three: Once it’s rolled out thin and even (and approximately the size of your stamp mount, you’re ready to print the design. With an un-inked stamp (we used our Vintage Label Save the Date stamp) center it over the clay and carefully set it down. With your fingertips, press each section of the design evenly to make the print. This printing method feels different than printing paper so it may take some extra time to get the hang of it! Not to worry though, you can just re-roll the clay so there is no waste in the practice process!

Once you get a good print, trim the clay around the design with a kitchen knife (we used the mount size as a guide). Carefully flip the clay over in your palm and transfer it to a plastic lined tray or baking sheet. Let dry 1 – 3 days or until firm.

DIY Tutorial: Rubber Stamp Paper Clay Save the Dates by Antiquaria for Oh So Beautiful Paper

DIY Tutorial: Rubber Stamp Paper Clay Save the Dates by Antiquaria for Oh So Beautiful Paper

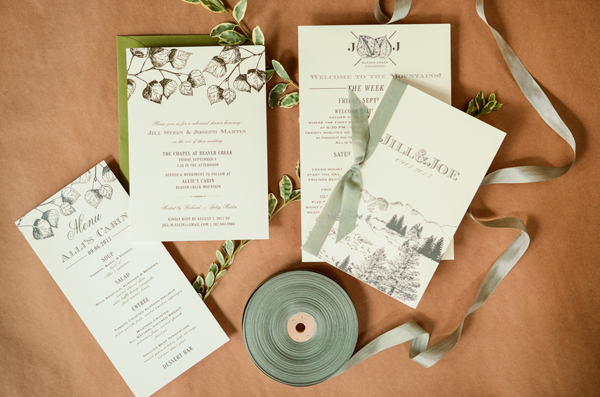
Step Four: Now that your clay save the dates are complete, you can move on the the rest of the pieces that you’ll need for the design. Cut patterned card stock (we used our Annabelle Violet Paper) into A2 sized cards (4.25″ x 5.5″) with a craft knife and ruler on a self healing mat. You will get four cards out of one 8.5″ x 11″ sheet.

DIY Tutorial: Rubber Stamp Paper Clay Save the Dates by Antiquaria for Oh So Beautiful Paper

Step Five: Stamp your accommodations and website information on the back of your patterned card. We used our Calligraphy Accent Accommodations and Calligraphy Accent Website stamps for this design. You can watch our step-by-step video tutorial about the stamp printing process here.

DIY Tutorial: Rubber Stamp Paper Clay Save the Dates by Antiquaria for Oh So Beautiful Paper

Step Six: A coordinating liner really dresses up an envelope, don’t you think? For this design, we used our daisy paper. The process is simple! Trace the template with a pencil and cut out the pattern. Use double sided tape or stick glue to adhere the liner into the envelope just below the gumming.

DIY Tutorial: Rubber Stamp Paper Clay Save the Dates by Antiquaria for Oh So Beautiful Paper

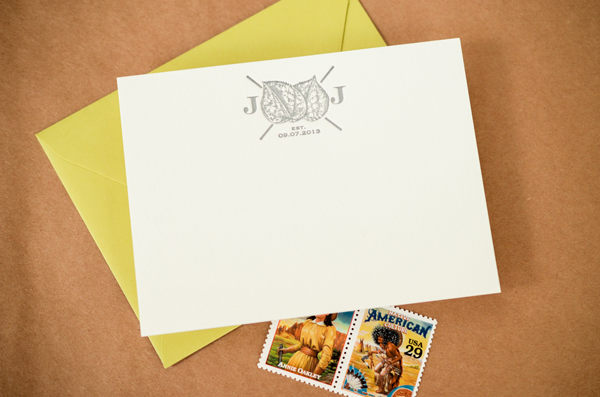
Step Seven: Now we’ll switch our focus to the outside of the envelope! We stamped our Scripted Return Address  stamp in eggplant on the back flap. To coordinate, we addressed the front in an eggplant colored ink as well and used (our favorite) seed packet postage to finish it all off!

Materials

Vintage Label Save the Date Stamp

Calligraphy Accent Accommodations Stamp

Calligraphy Accent Website Card Stamp

Scripted Return Address Stamp

Annabelle Violet Patterned Paper

Daisy Patterned Paper

Paper Clay

Cutting board, plastic wrap, rolling pen and knife

Trays or baking sheets for air drying

Self healing mat, kraft knife and metal ruler

Envelope liner templates

Pencil and Scissors

Stamp Pads in Ochre and Eggplant

A2 Envelopes in Luxe Blush

Calligraphy Ink for addressing in Red Violet

Grecian Pink Tailors Ribbon to tie the suite together

USPS Postage

Anti­quaria is a mem­ber of the Designer Rolodex – you can see more of their beau­ti­ful work right here or visit the real save the dates gallery for more save the date ideas!

Photo Credits: Antiquaria for Oh So Beautiful Paper

Happy Weekend!

Happy Friday everyone! So, that whole thing about kids being sick the entire first year of school or daycare? NOT AN EXAGGERATION. We’re currently on virus number three in just under two months. I’m feeling like we can’t catch a break, but thankfully this round seems to be milder than the previous two. Thankfully, for the first time in several weeks, we have absolutely zero obligations for the weekend. We’re planning to take things easy, enjoy the last of this beautiful DC fall, and maybe do a few things around the house (maybe). I hope you all have a wonderful weekend! But in the meantime…

OSBP-Instagram-Capitol-Hill-Fall

Photo by me via Instagram

…a few links for your weekend:

This week on Oh So Beautiful Paper:

Check back soon for this week’s cocktail! I hope you all have a wonderful weekend, and I’ll see you back here next week! xoxo

DIY Tutorial: Rubber Stamp Mountain-Inspired Save the Dates

Fall is officially here and we couldn’t be more thrilled! Today’s gorgeous save the date tutorial is perfect for the season with its shades of brown and mountain scenery. We can’t seem to get enough of folded cards lately (see our previous designs here and here). They’re perfect for destination weddings since they allow you to incorporate more information without having to have additional cards. – Bailey and Emma of Antiquaria

DIY Tutorial: Rubber Stamp Mountain-Inspired Save the Dates

Step One: Download the mountain folded card design (see bottom of post for download link) and print it out on a 11″ x 17″ piece of card stock. Next, trim the card down at the crop marks to reach the final size (16″ x 5 1/4″). We used a self healing mat, metal ruler and craft knife for this step, but if  you plan on cutting many cards, we recommend taking them to a local printer to have them cut them all at once with an industrial cutter.

DIY Tutorial: Rubber Stamp Mountain-Inspired Save the Dates

Step Two: Score your 16″ x 5 1/4″ every four inches (three scores total, at the 4″, 8″ and 12″ mark). Don’t fold it yet!

DIY Tutorial: Rubber Stamp Mountain-Inspired Save the Dates

Step Three: Gather all of your stamps and make certain that you have a stamping plan before you dive in. The stamps we used for this design, from left to right are our “Banner” Names Monogram, Vintage Label Save the Date, Calligraphy Accent Accommodations Card and our Calligraphy Accent Website Card. Once you have your plan, you will ink each stamp and align it into its appropriate space. For a step-by-step video tutorial about the stamp printing process go here. Once they’re dry, fold your cards at each score mark. Using a bone folder can help you get lovely, crisp, folds!

DIY Tutorial: Rubber Stamp Mountain-Inspired Save the Dates

Step Four: Next, you will stamp your return address on the back flap of your A2 kraft envelope. We used our Calligraphy Ampersand Return Address Stamp with chestnut  ink for this design. Once you have the return address stamped on your envelopes, all that’s left is addressing and adding postage!

Materials

Mountain Scene Illustration: Download available here **Note: digital download is for personal use only**

11″ x 17″ Card Stock

Self Healing Mat, Craft Knife and Metal Ruler (or you can take your prints to a professional printer to have cut)

Scoreboard

“Banners” Name Monogram Stamp

Vintage Label Save the Date Stamp

Calligraphy Accent Accommodations Card Stamp

Calligraphy Accent Website Card Stamp

Calligraphy Ampersand Return Address Stamp

Stamp Pad in Chestnut

Bone Folder

A2 Envelopes in Paper Bag

Anti­quaria is a mem­ber of the Designer Rolodex – you can see more of their beau­ti­ful work right here or visit the real save the dates gallery for more save the date ideas!

Photo Credits: Antiquaria for Oh So Beautiful Paper

DIY Tutorial: Dinner Party Placemats + Menus

One of the most fun aspects of a throwing a great party is designing the decor. There are so many creative options to choose from and it can really help accentuate the aesthetics of the event. Today, we designed a fun, easy and inexpensive option perfect for a western style wedding or even a dinner party! â€“ Bailey and Emma of Antiquaria

DIY Tutorial: Rubber Stamp Dinner Party Placemat by Antiquaria via Oh So Beautiful Paper

DIY Tutorial: Rubber Stamp Dinner Party Placemat by Antiquaria via Oh So Beautiful Paper

Step One: Cut a section of kraft paper off of a gift wrap roll sized to fit the length of your table. At each seat, trace a plate using a black brush marker so that you have the correct plate proportion.

DIY Tutorial: Rubber Stamp Dinner Party Placemat by Antiquaria via Oh So Beautiful Paper

Step Two: Decorate each plate! Using the same brush marker, draw a pattern on the circle you’ve just traced. We used a triangle motif to stay with the western theme…but scallops or flowers could be super cute too!

DIY Tutorial: Rubber Stamp Dinner Party Placemat by Antiquaria via Oh So Beautiful Paper

Step Three: So that everyone knows exactly where to sit, write each guests name under the plate. We penciled the name lightly first so that we could be sure that it was centered. Then, we traced over it in black to match the rest of the setting.

DIY Tutorial: Rubber Stamp Dinner Party Placemat by Antiquaria via Oh So Beautiful Paper

Step Four: Now it’s time to stamp your menus. Ink your menu stamp (we used our Old West Menu Stamp) with a black pad. On the oversized stamps, such as menus, it works best to hold the stamp facing you and dab and swipe the pad onto the stamp image.

DIY Tutorial: Rubber Stamp Dinner Party Placemat by Antiquaria via Oh So Beautiful Paper

Step Five: Once the stamp is inked, center it over your menu card. Press down using moderate pressure. Lift it off and set aside to dry thoroughly. For a step-by-step video tutorial about the stamp printing process go here.

Materials

Old West Menu Stamp

Stamp Pad in black

Turquoise 5″ x 7″ card stock

Wrapping Paper in paper bag

Scissors

Brush Pen

Plate

Photo Credit: Antiquaria for Oh So Beautiful Paper