DIY Tutorial: Modern Banner Tri-Fold Save the Date

It can be a challenge to fit all of the necessary information into your save the date or wedding invitations. Hotels, directions, maps and websites can weigh down your envelope and easily distract guests from the main message. Today’s tutorial is the perfect solution to the headache… and couldn’t be simpler! Using one letter size piece of paper, we’ve created a tri-fold save the date that’s fun, modern and informational. – Bailey and Emma of Antiquaria

DIY Tutorial: Kraft Paper Trifold Save the Date by Antiquaria

DIY Tutorial: Kraft Paper Trifold Save the Date by Antiquaria

Step One: Cut your 8.5″ x 11″ piece of kraft card stock into cards sized at 5″ x 10.5″

DIY Tutorial: Kraft Paper Trifold Save the Date by Antiquaria

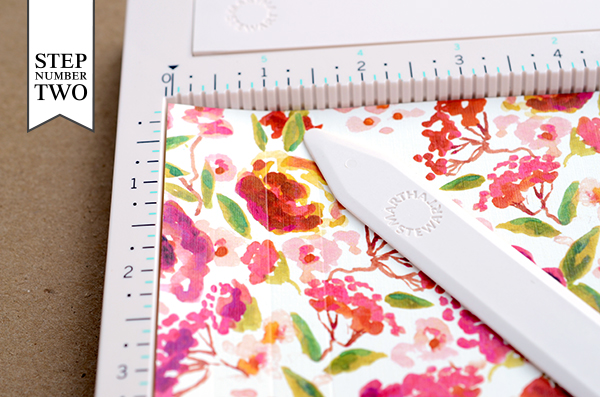
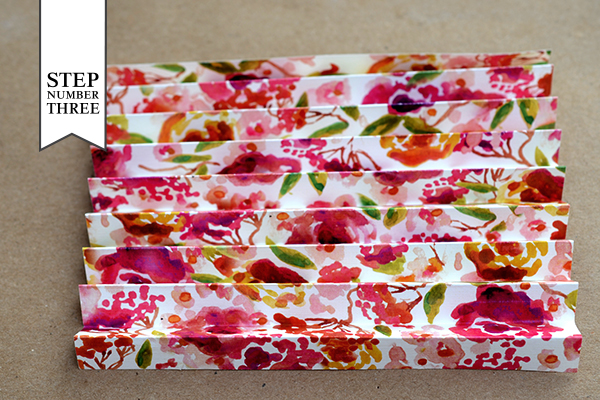
Step Two: Once cut, you will want to make score marks every 3.5 inches using a bone folder and scoreboard tool. Do not fold the card yet!

DIY Tutorial: Kraft Paper Trifold Save the Date by Antiquaria

Step Three: While the card is scored but still flat, stamp your monogram (we used our Modern Arrow Monogram Stamp, No.2), centering on the first third (the one on the left). Repeat with your save the date stamp (we used our Modern Banner Save the Date Stamp) in the center and your accommodations stamp (we used our Modern Banner Accommodations Stamp, No.2) in on the right-hand side. To make a stamped print, ink your stamp thoroughly and center it over your card. Once it is positioned correctly, press down to make a print. Use both hands to ensure even pressure. Lift off and let the print dry. For a step-by-step video tutorial about this printing process go here.

DIY Tutorial: Kraft Paper Trifold Save the Date by Antiquaria

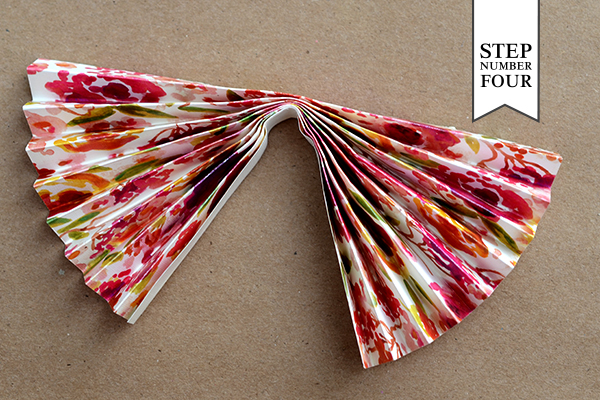
Step Four: Now you can fold your card! Carefully bend along score marks and use a bone folder to make certain the folds are crisp.

DIY Tutorial: Kraft Paper Trifold Save the Date by Antiquaria

Step Five: Adding a printed liner is a great way to add color and pattern to your Save the Date design. To make the liner, trace the template onto your printed paper (we used our “Geo” Patterned Paper in text weight) and cut it out with scissors. To install, simply use stick glue or double sided tape to adhere them into your envelope.

DIY Tutorial: Kraft Paper Trifold Save the Date by Antiquaria

Step Six: Next, you will stamp your return address on the back flap of your 4bar envelope using the same technique for printing as in step three. We used our Scripted Return Address Stamp for this design.

DIY Tutorial: Kraft Paper Trifold Save the Date by Antiquaria

Step Seven: Now all that’s left is to tie the trifold design with twine, address the envelopes, add postage and send them on their way!

Materials:

Modern Arrow Monogram Stamp, No.2

Modern Banner Save the Date Stamp

Modern Banner Accommodations Stamp, No.2

Scripted Return Address Stamp

Stamp Pad in Black

Card stock 8.5″ x 11″ sheets in paper bag

Self Healing Mat and Craft Knife

Score Board

Bone Folder

4Bar Envelopes in Peacock

Liner Paper

Envelope Liner Templates

Pencil and Paper

Twine

Anti­quaria is a mem­ber of the Designer Rolodex – you can see more of their beau­ti­ful work right here or visit the real wedding invitations gallery for more wedding invitation ideas!

Photo Credits: Antiquaria

DIY Tutorial: Patterned Paper Place Card Fans

Paper fans are not only festive but also fun and easy to make! Earlier this year, we started seeing this paper folding technique used in many different ways. From pretty photography backdrops to hanging mobiles to ornaments…the uses for these little fans are endless. The best part? You can make them any size you want to fit your specific needs. We’ve made them small in order to use them as place cards, adding a little pizazz to our tabletop decor. – Bailey and Emma of Antiquaria

The paper pattern and colors you use can yield so many different looks, making it easy to customize them to the theme of your event! Plus, the texture of the fan really makes a statement as guests approach the table!

Step One: To make the small fans, you will need to cut a sheet of 8.5″ x 11″ text paper into two equal parts (we used our Lucy Floral Patterned Paper). The final size of each sheet will be 8.5″ x 5.5.” You will need three 8.5″ x 5.5″ sheets per fan.

Step Two: Lay the paper on a scoreboard oriented in a landscape fashion. Make score marks every half inch. We love our scoreboard, but if you don’t have one handy that’s fine too! Simply fold the paper every half inch until you get the result in step three.

Step Three: Once the paper is scored, fold along the lines, altering directions each time, to get the accordion effect shown.

Step Four: Fold the paper in half length-wise and tape the center seam together using a tape gun or double sided tape. Repeat steps 2, 3, and 4 for the other two pieces.

Step Five: Once you have your three fan components, you will tape all of them together to form the final round fan.

Step Six: To make the place cards, we calligraphed our guests’ names in gold ink on 2.5″ round labels. If you’d prefer, you can use a font to typeset the names and print them on the round labels using the template download found here.

Step Seven: The final detail is to stick the round label onto the center of the little fan that you made. Repeat for each guest and see your table come to life!

Materials

Lucy Patterned Paper in text weight

Self healing mat, ruler, and craft knife

Scoreboard – optional but great to have

Tape Gun or Double Sided Tape

2.5″ Round Labels in Superfine Soft White

Pen and Ink or Home Printer

Photo Credits: Antiquaria

DIY Tutorial: Savannah-Inspired Floral Wedding Invitations

Ever since we designed our Savannah invitation suite for this inspiration shoot in collaboration with Camille Styles, it’s been one of our most popular invitations to date. This adaptation of the Savannah design is for the DIY couple that wants a custom suite on a budget. This design is soft and elegant with gorgeous floral accents: our version of a traditional invitation! – Bailey and Emma of Antiquaria

DIY Tutorial: Savannah-Inspired Wedding Invitations by Antiquaria via Oh So Beautiful Paper

For the foundation of the suite, we used our Letterpress Printed “Savannah” Invitation design. Adding in one piece of letterpress stationery really helps elevate the entire suite. While the single piece is still a bit of a splurge, your savings comes from all of the special DIY details that help complete the look and make it special and unique.

DIY Tutorial: Savannah-Inspired Wedding Invitations by Antiquaria via Oh So Beautiful Paper

Step One: Since the invitation piece is ready to go…the first step is to cut your cards for the reply postcard and monogram tag that you will be using. With a self sealing mat, ruler and craft knife (X-acto), cut cards to 4 x 6″ (postcard) and 2 x 3.5″ (tag). You should get 2 postcards and 10 tags out of 1 sheet of patterned 8.5 x 11″ paper (we used our Magnolia Branch Patterned Card Stock).

DIY Tutorial: Savannah-Inspired Wedding Invitations by Antiquaria via Oh So Beautiful Paper

Step Two: We added a cute little corner detail to the monogram tag! To do this, simply line up the corner of the card on your mat in the 45 degree triangle and make the cut with your knife against the ruler. Flip and repeat the cut on the other side. It may take a little time to get all the corners trimmed but it’s definitely worth the effort!

DIY Tutorial: Savannah-Inspired Wedding Invitations by Antiquaria via Oh So Beautiful Paper

Step Three: Lay your  4 x 6″ patterned postcard down on a firm surface (pattern facing down). Ink your stamp (we used our Calligraphy Accent Reply Postcard stamp) thoroughly and center it over your card. Once it is positioned correctly, press down to make a print. Use both hands to ensure even pressure. Lift off and let the print dry. For a step-by-step video tutorial about this printing process go here.

DIY Tutorial: Savannah-Inspired Wedding Invitations by Antiquaria via Oh So Beautiful Paper

Step Four: How cute are these little tags! Not only are they adorable with this suite but the extras would be great to use as gift tags as well! To make them, punch a 1/8″ hole in the top center of the 2.5 x 3″ card. Then you will print your monogram stamp (we used our Antique Monogram stamp) using the same print technique as in Step 3. Lastly, add those adorable kraft hole reinforcements to your hole punch and the tags are done!

DIY Tutorial: Savannah-Inspired Wedding Invitations by Antiquaria via Oh So Beautiful Paper

Step Five: One great way to save money with your wedding stationery is to stamp your return address! For this design, we embossed our Wildflowers Return Address Stamp with white so that it would be super opaque and “pop” on the kraft envelope. Place your A7 envelope on a stable and firm surface with the flap facing you. Ink your return address and center the stamp over the flap. When ready, press the stamp down with moderate pressure to make the print. Lift the stamp off and quickly move on to adding your embossing powder.

Once you’ve made your print, immediately cover it with embossing powder by sprinkling it across the envelope. Shift the powder around until you have covered the entire image. Now, you will pour the excess powder off of the envelope onto a scrap piece of paper so that you can reuse it for future prints. Heat set the print, using an Embossing Heat Tool. You will be able to see the powder melt into an opaque and solid color when it’s done. For more information about how to emboss using stamps, please watch this instructional video.

Note: One key thing about embossing is that it is wise to try to closely match your ink color with your powder color. By doing this, you will get much more crisp and opaque results. For example, we used a white pad with white embossing powder on this envelope.

DIY Tutorial: Savannah-Inspired Wedding Invitations by Antiquaria via Oh So Beautiful Paper

Step Six: While not crucial, adding an envelope liner can really pull your invitation suite together. We kept this liner traditional by using solid tan text weight paper and simply stamping the same monogram on it that we used on our tag. Trace the envelope liner template on your paper, cut it out, stamp it (we used our Antique Monogram stamp) and use double sided tape or stick glue to affix it to your envelope. It’s that simple!

DIY Tutorial: Savannah-Inspired Wedding Invitations by Antiquaria via Oh So Beautiful Paper

Step Seven: Now all that’s left is the finishing touches! We tied the suite together with tailors ribbon, addressed the envelope with opaque white ink and affixed our postage (we love these new vintage inspired seed packet stamps). Now they’re ready to send on their way!

DIY Tutorial: Savannah-Inspired Wedding Invitations by Antiquaria via Oh So Beautiful Paper

Materials

Savannah Letterpress Invitation on Pearl White with Kraft Envelopes, colors: Warm Grey & Nude

Calligraphy Accent Reply Postcard

Antique Monogram Stamp

Wildflowers Return Address Stamp

Magnolia Branch Patterned Paper in Cover weight

Text Weight Liner Paper

Envelope Liner Templates

Stamp Pads in Antique Pewter and Frost White

Ribbon

Embossing Powder

Heat Embossing Tool

1/8″ Hole Punch

Kraft Hole Reinforcements

Self healing mat, Ruler, Craft Knife, Pencil & Scissors

Postage Stamps

Anti­quaria is a mem­ber of the Designer Rolodex – you can see more of their beau­ti­ful work right here or visit the real wedding invitations gallery for more wedding invitation ideas!

Photo Credits: Antiquaria

DIY Tutorial: Hot Air Balloon Birth Announcement

Within the past few months, we’ve had babies on the brain. We’ve had numerous requests lately from crafty moms-to-be wanting chic, custom stamps so that they can make their own birth announcements for their new bundles of joy. This balloon announcement design is sweet, feminine and the perfect way to share the birth of a beautiful little girl with family and friends. – Bailey and Emma of Antiquaria

DIY Tutorial: Chic Rubber Stamp Baby Announcements by Antiquaria via Oh So Beautiful Paper (1)

Combining different pink hues (bright peony pink with the more traditional ballet pink) makes the design a bit more modern. And best of all…it’s super simple!

DIY Tutorial: Chic Rubber Stamp Baby Announcements by Antiquaria via Oh So Beautiful Paper (4)

Step One:  Lay an A2 card (4 1/4″x5 1/2″) card down on a firm surface. Ink your stamp (we used our “Hot Air Balloon” Birth Announcement Stamp) thoroughly and center it over your card. Once it is positioned correctly, press down to make a print. Use both hands to ensure even pressure. Lift off and let the print dry. For more information on this process go here.

DIY Tutorial: Chic Rubber Stamp Baby Announcements by Antiquaria via Oh So Beautiful Paper (3)

Step Two: Using the same technique as in Step One, print your return address (we used our Calligraphy Custom Return Address Stamp) on the back flap of an A2 envelope. To jazz up the back of the envelope, we used some adorable pink & gold washi tape!

DIY Tutorial: Chic Rubber Stamp Baby Announcements by Antiquaria via Oh So Beautiful Paper (2)

Step Three: Now all that’s left to do is to address the envelopes, add postage (we used vintage postage from Verde Studio) and send them on their way!

A quick tip for expecting parents: Since you will have your hands full once the baby is born, it is smart to stamp and address the envelopes before the big day arrives. This way, all you will have to do is stamp the announcement (you will need all the baby’s info for this piece), stuff and mail the envelopes, leaving more time to enjoy your new little one!

Materials List:

“Hot Air Balloon” Birth Announcement Stamp

Calligraphy Custom Return Address Stamp

A2 Card in Luxe White

A2 Envelope in Luxe Blush

Stamp Pad Peony

Washi Tape

Verde Studio Vintage Postage

Photo Credits: Antiquaria

DIY Tutorial: Neon + Kraft Paper Wedding Invitations

Neon is back in a big way. It’s been trending in fashion and home decor for a while now, so it’s fun to see the bright hues make a splash in the stationery world too! A while back, we shared a neon and kraft paper save the date design with you and today, we’re following up with a coordinating invitation suite! – Bailey and Emma of Antiquaria

DIY Tutorial: Neon and Kraft Paper Wedding Invitations by Antiquaria via Oh So Beautiful Paper

Step One: To achieve the vibrant neon effect for this suite, we utilize the embossing technique. This process creates a raised and opaque print that emulates the thermography printing you’d find in a traditional print shop. Place your A7 card on a stable and firm surface. Ink your invitation stamp (we used our Mod Invitation stamp) and center the stamp over your card. When ready, press the stamp down with moderate pressure to make the print. Lift the stamp off and quickly move on to adding your embossing powder.

DIY Tutorial: Neon and Kraft Paper Wedding Invitations by Antiquaria via Oh So Beautiful Paper

Once you’ve made your print, immediately cover it with embossing powder by sprinkling it across the paper. Shift the powder around until you have covered the entire image. Now, you will pour the excess powder off of the card onto a scrap piece of paper so that you can reuse it for future prints. Heat set the print, using an Embossing Heat Tool. You will be able to see the powder melt into an opaque and solid color when it’s done. For more information about how to emboss using stamps, please watch this instructional video.

Note: One key thing about embossing is that it is wise to try to closely match your ink color with your powder color. By doing this, you will get much more crisp and opaque results.

DIY Tutorial: Neon and Kraft Paper Wedding Invitations by Antiquaria via Oh So Beautiful Paper

Step Two: Using the same technique as step one, you will print and emboss your reply card. We used our Mod Reply Card stamp on a 4Bar card for this piece.

DIY Tutorial: Neon and Kraft Paper Wedding Invitations by Antiquaria via Oh So Beautiful Paper

Step Three: A really great way to add luxurious thickness and a pop of color to your invitation is to add a card stock backer to the invitation print. Adding a backer to the invitation also helps to flatten out any warping/curling that sometimes happens from the heat tool. To do this, simply cut the colored paper to your desired size (ours was 5.25″x7.25″) and use double sided tape to affix the two piece together. *We like to put tape all along the outer rim as well as an “X” across the middle to make sure that there is a good bond.

DIY Tutorial: Neon and Kraft Paper Wedding Invitations by Antiquaria via Oh So Beautiful Paper

Step Four: By now, you all probably know that we love envelope liners! For this suite we used the same neon paper (except in text weight this time) to cut a liner for our kraft envelope. Simply trace the template on your paper, cut it out and use double sided tape or stick glue to affix it to your envelope.

DIY Tutorial: Neon and Kraft Paper Wedding Invitations by Antiquaria via Oh So Beautiful Paper

Step Five: For a little added flavor, we stamped our Cross my Hearts Initial Monogram stamp in black ink on the inside flap of the liner. It’s a fun surprise for your guests when they first open your invitations!

DIY Tutorial: Neon and Kraft Paper Wedding Invitations by Antiquaria via Oh So Beautiful Paper

Step Six: For the reply card envelope, we kept things pretty simple and printed a matching address stamp (we used our Mod Banner Return Address Stamp) in black in on a 4bar kraft paper envelope. We also used the same monogram on the back flap that we used on the liner paper to carry the theme through the suite. We also used the same address stamp in black for the back flap of the A7.5 outer envelope, (not shown). For more detailed information on how to (properly) ink and print stamps, please watch this instructional video.

DIY Tutorial: Neon and Kraft Paper Wedding Invitations by Antiquaria via Oh So Beautiful Paper

Step Seven: Once you’ve crated all of your pieces, it’s time to address the invitations, add postage (we used vintage postage from Verde Studio) and send them on their way! We guarantee that your guests will be very impressed by all of your handiwork and pumped to celebrate with your on your big day!

Materials:

“Mod” Invitation Stamp “Mod” Reply Card Stamp “Mod Banner” Return Address Stamp “Cross my Heart” Monogram Stamp

A7 Cards in Luxe White

A7.5 Envelopes (Outer Envelopes) in Paper Bag

4Bar Card 4Bar Envelope in Paper Bag

Stamp Pad in Picante Red

Stamp Pad-Wicked Black

Embossing Powder Embossing Heat Tool

Card Stock Backer Cut to 5.25 x 7.25, in Rocket Red from Astro Brights

Liner Paper 8.5″x11″ text sheets, in Rocket Red from Astro Brights

Envelope Liner Templates

Pencil

Scissors

Double Sided Tape

Vintage Postage (from Verde Studio)

Anti­quaria is a mem­ber of the Designer Rolodex – you can see more of their beau­ti­ful work right here or visit the real wedding invitations gallery for more wedding invitation ideas!

Photo Credits: Antiquaria