When we first created our baby registry last year, I really only focused on items that I thought we would need to get through the newborn phase. I didn’t even think about some of the things that Sophie would need after passing the three month mark! We were also living in a small apartment at the time, so we intentionally kept our registry to just what we thought was the most basic list of essentials. Now that Sophie is a year old, I thought it would be helpful to look back at the things that we did (and didn’t) need for that first year.
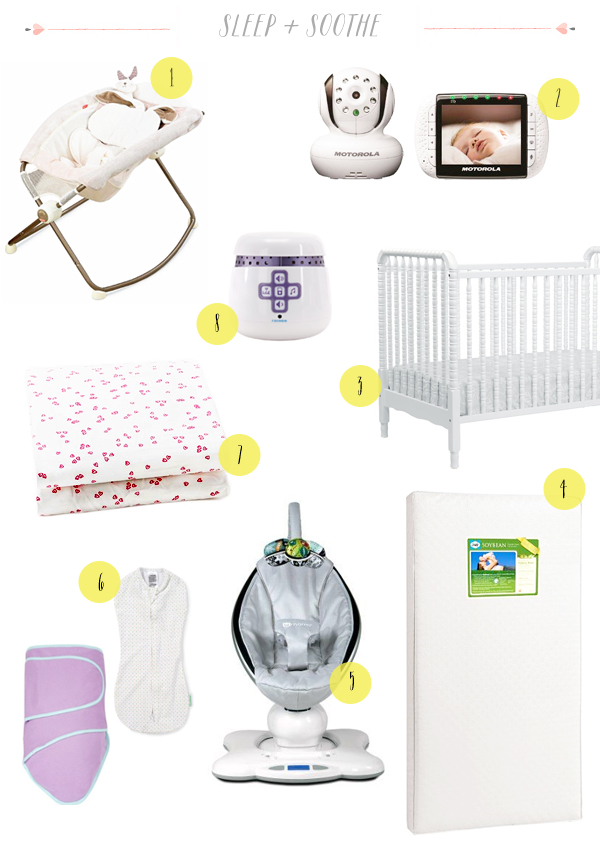
1. Rock n’ Play; 2. Motorola wireless infant video monitor; 3. Jenny Lind crib; 4. Sealy soy foam mattress; 5. 4moms MamaRoo swing; 6. Miracle Blanket + Summer Infant SwaddlePod; 7. Auggie crib sheets; 8. Graco sound machine
Bassinet + Crib: We started with a separate moses basket, but once we discovered the rock n’ play Sophie slept in that until we transitioned her to the crib. I love the sweet vintage style of our Jenny Lind crib, and like most cribs it can be converted to a toddler bed.
Monitor + Noise Machine: The video monitor and sound machine are two of our absolute essential baby items. We registered for the video monitor based on Joy’s registry list and love it. When Sophie was a newborn we used the extreme rain setting on this iphone app, which seemed to help calm her down faster and soothe her to sleep, but now that she’s a bit older the waves setting on the Graco sound machine is just perfect.
Swings: We received this Fisher Price hand-me-down swing from my sister-in-law and absolutely loved it, even though it takes up quite a bit of space. However, the swing has been through my sister-in-law’s 3 kids and now Sophie, so it’s pretty much on its last legs. I’ve heard good things about the MamaRoo from 4moms and may go that route for our next baby.
Swaddle: We swaddled Sophie at night until she was nearly six months old. Most fellow moms rave about the Aden + Anais swaddle wraps, but it was just too much fabric for our tiny baby and she would always break free. My favorite combination was a Miracle Blanket swaddle underneath a zip-up swaddle. Totally breakout-proof! I recommend registering for three of each: one to use, one to have in the closet, and another in the wash.
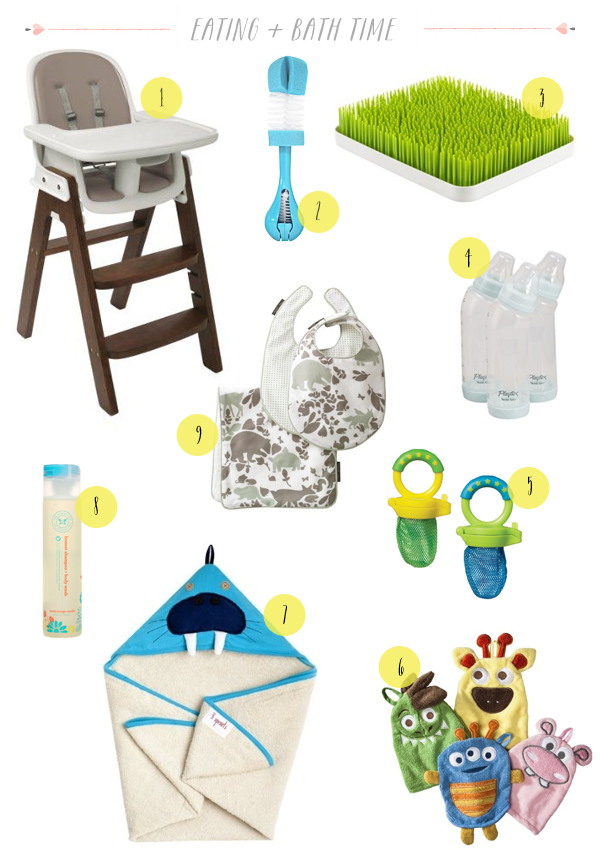
1. OXO high chair; 2. The First Years bottle brush; 3. Boon lawn drying rack; 4. VentAire bottles; 5. Munchkin mesh feeders; 6. Circo bath mitts; 7. 3 Sprouts towel; 8. Honest shampoo; 9. Dwell Studio bibs
High Chair: I never even thought to register for a high chair, but we ended up needing one when Sophie started solids around the six-month mark. Of course I wanted something well-designed, but also something that could be cleaned up with a simple wipe down (no fabric covers or anything that might require laundering). I’m a big fan of this OXO high chair.
Bottles + Cleaning: Everyone seems to have a different favorite bottle, and we ended up trying a few varieties before settling on these. We added the Boon drying rack after moving to our new house (where we have a bit more counter space). We could probably do without a separate drying rack, but it’s handy for keeping track of small bottle parts.
Bibs: We mostly used bibs when Sophie was a newborn, and then again a bit later when she was drooling up a storm while cutting her first tooth. We were gifted a set of these Dwell bibs, and I love how soft and absorbent they are!
What we don’t have or use: We don’t have a separate bottle warmer or sterilizer and have gotten by just fine without them. We did receive an infant tub, but Sophie didn’t particularly care for it and we found it kind of awkward to use, so we ended up just bringing her into the bath or shower with us. Now that she’s older she sits in the big tub (with a bath mat to keep her from slipping too much). Sophie’s favorite bath toys include a toothbrush, these foam bath stickers from Target, and empty shampoo bottles.
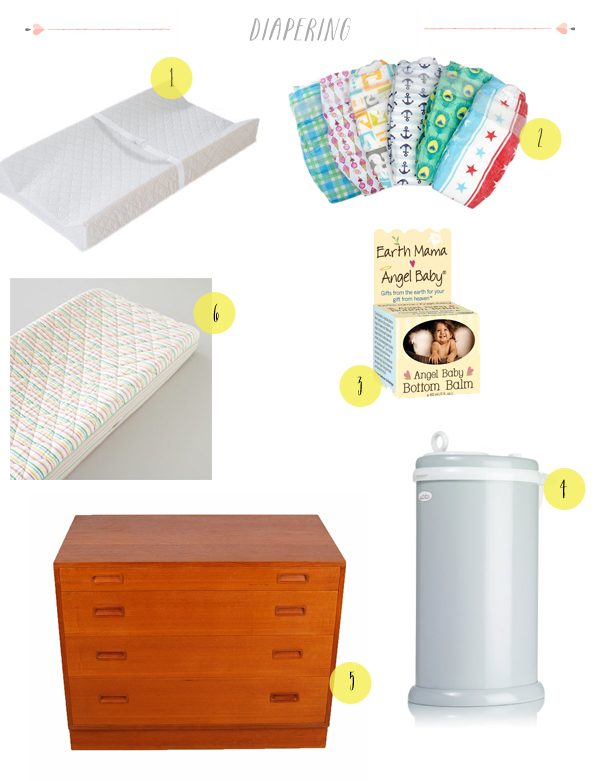
1. Summer infant changing pad; 2. Honest diapers; 3. Earth Mama Angel Baby bottom balm; 4. Ubbi diaper pail; 5. vintage dresser; 6. Land of Nod changing pad cover
Changing Table + Diaper Pail: Because space is limited in Sophie’s nursery, we used a vintage dresser that my parents bought for me when I was a baby – similar to this one from Ruby Lane – in lieu of a separate changing table. The first drawer holds diaper supplies and smaller accessories like socks and tights, while the other three drawers hold clothing and pjs. I like the Ubbi diaper pail because it takes regular trash bags.
Diapers + Ointment: We use Honest diapers during the day and Pampers Baby Dry diapers for overnight. Sophie has never had a big issue with diaper rash, so we use this all-natural ointment and it works great for us!
What we don’t have or use: a wipes warmer or a separate tray to hold the changing pad. The changing pad simply sits on top of the dresser and attaches via a strap screwed into the back of the dresser.
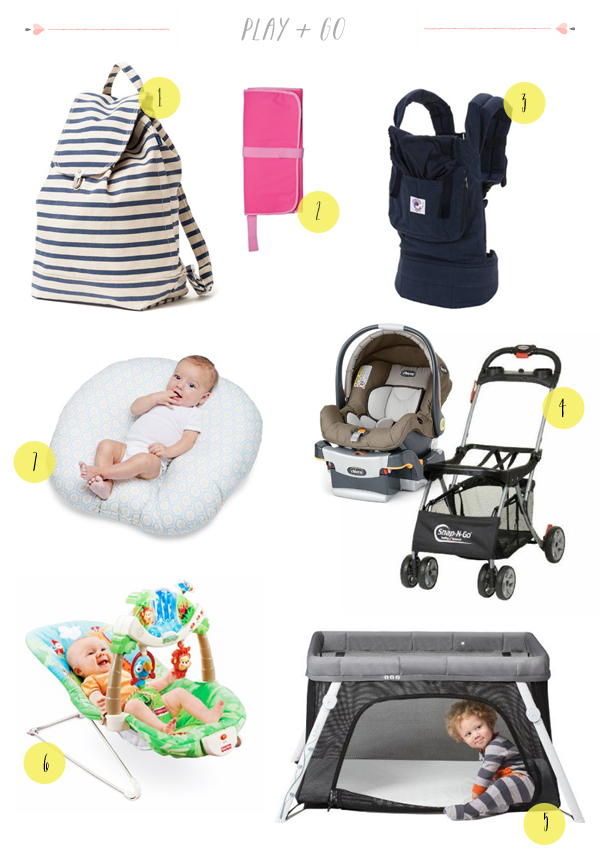
1. Baggu backpack; 2. Green Sprouts travel changing pad; 3. Ergobaby carrier; 4. Snap n’ Go; 5. Lotus travel crib; 6. Fisher Price activity chair; 7. Boppy newborn lounger
Diaper Bag: I invested in a not-too-frilly Kate Spade diaper bag, which I love for its multiple pockets and included changing pad but is sadly no longer in production. But when I’m out and about with Sophie, particularly if I’m carrying her or wearing her in the Ergo, I often switch over to my Baggu backpack. I also really love this diaper bag from Ikabags; just make sure you have a separate travel changing pad to take along for outings.
Baby Carrier: We love, love, love our Ergo! We take Sophie everywhere in the Ergo, and when she was a newborn she would snuggle down into the infant insert and go to sleep almost instantly. We also have a sling and moby wrap, but we haven’t used the sling much since Sophie turned 3 months old and I never figured out how to properly tie the moby wrap. I can’t recommend the Ergo highly enough.
Stroller + Car Seat: I’m actually still searching for our perfect stroller, so I’ll update this section if or when I find one. We received an infant car seat from my sister-in-law, so we purchased an inexpensive Snap n’ Go frame that we use whenever we need a stroller. Now that Sophie is almost at the 20 lb mark, we’re preparing to transition from an infant car seat to a convertible car seat. We’ve settled on the Britax Roundabout after reading reviews and talking with friends and family.
Travel Crib: Another omission from the registry list! I like this Lotus travel crib because it folds up into a carry-on size backpack, which is great for airplane trips.
Activity Chairs + Loungers: We received this activity chair from my sister-in-law, and while it’s not something I probably would have chosen to buy on my own, Sophie LOVED it! It kept her entertained for extended periods of time from about 8 weeks old until she started backwards-crawling around 8 months. We also used a Bumbo seat pretty regularly until Sophie started sitting on her own at 9 months. Finally, we also received a hand-me-down Boppy (the regular kind), and while we ended up using it primarily as a newborn lounger it was a pretty important part of Sophie’s first few months.
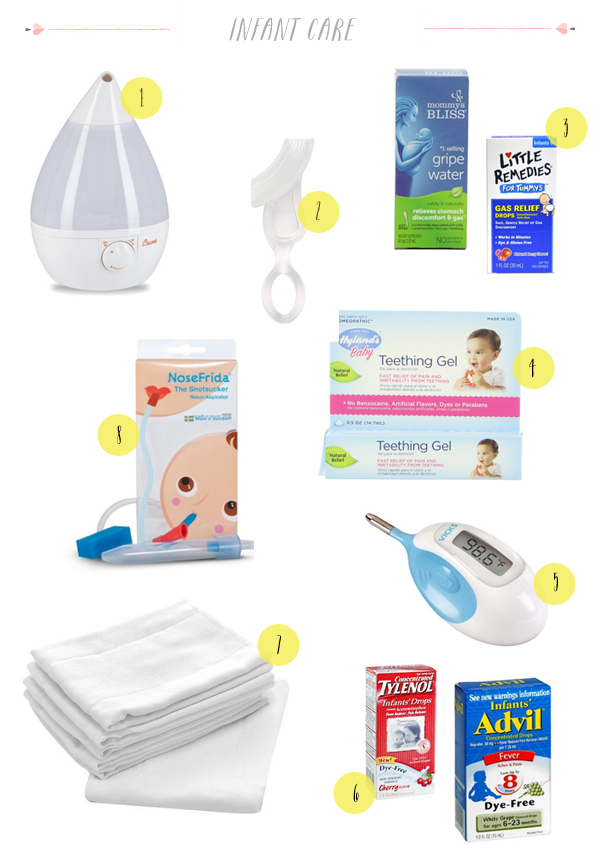
1. Crane humidifier; 2. Baby toothbrush; 3. Gripe water + gas drops; 4. Hyland’s teething gel; 5. Infant thermometer; 6. Infant pain relief; 7. Gerber pre-folds; 8. NoseFrida
Gas + Pain Relief: Sophie never had colic, but like all babies she experienced some gas and tummy issues when she was around 2-3 months. Once I found out about gripe water, we started adding it to her bottles and her symptoms definitely improved. I wish I’d known about it sooner! When we need to use a pain reliever, we alternate between infant Tylenol and Advil depending on the situation, since Advil is an NSAID that can irritate the stomach.
Snot: Sophie caught her first cold just before she turned 7 months old, and the NoseFrida was the only thing that got us through those 10 days. It sounds awful, but it absolutely works. The humidifier also helps Sophie from getting congested during our dry winter months.
Misc: Gerber pre-folds are super absorbent and can be used for just about anything, from receiving blankets to cleaning up spills to drying baby bottoms. We inherited a pile from my sister-in-law and still use them regularly. Sophie didn’t really take to any traditional teething toys, but she loves to chew on her baby toothbrush along with our keys, wallets, and other household objects. We’ve been using Hyland’s teething gel regularly since she was around 6 months.
What we don’t have or use: infant nail clippers. I tried some out, but they were just too clumsy and I couldn’t see what I was doing enough to feel confident using them. Some people bite their babies’ nails, some people use cuticle scissors, I just use regular adult nail clippers since I’m most familiar with the feel. We also didn’t bother with a separate infant care or first aid kit, since we already had most of the individual pieces (and most hospitals send you home with a few of those pieces).
* * *
That’s pretty much everything! I relied pretty heavily on the lists from Joy, Erin, and Christine when building my registry, so feel free to check those out for additional recommendations. I’ve also put together a Pinterest board with everything above along with a few alternative recommendations, which you can find right here.
Finally, while most of our registered items are easily available on Amazon or Diapers.com (yay for free shipping!), we chose Babyli.st as our registry so that we could include items from other online shops – it was perfect for us!
