Vibrant Tropical Hawaiian Wedding Invitations

It feels like everyone is going to Hawaii right now! Just last week, a large chunk of my Instagram feed was filled with Hawaiian sunsets, acai smoothie bowls, and oversized sun hats. Until I can make it out to the beach, these vibrant tropical Hawaiian wedding invitations from Jill of Shindig Bespoke will have to feed my wanderlust! The texture created from layering moss, wood veneer, and gold foil printing is so fun! And the playful tropical motif is woven throughout the invitation suite all the way down to the festive mailer and curated vintage stamps. Aloha friends!

Vibrant Tropical Hawaiian Wedding Invitations

From Jill: This extra special invitation was designed for an intimate wedding on the Island of Kauai, Hawaii. From tip to tail, the bride, whose is a florist, encouraged our team to push the creative “envelope” as much as possible and gave us almost no boundaries except for requesting that we make the suite colorful and unique.

Vibrant Tropical Hawaiian Wedding Invitations

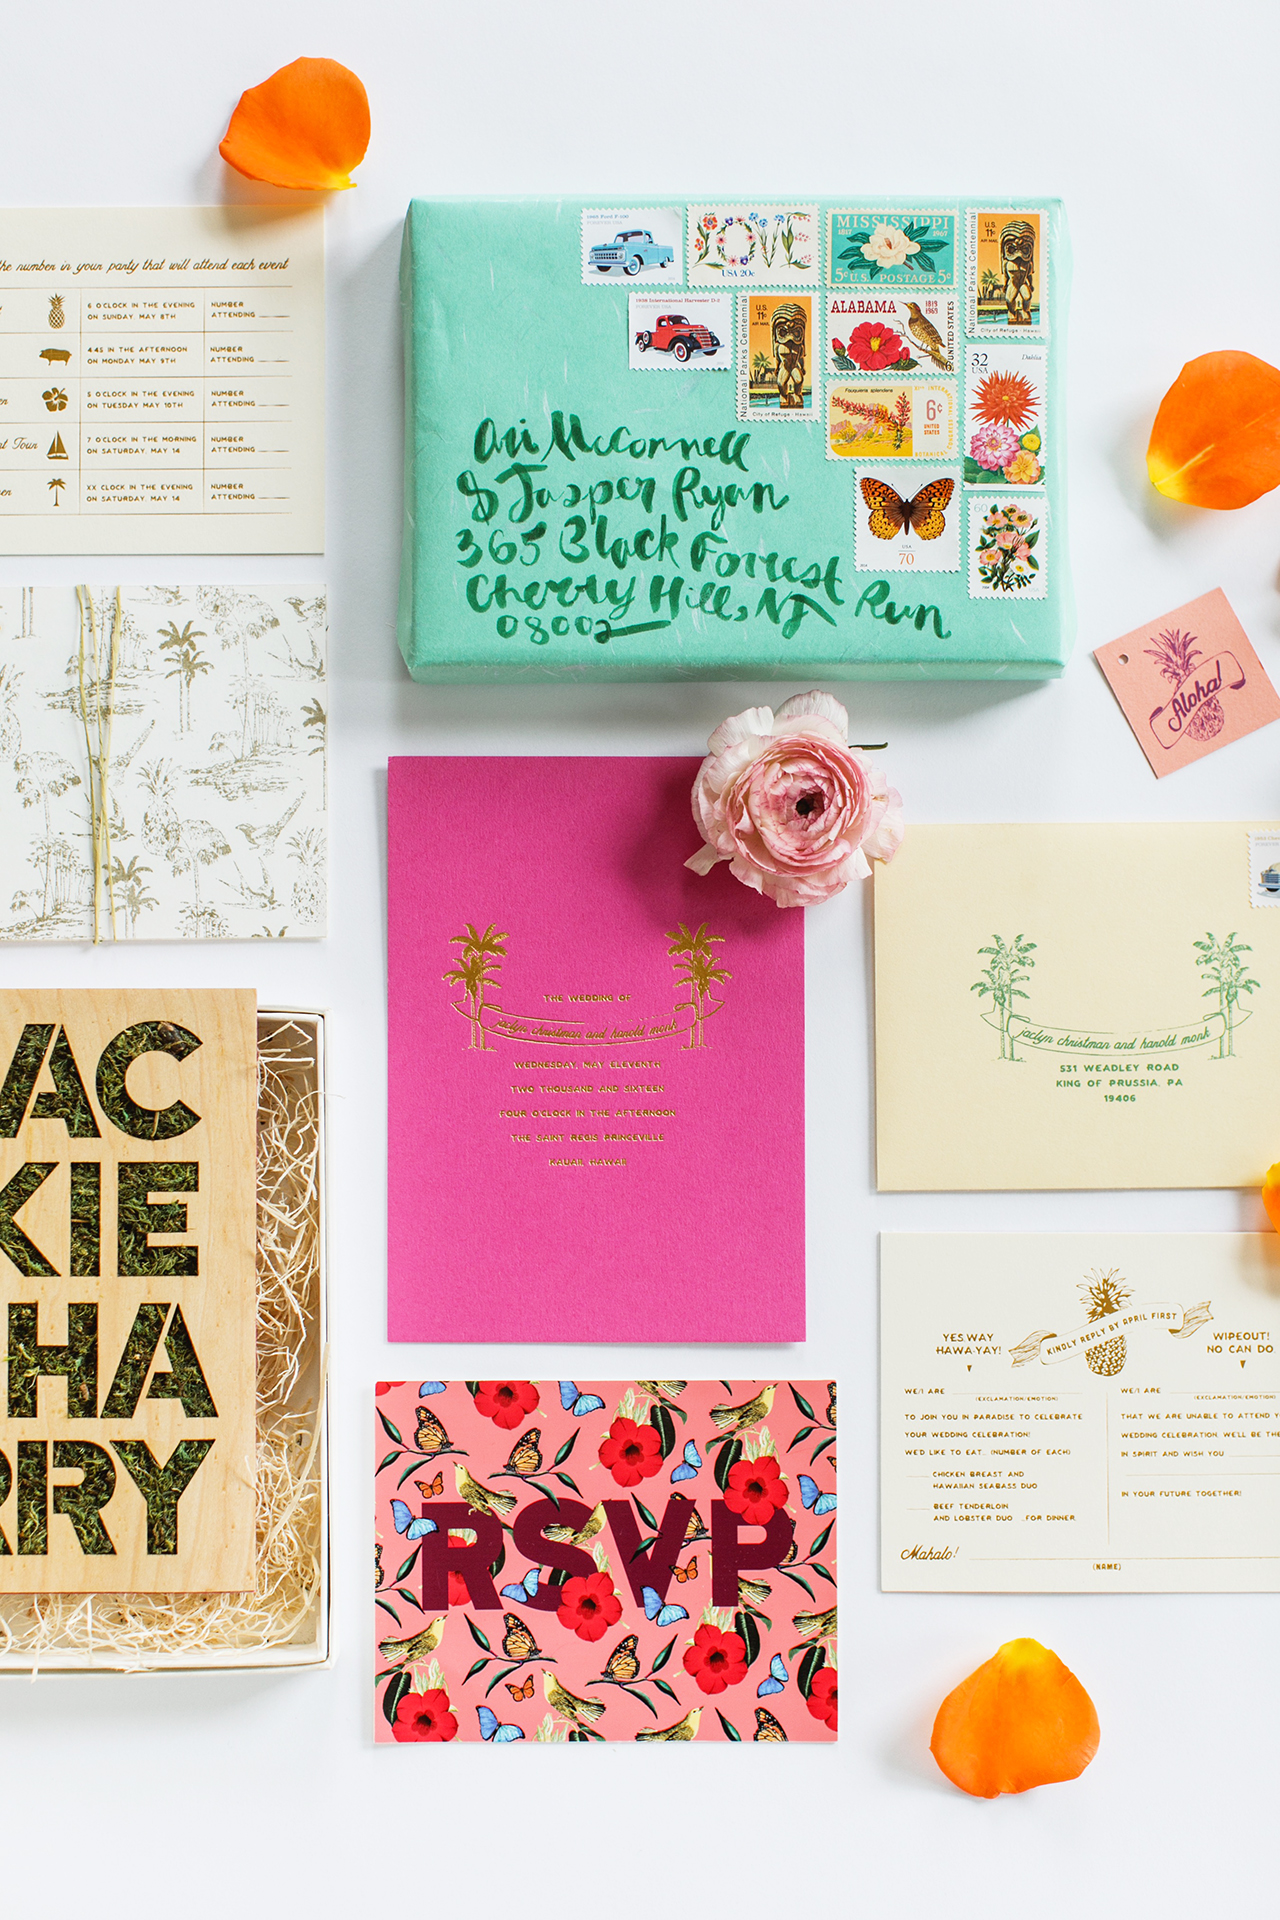
We created a visual theme that spanned a broad arrangement of media, from paper and wood to moss. We also incorporated a variety of color and contrast; mixing patterns and pinks, texture and type. It was so fun to have extensive creative freedom with this design!

Vibrant Tropical Hawaiian Wedding Invitations

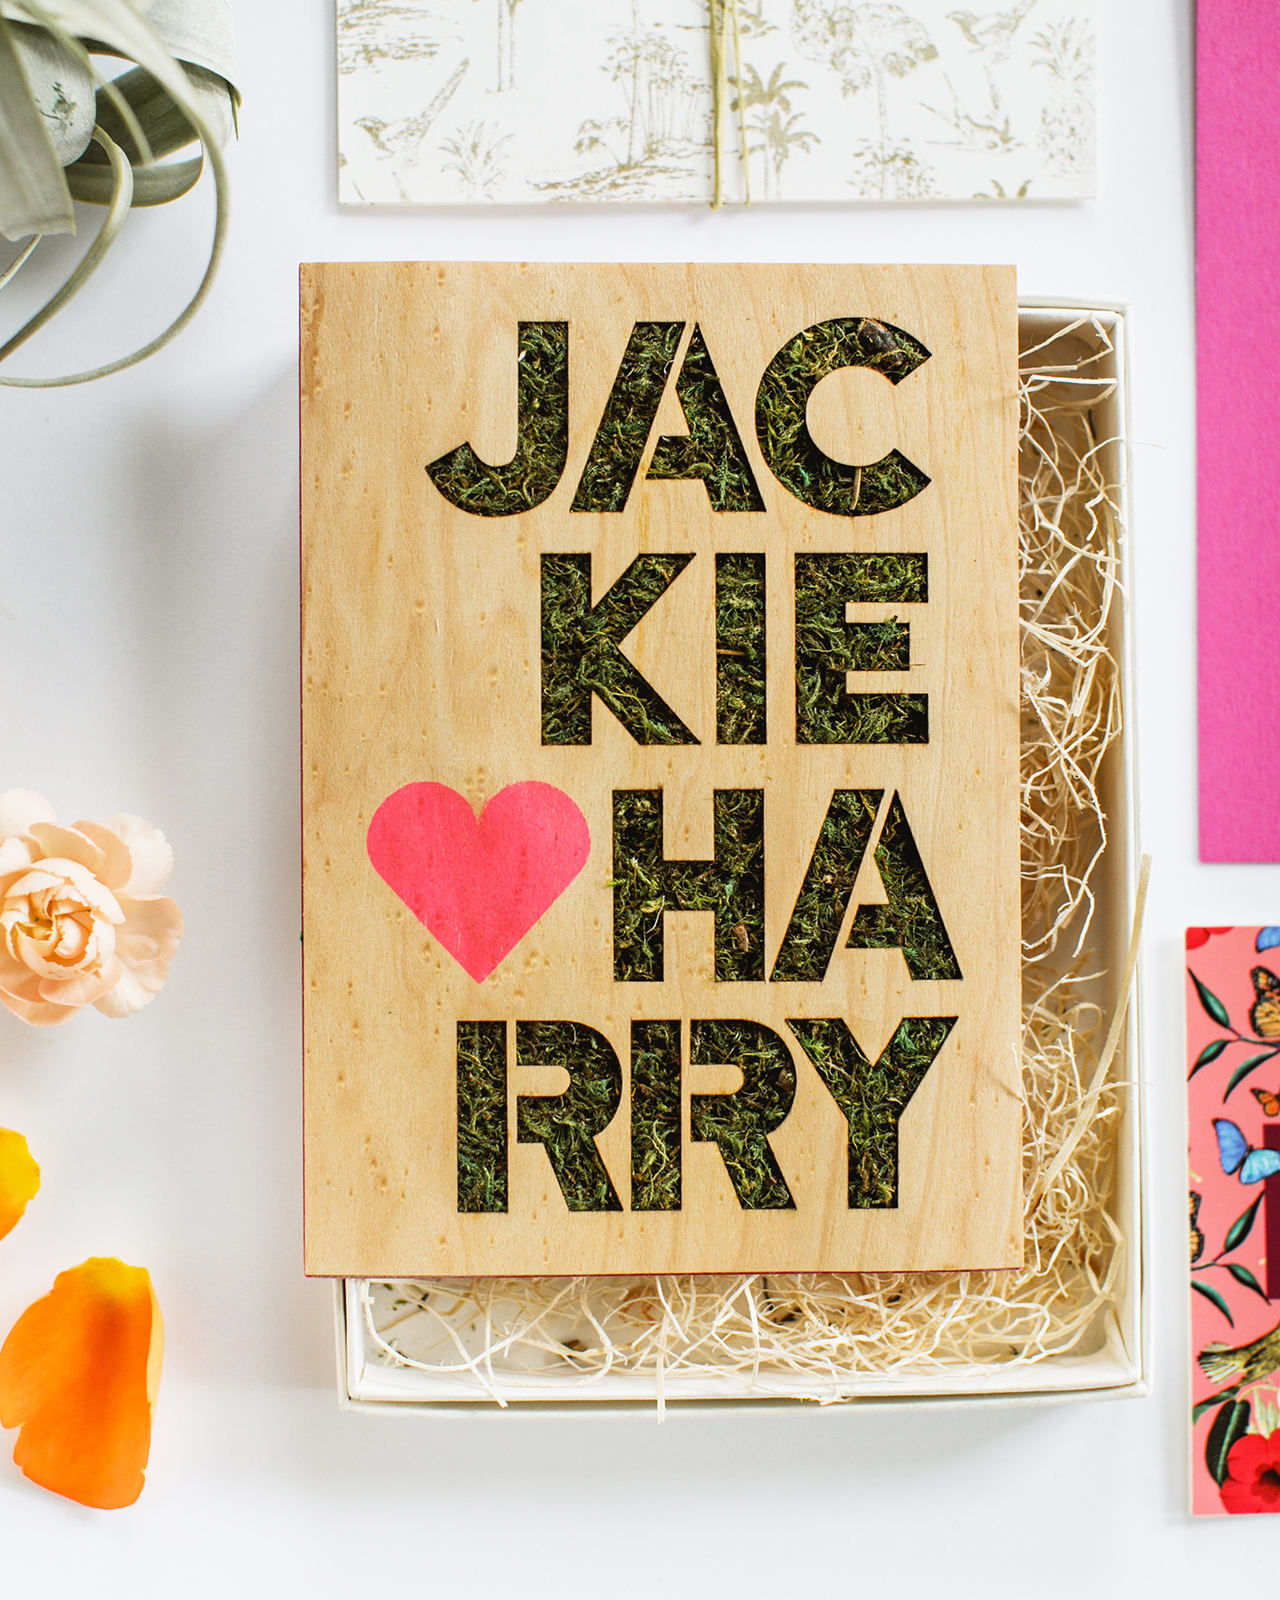
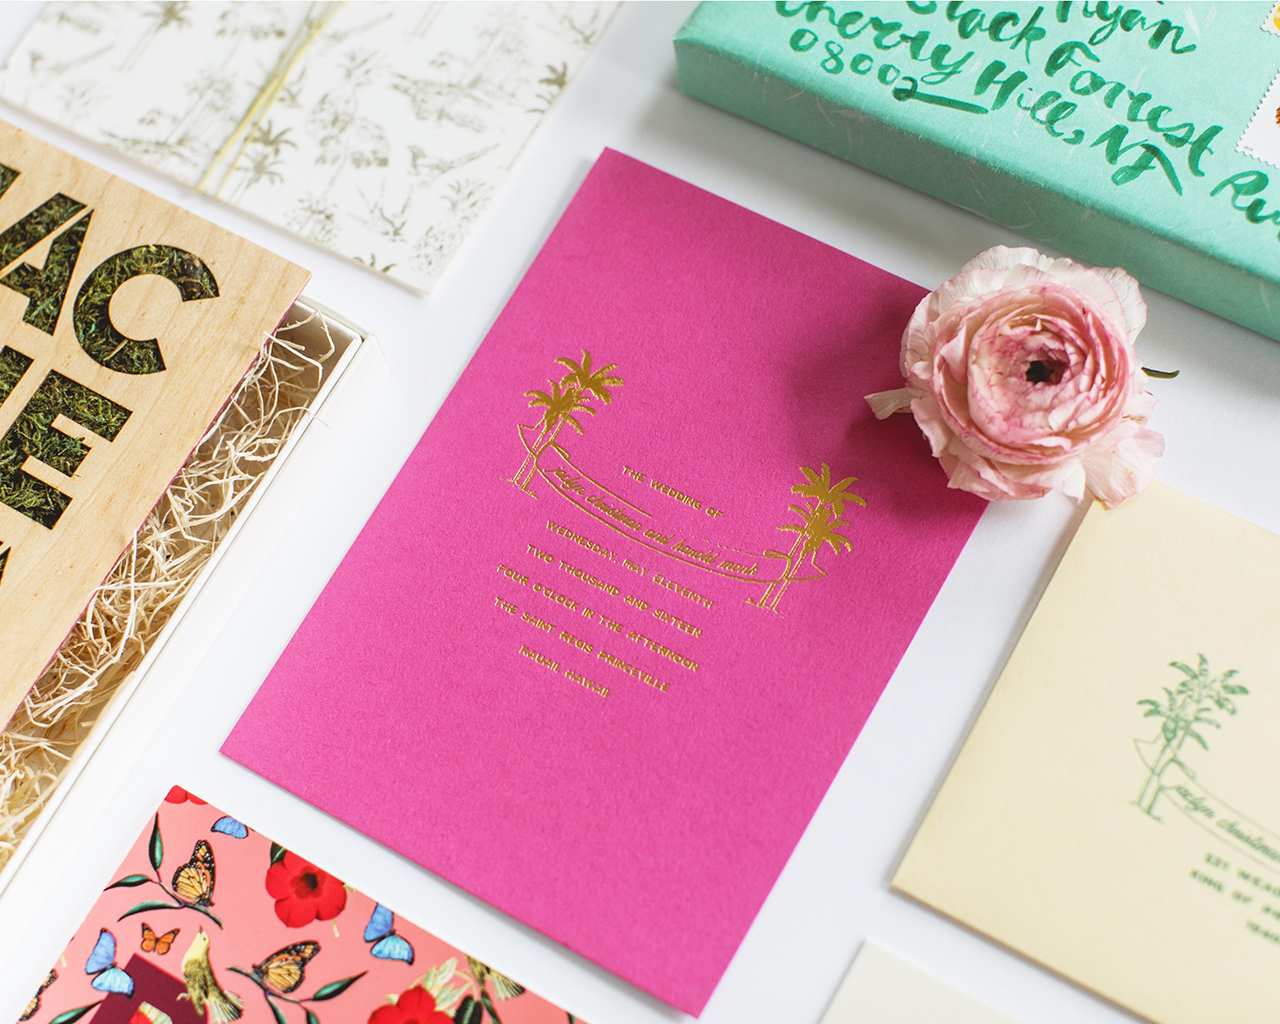
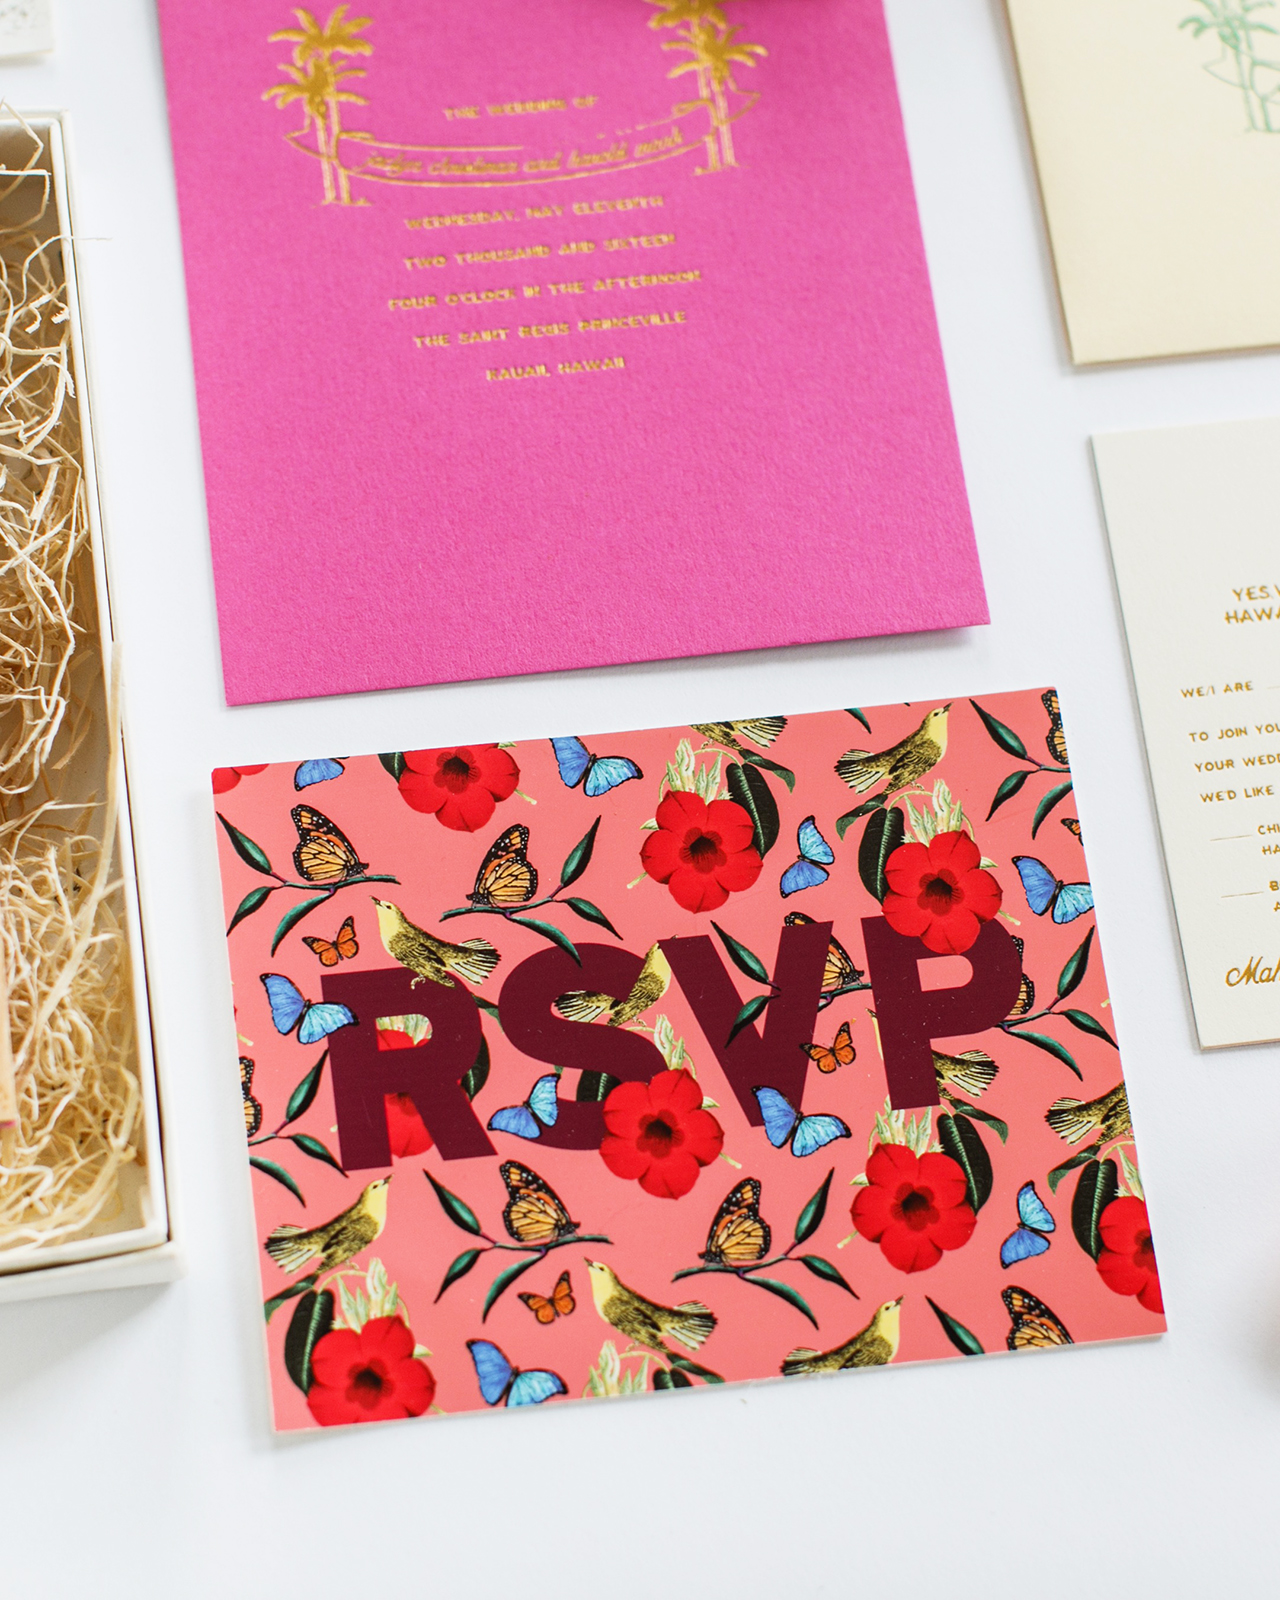
The main card’s back side is the focal point of the suite. A curly maple wood veneer card was laser cut with the couple’s names in a bold and modern type treatment and then inlaid with real moss. A hot pink screen printed heart finishes the pop art installation! On the front, a lightly textured magenta card was foil printed in gold with wedding information framed by vintage palm trees.

Vibrant Tropical Hawaiian Wedding Invitations

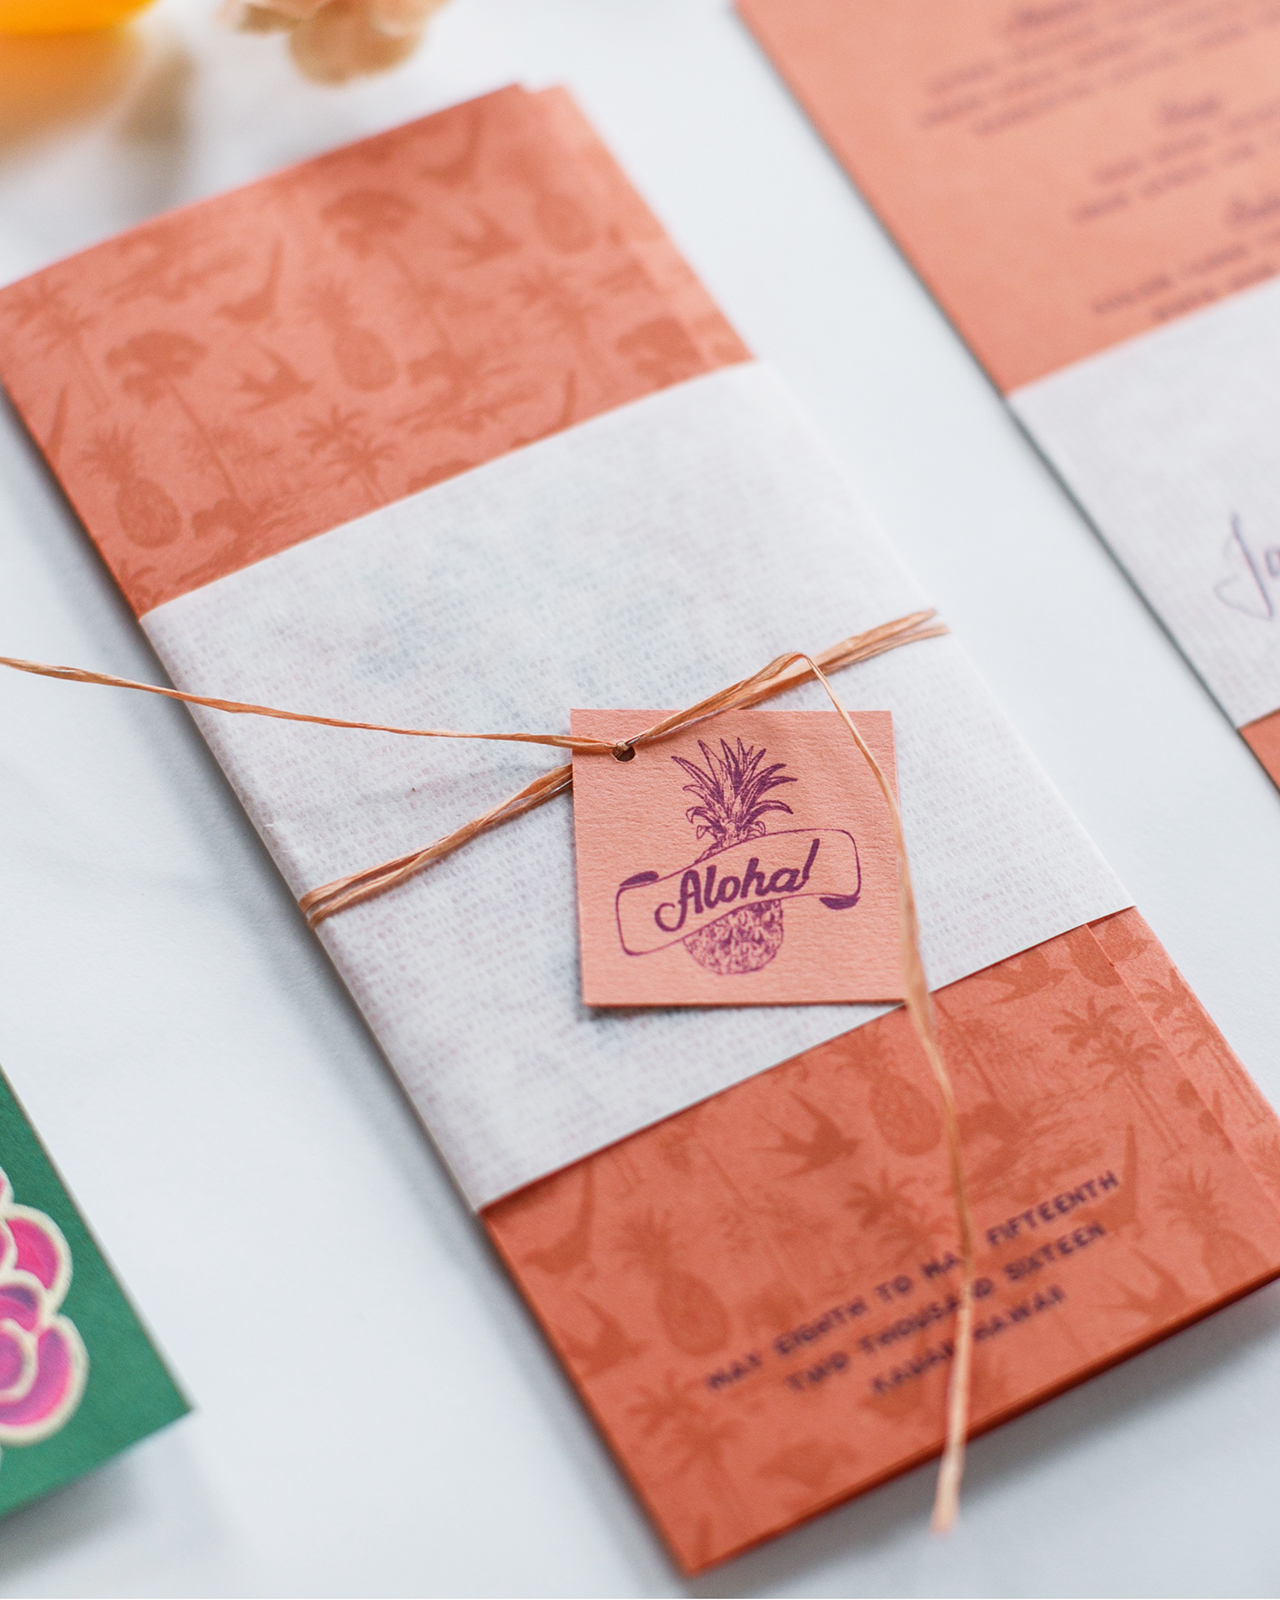
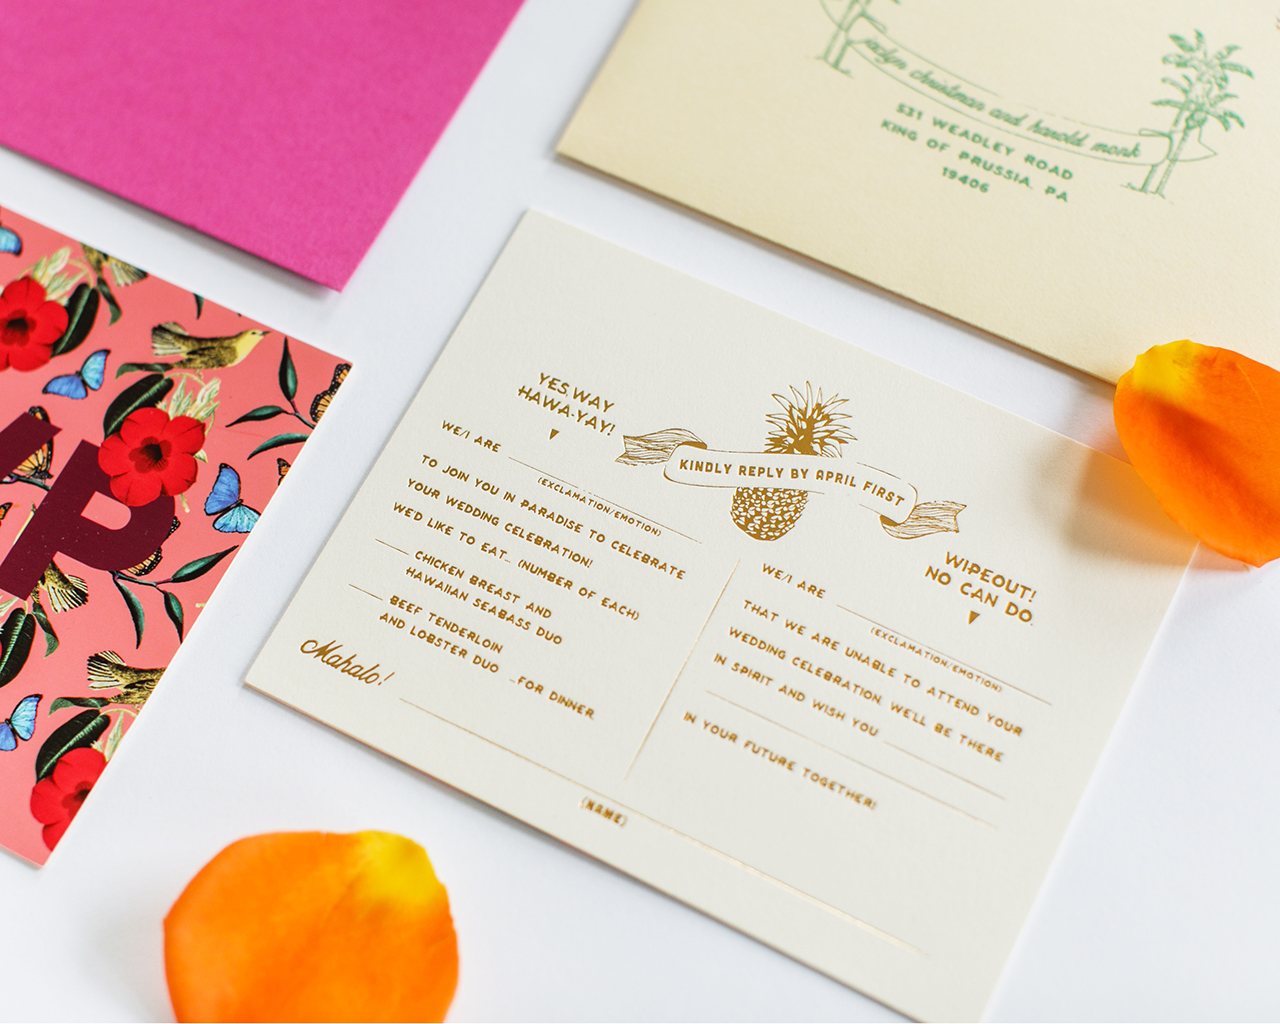
Two patterns were created to back the two foil printed reply cards. One, a subtle vintage toile, the other a bold tropical number inspired by Hawaiian printed shirts, the common thread being tropical imagery. With multiple events spanning a week, one reply card provided a chart where guests could select the activities in which they wanted to participate; from an afternoon sail to a hike along the Na Pali Coast. The main reply card, with playful language supporting the Hawaiian destination, provided guests a fun question and answer format.

Vibrant Tropical Hawaiian Wedding Invitations

Vibrant Tropical Hawaiian Wedding Invitations

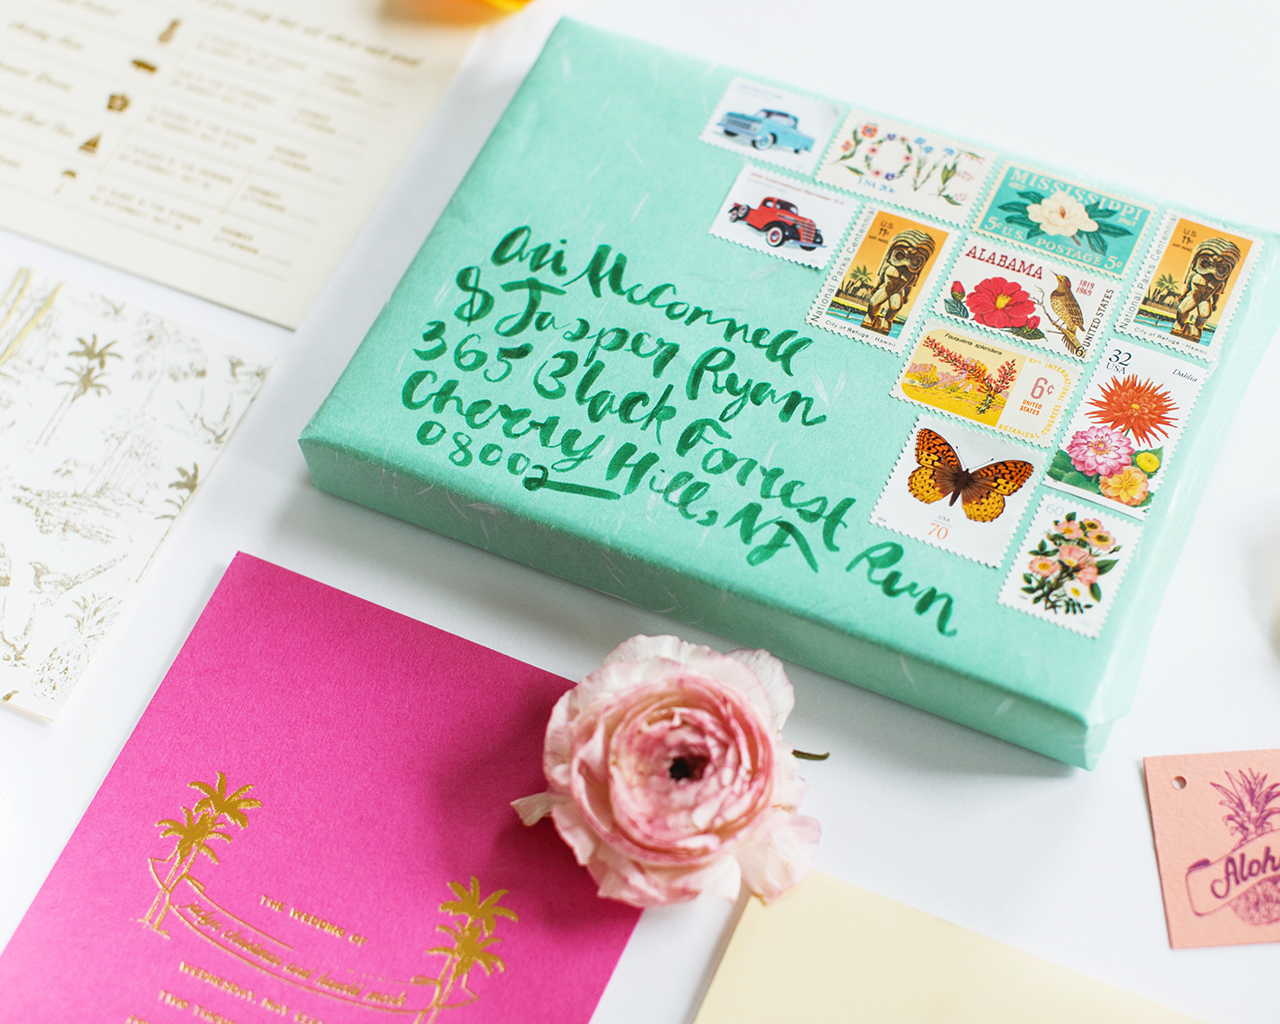
The entire suite was tied with a light green paper yarn and popped in a mailing box cushioned with straw excelsior.

Vibrant Tropical Hawaiian Wedding Invitations

For the save the date, a custom wood mailer was backed with grass paper. Inside, a save the date card with poster style illustration was tied to a telegram style note from Jackie and Harry to their guests.

Vibrant Tropical Hawaiian Wedding Invitations

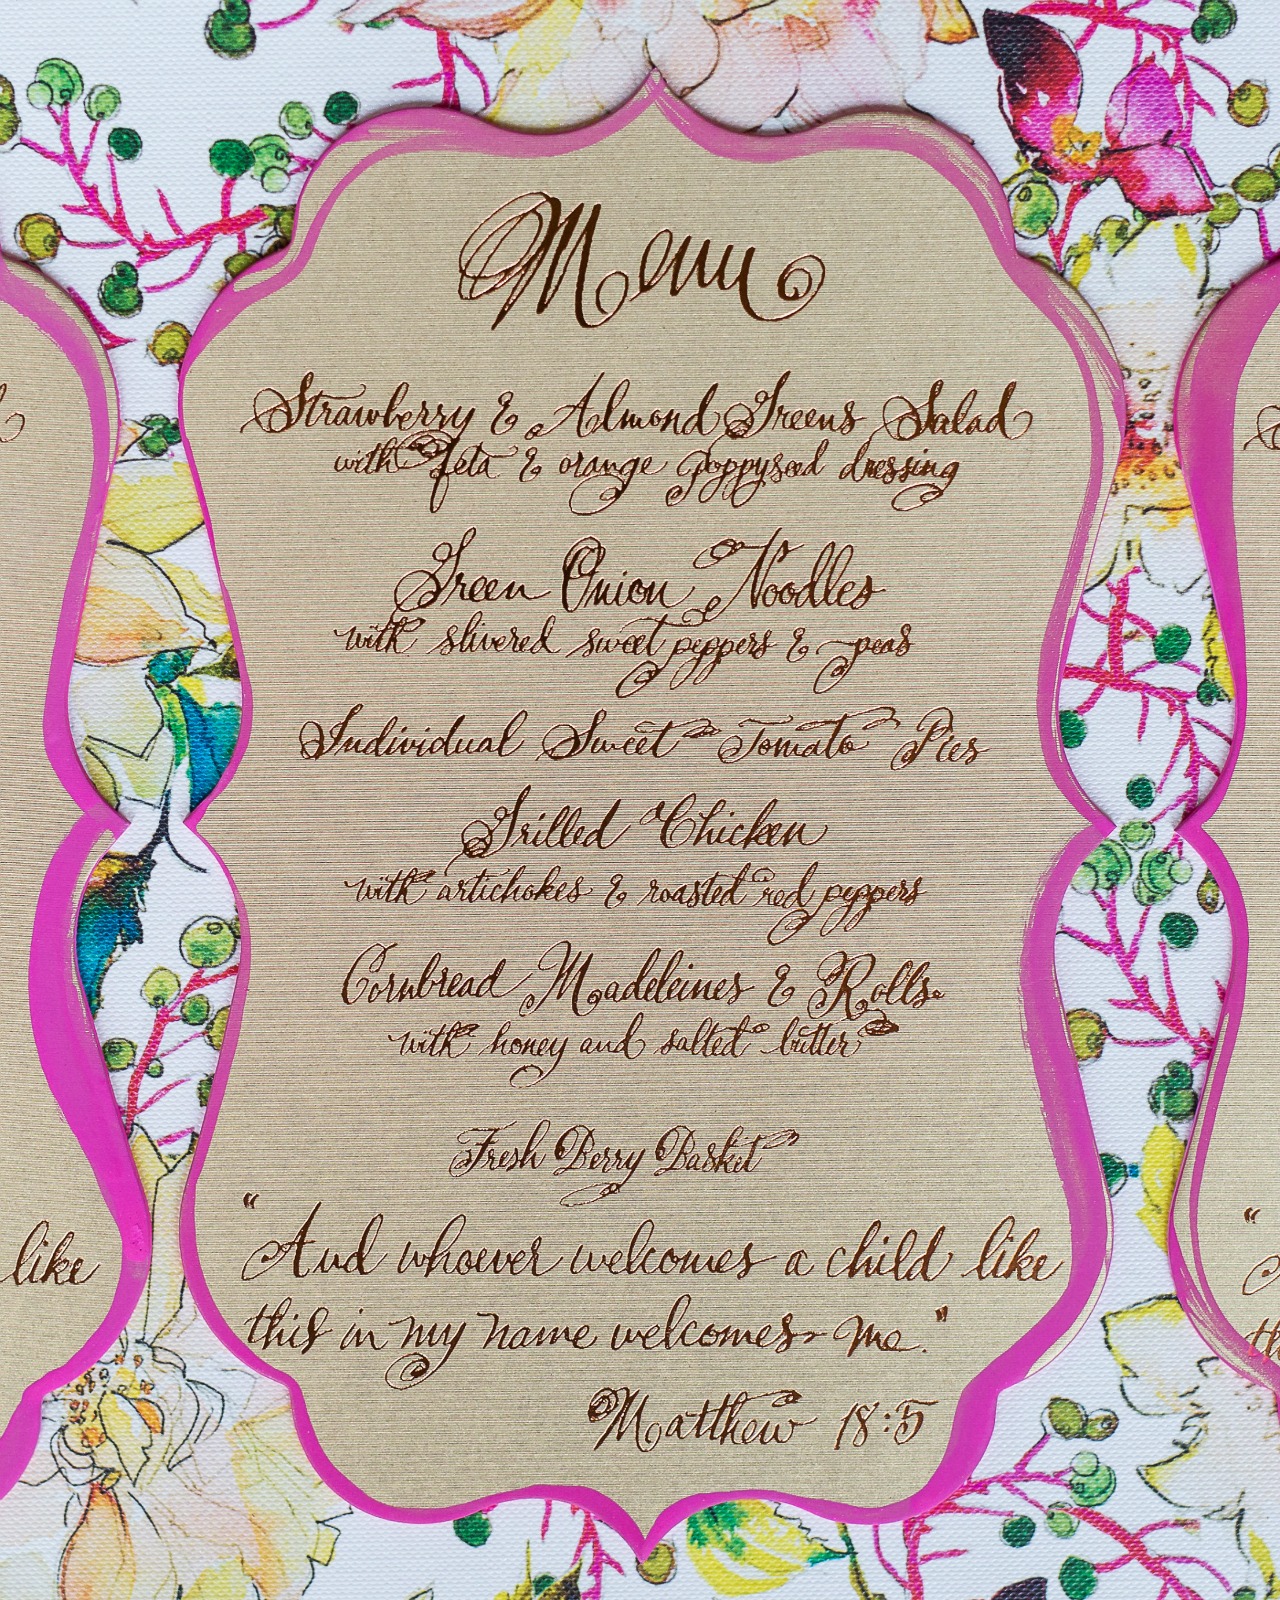
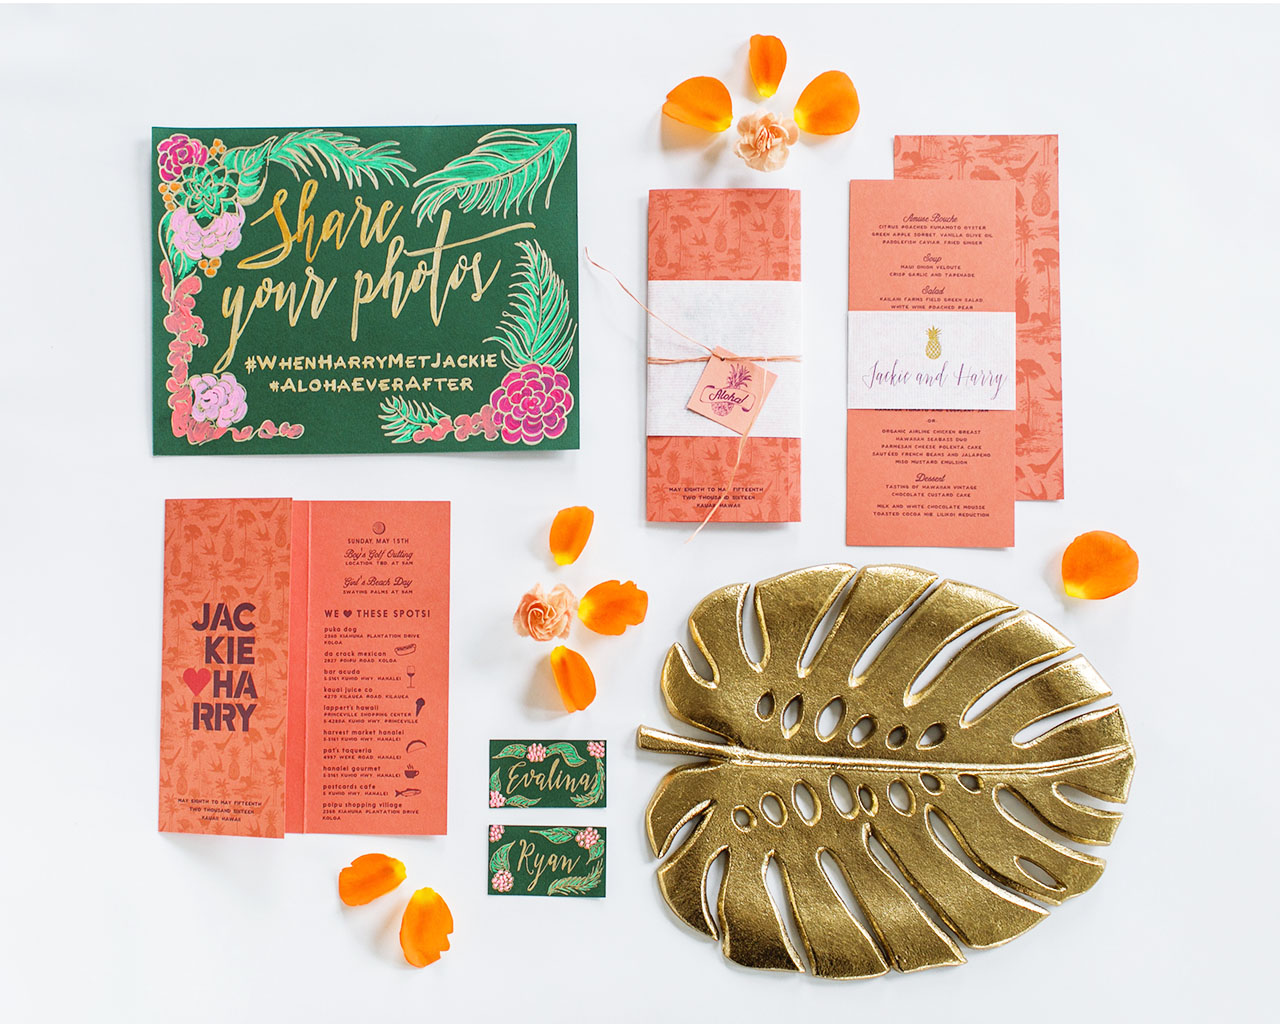
A vibrant collection of collateral pieces were created for the week and day of the wedding. From place cards and signage festooned with hand-painted lush tropical flora, to the dinner menu and itinerary which reused the toile pattern we created for the invitation suite! There truly was a plethora of stationery goodness!

Vibrant Tropical Hawaiian Wedding Invitations

Thanks Jill!

Design: Shindig Bespoke

Photo Styling and florals: Belovely

Printing: Thomas Printers  & Atmosphere Printing Company

Laser: Venture Laser

Planner: Moana Events

Check out the Designer Rolodex for more tal­ented wed­ding invi­ta­tion design­ers and the real invi­ta­tions gallery for more wedding invitation ideas!

Photo Credits: Carina Romano & Love Me Do

Whimsical Floral Adoption Baby Shower Invitations

Baby showers are just the best. They’re both a chance for parents-to-be to celebrate with family and friends and stock up on a few new baby essentials (OMGbabiesneedsomuchstuff). And seriously, there really are so many things that new parents need – including moms and dads becoming parents through adoption. I’m beyond thrilled and honored that the talented Kristy Rice of Momental Designs is sharing her whimsical floral adoption baby shower invitations with us today! The invitations feature Kristy’s signature vibrant hand painted florals, rose gold foil printing, and fabric envelope liners, these festive baby shower invitations – perfect for celebrating Kristy’s newest addition!

Whimsical Floral Adoption Baby Shower Invitations by Momental Designs

From Kristy: These invitations were very special for me as I created them for my own baby shower for my recent adoption. The invitations are loosely based on the paintings of artist, Frida Khalo, and a blooming cactus watercolor painting that I did. They are very whimsical, featuring a variety of different fun elements to help the overall aesthetic come to life!

Whimsical Floral Adoption Baby Shower Invitations by Momental Designs

The highlights of the design for me were the rose gold foil printing, fabric elements, and the individually hand painted components of the invitations. All pieces are hand painted using various techniques like gold spatter, bold aqua watercolor washes, and fuchsia free hand outlines on the menus.

Whimsical Floral Adoption Baby Shower Invitations by Momental Designs

Whimsical Floral Adoption Baby Shower Invitations by Momental Designs

The envelopes were lined with fabric for an added touch! To complement everything inside the envelopes, we featured calligraphy envelope addressing with colorful artwork on front and oversized vintage stamp composition.

Whimsical Floral Adoption Baby Shower Invitations by Momental Designs

Whimsical Floral Adoption Baby Shower Invitations by Momental Designs

Each guest wore paper flower crown, even the babies! Made from handmade, painted papers and greens, each crown had its own personality. Each seating card featured a personal free hand watercolor sketch that I made for guests based on their favorite flowers, favorite pet, favorite collectibles, favorite food, or a nickname. Seating cards were hung on a dip dyed fabric backdrop featuring a calligraphy laser cut wood sign and greenery.

Whimsical Floral Adoption Baby Shower Invitations by Momental Designs

The menus were die cut on shimmering gold stock with a nearly-neon pink painted edge. The edge painting was done a bit differently than usual as it was painted on the face of the menu along with the edge. Each menu was unique depending on how much pressure was applied to the brush during painting.

Whimsical Floral Adoption Baby Shower Invitations by Momental Designs

The vibrant floral aesthetic continued throughout the party with floral watercolor pattern placemats featuring dahlias, mulberries, vines and ranunculus. I had a blast putting together all the elements for this special day and making my vision come to life.

Whimsical Floral Adoption Baby Shower Invitations by Momental Designs

Whimsical Floral Adoption Baby Shower Invitations by Momental Designs

Thanks Kristy!

Design: Momental Designs

Envelope Calligraphy: Designsgirl

Wooden Calligraphy Sign: Laura Hooper Calligraphy

Event Planning: Patchwork Planning

Momental Designs is a member of the Designer Rolodex – you can see more of their beautiful work right here or visit the real invi­ta­tions gallery for more wedding invitation ideas!

Photo Credits: Danielle Coons Photography

Unicorn and Gemstone Inspired Birthday Party Invitations

These unicorn and gemstone inspired birthday party invitations are perfect if you’re in the mood for something magical, festive, and just plain fun! This bright pink invitation suite, complete with the most adorable gemstone envelope liner, was designed by Briana of Flyover Design Co. I imagine that quite a bit of giggling ensued while guests played pin the horn on the unicorn!

Unicorn and Gemstone Inspired Birthday Party Invitations by Flyover Design Co.

From Briana: We designed this unicorn-themed invitation suite for a lucky four-year-old girl’s upcoming birthday party. The client’s main request when contacting us to help with the party was to incorporate hand-drawn unicorns, watercolor washes, and geometric elements while staying in the desired pink color palette.

Unicorn and Gemstone Inspired Birthday Party Invitations by Flyover Design Co.

Our process began with the illustration of the unicorn—we hand-drew a few variations of unicorns for the client to choose from. Once the unicorn design was selected, we started on the main 5×7 invitation. The final invitation includes all of the party details with design elements including: watercolor, hand-lettering, and gold-foil printing. After completing the main invitation, we moved on to the envelope liners to accompany the suite. The liners incorporated the same geometric gemstones from the 5×7 invitation while staying in the pink color palette. From there, we created party favors for the event.

Unicorn and Gemstone Inspired Birthday Party Invitations by Flyover Design Co.

The favors and details we created include laser cut wood unicorns that were wrapped around the invitations and the napkins at the party with gold and white twine. We added holes and ribbon to hang the poster. We also created stickers in six color variations as party favors for guests to take home from the party, along with a 10×20 Pin the Horn on the Unicorn Sign with a hand-drawn unicorn on a 10×20 poster board and cutout horns for the guests. Finally, we printed place cards with the gemstone motif for the number of guests specified, then hand-lettered each card with a black paint pen.

Unicorn and Gemstone Inspired Birthday Party Invitations by Flyover Design Co.

Unicorn and Gemstone Inspired Birthday Party Invitations by Flyover Design Co.

Unicorn and Gemstone Inspired Birthday Party Invitations by Flyover Design Co.

Once finished, the overall suite and favors create a cohesive look for the birthday party. By sticking within the same palette and including the two main elements—the unicorn and gemstones—throughout, it stays consistent and gives off the magical, girly feel that the client was looking for.

Unicorn and Gemstone Inspired Birthday Party Invitations by Flyover Design Co.

Thanks Briana!

Design: Flyover Design Co.

Invitation Printing: Cat Print

Laser Cutting: Ever Laser

Envelope Printing: Cards and Pockets

Sticker Printing: Moo

Photo Credits: Briana Wengert

DIY Paper Flower Advent Calendar

You guys! I’m SO excited to share today’s DIY post! I’ve been wanting to make an advent calendar for years, but I never really found something that felt quite like “me.” Well, along came my favorite Heidi Swapp Minc foil applicator and all of a sudden it just clicked! I shared a couple of DIY projects over the summer involving the Minc, but if you want to create your own DIY projects with the Minc you need access to a laser printer or copier since it works with toner ink. Well, for those of us that might not have regular access to a laser printer or copier, Heidi Swapp offers a few ready made DIY kits – including these amazing 3D flowers! I decided to pair the 3D flowers with some gold hexagon favor boxes from the Oh Happy Day party shop to create a DIY paper flower advent calendar of my dreams!

DIY Paper Flower Advent Calendar / Oh So Beautiful Paper

DIY Paper Flower Advent Calendar / Oh So Beautiful Paper

DIY Paper Flower Advent Calendar / Oh So Beautiful Paper

The Minc has easily become my favorite DIY tool in the last few months. You can find the Minc at Michael’s and craft stores, or pick one up right here. This was my first time experimenting with one of the readymade kits and I’m now completely obsessed with these 3D flowers. They come flat in sheets with pre-printed toner ink, so you just run them through the Minc to apply the foil – then pop them out and assemble the layers into beautiful flowers! I kind of want to do an entire backdrop using these gorgeous metallic flowers! But I’m getting ahead of myself. The holidays are just around the corner: advent calendars first!

DIY Paper Flower Advent Calendar / Oh So Beautiful Paper

DIY Paper Flower Advent Calendar / Oh So Beautiful Paper

DIY Paper Flower Advent Calendar / Oh So Beautiful Paper

To make the DIY paper flower advent calendar:

Step 1. Cut sheets of foil just big enough to fit over each flower sheet. We chose light pink, hot pink, gold, and silver hologram foil, and we were able to fit three sheets of flowers at a time in the Minc folder. Run the flowers through the Minc foil applicator on high heat (at least the “4” setting).

Step 2. Pop the foiled flowers out of each sheet and assemble flowers according to package instructions. You’ll want a total of twenty-five flowers with a nice mix of large, medium, and small flowers for the advent calendar.

Step 3. Print the advent calendar number template on text weight paper and cut out each number. Place a number under each flower, then adhere to the gold hexagon boxes using double-sided tape or removable mounting squares.

Step 4. Fill each box with candy or small trinkets! You can use removable mounting squares to mount the boxes to the wall, or just set them out on a side table to open and enjoy!

DIY Paper Flower Advent Calendar / Oh So Beautiful Paper

DIY Paper Flower Advent Calendar / Oh So Beautiful Paper

DIY Paper Flower Advent Calendar / Oh So Beautiful Paper

DIY Paper Flower Advent Calendar / Oh So Beautiful Paper

DIY Paper Flower Advent Calendar / Oh So Beautiful Paper

DIY Paper Flower Advent Calendar / Oh So Beautiful Paper

I can’t wait to start the advent calendar tradition with Sophie – she already spotted the flowers on my desk and she’s so excited to open all the little boxes! Are any of you planning to do an advent calendar this year?

This post was created in partnership with American Crafts. All content and opinions are my own. Thank you for supporting the sponsors that make Oh So Beautiful Paper possible!

Photos by Nole Garey for Oh So Beautiful Paper

How to Use Vintage Stamps

I love, love, LOVE using vintage postage stamps on envelopes. They add a little something special to everything from wedding invitations to dinner and cocktail party invitations to baby announcements. Vintage stamps offer a wonderful opportunity to represent your personal style, whether chosen thematically or by color palette. And since unused postage never expires, there are endless options to suit every type of occasion – from a formal black tie wedding to a casual backyard gathering. Here are a few of my tips for how to use vintage stamps – plus, I put a collection together with some of my favorite vintage stamps that you can use in your own projects!

How to Use Vintage Stamps / Oh So Beautiful Paper for eBay

How to Use Vintage Stamps / La Happy

Photo Credit: La Happy Design & Calligraphy

1. Add it Up

First things first: vintage postage must add up to current postage rates. While searching and shopping for stamps, make sure that you have one stamp worth at least 25¢ (or more!). Wedding invitations and birth announcements mailed in a larger envelope usually require a minimum of 71¢ postage. The 3¢ and 8¢ stamps are great for rounding out a color palette or subject theme, but you’ll need a 29¢ or 33¢ stamp in the mix to make up the difference in the total postage amount.

How to Use Vintage Stamps / Wondrous Whimsy

Photo Credit: Diana McGregor Photography / Calligraphy by Wondrous Whimsy

How to Use Vintage Stamps / Anne Robin Calligraphy and Underwood Letterpress

Photo Credit: Stephanie Collins Photography / Calligraphy by Anne Robin / Vintage Postage by Underwood Letterpress

2. Plan it Out

Plan your stamp arrangement ahead of time to make sure you leave room for an address – and to maximize visual impact. Some stamps look best in a straight row across the top of an envelope, while others look best in a puzzle piece arrangement in the corner. It all depends on the stamps you select!

How to Use Vintage Stamps

Calligraphy: The Weekend Type / Floral Styling: The Moss & Rose / Styling: Two Be Wed / Photo Credits: Korie Lynn Photography

How to Use Vintage Stamps / Anne Robin Calligraphy and Underwood Letterpress

Photo Credit: Stephanie Collins Photography / Calligraphy by Anne Robin / Vintage Postage by Underwood Letterpress

3. Color Theory

The easiest way to group vintage stamps together? By color! Let your wedding color palette guide your vintage stamp selections and your envelopes will shine! You can even address the envelopes using ink in a complementary color to make your envelopes even more special and complete the overall look.

How to Use Vintage Stamps / Antiquaria Design

Photo Credit: Antiquaria Design Studio

4. Personal Geography

I love it when couples share a glimpse of their personal history – and geography! – in their vintage stamp selections. It can be as simple as a stamp with the city or state where the couple met, along with stamps of their home state. Perhaps they grew up in Montana and Texas but met in college in DC. When placed together on an envelope, these stamps tell such a fun story!

How to Use Vintage Stamps / Coral Pheasant

Photo Credit: Coral Pheasant

How to Use Vintage Stamps / Lauren Chism Fine Papers

Photo Credit: Lauren Chism Fine Papers

5. Stick to a Theme

Love science? Have a passion for architecture? Maybe you’re both crazy for horses, or you met while working on a political campaign. Whatever your interests, let them shine in your envelope postage! You can find vintage postage stamps for practically any topic or theme, from travel to modern art.

How to Use Vintage Stamps / Blue Eye Brown Eye Calligraphy

Photo Credit: Blue Eye Brown Eye Calligraphy

6. Pretty Botanicals

If themes aren’t your thing, go with flowers! My favorite vintage stamps feature floral designs – and they look so incredibly beautiful when grouped together on a wedding invitation envelope! My favorite floral stamps are the Mississippi and Alabama statehood stamps, along with this love stamp.

p.s. Where to find (and buy) vintage stamps and more inspiration for mixing vintage stamps

This post was created in partnership with eBay. All content and opinions are my own. Thank you for supporting the sponsors that make Oh So Beautiful Paper possible!