Anjali + Suchit’s Elegant Gold Foil Hindu Wedding Invitations

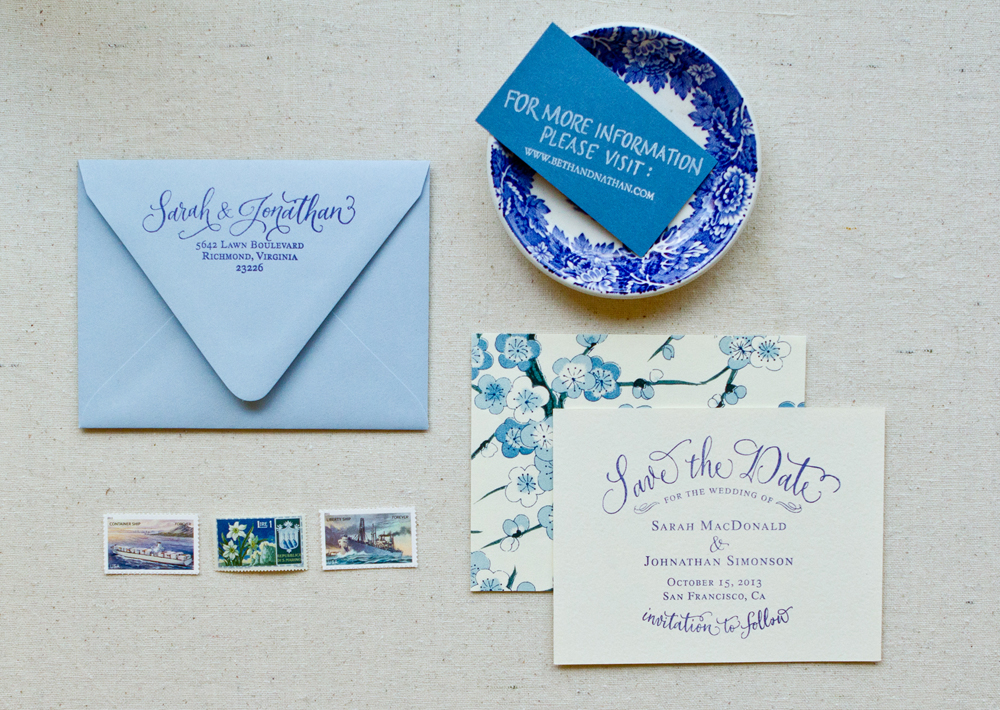
Bride and groom Anjali and Suchit wanted invitations that were both elegant and modern to complement their Hindu wedding.  Designer Rashi Birla created a wedding invitation suite that combines gold foil and deep royal purple letterpress elements, along with an airy botanical pattern and classic type throughout the suite.  Gorgeous!

Hindu Wedding Invitations by Rashi Birla via Oh So Beautiful Paper (8)

From Rashi: Anjali and Suchit have a keen eye for design and wanted to take a modern approach to their Hindu wedding. Anjali loves letterpress and there was no question that I was going to design the invitation with letterpress printing in mind. We wanted the invitation to feel airy and simple, but with Indian touches. I created an organic pattern that was used throughout the suite.

Hindu Wedding Invitations by Rashi Birla via Oh So Beautiful Paper (6)

The invitation text was set to look elegant and regal. We decided to use gold foil and purple letterpress for the two main cards. The deep purple envelopes were also stamped in gold foil.

Hindu Wedding Invitations by Rashi Birla via Oh So Beautiful Paper (5)

Hindu Wedding Invitations by Rashi Birla via Oh So Beautiful Paper (4)

Hindu Wedding Invitations by Rashi Birla via Oh So Beautiful Paper (3)

Hindu Wedding Invitations by Rashi Birla via Oh So Beautiful Paper (7)

To save costs, we printed the reception, Sangeet, and ceremony RSVP cards digitally in purple and yellow (a ‘Sangeet’ is an Indian tradition and a big pre-wedding party that happens the night before a wedding). A gold folder with gold cord and contrasting green ribbon completed the look.

Hindu Wedding Invitations by Rashi Birla via Oh So Beautiful Paper (2)

Thanks Rashi!

Design: Rashi Birla

Letterpress Printing: The Ligature

Check out the Designer Rolodex for more tal­ented wed­ding invi­ta­tion design­ers and the real invi­ta­tions gallery for more wedding invitation ideas!

Photo Credits: Rashi Birla

Cristina’s DIY Under Construction House Warming Party Invitations

Ah, the joys of moving.  As much as I love decorating a new space, it always takes me several months before I feel comfortable enough in a new space to invite guests over.  Designer Cristina Pandol (you might remember her creative map moving announcements) decided to take advantage of this transitional period and her new apartment’s industrial feel when planning her house warming party.  She created invitations with an “under construction” theme using rubber stamps and leftover wallpaper from her decorating adventures.

Under Construction House Warming Party Invitations by Cristina Pandol via Oh So Beautiful Paper (1)

From Cristina: After 3 months of being at my new place, I finally was getting my act together and having a house warming party.  Naturally, I needed an invitation.  Even though my place wasn’t completely put together, I figured “under construction” could be the theme for the party and my downtown Los Angeles loft would serve as the inspiration for the entire project.

Under Construction House Warming Party Invitations by Cristina Pandol via Oh So Beautiful Paper (2)

Since I had painted, hung wallpaper, and sewn throw pillows all myself, I knew that the invitation had to be completely handmade.  I also wanted them to complement the very industrial and urban aesthetic of my apartment.

Under Construction House Warming Party Invitations by Cristina Pandol via Oh So Beautiful Paper (4)

I drew the little tools and used Neutraface and AW Conqueror Slab for the type.  Once the design was finalized, I sent the stamp to be made and while I was waiting for that I set off to buy a ZAP! heat gun and Adirondack powder.  I stamped each invitation with clear watermark ink, then covered the wet ink with the powder, removed the extra powder by flipping the card over on a large piece of scrap paper, and then used the heat gun to melt the powder.

Under Construction House Warming Party Invitations by Cristina Pandol via Oh So Beautiful Paper (3)

I decided on a light gray envelopes to match my cement floors and to use the extra wallpaper that I had hung as envelope liners so every envelope was different.  I picked a forever stamp of Gregory Peck since he’s such a Los Angeles icon and the coloring of the stamp worked with the aesthetic and color palette of the invitation.

Under Construction House Warming Party Invitations by Cristina Pandol via Oh So Beautiful Paper (5)

Under Construction House Warming Party Invitations by Cristina Pandol via Oh So Beautiful Paper (6)

Thanks so much Cristina!

Design: Cristina Pandol

Rubber Stamp: Hollywood Rubber Stamp Company

Photo Credits: Garrett Shannon

Nikki + Mike’s Vintage-Inspired Illustrated Save the Dates

Who knew you could combine nautical, vintage and woodsy into one cohesive save the date?  Nikki Tranchita, both bride and graphic designer, made it happen for her outdoor, lakeside wedding.  Marrying outdoors was top priority for Nikki and Mike as it reminded them of their childhood exploring the rural mid-west.  She hand-illustrated the natural floral design before letterpress printing the save the dates herself and finishing them off with a hand addressed kraft paper envelope and an array of coordinating vintage stamps.

Vintage Inspired Illustrated Save the Dates by Nikki Tranchita via Oh So Beautiful Paper

From Nikki: The style of the wedding is lakeside nautical, vintage, outdoors/woodsy, and slightly bohemian. I strived to allude to all of that in my design. It was also very important to me to keep my hand drawn style throughout the design. I hand illustrated the floral/plant wreath around the text and the anchor/ampersand in the middle. I used vintage stamps for postage, stamped our return address on each Kraft envelope, and hand addressed them, too.

Vintage Inspired Illustrated Save the Dates by Nikki Tranchita via Oh So Beautiful Paper

Vintage Inspired Illustrated Save the Dates by Nikki Tranchita via Oh So Beautiful Paper

Vintage Inspired Illustrated Save the Dates by Nikki Tranchita via Oh So Beautiful Paper

Thanks so much Nikki!

Check out the Designer Rolodex for more tal­ented wed­ding invi­ta­tion design­ers and the real save the dates gallery for more beau­ti­ful cus­tom save the dates!

Photo Credits: Nikki Tranchita

{happy weekend!}

This has been quite a whirlwind of a week and a long weekend is just what I need to help recover.  My husband and I are approaching the last phase of our first pregnancy, and earlier this week we found out that our baby will be making a slightly earlier entrance than originally expected – possibly in just a couple of weeks!  To be honest, I’m both a little freaked out by our new accelerated timeframe, worried about making sure that our baby stays healthy, and excited to finally meet this little person!  But in the meantime…

Photo Credit: Lisa Teso Photography

…a few links for your weekend!

This week on Oh So Beautiful Paper:

I hope you all have a wonderful weekend!  Since Monday is the Labor Day holiday here in the U.S., I’ll be taking the long weekend to rest and refocus, but I’ll see you all back here on Tuesday! xoxo

DIY Tutorial: Blue and White Rubber Stamp Save the Dates

We love blue and white as a color combo. It’s fresh, clean & add a great vintage touch without going overboard. A few weeks ago, while picking up some paper for my moving announcements (which will probably be a future DIY project), I spotted from across the room, some gorgeous floral fine art paper. This blue and white paper instantly reminded me of an inspiration post we’d written a while back about our very popular Copenhagen China Collection. After choosing the paper as my starting point, this lovely, demure, save the date came together quite quickly!  – Bailey and Emma of Antiquaria

DIY Tutorial: Blue and White Rubber Stamp Save the Dates by Antiquaria via Oh So Beautiful Paper

The blue and white floral patterned paper used as backing adds visual interest and a luxurious quality to the design. It could also easily be used as an envelope liner.

DIY Tutorial: Blue and White Rubber Stamp Save the Dates by Antiquaria via Oh So Beautiful Paper

Step One: You’ll want to first adhere the card to the patterned paper. To do this, use permanent spray mount on the back side of your A2 (4.25″ x 5.5″) card. Let the glue get tacky for a few seconds and then place your card onto the backer paper. Let the two pieces adhere well (like overnight) under a heavy book.

DIY Tutorial: Blue and White Rubber Stamp Save the Dates by Antiquaria via Oh So Beautiful Paper

Step Two: Once you’ve waited for the glue to set, carefully trim the card so that the card and backer are the same size. The easiest way to do this is to use a metal ruler and craft knife on a seal healing mat. Take this step slow so that you don’t warp the size of the A2 front.

DIY Tutorial: Blue and White Rubber Stamp Save the Dates by Antiquaria via Oh So Beautiful Paper

Step Three: Lay your backed A2 card on a hard, flat surface. Ink your invitation stamp (we used our Vintage Calligraphy Save the Date Stamp), using a midnight blue stamp pad and center over the backed card. Press down on stamp making certain to apply even pressure on the entire mount (especially the center). Lift stamp and let the print dry thoroughly.

DIY Tutorial: Blue and White Rubber Stamp Save the Dates by Antiquaria via Oh So Beautiful Paper

Step Four: For a reverse effect, stamp your website card using white ink on a blue card. We used our Art Deco Website Stamp on a standard business sized card. This white ink pad really did the trick and was super opaque!

DIY Tutorial: Blue and White Rubber Stamp Save the Dates by Antiquaria via Oh So Beautiful Paper

Step Five: Before addressing the save the dates, we stamped our return address (we used our Calligraphy Ampersand Return Address Stamp) on our light blue A2 envelopes.  All done!

Materials:

Stamps:

Vintage Calligraphy Save the Date Stamp

Art Deco Website Stamp

Calligraphy Ampersand Return Address Stamp

Stamp Pads: Midnight and Frost White

Paper (available at Paper Source):

A2 Notecards in Luxe White

A2 Envelopes in Bluebell

Business Cards in Lake, for the web card

Fine art paper, used for backer

Other Materials:

Permanent Spray Adhesive

Craft knife, metal ruler, and self healing mat

Photo Credits: Intertwyned