DIY Iridescent Paper Prize Ribbons

My oldest daughter, Sophie, graduates from preschool next week! Cue all the tears! I seriously cannot believe that I’ll have a kindergardener on my hands in September. I wanted to do something special for Sophie and the other kids in her class, so I made some fun DIY iridescent paper prize ribbons using opalescent tissue paper and pastel card stock. They turned out super cute, so I thought I’d share the how-to with all of you! These prize ribbons are a really cute way of congratulating someone on a recent achievement – like graduation, landing a new job, buying a home – celebrating an engagement, or even offering a quick note of encouragement!

DIY Iridescent Paper Prize Ribbons

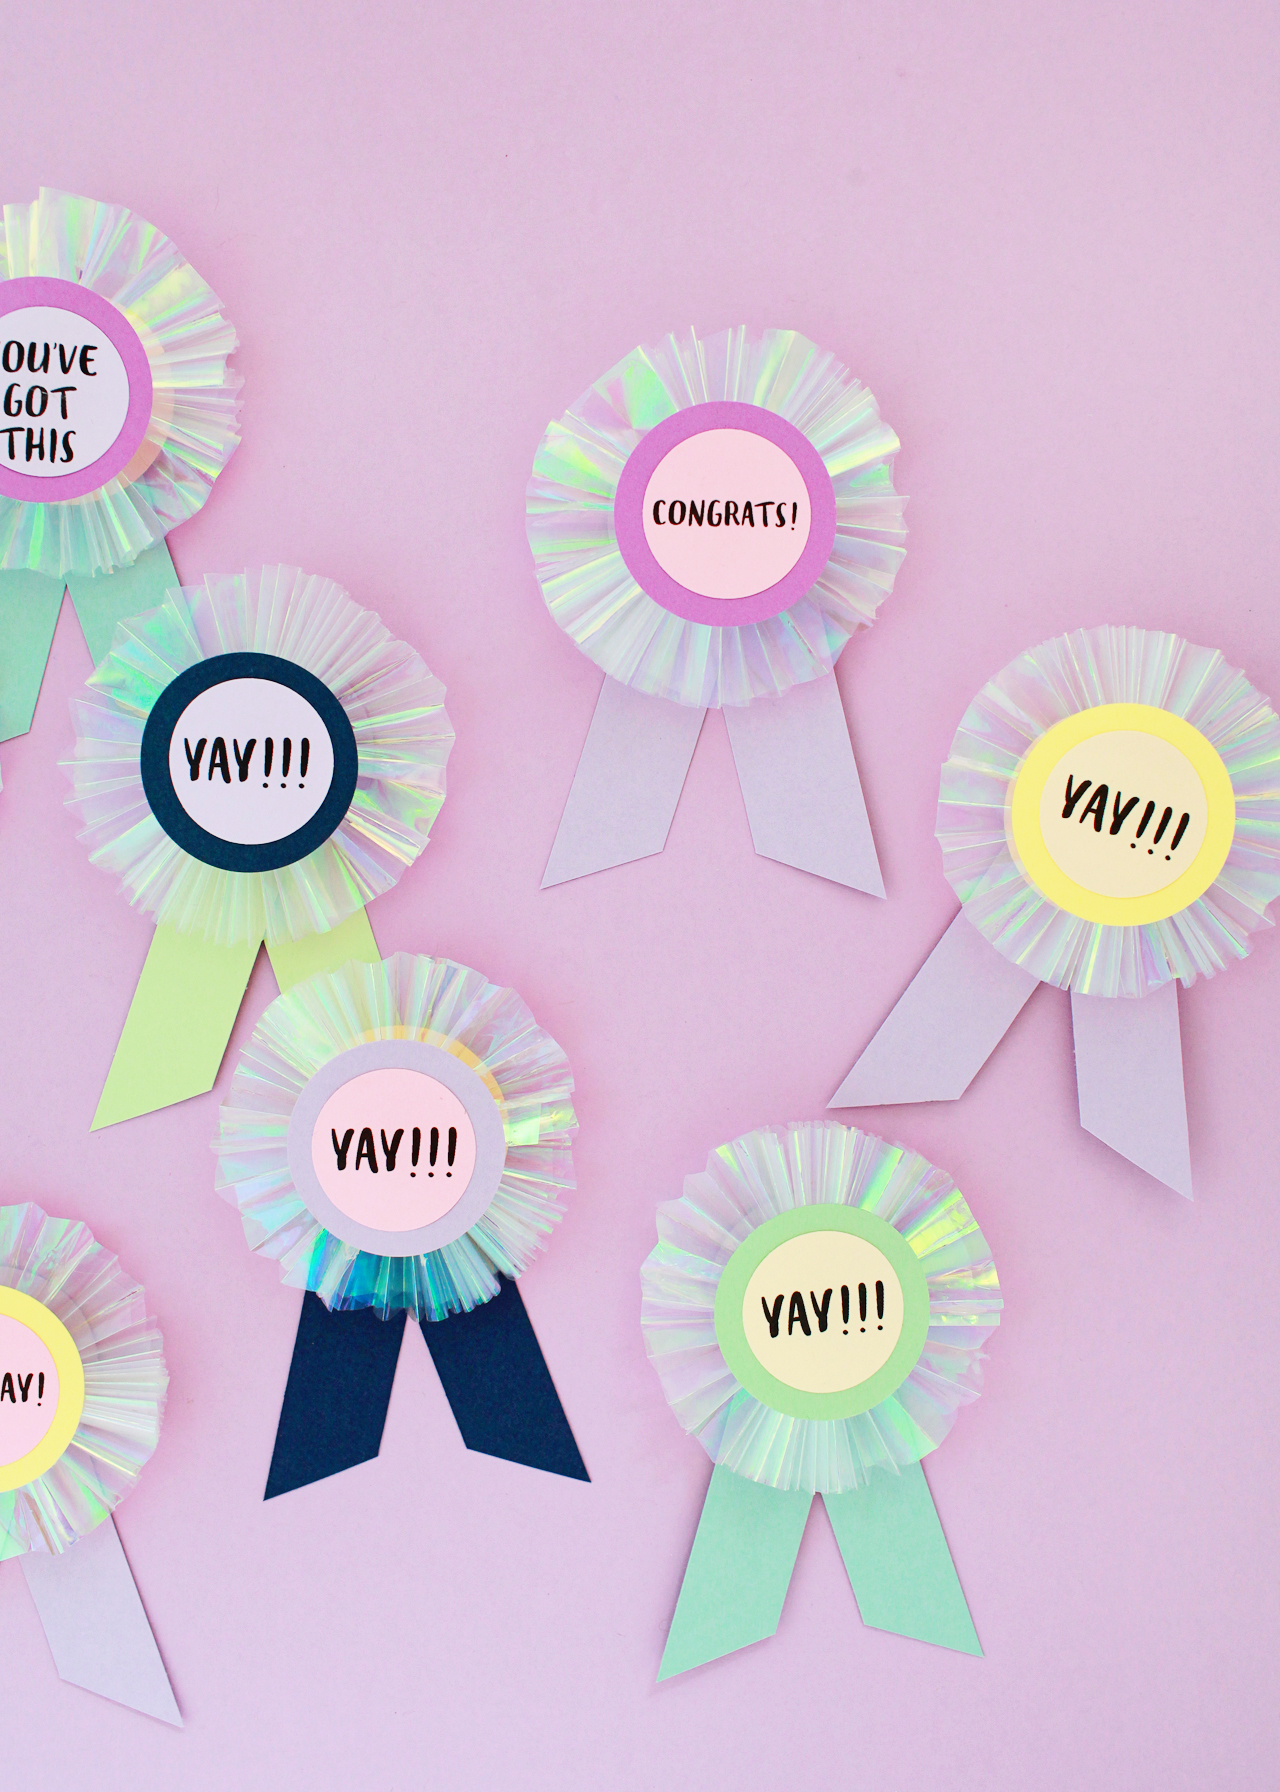
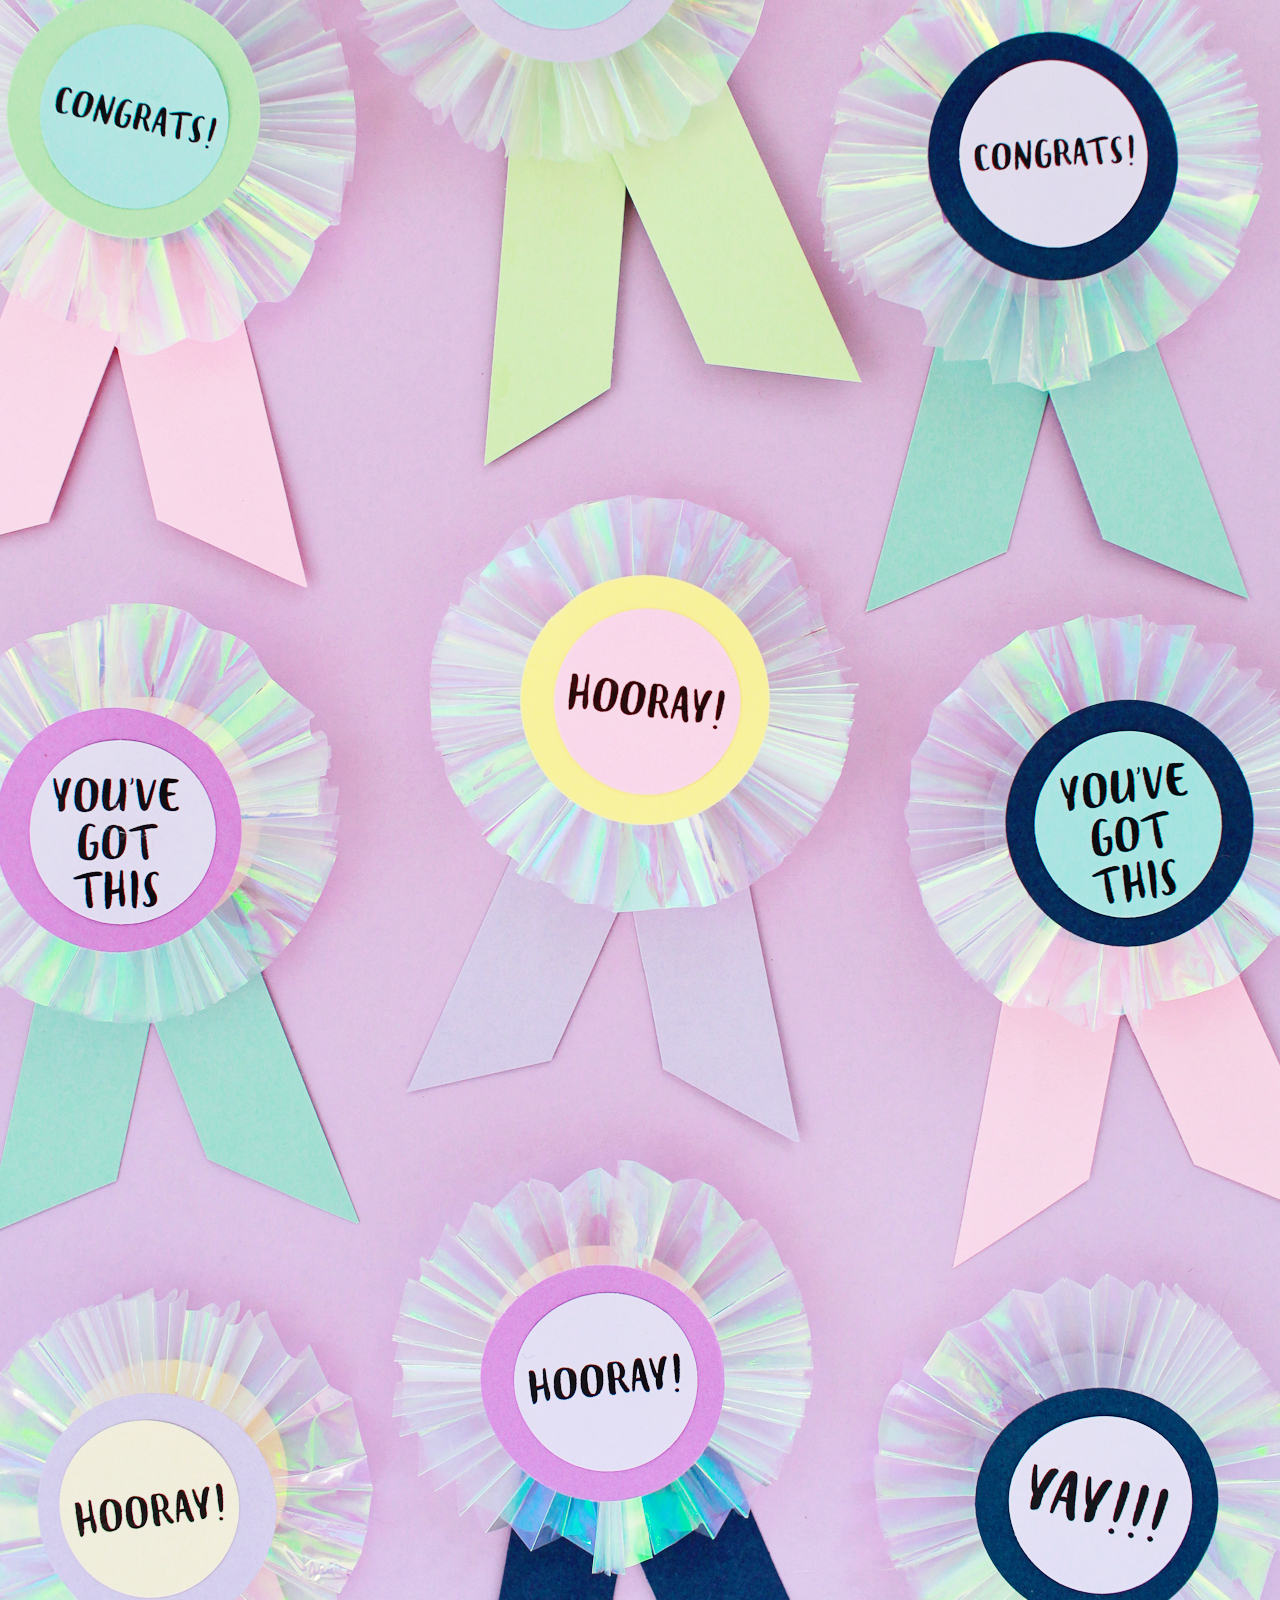
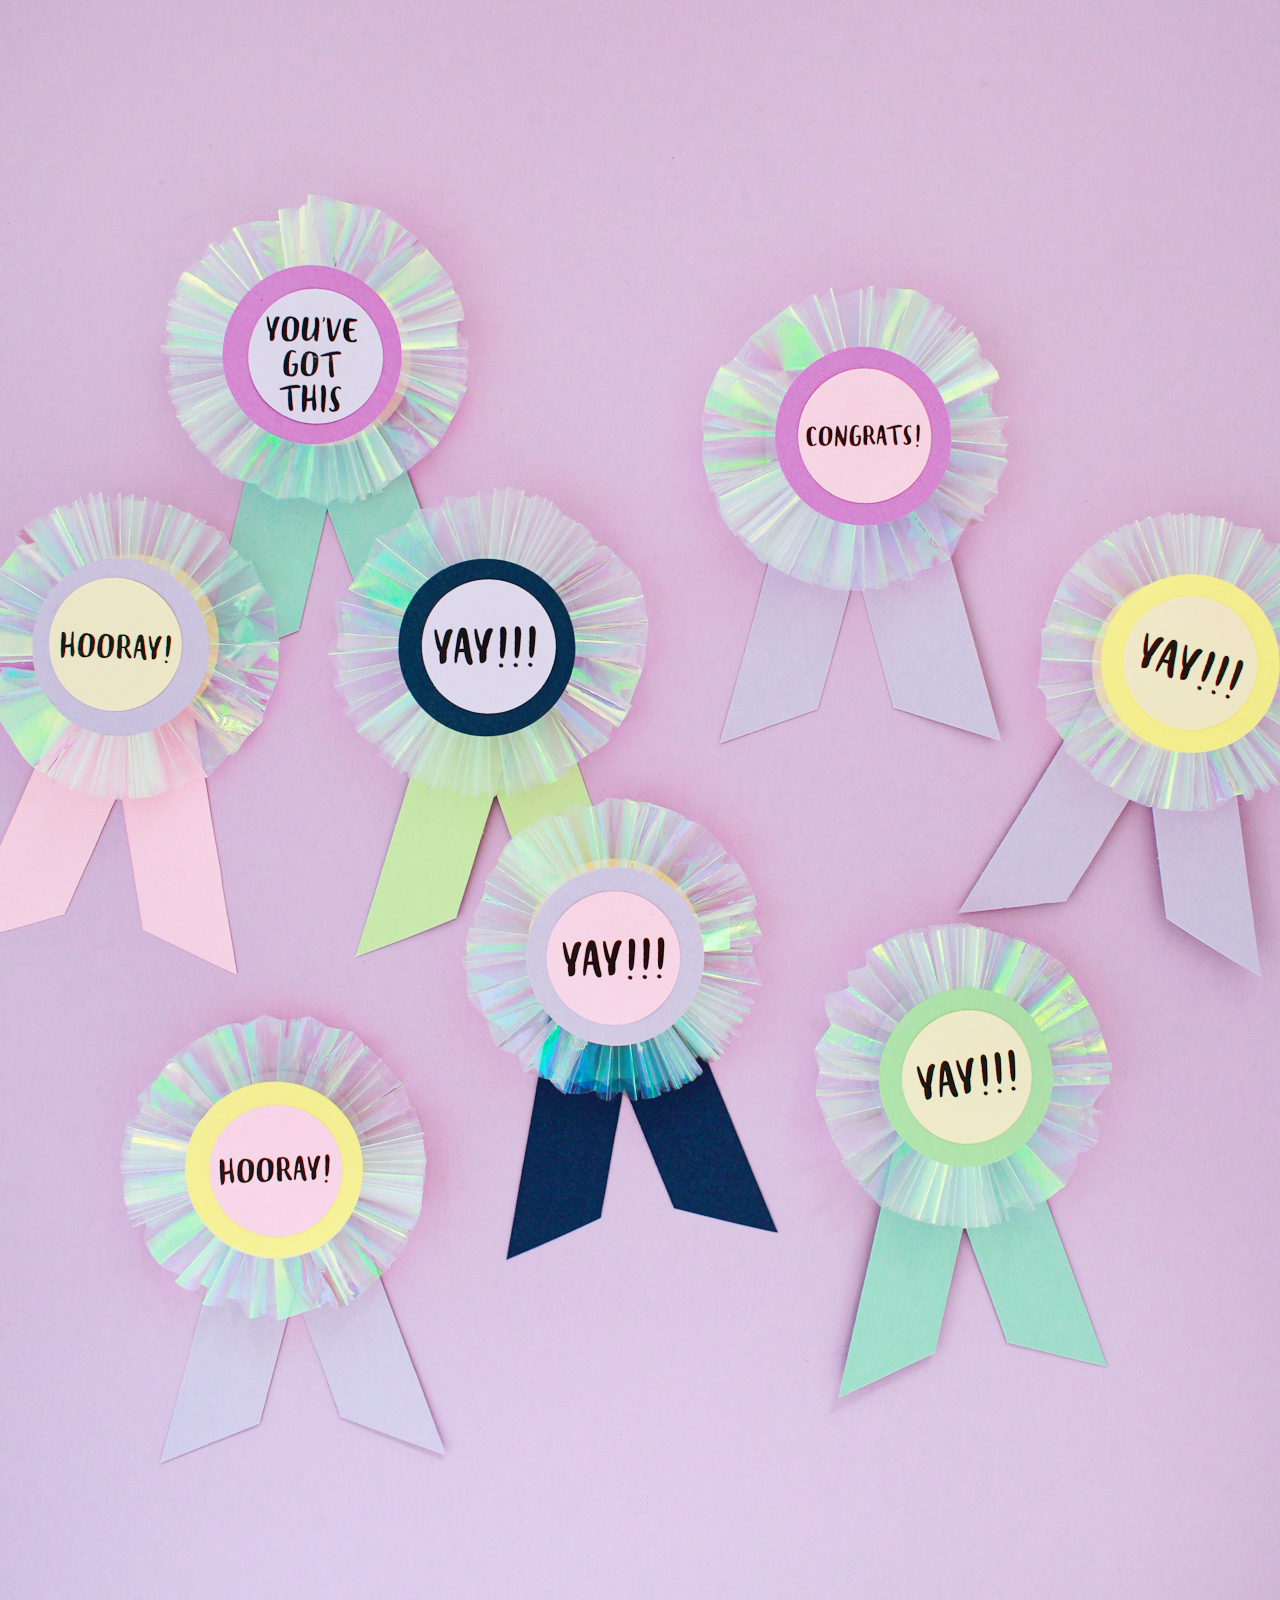
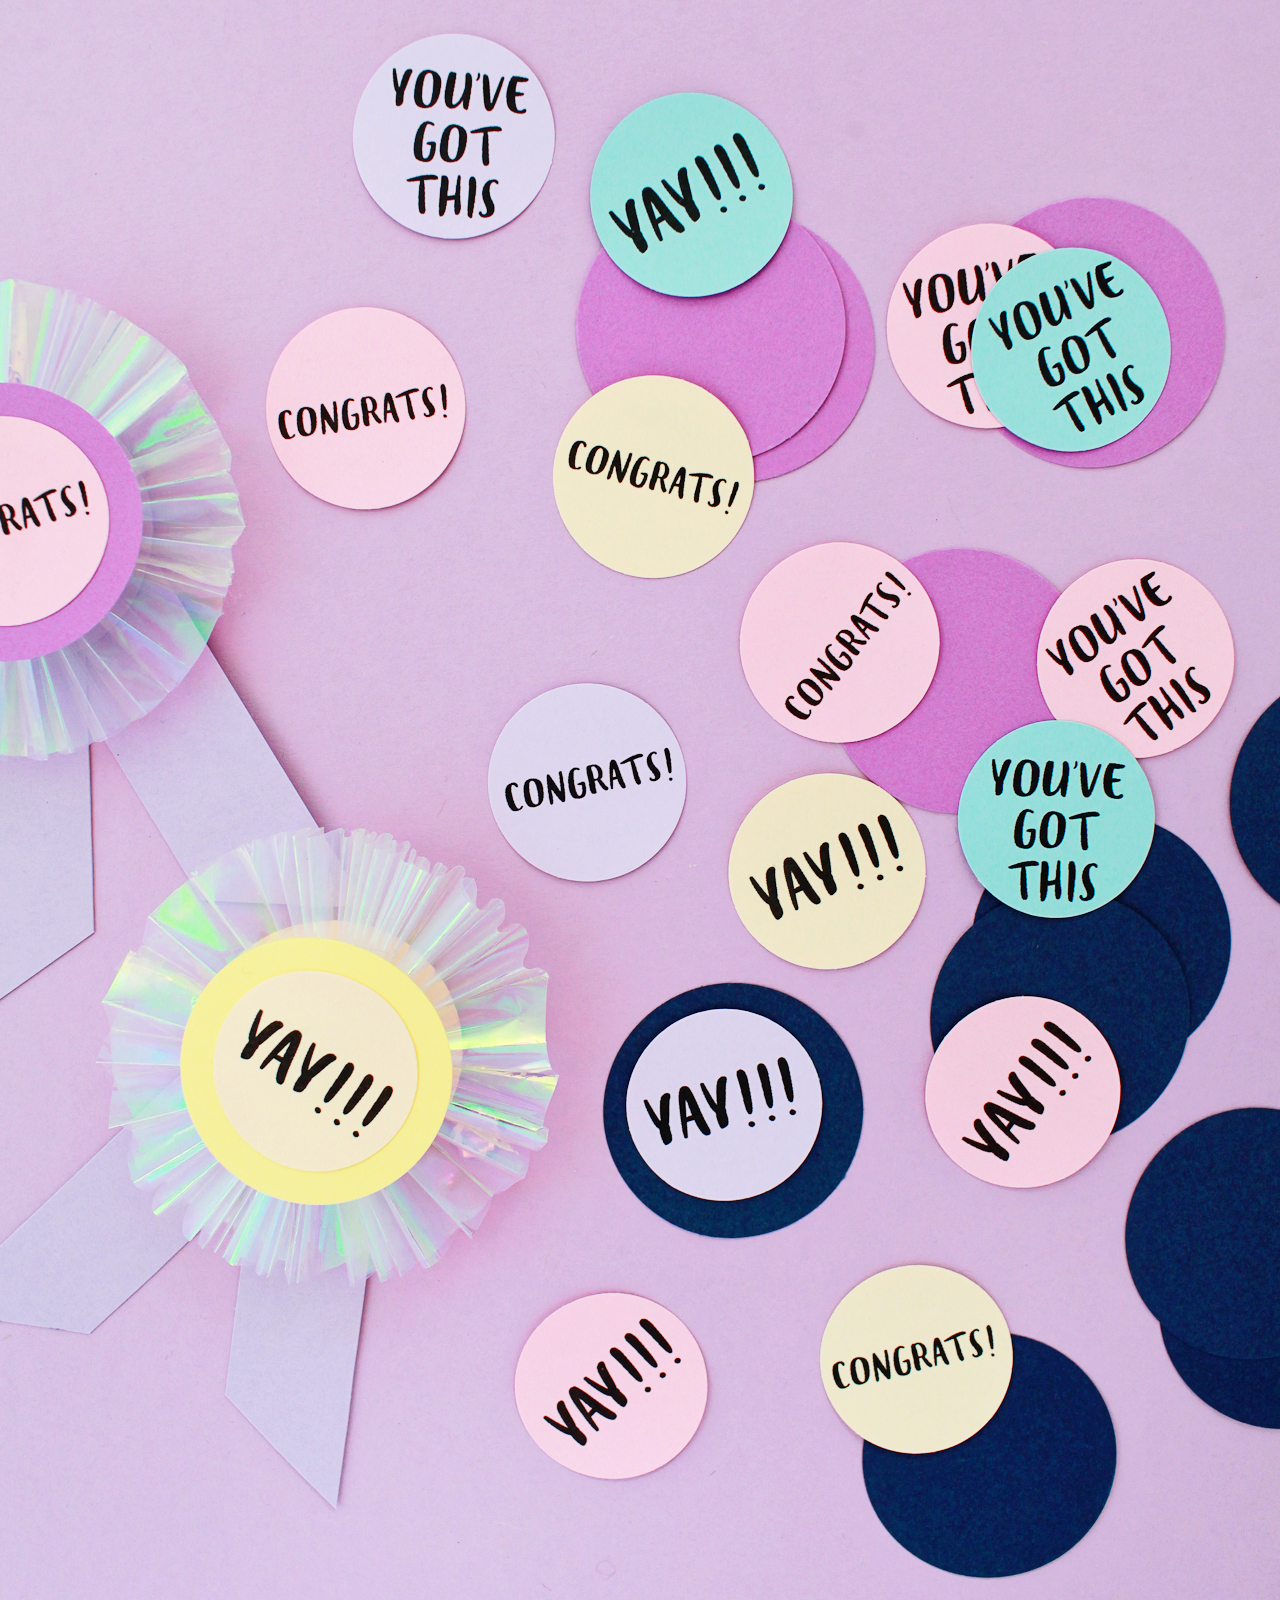
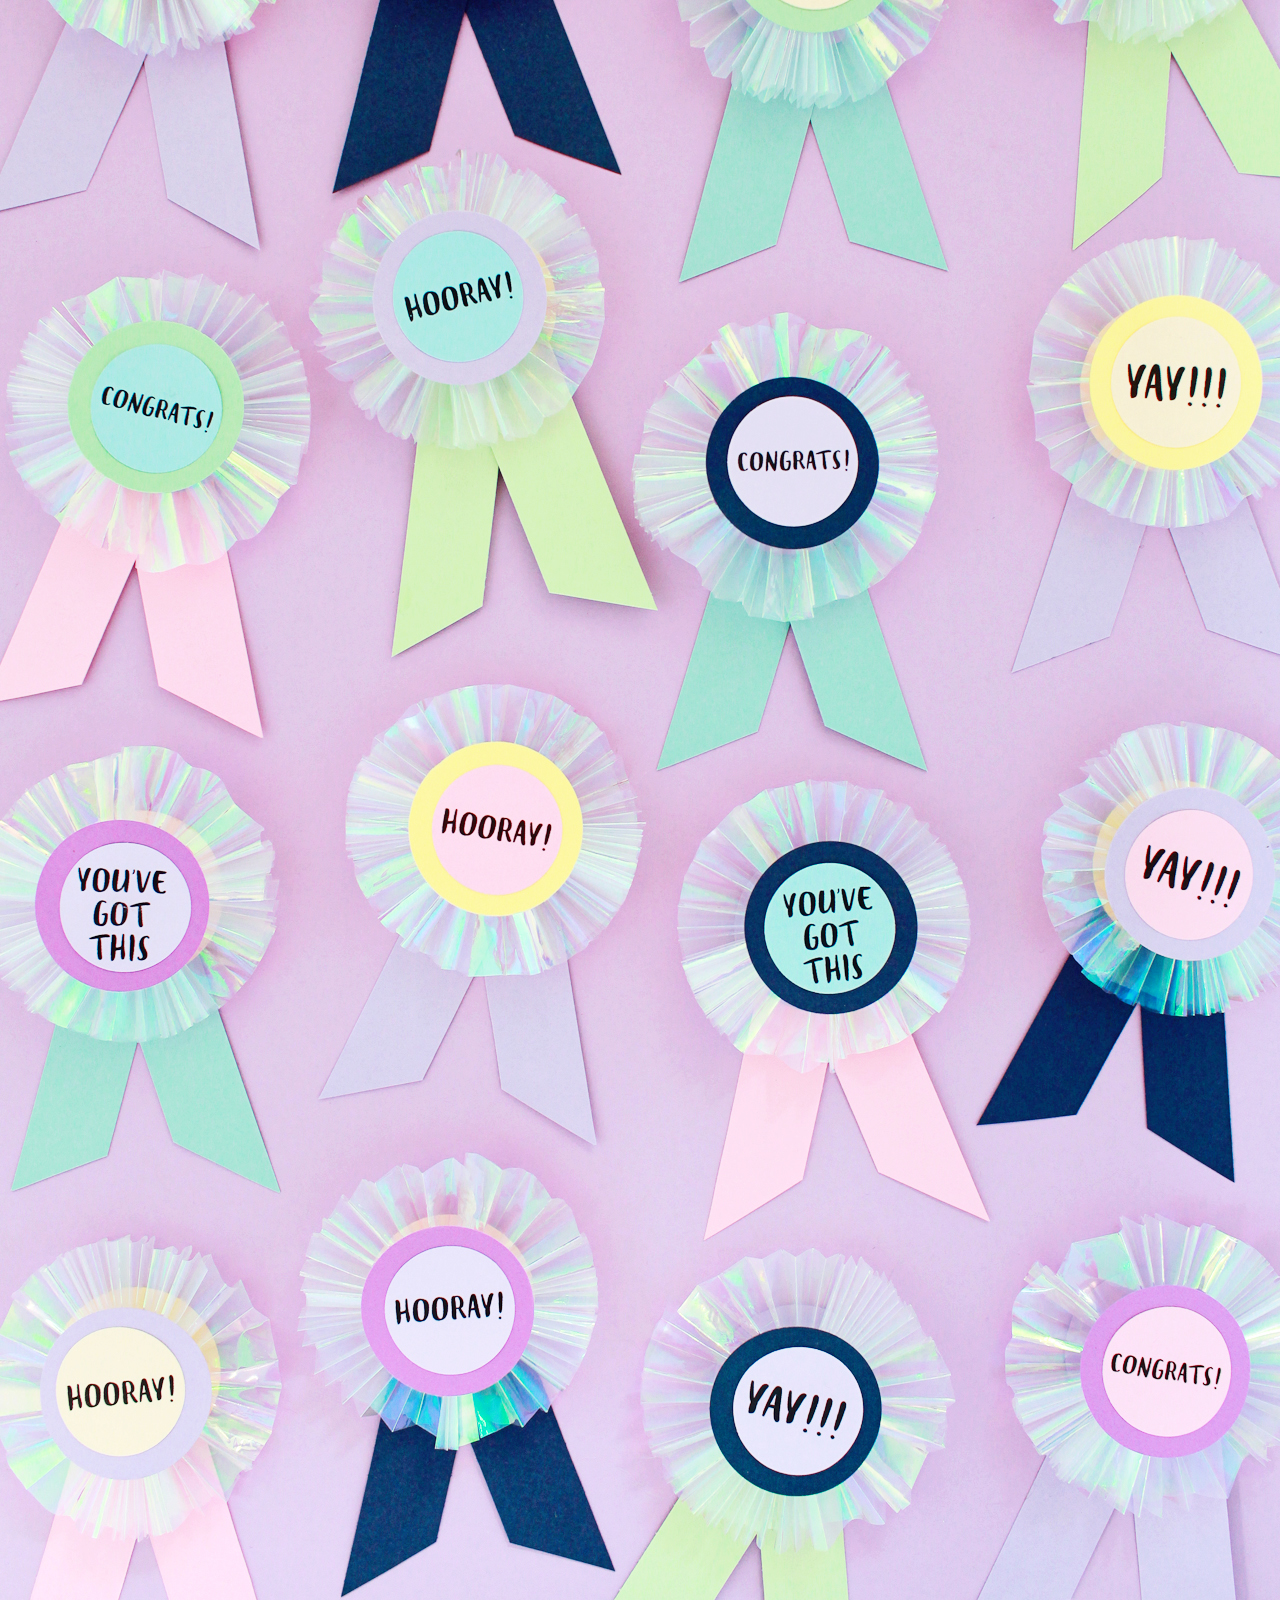
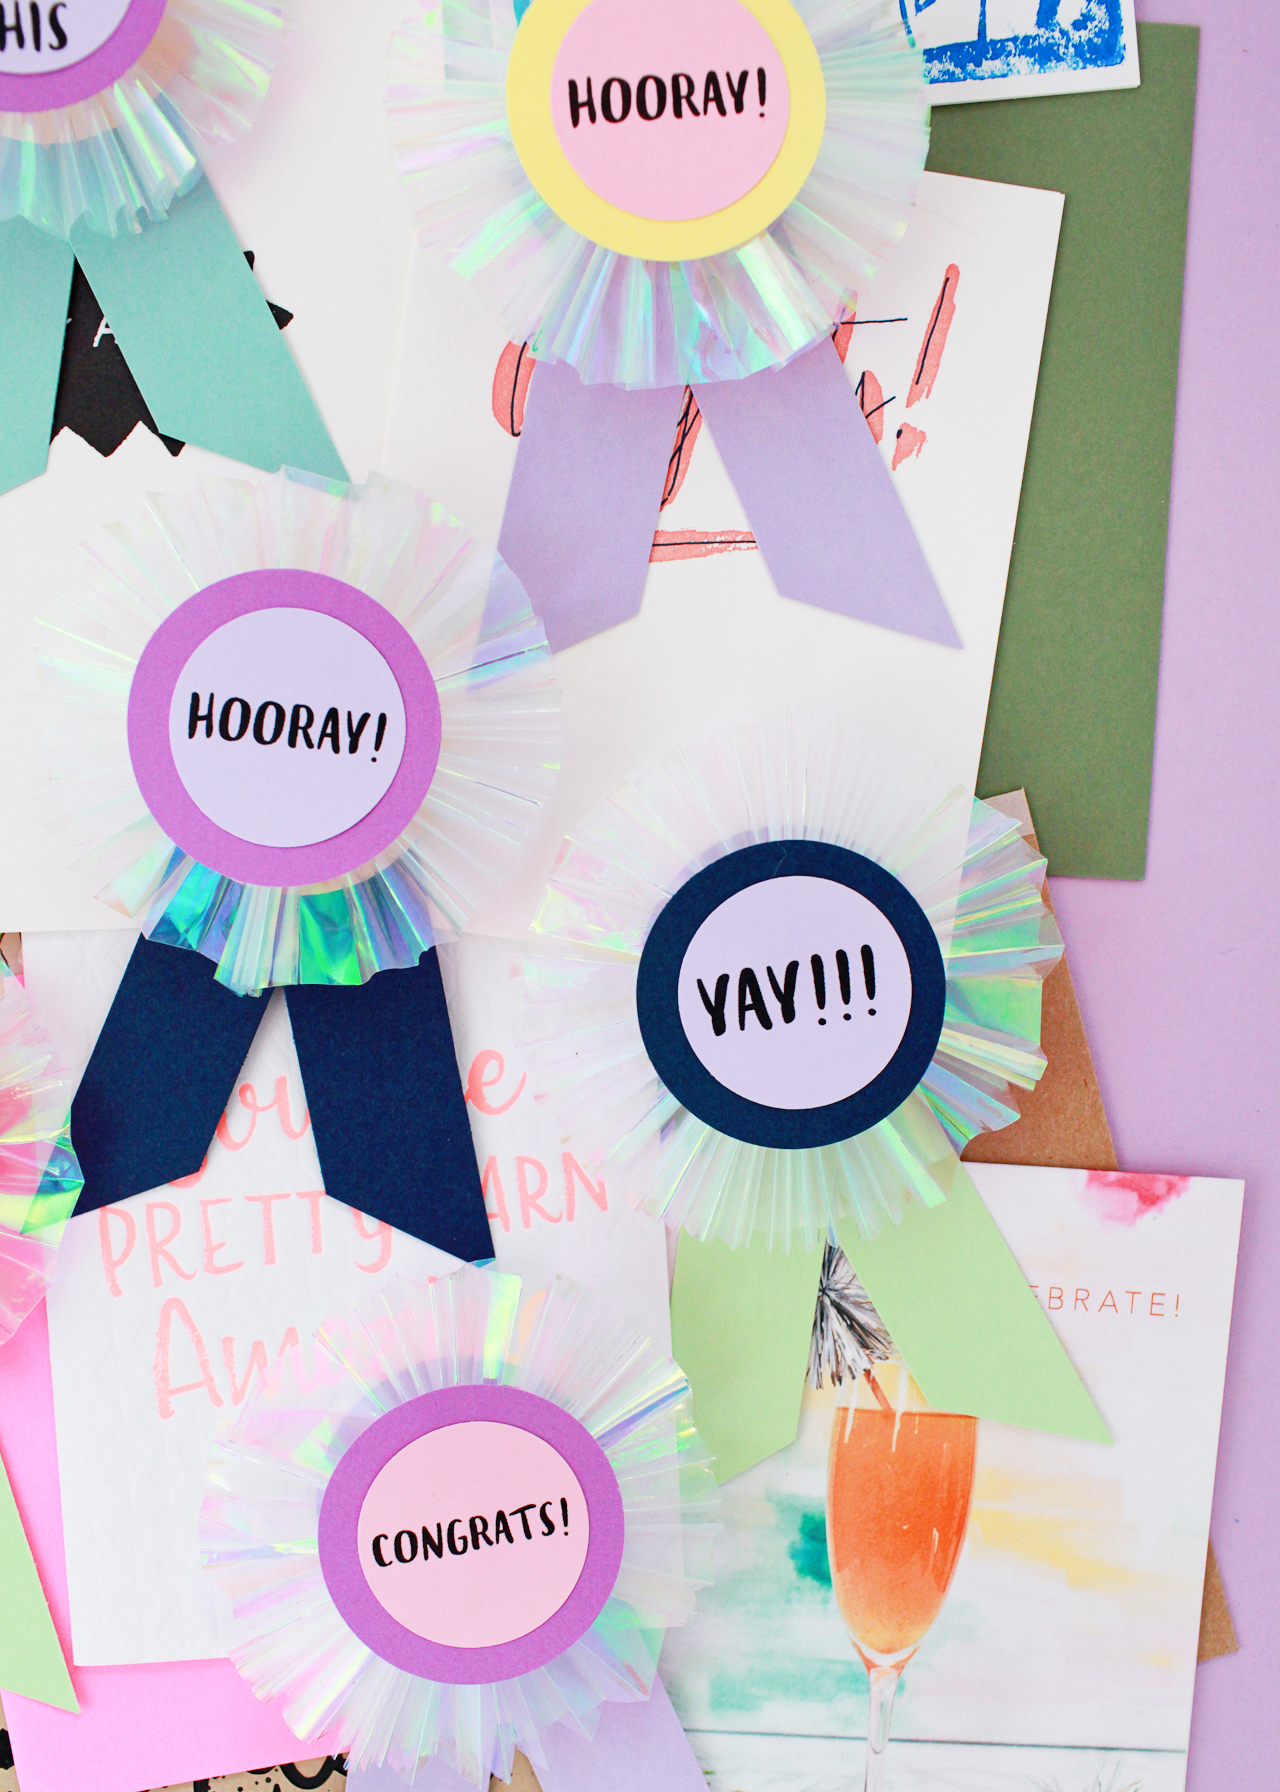
The prize ribbons that I made for Sophie’s classmates all say “preschool graduate,” but I wanted to show them with more general congratulatory messages for those of you who don’t have kids. You can also write your own personalized message by hand on a blank circle! But if you’re worried about your hand lettering skills, you can totally download our free printable downloads through the links at the bottom of the post and use them as needed! There’s one version with school-specific messages and another with general messages that can work all year long! I love the idea of making a bunch of these to have ready throughout the year, or even making an end-of-the-school-year tradition by taking a photo with a new ribbon after finishing each grade! Ooooh, these would also be really fun for a birthday party! So many possibilities!

DIY Iridescent Paper Prize Ribbons

DIY Iridescent Paper Prize Ribbons

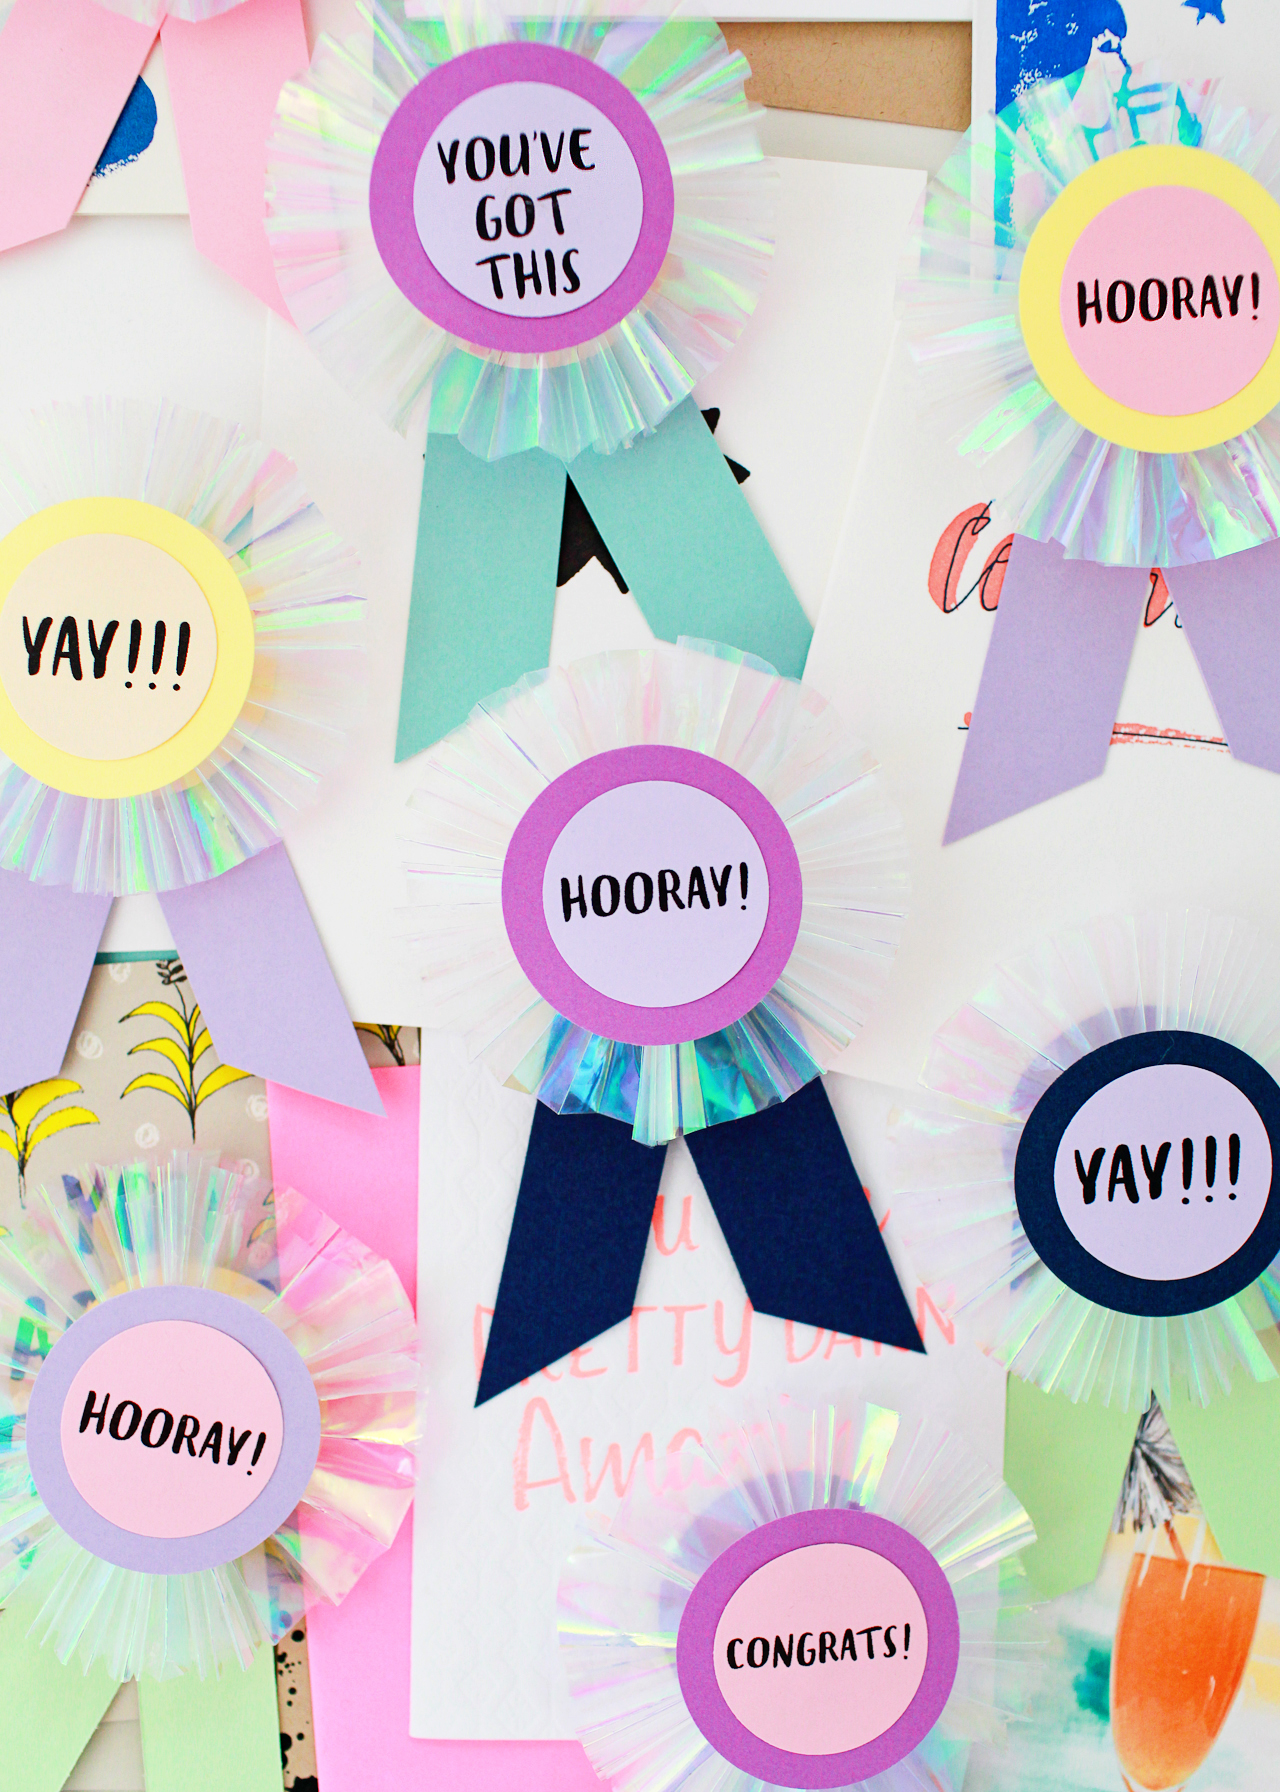
Aaaaah!! These paper prize ribbons are so colorful and full of iridescent shimmer! I used pastels with pops of navy and plum, but they’d be so good in any color combination. Let’s make some, yes??
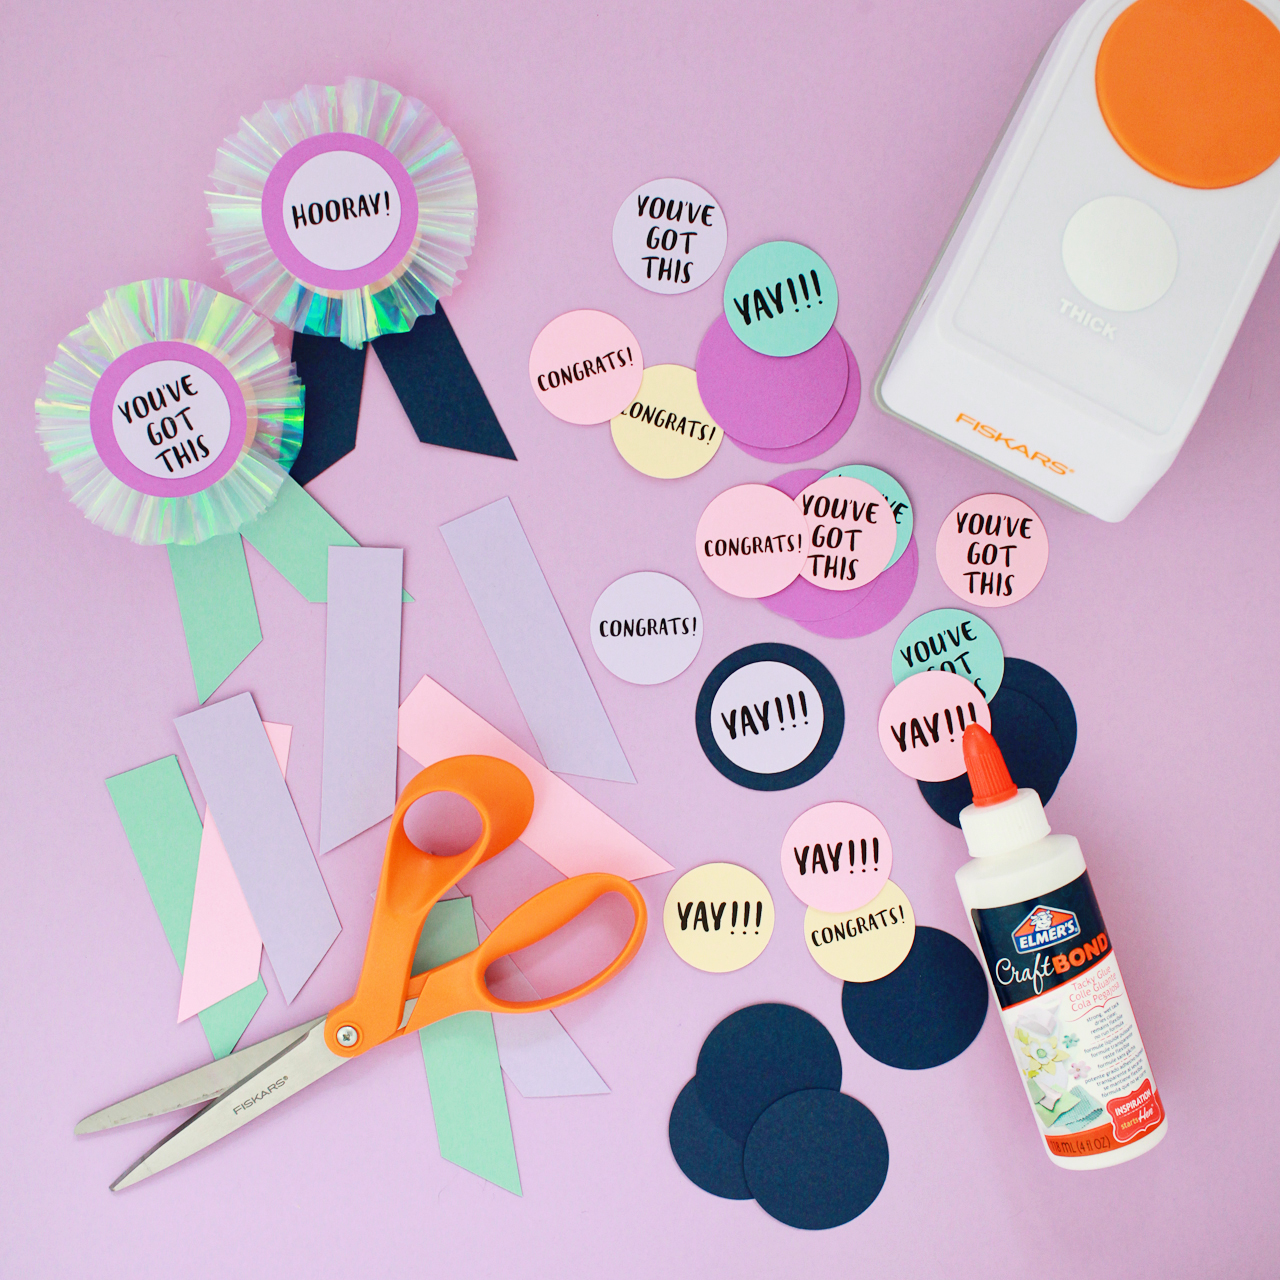
DIY Iridescent Paper Prize Ribbons

Materials

DIY Iridescent Paper Prize Ribbons

DIY Iridescent Paper Prize Ribbons

To make the DIY iridescent paper prize ribbons:

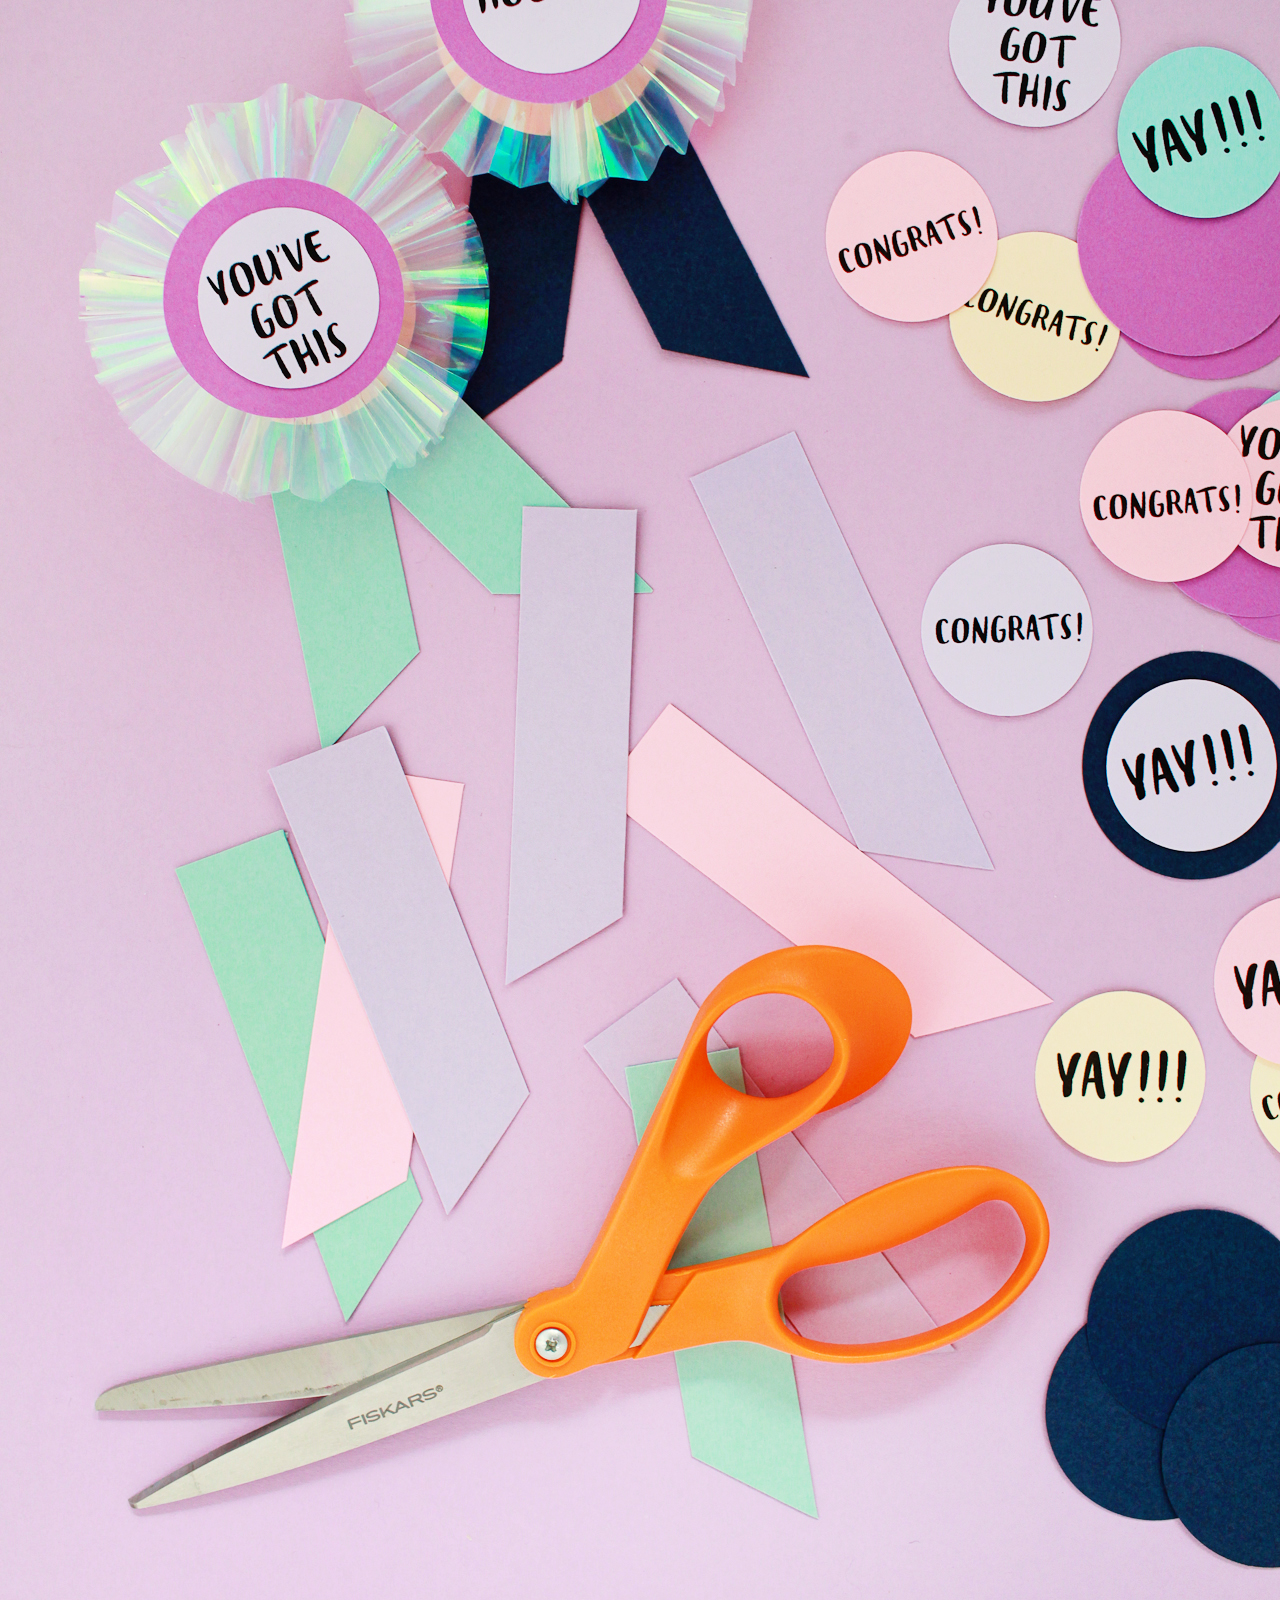
Step 1. Without unfolding the iridescent tissue, cut the folded tissue into 7.5″ segments. My iridescent tissue contained three sheets per package, so after making all the cuts I had twelve 7.5″ x 18″ sheets of iridescent tissue. Fold each sheet in half lengthwise to create a 3.25″ x 18″ sheet. Accordion fold the iridescent tissue, then staple in the middle and trim the ends as needed. You can leave the ends straight – or make them curved or angled! Gently unfold and use a very small amount of hot glue to glue the edges together and form a complete circle.

Step 2. Punch several 2″ circles out of your card stock. You’ll need twice as many 2″ circles as the final number of ribbons – one for the front and one for attaching the ribbon tail on the back.

DIY Iridescent Paper Prize Ribbons

Step 3. Download our printable template with congratulatory messages and print them onto colorful card stock. Use the 1.5″ circle punch to punch out each message – or you can punch a bunch of 1.5″ circles and hand write your own personalized message! Use craft glue or a glue stick to glue the smaller circle to the center of a larger circle – this is the center of your prize ribbon! Hot glue the center circle to the center of the folded iridescent tissue.

Step 4. To make the ribbon tails, use your paper trimmer to cut a piece of card stock in half lengthwise, then into 1″ segments (giving you 1″ x 4.25″ pieces). Staple two pieces to a 2″ circle, then trim the edges – just like you would do with a real ribbon! Hot glue the 2″ circle with the tails to the back of the prize ribbon.

DIY Iridescent Paper Prize Ribbons

Step 5. To make the ribbons wearable, hot glue a bar pin to the back of the prize ribbon. These prize ribbons also make fantastic gift toppers, or you can hot glue a loop of string to hang them on the wall! 

DIY Iridescent Paper Prize Ribbons

DIY Iridescent Paper Prize Ribbons

DIY Iridescent Paper Prize Ribbons

Download the printable templates right here:


SCHOOL YEAR PRIZE RIBBONS

CONGRATULATIONS PRIZE RIBBONS

All artwork © 2017 Oh So Beautiful Paper. All artwork is made available for personal use only. By downloading the patterns you agree to the terms of use.

Photos by Nole Garey for Oh So Beautiful Paper

This post contains affiliate links. By clicking on these links, you’ll help support Oh So Beautiful Paper while also purchasing some fantastic products. We only recommend products that we truly love and trust that you’ll love, too. Our full disclosure policy can be found here.

Classic and Romantic Dusty Blue Wedding Invitations

These romantic wedding invitations from Patricia of Fourteen-Forty feature a color that we don’t often see in wedding invitations: dusty blue! But really, what color would be more fitting for an intimate outdoor wedding in upstate New York?? These classic and romantic dusty blue wedding invitations balance traditional wording and type selections with a whimsical floral border illustration and subtle dusty blue envelope liner. Perfect for a romantic black tie affair, and just so, so lovely.

Classic and Romantic Dusty Blue Wedding Invitations by Fourteen-Forty

From Patricia: Monica and David had an intimate wedding in upstate New York last fall surrounded by their closest friends and family. From the stunning arrangements to Monica’s wedding gown, this outdoor wedding was an absolute dream! When we first met Monica, she wasn’t sure what to expect from the stationery process. But as we started designing together, we could definitely tell she was getting much more excited about the paper goods and how they would add so much to her wedding vision! Monica wanted something romantic, so we stuck to traditional wording but added special touches like the liner and floral border.

Classic and Romantic Dusty Blue Wedding Invitations by Fourteen-Forty

Together we decided on a beautiful two tone palette of dusty blue and navy, which played out in the bridesmaid dresses, linens, and most importantly Monica’s wedding ring! The entire suite was letterpress printed, which gave the blue and white palette more dimension and a luxe finish. We loved that we could work in these personal details to make a suite that was specifically for her.

Classic and Romantic Dusty Blue Wedding Invitations by Fourteen-Forty

Often times our clients want a map and events card whether it’s a one-sided sheet or an elaborate accordion! For Monica, we designed a great little map to pinpoint the important events. We always tell our clients that the invitation is an opportunity to get their guests excited about the weekend and a beautiful map is a great way to do this! It gives everyone a sense of place, and more practically, allows them to prepare properly for the kinds of celebrations that are going to happen.

Classic and Romantic Dusty Blue Wedding Invitations by Fourteen-Forty

When it comes to the day-of pieces, we usually like to bring back aspects of the client’s invitations for a more cohesive look. We love that we were able to use the beautiful garland from her main invitation in her table numbers and timeline of events!

Classic and Romantic Dusty Blue Wedding Invitations by Fourteen-Forty

Classic and Romantic Dusty Blue Wedding Invitations by Fourteen-Forty

Thanks Patricia!

Design: Fourteen-Forty

Flowers: Designs by Ahn

Linen: Nuage Designs

Ring Box: The Mrs. Box

Check out the Designer Rolodex for more tal­ented wed­ding invi­ta­tion design­ers and the real invi­ta­tions gallery for more wedding invitation ideas!

Photo Credits: Sawyer Baird

Cabo San Lucas Lasercut Destination Wedding Invitations

We’re on a roll with tropical destination weddings this week! First these tropical Hawaiian wedding invitations, now a beach wedding in Cabo San Lucas, Mexico! These lasercut destination wedding invitations from Clara of Goldie Design Co. feature a beautiful watercolor crest with tropical greenery, a gorgeous envelope liner with a hand painted watercolor pattern, and a seriously stunning floral lasercut enclosure. A custom watercolor map and address calligraphy in navy ink complete the invitation suite!

Cabo San Lucas Destination Wedding Invitations by Goldie Design Co.

From Clara: This wedding invitation suite was designed for a couple having a gorgeous, luxurious, traditional summer wedding in Cabo San Lucas, Mexico. Their wedding will be filled with lush florals, greenery, lots of white and ivory, and hints of blush pink. We wanted the invitations to give off a grand and classic feel while having some fun accents since it will be set on a beach with gorgeous ocean views!

Cabo San Lucas Destination Wedding Invitations by Goldie Design Co.

Cabo San Lucas Destination Wedding Invitations by Goldie Design Co.

The custom watercolor crest was designed to coordinate with a crest that was used in their save the dates, but brings in tropical greenery accents with a hand-painted watercolor look. This watercolor crest would also tie in with the custom watercolor wedding map. The map is a wonderful pop of color amongst the otherwise quite neutral invitation pieces! The map shows the island of Cabo San Lucas with their wedding venues and hotel, as well their custom wedding crest. By tying that familiar piece of the crest throughout several pieces of the suite, it gives a uniform look that keeps it classic and traditional.

Cabo San Lucas Destination Wedding Invitations by Goldie Design Co.

The envelope liner also coordinates with the belly band pattern from their save the dates, but has been transformed into a beautiful hand-painted watercolor version. The soft colors bring a gorgeous subtle texture to the entire suite! This same tiled pattern is used in other pieces throughout the invitation suite, such as the RSVP card and the wedding timeline. By bringing in little familiar pieces from the save the dates, it gives an overall sense of coordination and purpose in the design of the wedding invitations.

Cabo San Lucas Destination Wedding Invitations by Goldie Design Co.

The invitation card itself has very simple design, again utilizing that custom wedding crest, gorgeous and clean modern calligraphy, and a traditional serif font. The simplicity pairs perfectly with the intricate and lavish laser cut enclosure. The laser cut enclosure has a gorgeous floral pattern that ties in with the white and ivory florals that will be used throughout the ceremony itself. The enclosure is cut out of a metallic ivory paper to give it an extra little shine. All of the pieces are placed within the enclosure, and the whole set is tied with a simple white satin ribbon. The outer envelope is a classic white envelope adorned with navy blue modern calligraphy to match the pieces of the invitation suite.

Cabo San Lucas Destination Wedding Invitations by Goldie Design Co.

Thanks Clara!

Design and Calligraphy: Goldie Design Co.

Laser Cut Enclosures: Simply Scripted Design

Check out the Designer Rolodex for more tal­ented wed­ding invi­ta­tion design­ers and the real invi­ta­tions gallery for more wedding invitation ideas!

Photo Credits: Goldie Design Co. 

DIY Mud Cloth-Inspired Envelopes and Stationery Ideas

I just love the look of white ink against dark paper. It’s so striking! I just can’t pass up a black or navy blue envelope with a calligraphed address in white ink, like these gorgeous black and white invitations (or these brush lettered envelopes!) Last year, I shared some colorful envelope ideas using Sakura of America’s 3-D opaque Soufflé pens and glossy Glaze pens – it’s still one of my all-time favorite projects that we’ve ever done! Given my love for white ink on black envelopes, I wanted to see what would happen if I used the white Soufflé and Glaze pens on black paper, along with white Gelly Roll pens! I’ve been feeling super inspired by global textiles lately, particularly African mud cloth textiles – so today I’m sharing some fun envelopes and stationery ideas with global-inspired patterns – along with some tips for recreating these DIY mud cloth-inspired envelopes and stationery ideas at home!

DIY Mud-cloth-Inspired Envelopes and Stationery Ideas

DIY Mud Cloth-Inspired Envelopes and Stationery Ideas

For this project, I used opaque white Soufflé pens, gloss white 3-D Glaze pens, and opaque white Gelly Roll pens on black envelopes and flat cards from Paper Source. The Soufflé pens also come in a range of pastel colors that I think would be really fun to play around with – can you imagine some of these patterns in pastel lavender ink on a dark navy envelope??? So good. You can see the other Soufflé colors in action in this post, but I’m loving classic black and white for these graphic global-inspired patterns.

DIY Mud-cloth-Inspired Envelopes and Stationery Ideas

You can definitely freehand some of these patterns, but I found it easiest to create guidelines using a ruler and a No. 2 pencil before creating the individual patterns with my Soufflé, Glaze, and Gelly Roll pens. Each pen has a slightly different texture, so you’ll want to practice on a test sheet of paper before picking the pen that works best for you. The steps vary slightly depending on whether you’re making envelopes, menus, or place cards, so I’ll write the steps out for each one below.

DIY Mud-cloth-Inspired Envelopes and Stationery Ideas

Supplies

White Soufflé pens, Glaze pens, and Gelly Roll pens

Ruler

No. 2 pencil

SumoGrip block eraser

Black envelopes and flat cards (I used A7 envelopes, A7 flat cards, and 4bar flat cards)

DIY Mud-cloth-Inspired Envelopes and Stationery Ideas

To make the envelopes:

Step 1. First, you’ll need to decide where you want your text to go: centered, left justified, or right justified. Using your ruler and a No. 2 pencil, draw a rectangle approximately 4″ wide and 3″ tall on a black A7 envelope. (For oversize envelopes or longer addresses, adjust the rectangle dimensions as needed.) Within that rectangle, draw lines that are 3.5″ wide and 1/2″ inch apart, leaving some extra room at the top and bottom. That’s where you’ll write the address in your chosen lettering style – I think it’s fun to use a mix of script, serif, and sans-serif lettering!

Step 2. Around the address rectangle, draw both vertical and horizontal lines 1/4″ apart across the entire envelope. This will give you a grid guideline for your pattern. I chose a few mud cloth-inspired patterns and freehanded them within the pencil grid. You can find some mud cloth pattern inspiration here!

Step 3. Using your white Soufflé, Glaze, and Gelly Roll pens, draw your chosen pattern on the envelope and allow the ink to dry. If you’re satisfied with the pattern, you can also use the pens to write the address on the lines within the rectangle. Once the ink is completely dry, erase all the pencil lines with the SumoGrip block eraser.

DIY Mud Cloth-Inspired Envelopes and Stationery Ideas

To make the menus and table numbers:

Step 1. Using your ruler and a No. 2 pencil, draw a rectangle approximately 3″ wide and 4″ tall in the middle of an A7 (5×7) flat card. The number of lines that you’ll need inside the rectangle will depend on the text you plan to use, but I spaced my lines at 1/4″ apart and left a line blank between menu items. Around the rectangle, draw both vertical and horizontal lines 1/4″ apart across the entire card. For table numbers and other signs, you can also leave the top third of the card blank and draw your pattern guidelines on the bottom 2/3 of the card.

Step 2. Using your white Soufflé, Glaze, and Gelly Roll pens, draw your chosen pattern on the card and add your text – you could even use the cards to make small signs for a party or wedding reception! Allow the ink to fully dry, then erase all the pencil lines with the SumoGrip block eraser. If you’re working with a calligrapher (which I highly recommend when lots of text is involved), draw your pattern and then hand the patterned card off to your calligrapher to add the text!

DIY Mud-cloth-Inspired Envelopes and Stationery Ideas

To make the place cards:

Using your ruler and a No. 2 pencil, draw horizontal and vertical lines 1/4″ apart across the lower half of a 4bar flat card. Then use your white Soufflé, Glaze, and Gelly Roll pens to draw your chosen pattern on the card, using the pencil lines as guidelines for your pattern. Allow the ink to fully dry, then erase all the pencil lines with the SumoGrip block eraser. Then write the name of each guest on the top half of the card – or hand the patterned cards off to your calligrapher for lettering!

DIY Mud-cloth-Inspired Envelopes and Stationery Ideas

DIY Mud Cloth-Inspired Envelopes and Stationery Ideas

DIY Mud-cloth-Inspired Envelopes and Stationery Ideas

DIY Mud Cloth-Inspired Envelopes and Stationery Ideas

DIY Mud-cloth-Inspired Envelopes and Stationery Ideas

I had SO much fun making these mud cloth-inspired patterns – and I think you will, too! The pencil guidelines help make sure everything is straight and properly spaced, but I love that these patterns are meant to look hand drawn and imperfect. You can pick up your own set of white Soufflé pens here, white Glaze pens here, and white Gelly Roll pens here – and the full color packs herehere, and here â€“ I can’t wait to see all the gorgeous patterns you make with them!

Photos by Nole Garey for Oh So Beautiful Paper

This post is sponsored by Sakura of AmericaAll content and opinions are my own. Thank you for supporting the sponsors that make Oh So Beautiful Paper possible!

French Chateau Inspired Calligraphy Wedding Invitations

You guys, I just CANNOT EVEN with these gorgeous calligraphed wedding invitations. Brandi of Brandi Smyth Photography teamed up with Shannon Inman of Paperglaze Calligraphy to create these absolutely stunning French Chateau inspired calligraphy wedding invitations for a wedding in southern Louisiana. Every single detail is just so beautiful, from the custom envelope liner to the beautiful deckle edge paper. And that gold wax seal! So much yes.

French Chateau Inspired Calligraphy Wedding Invitations by Paperglaze Calligraphy

From Brandi: Pulling off a french chateau inspired wedding is not an easy task when you are in southern Louisiana. But boy do these invitations set the tone! Shannon with Paperglaze Calligraphy did an amazing job. She crafted a beautiful invitation suite for the couple, even going the extra mile and customizing the envelope liner with a french love poem. The wedding colors were very subdued and light, with mixes of ivory, soft blues and gold undertones. Shannon went with a navy blue ink to complement those colors and it turned out to be a beautiful choice! To top off the invitations they were sealed with a gold wax stamp and beautifully curated vintage stamps to perfectly complement the design.

French Chateau Inspired Calligraphy Wedding Invitations by Paperglaze Calligraphy

French Chateau Inspired Calligraphy Wedding Invitations by Paperglaze Calligraphy

French Chateau Inspired Calligraphy Wedding Invitations by Paperglaze Calligraphy

Throughout the wedding there was a French “locks of love” theme. As guests arrived, instead of signing a traditional guest book, they signed small cards attached to locks and keys and placed them on a beautiful iron gate upon entering the ceremony site. From the French inspired food and beverage selections, to the floral arrangements and vows, it was a night to remember and you definitely did not feel like you were in Louisiana. Instead you escaped for a special celebration. The venue had beautiful tall cypress trees, gravel roads, ornate fountains, lush gardens, and the land around the venue appeared to having rolling hills, even a pond with ducks and geese. It was truly an enchanting evening. Shannon hand calligraphed invitation suite tied in beautifully with the aesthetic of the day and the theme was continued throughout each and every detail.

French Chateau Inspired Calligraphy Wedding Invitations by Paperglaze Calligraphy

French Chateau Inspired Calligraphy Wedding Invitations by Paperglaze Calligraphy

Thanks Brandi and Shannon!

Check out the Designer Rolodex for more tal­ented wed­ding invi­ta­tion design­ers and the real invi­ta­tions gallery for more wedding invitation ideas!

Calligraphy: Paperglaze Calligraphy

Wax Seal: Nostalgic Impressions

Vintage Stamps: Verde Studio

Ribbon: FrouFrou Chic

Photo Credits: Brandi Smyth Photography