DIY Watercolor and Gold Leaf Gift Tags

This is a sponsored conversation written by me on behalf of Cuties. All content and opinions are my own. Thank you for supporting the sponsors that make Oh So Beautiful Paper possible!

Thanksgiving is tomorrow, which means the season of giving is just around the corner! I grew up in Florida, so I always associate the months of December through February with amazing in-season winter citrus. My favorite little citrus fruit, Cuties, is finally back in our local grocery store – yay! Even though the days are shorter and the nights are longer, Cuties is sending us a dose of love and sunshine straight from their California groves right when we need it most. I’m so excited to celebrate both the season of giving and the return of Cuties season with these gorgeous DIY watercolor and gold leaf gift tags!

DIY Watercolor and Gold Leaf Gift Tags

Celebrate the Season of Giving with Cuties Mandarin Oranges

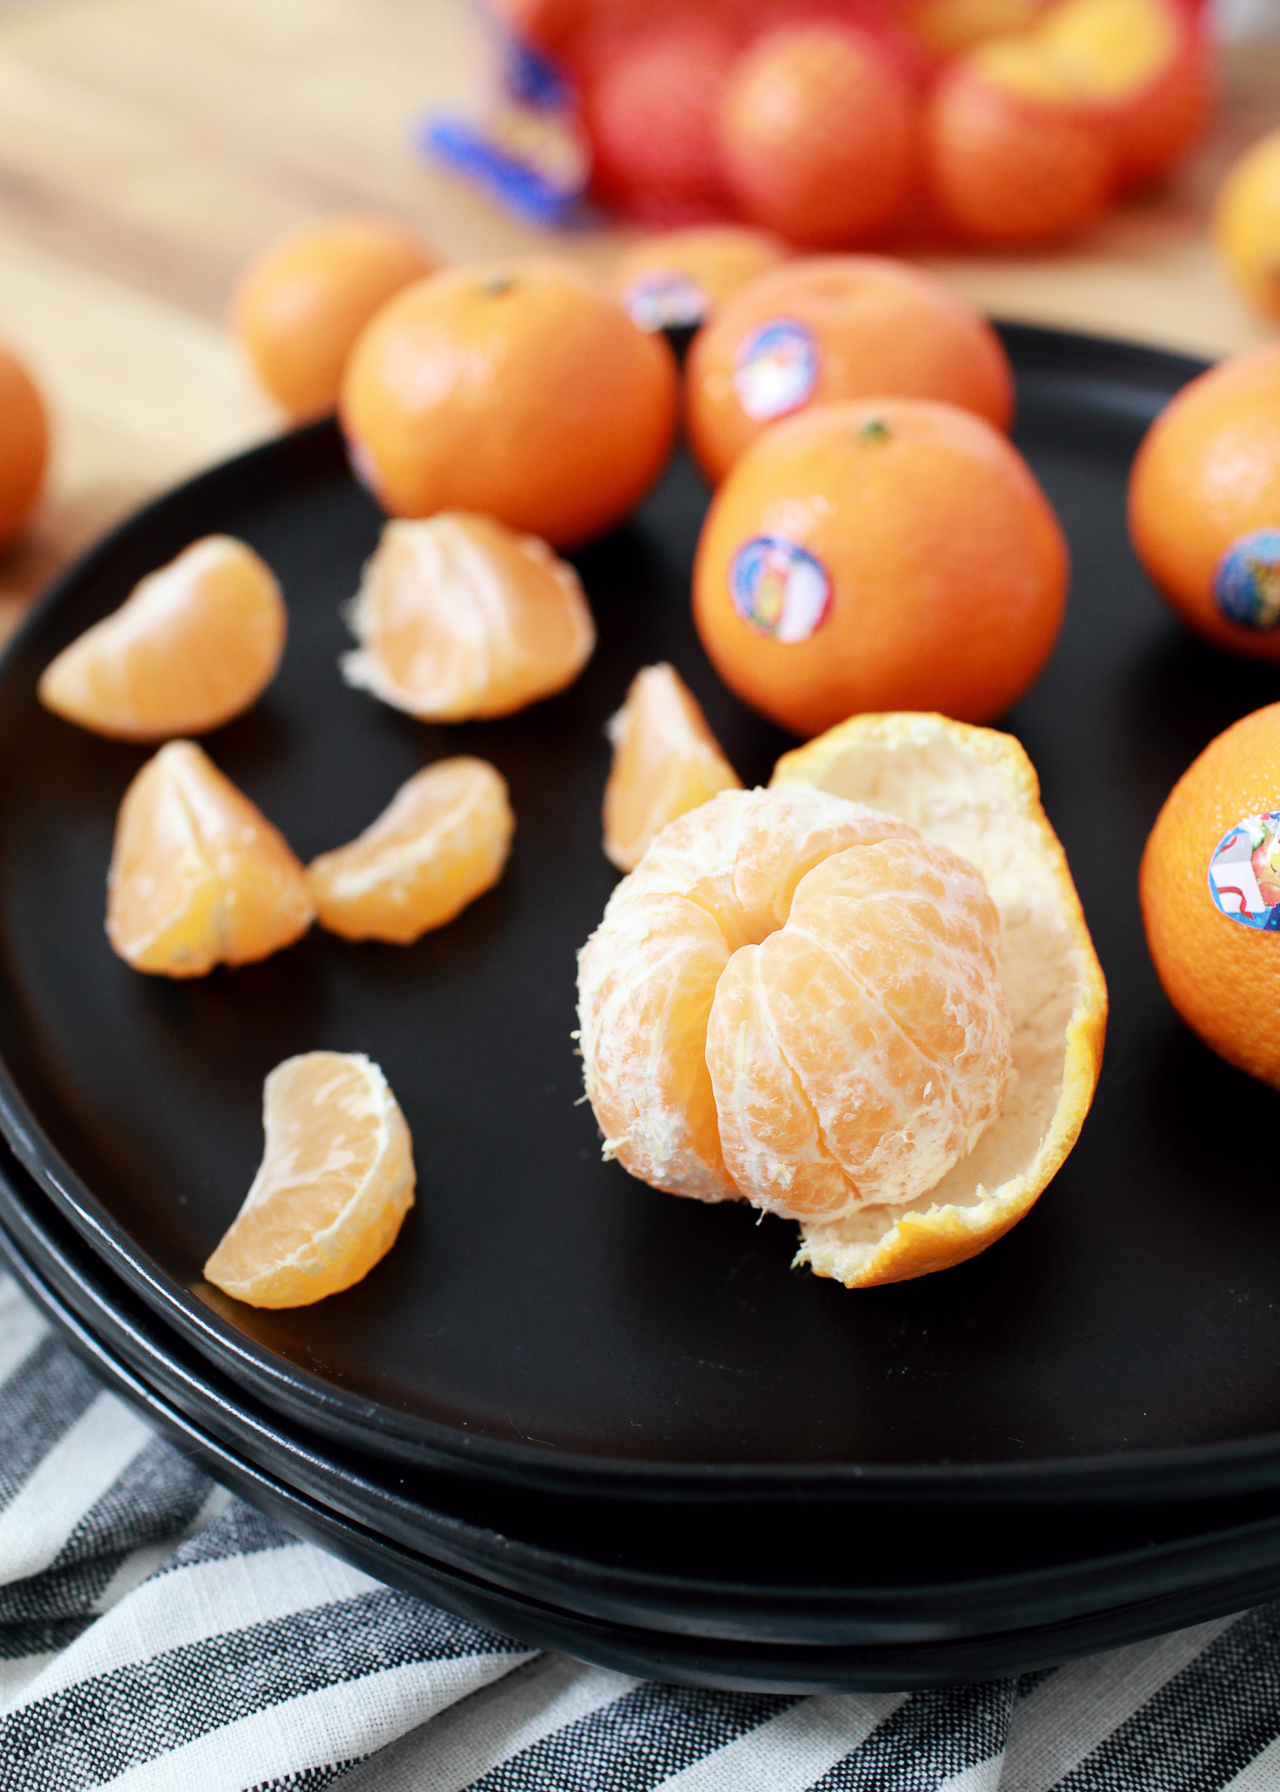
Now that I live in DC and spend most of my holidays with my husband’s family in upstate New York, I’ve learned to embrace the dark coziness of the winter months in the Northeast and Mid-Atlantic. We wrap ourselves in warm blankets, make tea and hot cocoa in the evening, light lots of candles with the seasonal scents of evergreen, vanilla, and citrus – and of course we snack on delicious, in-season winter citrus. My kids always reach straight for the bowl of Cuties on the kitchen counter: they’re sweet, seedless, easy for little hands to peel apart, and perfectly kid-sized. They’re also the perfect on-the-go snack, and we always bring a handful of Cuties when we’re out exploring on the weekends.

Celebrate the Season of Giving with Cuties Mandarin Oranges

One of the things I love most about being a mom of two little girls is seeing the way they offer love and affection so freely and easily. They’re full of hugs for all their little friends when I drop them off at school in the morning – and then again when I pick them up in the afternoon! Whenever her older sister is having a bad day or falls and scrapes a knee, my youngest daughter, Alice, will bring over her favorite toy or doll to make her older sister feel better. It’s the absolute sweetest thing to see.

DIY Watercolor and Gold Leaf Gift Tags

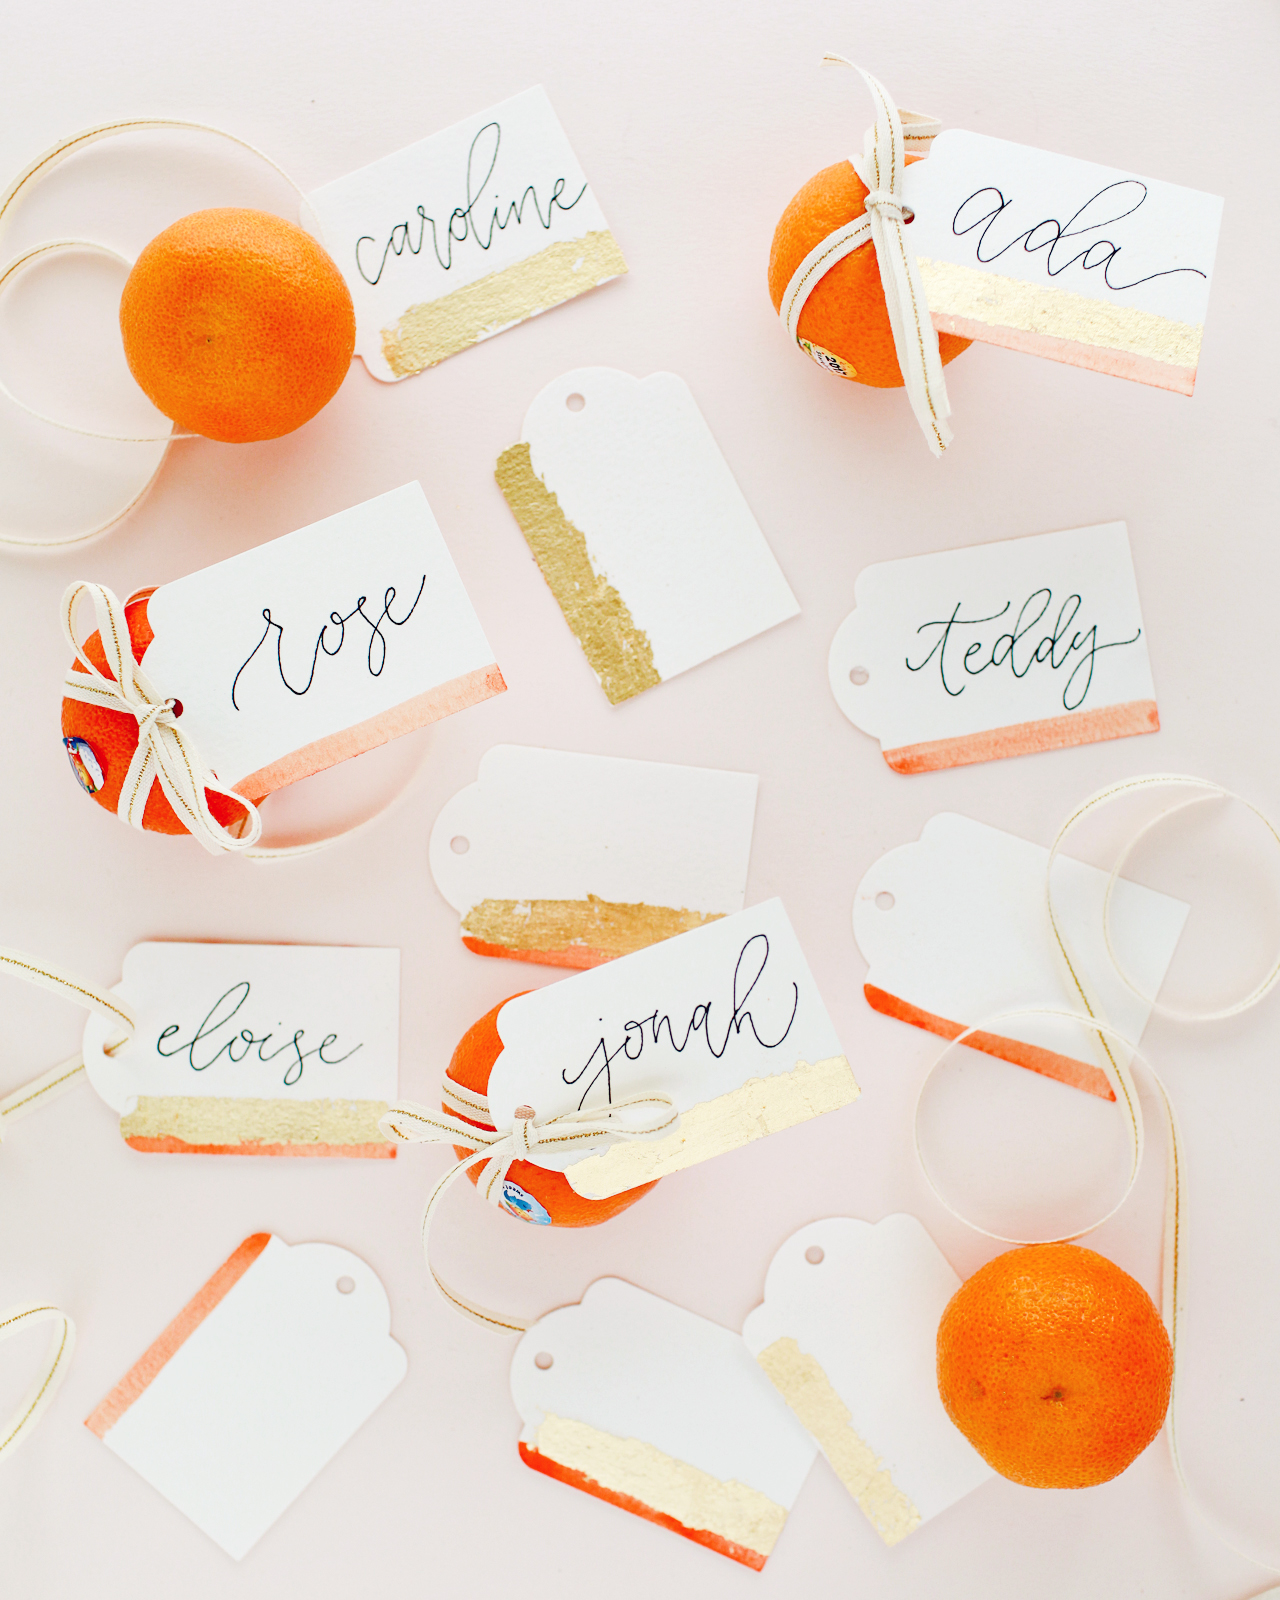
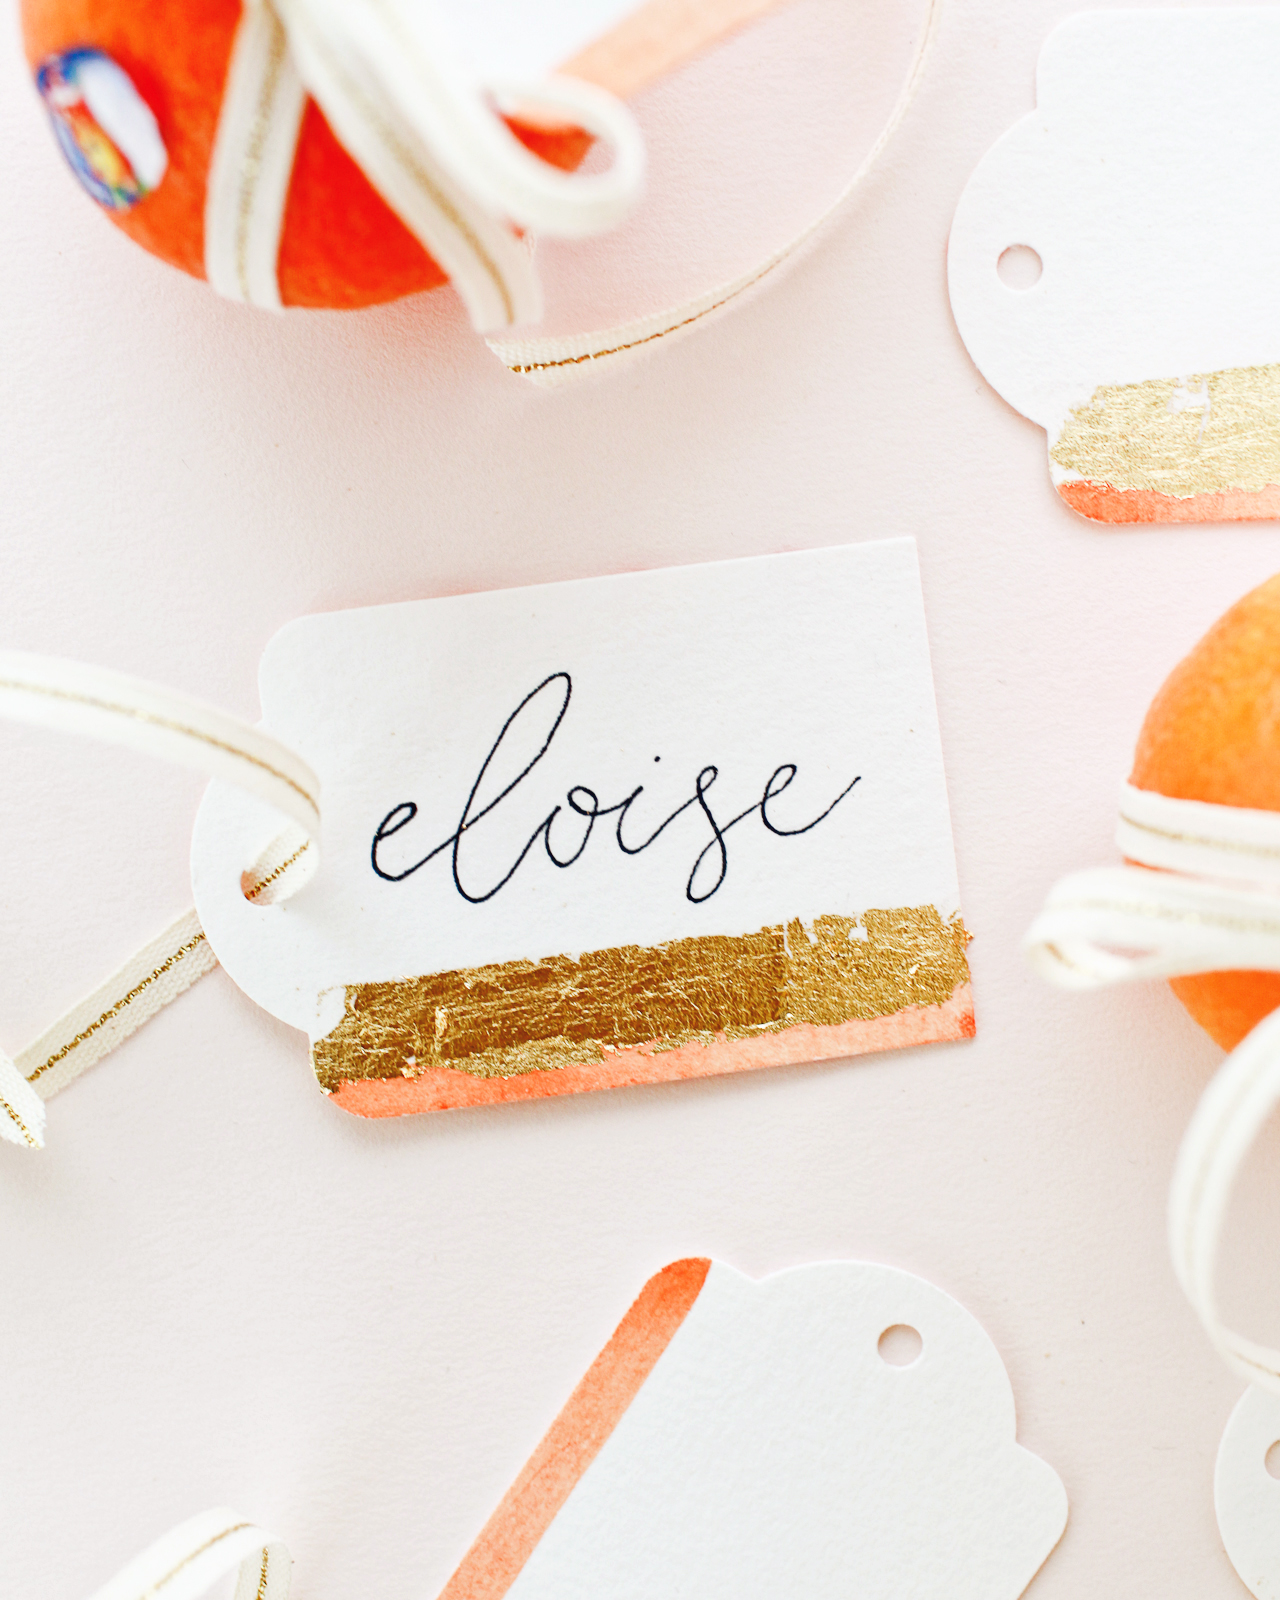
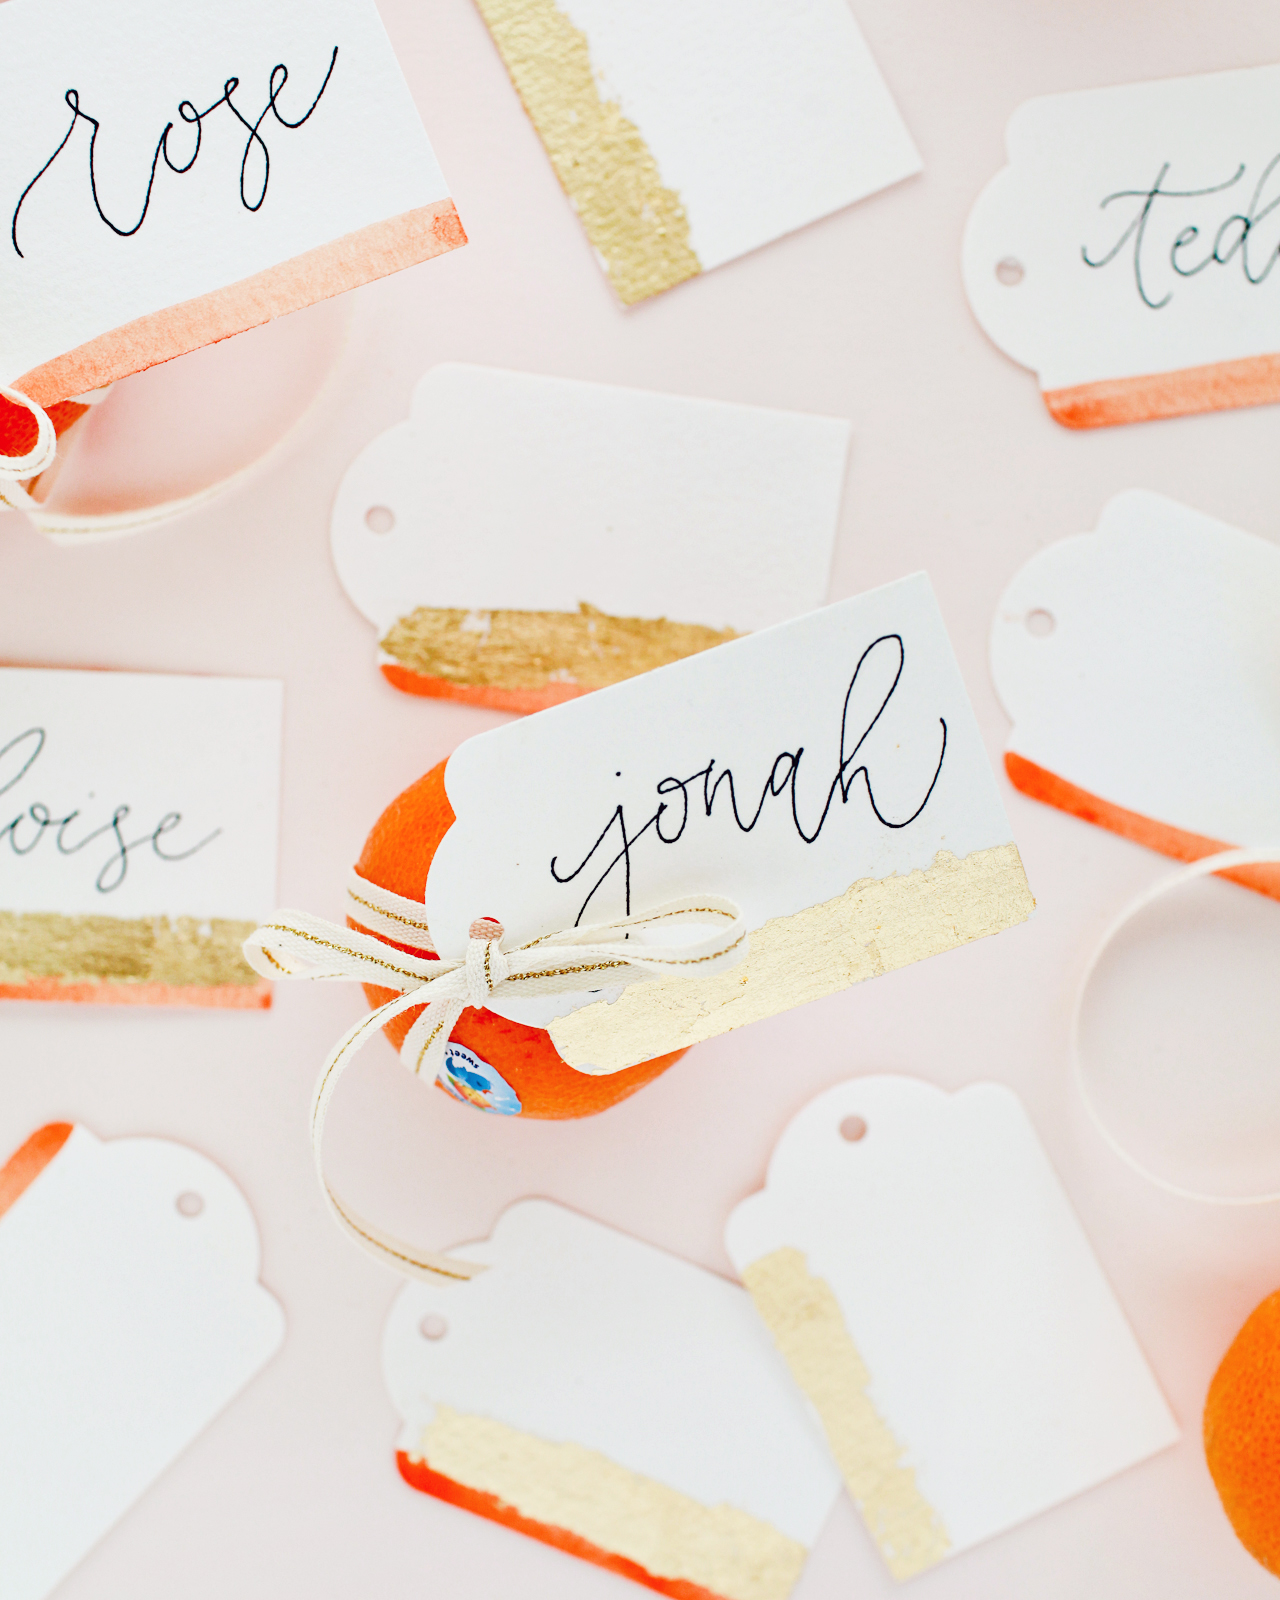
I wrapped a bunch of Cuties in these watercolor and gold leaf gift tags for my daughters to give to their teachers and school friends as our family’s Cuties Correspondents. I’ve been talking with my girls a lot lately about the concepts of kindness and compassion as we head into the holiday season, and these little treats are the perfect way to bring a smile to their friends’ faces as we head off for the holiday weekend. Even as adults, I’m sure we could all use a surprise treat with a sweet message to brighten our day. Cuties are the perfect snack to share with friends and loved ones, from preschool friends to coworkers, and these sweet gift tags make them even more special. Let’s make some!

DIY Watercolor and Gold Leaf Gift Tags

Supplies

Bag of Cuties!

Gift Tag Maker

Cotton Watercolor Paper

Watercolor Set or Watercolor Brushes

Size 6 Round Paint Brush

Gold Leaf Kit

Scissors

Ribbon

DIY Watercolor and Gold Leaf Gift Tags

To make the DIY watercolor and gold leaf gift tags:

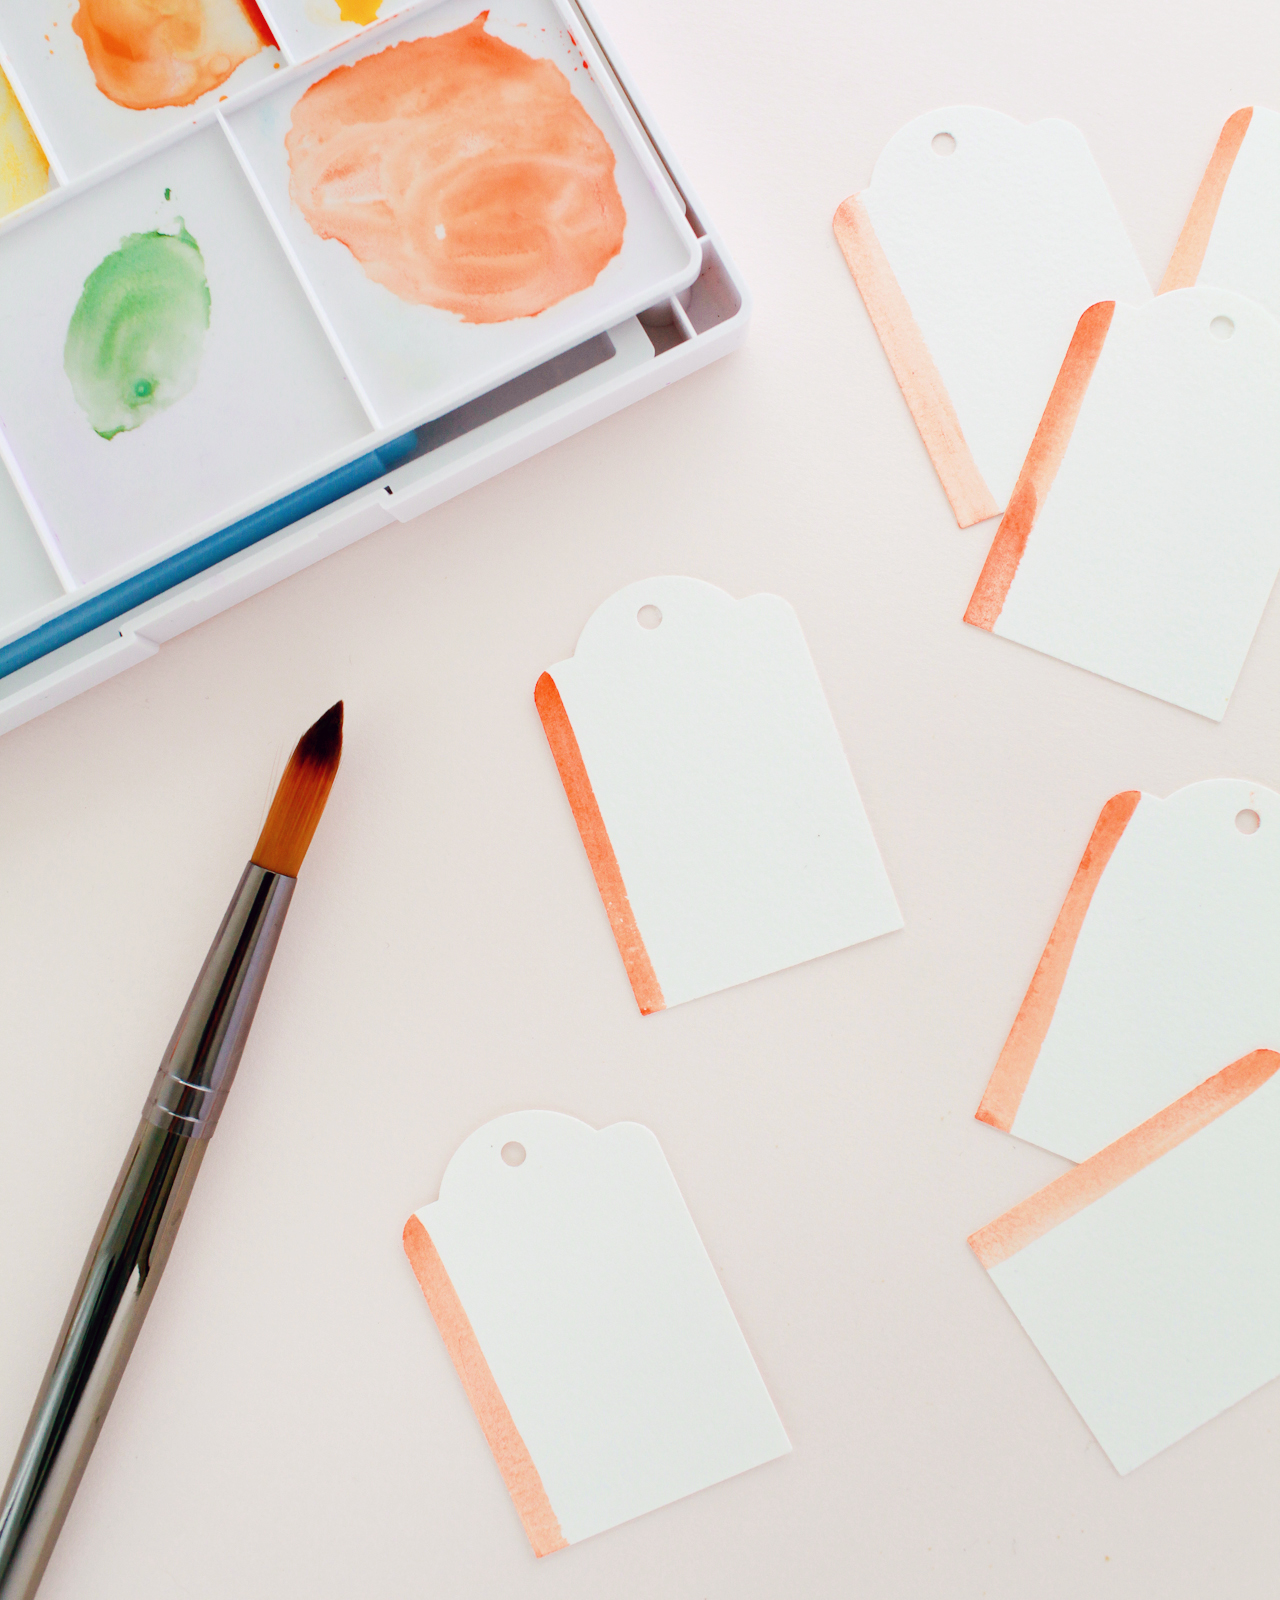
Step 1. Use a gift tag maker to punch gift tags out of 100% cotton watercolor paper and create a small eyelet hole for the ribbon. If you don’t have a gift tag maker, you can use scissors and a standard hole punch. 100% cotton watercolor paper will best absorb the watercolor pigment without warping, so try to avoid lower quality paper or card stock for this project.

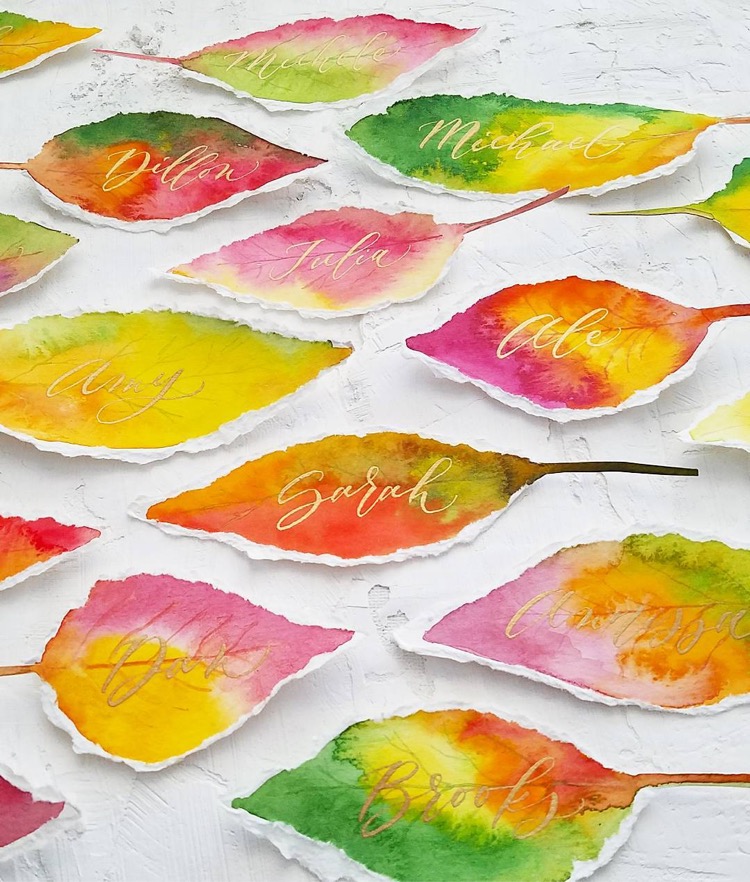
Step 2. Use a Size 6 round paint brush to paint a thin line of orange watercolor on one edge of the gift tag. I used this 30-color watercolor set, but these watercolor brush pens would be fun, too!

Step 3. Add a thin strip of gold leaf above the orange watercolor, leaving enough room to write a name above the gold leaf. Each gold leaf kit is different, so follow the instructions on your package for best results. 

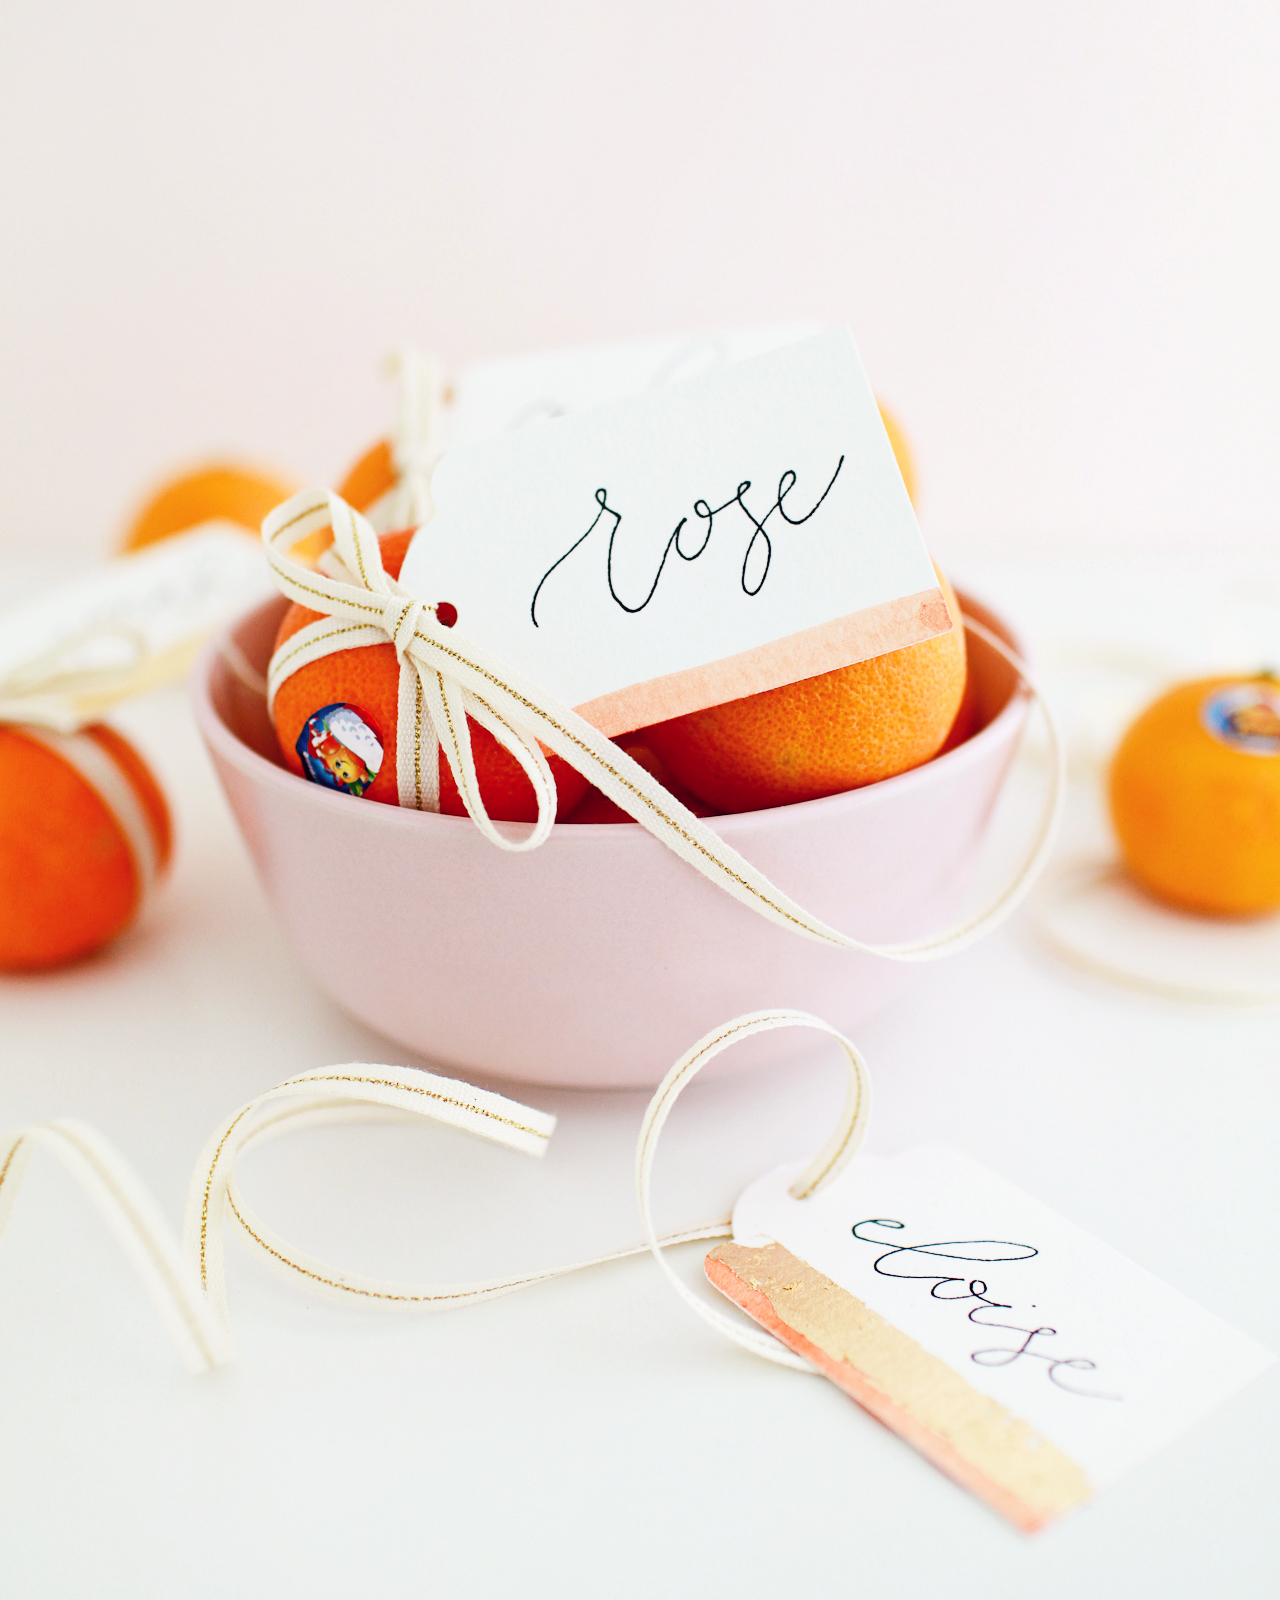
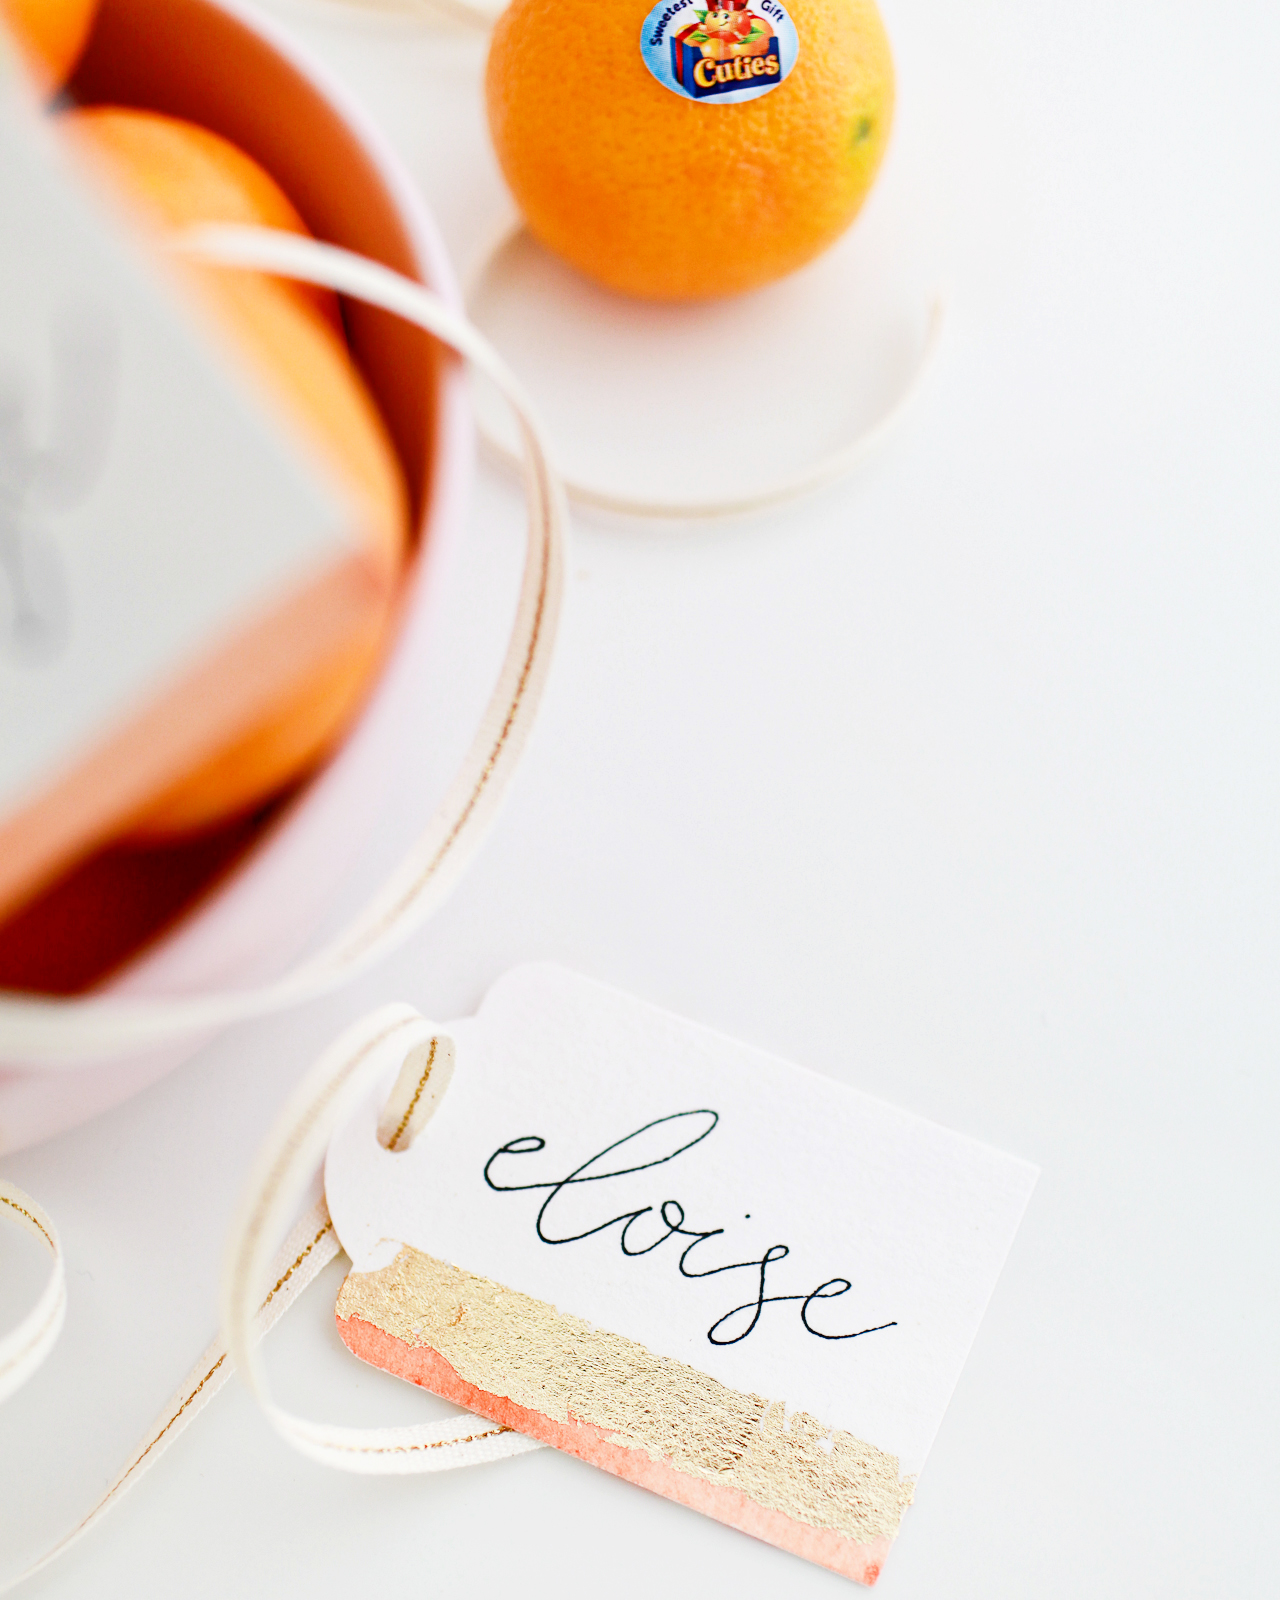
Step 4. Wrap a Cutie in your favorite ribbon (or place a few Cuties into a little bag!), then attach a gift tag and write the name of the recipient. Too cute!

DIY Watercolor and Gold Leaf Gift Tags

DIY Watercolor and Gold Leaf Gift Tags

DIY Watercolor and Gold Leaf Gift Tags

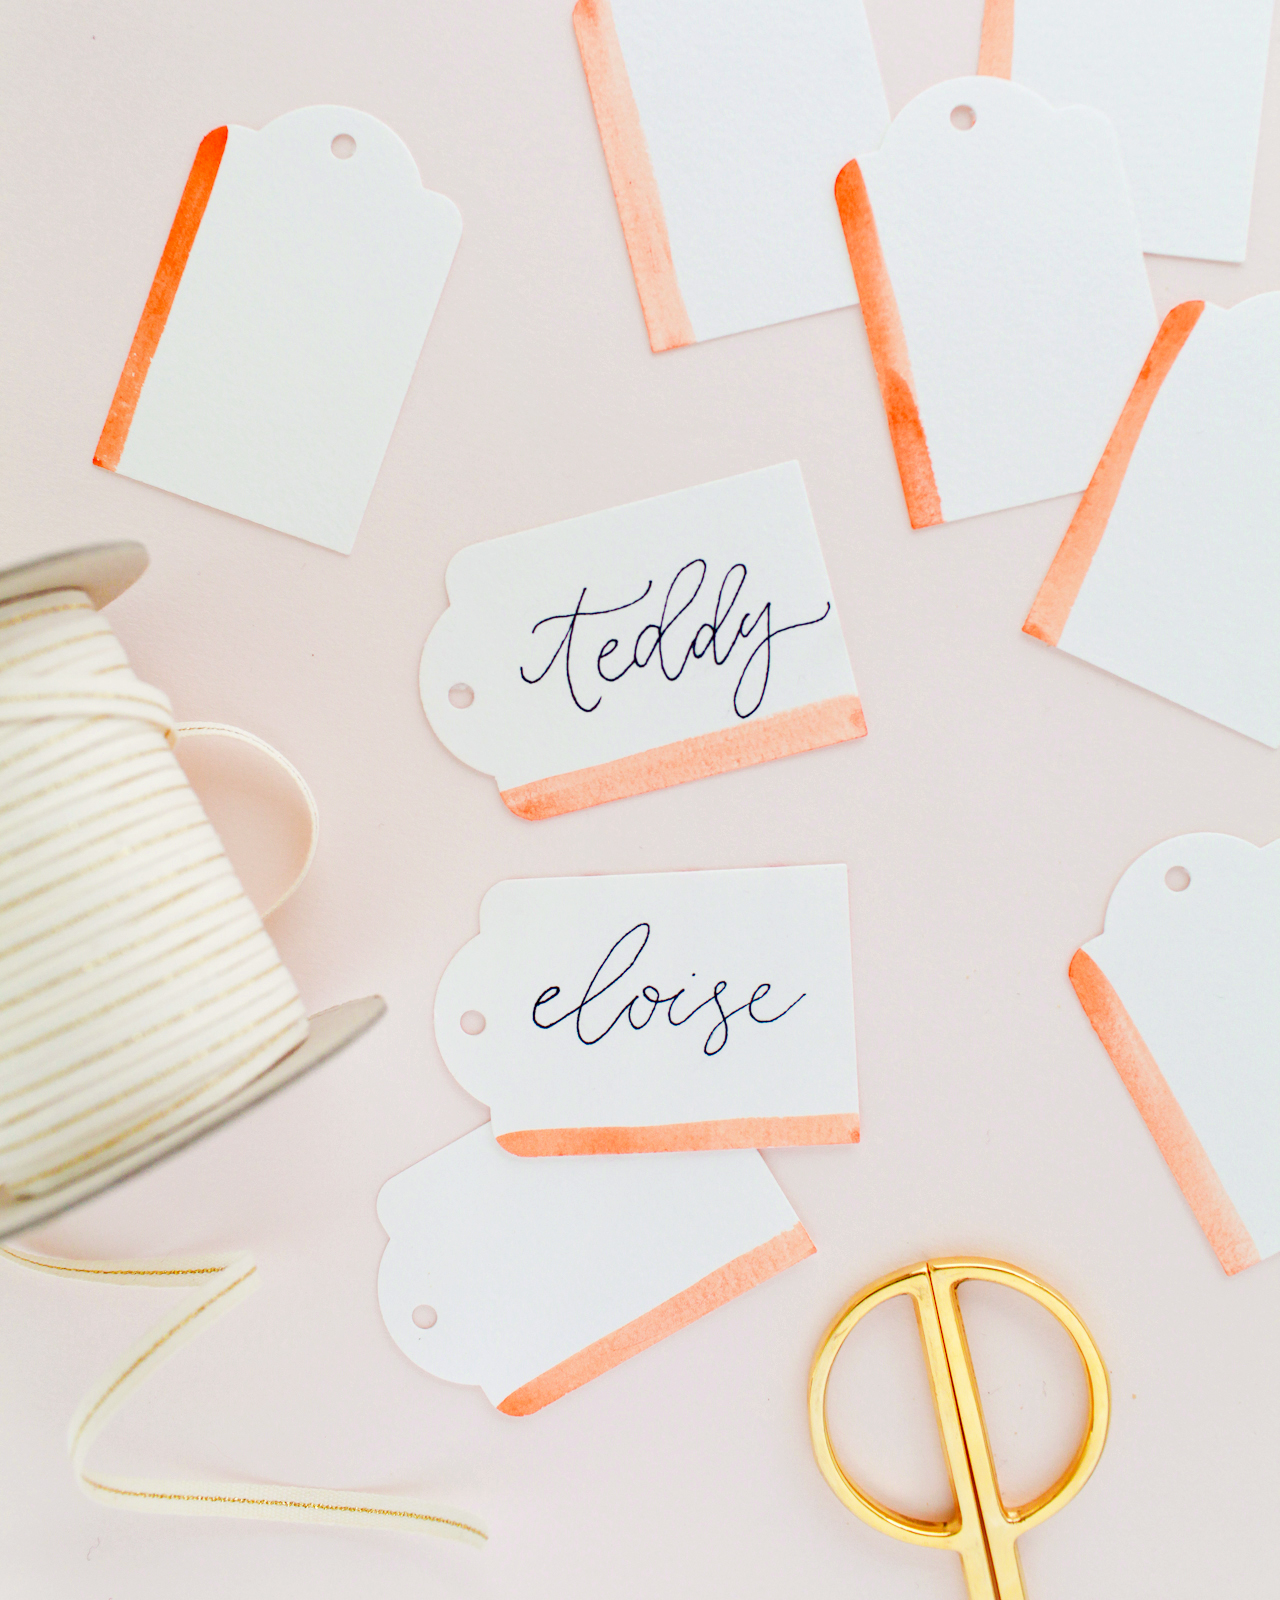
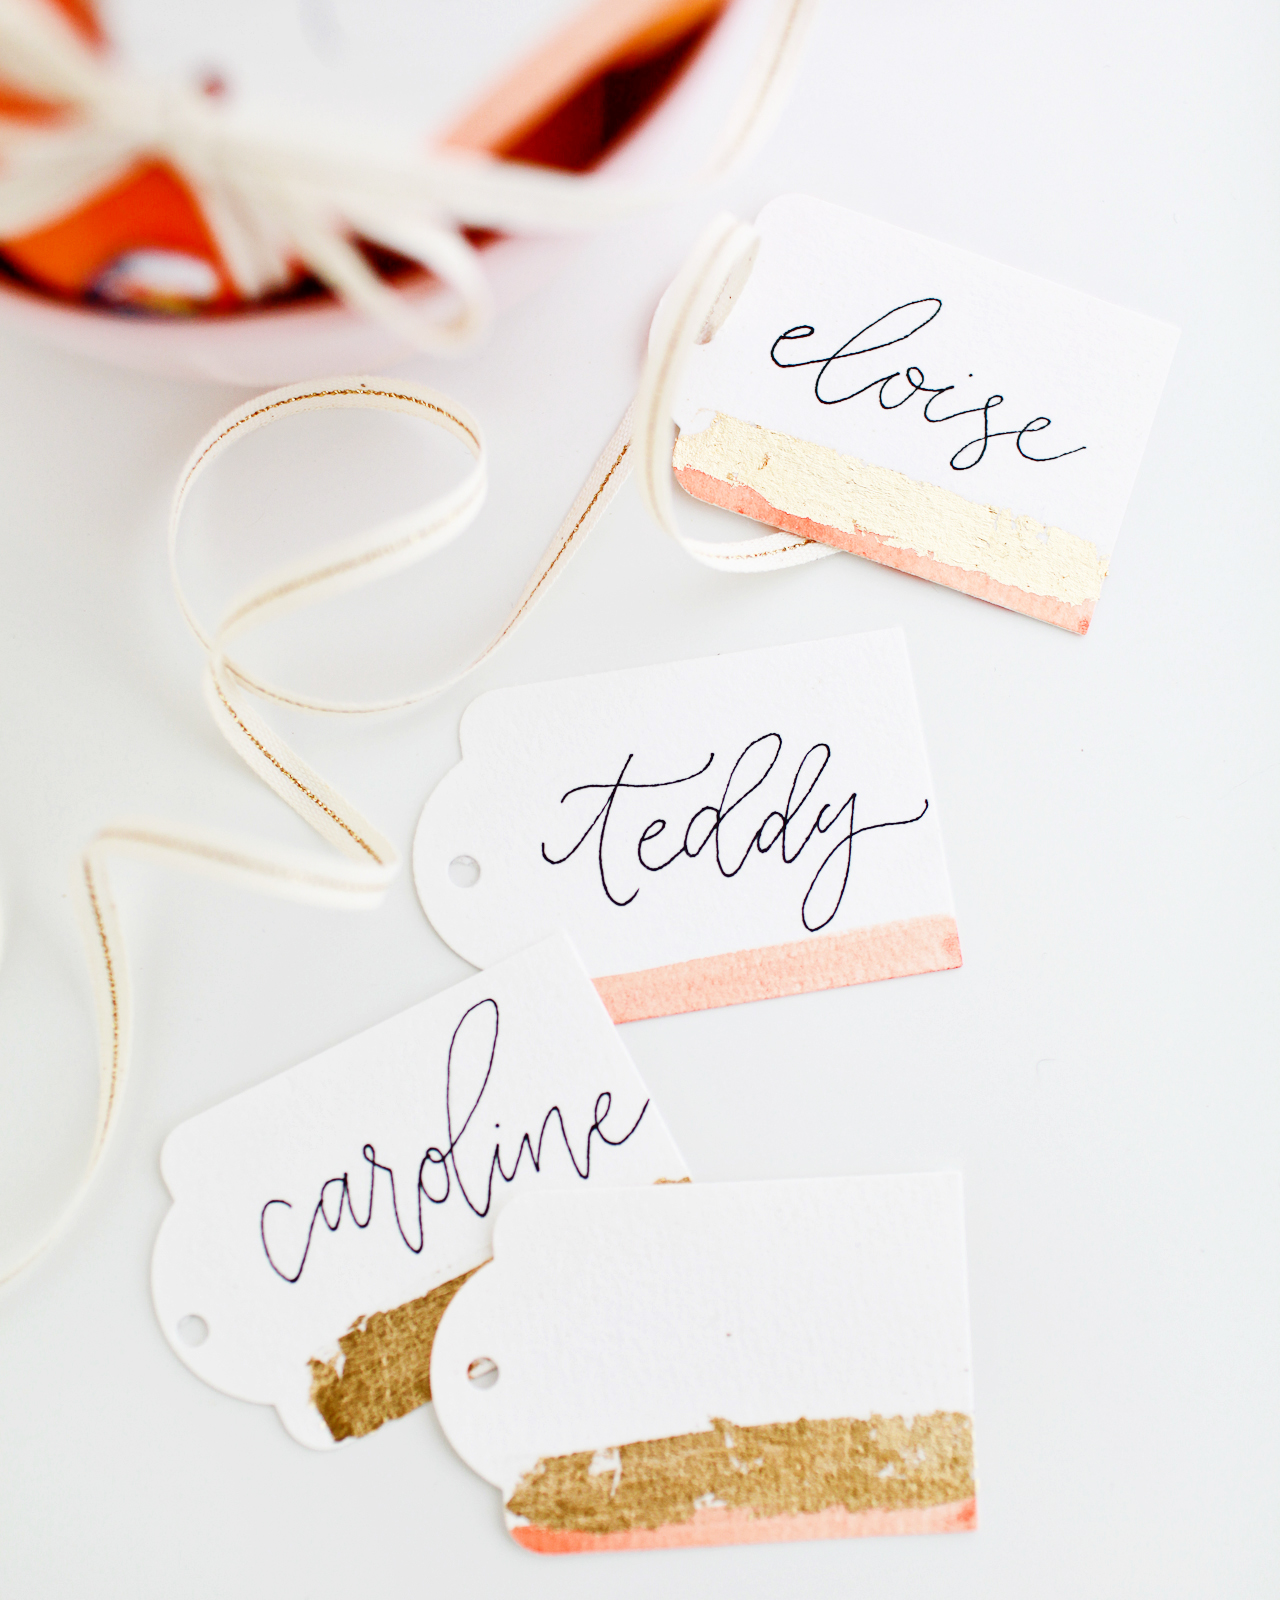
I mixed things up with some gift tags that only have gold leaf, some that only have the dash of watercolor, and some that have both – so fun! For older kids, I love the idea of writing a sweet little note on the other side, but since my kids are still very young we kept our gift tags simple. Now that they’re just learning how to write their names and read, the kids in my daughters’ preschool and kindergarten classes just LOVE getting little gifts or notes with their names on them!

DIY Watercolor and Gold Leaf Gift Tags

DIY Watercolor and Gold Leaf Gift Tags

These gift tags are such a fun and easy way to add a dose of color and sparkle to little gifts – and if you have older children, they can even join in on the painting and gilding process!

How will you be celebrating the return of Cuties season? Share your ideas for brightening someone’s day in the comments below!

This is a sponsored conversation written by me on behalf of Cuties. All content and opinions are my own. Brighten someone’s day and share the sweetness of the season by sharing Cuties with friends and loved ones during our #100DaysofSunshine!

Photo Credits: Nole Garey for Oh So Beautiful Paper

Samsung Connect Home + My Tips for Working from Home

This is a sponsored conversation written by me on behalf of Samsung. All content and opinions are my own. Thank you for supporting the sponsors that make Oh So Beautiful Paper possible!

Earlier this year I marked seven years of self employment and working from home. Seven years! I genuinely love working from home, even if it does come with a set of unique challenges. Today I’m excited to partner with our friends at Samsung to share some of my tips for working from home as a creative entrepreneur and help spread the word about their latest lifestyle innovation: Samsung Connect Home!

Samsung Connect Home + My Tips for Working from Home

One of my biggest challenges working from home has been getting a reliable internet signal in my home office – which is on the second floor of our home and towards the back of the house, while our modem lives on the first floor in the living room at the front of the house. The Wi-Fi signal can’t make it through the plaster and brick in our walls and ceilings, so the signal is incredibly weak by the time it gets to my office on the opposite side of the house. A good Wi-Fi signal is kind of essential for anyone working from home, and I could barely even watch videos on Instagram stories – much less upload photos to a blog post!

Samsung Connect Home + My Tips for Working from Home

Samsung Connect Home was the perfect solution for my weak Wi-Fi signal woes. Samsung Connect Home is a mesh Wi-Fi router that optimizes your signal, creating a powerful Wi-Fi signal throughout your home and eliminating Wi-Fi dead zones. Each router has a range of 1,500 square feet – which is actually larger than my entire house! – and you can wirelessly connect up to five Samsung Connect Home devices for mesh network coverage of 7,500 square feet. You can upload and download in an instant and stream your favorite tv shows, videos, and podcasts without interruption – which really helps maximize those working hours.

Samsung Connect Home + My Tips for Working from Home

Samsung Connect Home + My Tips for Working from Home

Samsung Connect Home is also the only whole-home Wi-Fi system that works as a SmartThings Hub to remotely control a variety of smart-home appliances and devices – like security systems, locks, Philips Hue lighting, Nest thermostats, and more! Just set the whole thing up on your phone using the Samsung Connect app (available on both Android and iOS devices) and you can control all your smart devices and appliances from your phone through just one app, instead of a bunch of different apps for each individual product or appliance. You can even use the apps to control appliances when you aren’t home. Handy, right? The app also tells you where to place each Samsung Connect Home device in your home for optimal performance. You can even use the app to manage connected devices, set parental controls, and allow guest access if you have friends or family visiting – or maybe even a friend co-working with you for the day. So easy!

Samsung Connect Home + My Tips for Working from Home

I’m pretty particular about how things look in my home, and I’m totally one of those people that hid my old clunky antenna router behind some books in our living room. But the Samsung Connect Home is so pretty! The design is simple, sleek, and compact – is it weird to say that a router is pretty? I have mine on a book shelf in my office and I actually enjoy looking at it every day. It just goes to show you the power of well-designed home appliances and the value of making something both utilitarian and beautiful. Plus, Samsung Connect Home is protected by hardware-based security technologies with integrated network certification, so you can rest easy knowing your phone and devices are secure.

Samsung Connect Home + My Tips for Working from Home

I love working from home, but it can definitely be a challenge to stay productive and focused. Here are my top 5 tips for working from home as a creative entrepreneur:

1. Create a Comfortable, Dedicated Work Space. I’ve worked from home since 2010, and during that time I’ve moved from a little desk nook in our living room to a dedicated home office – although I still end up writing blog posts and emails from my the couch in the evenings. Having a dedicated work space helps me get into a “work” mindset, and because I am very much affected by my visual surroundings I need that dedicated work space to be both comfortable and visually inspiring, with a comfortable place to sit, shelves full of my favorite props, and beautiful artwork on the walls.

2. Set a Consistent Work Schedule – Including a Quitting Time! Before I had children, I would pretty much work from the moment I woke up until the moment I went to sleep. Forget about work/life balance! These days, I work until 3:30 p.m., which is when I go pick my kids up from school each day. I work for a couple more hours in the evening after they go to bed, but I rarely check email or social media during the hours that they’re home and awake. Having a consistent work schedule and regular quitting time has improved my productivity during the week, since I know I only have a finite amount of time to get things done during each work day!

My Tips for Working from Home + Samsung Connect Home

3. Batch Task Your Week. We’ve all heard of batch tasking, but I basically apply the concept to my entire week. On Sunday night, I write out my goals for the upcoming week and plan each day around all the specific objectives that I need to accomplish that week. Monday might be dedicated entirely to running errands: heading to my local craft store for DIY supplies, visiting the flower market to source florals for an upcoming photo shoot, and doing a couple personal errands like food shopping or dropping clothes at the dry cleaner. Tuesday might be dedicated entirely to responding to emails and bookkeeping. Anything that needs to be photographed that week gets batch scheduled on the same day, from DIY projects to photos for a cocktail recipe. I started doing this back when my kids were tiny babies and I was still trying to fit work in around nap schedules and playtime, but I still do it now that my kids are in school and my days are so much more productive than they used to be!

Samsung Connect Home + My Tips for Working from Home

4. Don’t Let Personal Tasks Distract You. When you work from home, it can be really easy to blur the lines between personal tasks and work tasks, especially when all those dirty dishes and the piles of unfolded laundry are just sitting there staring at you. I might squeeze a couple of personal errands into my dedicated work errand days, but otherwise I treat my work days and work hours just as I would if I was working in an office. It’s so easy to get distracted by all the things that need to be done at home, like folding laundry and cleaning, but if I let myself get sidetracked by those tasks I’d never get any work done! I save most of my personal chores and errands for nights and weekends, just like I would if I worked outside the home.

5. Make Time for Connecting with your Local Community Outside of Your Home. Working from home is great, but it can also be really isolating – especially as a new mom. I’ve spent most of the last five years in my little working mom bubble at home and I haven’t been all that great about connecting with other creative entrepreneurs in the DC area. I really missed having people to bounce ideas off of and help spark creativity, so a few months ago I made a conscious effort to get out of my home office bubble. I made lunch dates with friends, started collaborating with new photographers, reached out to local creatives about doing workshops at Common Room Studio – and I’m hoping to hold open studio co-working sessions and organize creative meet ups at the studio in the new year!

Samsung Connect Home + My Tips for Working from Home

For anyone else working from home – whether you’re telecommuting or a creative entrepreneur – what are your tips for working from home? How do you stay productive and inspired? Share your experience in the comments below!

This is a sponsored conversation written by me on behalf of Samsung. All content and opinions are my own. Check out Samsung Connect Home and download the Samsung Connect app right here!

Photo Credits: Meghan Marie Photography and Nole Garey for Oh So Beautiful Paper

Happy Weekend!

Happy Thursday everyone! DC schools and the federal government are observing Veterans Day tomorrow, so I’m taking the opportunity to head out a bit early this week. Plus, I’ve been busy over at Common Room Studio getting ready for three big workshops this weekend! Jenna of Mon Voir is coming out to DC to celebrate her new book, Everyday Watercolor, and teach three of her floral watercolor workshops. If you’re local, we still have a couple spots in the class on Sunday morning – you can sign up right here! We’re also getting ready to announce some exciting workshops and events in December, so jump on our mailing list if you haven’t already! But in the meantime…

Hanwriting Watercolor Leaf Placecards

Photo by hanwriting via Instagram

…a few links for your weekend!

Make handmade holiday cards for retired soldiers at the Old Soldiers Home/ Armed Forces Retirement home here in DC. I know I’ll be making some with my girls this weekend!

Have you seen all the amazing shoes in the Nordstrom fall sale??? These knee high leather boots are the perfect winter boot (and they’re 50% off!) and I love the side cut outs on these black leather booties (30% off!)

A Macy’s Thanksgiving Day Parade centerpiece! This would be so cute for a kids table design! (p.s. I’m also loving Brittany’s version)

How cute is this pink parka??

MAKE: Fettuccine with Avocado-Garlic Sauce (yum!)

I desperately want this pink chaise lounge for Common Room Studio!

Card of the week!

This is fascinating and horrifying: A toxic city on the edge of the world


This week on Oh So Beautiful Paper:

Blush and gray desert-inspired wedding invitations

We went all the way to Brisbane, Australia to go Behind the Stationery with Fox & Fallow!

Add color to your wardrobe with vintage accessories!

One of my favorites from the DIY archives: DIY hand lettered dinner plates (perfect for holiday dinners!)


That’s it for me this week! I hope you have a wonderful weekend, and I’ll see you back here on Monday! xoxo


Fall Cocktails: The Stone Fence

It’s Halloween! But the adults deserve treats, too. If you just spent the last few nights in a row working into the wee hours of the morning making your kids their perfect costumes, of if you just spent all night escorting your kids on a sugar rampage through the neighborhood, then treat yourself to a favorite fall cocktail: the Stone Fence. – Andrew

The Stone Fence Cocktail Recipe

The Stone Fence

2 oz Rye Whiskey
2 oz Sweet Apple Cider
2 dashes Boker’s Bitters
Dry Hard Cider

Combine the rye whiskey, sweet apple cider, and bitters in a highball glass filled with crushed ice. Top with the hard cider and give it a stir. Garnish with fresh mint or another handy herb and enjoy!

The Stone Fence Cocktail Recipe

We first featured the Stone Fence all the way back in 2012 and have revisited periodically since then, both because it’s an awesome drink with an awesome history* and because it’s a very versatile recipe that can be endlessly tweaked.

*Seriously, it’s an awesome history, playing a big role in Ethan Allen’s capture of Fort Ticonderoga in 1775. This is the drink that gave a bunch of backwoods militiamen the courage to drunkenly stumble into a military outpost of a global super power and successfully demand its surrender through sheer drunken outrageousness.

The Stone Fence Cocktail Recipe

The original recipe called for rye whiskey – America’s first love, before the Age of Bourbon – and hard apple cider. I’ve tried this version, and it’s ok, but a little bland; the cider and rye play up each other’s dryness and bitterness in a way that I don’t really love. I’ve also tried an updated version that pairs rye with sweet apple cider, the non-alcoholic stuff that most Yankee kids know just as plain “cider.” This version is pretty good, tart sweet and spicy, but it can feel a little…childish.

So I made the best of both worlds and added both sweet, non-alcoholic cider and a dry, sparkling hard cider. The result is sweet and tart and spicy, but the hard cider dries it out a bit and lightens the drink with effervescence. The hard cider also kicks up the proof just a bit, which helps balance out the sweet cider.

The Stone Fence Cocktail Recipe

We went with Boker’s bitters – a long-lost bitters recipe heavy on the cardamom that used to be ubiquitous in drinks, then vanished from the record, and was recently resurrected. This adds some warm baking spice notes, always welcome in a fall drink featuring apple. If you don’t have Boker’s bitters on hand, you could always try making your own cardamom bitters – or there’s always the old standby, Angostura bitters, that will add some complex spices to your Stone Fence.

The Stone Fence Cocktail Recipe

Recipe, glassware, and Boker’s Bitters: Liquorary – you can also follow along on Instagram for more cocktail recipes!

Photo Credits: Nole Garey for Oh So Beautiful Paper

This post contains affiliate links. By clicking on these links, you’ll help support Oh So Beautiful Paper while also purchasing some fantastic products. We only recommend products that we truly love and trust that you’ll love, too. Our full disclosure policy can be found here.

DIY Moon and Stars Pumpkins

Last year, I made these really fun swirly galaxy-inspired iridescent pumpkins. This year, I wanted to do another spin on a celestial-inspired pumpkin using my new favorite material: hologram vinyl! So today I’m teaming up with one of my favorite crafting partners, Fiskars, to make these beautiful DIY moon and stars pumpkins. This DIY couldn’t be easier – all you need are some scissors, a few craft punches, and vinyl! Oh, and pumpkins of course. And since the vinyl essentially functions like a sticker, it’s also a super fun activity for kids. Are you ready? Let’s go!

DIY Moon and Stars Pumpkins

I always like to incorporate hand drawn shapes into my projects, so these pumpkins feature a quirky crescent moon and cute little stars that I cut by hand using my favorite Orange-handled Scissors – which just celebrated their 50th anniversary! (Did you catch the Matisse-inspired garland that I made to celebrate??) For those of you with little helpers at home that are anxious to help out, they can cut a few hand drawn stars using Fiskars Kids Scissors! I made the rest of the stars using the Fiskars Star Thick Materials Shape Punches and mixed them with the hand cut shapes. I love the idea of having one big pumpkin with the crescent moon surrounded by lots of little pumpkins with tiny hologram foil stars!

DIY Moon and Stars Pumpkins

I’m always drawn to black and white pumpkins for Halloween, but for these moon and star pumpkins I added dark navy blue and charcoal gray to the mix. I’m all about those non-traditional holiday color palettes! You can use faux pumpkins and/or real pumpkins for this tutorial (I used both), but the hologram foil is particularly striking against dark colors, so I’d recommend painting any real pumpkins with navy blue or black matte craft paint before applying the hologram foil stars.

DIY Moon and Stars Pumpkins

Supplies

Fiskars Original Orange-handled Scissors

Fiskars Kids Scissors (for those of you with little helpers!)

Fiskars Star Thick Materials Shape Punch in small, medium, and large

Hologram vinyl, hologram glitter self-adhesive sheets, and matte white vinyl

Pencil

Real or faux pumpkins

Matte craft paint and paintbrush

DIY Moon and Stars Pumpkins

DIY Moon and Stars Pumpkins

To make the DIY Moon and Stars Pumpkins:

Step 1. Paint your pumpkins using a matte craft paint in a dark color (like navy blue, charcoal gray, or black) and allow them to dry completely. If you like, you can also use faux black pumpkins and skip this step!

Step 2. Use a pencil to lightly sketch the shape of a crescent moon on the back of the white vinyl. The size of the crescent moon will vary depending on the size of your pumpkin, but my crescent moon was just over 5″ tall on an 8″ tall faux pumpkin. Use the Orange-handled Scissors to cut the crescent moon shape from the white vinyl.

Step 3. Use the Star Thick Materials Shape Punches to make lots of stars in varying sizes from the hologram vinyl and hologram glitter self-adhesive sheets. You can also punch some stars out of the matte white vinyl and add those to the mix!

A couple quick tips for punching the star shapes from the vinyl: I found it easiest to cut 3″ strips of vinyl from the roll using my Orange-handled Scissors, then punch the star shapes from those strips. When operating the punch, I had the best luck when the vinyl was facing up and I moved the blades really quickly. If you try to punch the vinyl too slowly, the vinyl can get stuck in the blades and create rough edges. Punching quickly creates nice clean edge lines!

Step 4. Use a pencil to draw some stars on the back of the hologram vinyl and glitter sheets, then cut those by hand using the Orange-handled Scissors. If you have little helpers, they can also cut out a few hand drawn stars using Fiskars Kids Scissors!

Step 5. Peel the protective backing off the white crescent moon and apply the vinyl shape to your largest pumpkin. Then peel the protective backing off the star shapes and apply them to your pumpkins one by one. Try to cluster a bunch of the smallest stars together and incorporate the larger stars in random patterns, just like you’d see in the night sky. For the smallest pumpkins, use only the smallest star shape and place them in a staggered line around the pumpkin. Continue placing stars (and punching new stars as needed) until you’ve covered all of your pumpkins!

DIY Moon and Stars Pumpkins

DIY Moon and Stars Pumpkins

DIY Moon and Stars Pumpkins

DIY Moon and Stars Pumpkins

Aaaaaah! These are so cute I can barely stand it! And so pretty when mixed with a few undecorated white (or even orange!) pumpkins. Add in some colorful fall flowers and you’re pretty much guaranteed to have the prettiest front porch on the block. Happy Halloween crafting!

p.s. Printable Halloween favor bags and a fun DIY eyeball Halloween door cover!

This post was created in partnership with Fiskars. All content and opinions are my own. Thank you for supporting the sponsors that make Oh So Beautiful Paper possible!

Photos by Nole Garey for Oh So Beautiful Paper