Friday Happy Hour: The First Kiss

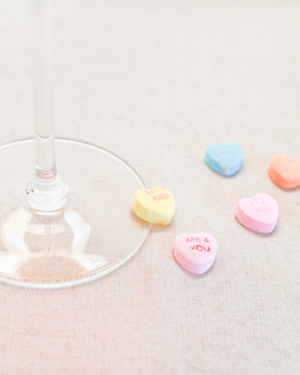
Happy St. Valentine’s Day! In the spirit of the holiday, here’s a drink that’s a little cheezy, a little pink (well, red), and lots of fun to enjoy with someone else: the First Kiss. – Andrew

OSBP-Signature-Cocktail-Recipe-Red-Champagne-Cocktail-7

OSBP-Signature-Cocktail-Recipe-Card-The-First-Kiss-Shauna-Lynn-Illustration

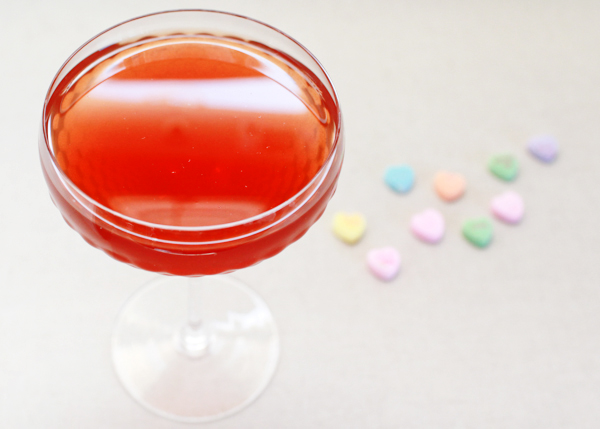
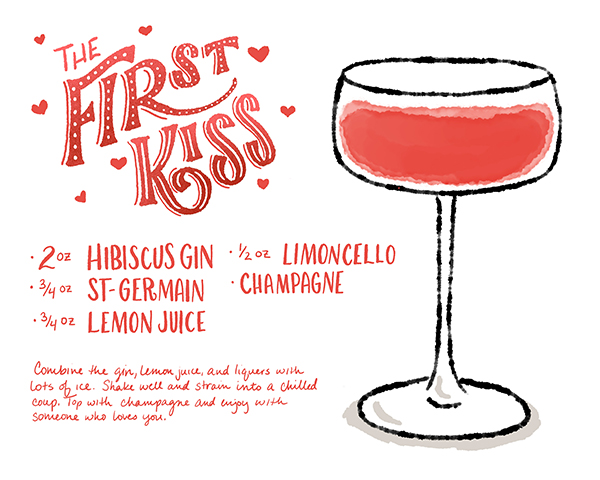
Illustration by Shauna Lynn for Oh So Beautiful Paper

The First Kiss

2 oz Hibiscus Gin
3/4 oz St-Germain
3/4 oz Lemon Juice
1/2 oz Limoncello
Champagne

Combine the gin, lemon juice, and liqueurs with lots of ice. Shake well and strain into a chilled coupe or a flute.  Top with champagne and enjoy with someone you love.

OSBP-Signature-Cocktail-Recipe-Red-Champagne-Cocktail-21OSBP-Signature-Cocktail-Recipe-Red-Champagne-Cocktail-6

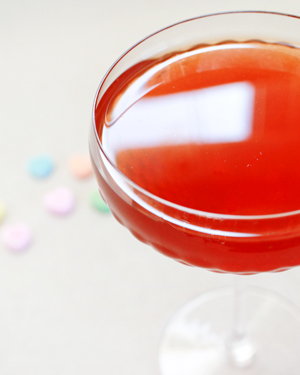
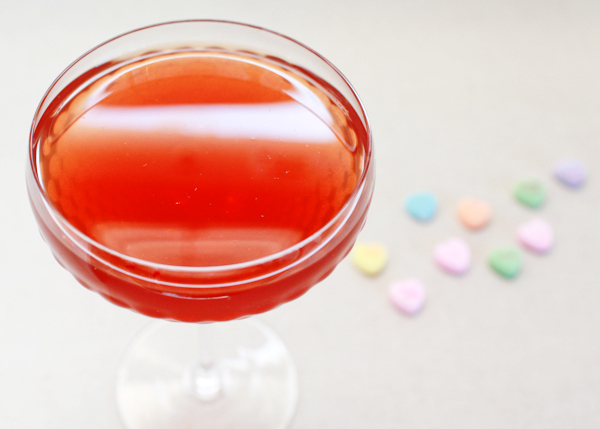
Last year, we showcased our first Valentine’s cocktail, the Love Letter, which also used hibiscus gin. It’s very easy to make – just steep some hibiscus tea bags in English Dry gin for at least a few hours and a day or two for best results – and adds a tremendously botanical flavor to the gin. Hibiscus can be a bit astringent, though, so I paired it with St-Germain and Limoncello (Cointreau would work in its place too) to add plenty of sweetness and fruity, floral notes for balance. And champagne seems to perfect not to include on Valentine’s Day, though it makes for a pretty good drink even without it.

OSBP-Signature-Cocktail-Recipe-Red-Champagne-Cocktail-8

It’s enormously easy to make all sorts of personalized infusions like this. Ethyl alcohol – the stuff that makes booze boozy – is also a fantastic solvent. It will pick up tons of flavor from anything it touches, like gin’s juniper berries or whiskey’s caramel and vanilla notes from the wood barrels in which it’s aged. Herbal teas like hibiscus are perfect for this: easy to drop in a bottle and pull out when you’re done, with a huge variety of possible flavors. So consider spicing up your bar and impressing your friends with some rum, gin, or Tequila infusions. And let us know when you do!

Photo Credits: Nole Garey for Oh So Beautiful Paper

Happy Weekend!

Happy Valentine’s Day everyone! I hope you’re able to spend time with your special people this weekend! We got a few more inches of snow here in DC on Wednesday night and are expected to get even more this weekend, so we’re hunkered down for a quiet weekend at home. Is it spring yet?? Sigh. But in the meantime…

Julie-Song-Ink-Calligraphy-Love-Quote

Printable calligraphy quote by Julie Song Ink (see below for a discount!)

…a few links for your weekend!

This week on Oh So Beautiful Paper:

Check back soon for this week’s cocktail! I hope you all have a wonderful weekend, and I’ll see you back here next week! xoxo

DIY Tutorial: Travel-Inspired Save the Date

We’ve been having an unusually cold winter here in Texas and all of these winter storms have us dreaming of warmer places. With destination weddings more popular than ever, this travel inspired save the date is sure to excite your guests and have them booking their flights pronto. Our favorite part of this design? The one-of-a-kind vintage maps we used for the liners! – Bailey and Emma of Antiquaria

Step One: First of all, you’ll need to stamp your save the date on a kraft paper card cut to 3.75″ x 5.75″. For this design we used our Air Mail Save the Date stamp and a black stamp pad. For a step-by-step video tutorial about this printing process go here.

Step Two: To add a pop of color into the design, we mounted our kraft paper card onto a red-orange A6 backer. To do this, simply apply stick glue or double sided tape around the back edges of the kraft paper card. Center it over the A6 red card and press down. If you used glue, let it dry.

Step Three: We’re simply swooning over this gorgeous vintage map paper. Each sheet is different so the results are fun and varied. Trace an A6 envelope liner template with a pencil on the back of the map paper and cut out the pattern. Use double sided tape or stick glue to adhere the liner into the mint envelope just below the gumming.

Step Four: We just couldn’t stand to waste any little bits map paper so we used the leftovers from the liners in Step 3,  stamped a monogram (we used our Cross my Heart Initials monogram stamp) in black and then cut them out around the design, in a cute heart shape.

Step Five: The last step is to pull it all together! We punched holes on either side of the heart tag so that it would lay flat and straight when we threaded the twine around the save the date. Once that’s done, just address your envelopes and add postage so that you can mail them off!

Materials

Air Mail Save the Date Stamp

Cross my Heart Monogram Stamp

Stamp Pad in Black

Kraft Card Stock

A6 Cards in Persimmon

A6 Envelopes in Mint

Map Paper

Twine in Teal

Double Sided Tape or Stick Glue

Scissors

â…› inch Hole Punch

Anti­quaria is a mem­ber of the Designer Rolodex – you can see more of their beau­ti­ful work right here or visit the real save the dates gallery for more save the date ideas!

Photography: Antiquaria for Oh So Beautiful Paper

Calligraphy Inspiration: Blue Eye Brown Eye

Love must be in the air as I recently fell head over heels when I came across the work of Blue Eye Brown Eye‘s Lauren Essl. A designer and calligrapher, Lauren’s portfolio of work is as impressive as it is beautiful. Her pitch perfect invitation design and calligraphy turns something as everyday as a paper and envelopes into a beloved keepsake. Her blog is filled with stunning peeks of her work along with tips and resources for the beginning calligraphers. She’s also sharing her talent with the world through calligraphy classes!  – Julie

Blue Eye Brown Eye calligraphy invitation suite

blueeyebrowneye_2

blueeyebrowneye_3

I really love how Lauren utilizes space; corners and flaps are filled with ribbons of ink and creates a nice balance for a colorful array of stamps.

blueeyebrowneye_4

blueeyebrowneye_5

blueeyebrowneye_6

To see more of her beautiful calligraphy be sure to check out Lauren’s portfolio and blog. You can also register for her calligraphy classes if you’re located in Texas! More information is available on her website.

Photo credits: 1, 4 Amanda Marie Portraits; 2 Apryl Ann Photography; 3 l+r Heather Ann Design & Photography; 5 Lauren Essl; 6 left N.Barrett Photography, right Ben Q Photography

NYNOW Winter 2014, Part 5

Today we’re wrapping up coverage from the NYNOW winter 2014 market with a final group of booths that spans everything from accessories and jewelry to gorgeous chandeliers! First up, one of my favorite colorful booths: Baggu! Spring colors were everywhere in this latest collection, from leather clutches and totes to travel-friendly zip cases. I’m loving the gorgeous shade of teal!

OSBP-NYNOW-Winter-2014-Baggu-9

OSBP-NYNOW-Winter-2014-Baggu-12

OSBP-NYNOW-Winter-2014-Baggu-1

OSBP-NYNOW-Winter-2014-Baggu-3OSBP-NYNOW-Winter-2014-Baggu-4

OSBP-NYNOW-Winter-2014-Baggu-6

OSBP-NYNOW-Winter-2014-Baggu-13OSBP-NYNOW-Winter-2014-Baggu-16

OSBP-NYNOW-Winter-2014-Baggu-14

Baggu

I don’t normally cover lighting or furniture on OSBP, but I had to make an exception when I saw these gorgeous bubble chandeliers from Pelle. I’ve been a fan for years and years – all the way back to when Pelle first started on Etsy – so I was thrilled to finally see these gorgeous creations in person!

OSBP-NYNOW-Winter-2014-Pelle-4

OSBP-NYNOW-Winter-2014-Pelle-1OSBP-NYNOW-Winter-2014-Pelle-5

OSBP-NYNOW-Winter-2014-Pelle-15

OSBP-NYNOW-Winter-2014-Pelle-13

OSBP-NYNOW-Winter-2014-Pelle-22OSBP-NYNOW-Winter-2014-Pelle-6

OSBP-NYNOW-Winter-2014-Pelle-18OSBP-NYNOW-Winter-2014-Pelle-19

OSBP-NYNOW-Winter-2014-Pelle-8OSBP-NYNOW-Winter-2014-Pelle-20

OSBP-NYNOW-Winter-2014-Pelle-10

Pelle

My friend Laurel Denise was at NYNOW with a brand new collection of colorful beaded necklaces, metal necklaces (including rose gold!), and gold leather bracelets, all with Laurel’s unique handwriting. So very pretty!

OSBP-NYNOW-Winter-2014-Laurel-Denise-23

OSBP-NYNOW-Winter-2014-Laurel-Denise-6

OSBP-NYNOW-Winter-2014-Laurel-Denise-1OSBP-NYNOW-Winter-2014-Laurel-Denise-2

OSBP-NYNOW-Winter-2014-Laurel-Denise-11

OSBP-NYNOW-Winter-2014-Laurel-Denise-13

OSBP-NYNOW-Winter-2014-Laurel-Denise-14OSBP-NYNOW-Winter-2014-Laurel-Denise-9

OSBP-NYNOW-Winter-2014-Laurel-Denise-15

OSBP-NYNOW-Winter-2014-Laurel-Denise-8

OSBP-NYNOW-Winter-2014-Laurel-Denise-16

OSBP-NYNOW-Winter-2014-Laurel-Denise-18

OSBP-NYNOW-Winter-2014-Laurel-Denise-20

Laurel Denise

And finally, a new-to-me company from the UK – Timbergram – with colorful wood post cards and art prints. So fun!

OSBP-NYNOW-Winter-2014-Timbergram-2

OSBP-NYNOW-Winter-2014-Timbergram-6

OSBP-NYNOW-Winter-2014-Timbergram-8OSBP-NYNOW-Winter-2014-Timbergram-19

OSBP-NYNOW-Winter-2014-Timbergram-11OSBP-NYNOW-Winter-2014-Timbergram-13

OSBP-NYNOW-Winter-2014-Timbergram-15OSBP-NYNOW-Winter-2014-Timbergram-12

OSBP-NYNOW-Winter-2014-Timbergram-16OSBP-NYNOW-Winter-2014-Timbergram-18

Timbergram

That’s it for the NYNOW winter 2014 market! If you missed any of the previous recaps, you can find them right here!

Photo Credits: Nole Garey for Oh So Beautiful Paper