Happy Weekend!

Happy Friday everyone! I’m super excited for this weekend – I’m heading up to New York to attend NYNOW! After skipping the summer show (I was 8 months pregnant with Alice at the time), I’m looking forward to saying hello to all my exhibitor friends in person and see all their new goodies! You can walk the show with me via Instagram (I’ll be walking Sunday and Monday), and of course I’ll be sure to share a few favorites here after I get back. But in the meantime…

Robert Frost Quote by Kal Barteski on Instagram

Photo + Hand Lettering by Kal Barteski via Instagram

…a few links for your weekend!

This week on Oh So Beautiful Paper:

Check back this afternoon for this week’s cocktail recipe! Have a wonderful weekend, and I’ll see you back here on Monday! xoxo

Quick Pick: Yellow Owl Workshop DIY Indigo Textile Kits

So here’s the thing. I’m 100% convinced that Christine from Yellow Owl Workshop is a genius. Her designs have been among my favorites for the past 6+ years, but I also know that she puts an incredible amount of time and energy into product development – from her offset printed cards to her DIY kits – to make each detail as perfect as possible. But I think she’s completely outdone herself with these new Indigo Textile Kits making their debut at NYNOW this weekend!

Yellow-Owl-Workshop-Indigo-Dye-Kit

Christine spent a year and a half basically inventing a new ink that works as both a dye and a paint and is packaged in a dripless nozzle (instead of a big vat of very particular dyeing chemicals). See? Genius! The kit comes with a cotton scarf, but I could totally see this kit being used to create tablecloths and napkins, clothing, or even upholstery textiles. The kit even comes with a booklet of instructions for tie-dye, shibori dye, vat dye, and resist dye techniques, as well as painting and stamping techniques.

Yellow-Owl-Workshop-Indigo-Dye-Kit2

Yellow-Owl-Workshop-Indigo-Dye-Kit3

Yellow-Owl-Workshop-Indigo-Dye-Kit4

 So. Awesome. I know a lot of people are going to have a lot of fun with these new kits – congrats Christine!

Casey + Blain’s Brewery Baby Shower Invitations

I love the idea of a laid-back baby shower – aka pre-baby party celebration! Laura from Duncan Park Papers drew inspiration from the venue (a brewery!) when designing these baby shower invitations, incorporating casual lettering in a silhouetted pilsner glass. So fun!

Brewery-Baby-Shower-Invitation-Duncan-Park-Papers2

From Laura: My brother-in-law and his wife, Jackie, came to me looking for an out of the ordinary baby shower invitation for Jackie’s sister Casey and her husband Blain. The event was a couples shower, hosted at a local brewery for a fun and laid-back vibe.

Brewery-Baby-Shower-Invitation-Duncan-Park-Papers

For the design, we went with a ‘baby is brewing’ theme. I chose a vertical layout inspired by a drink menu, and completed the look with a pilsner glass silhouette filled with hand drawn elements, subtle texture, and modern type. The mint green and yellow we used are the colors of the baby’s nursery: neutral, because the couple is waiting until the baby’s birth to learn the gender. Registry information and additional details were included on the back of the digitally printed invitation, and the package was completed with a top opening kraft envelope.

Brewery-Baby-Shower-Invitation-Duncan-Park-Papers9

This was one of my favorite custom projects to date, the location provided such an immediate inspiration and I love where it ended up!

 Brewery-Baby-Shower-Invitation-Duncan-Park-Papers5

Thanks Laura!

Photo Credits: Duncan Park Papers

DIY Tutorial: Floral and Lace Wedding Invitations

Today, we’re back with our first DIY of the new year! Hooray! This delicate floral and lace wedding invitation suite has been bouncing around in our brains for a while now – and the results exceeded even our expectations. Don’t you love it when that happens? We used a soft palette of misty blue, white, cream, and gold and incorporated some really fancy lace inner envelopes to bring it all together. With these fresh colors, it feels like spring is right around the corner! –Bailey and Emma of Antiquaria
DIY Floral and Lace Wedding Invitations by Antiquaria for Oh So Beautiful Paper

DIY Floral and Lace Wedding Invitations by Antiquaria for Oh So Beautiful Paper

Materials

Floral Calligraphy Invitation Stamp

Floral Calligraphy Reply Card Stamp

Wildflowers Return Address Stamp

Lace Inner Envelopes

A7 Cards

A7 Envelopes, in Pure White

Chamomile Patterned Paper (for liner) and Liner Templates

4bar Card, (3.5″x5″ cut from our Chamomile Patterned Paper, Card Weight)

4bar Envelopes

Stamp Pad, black

Embossing Stamp Pad

Embossing Powder

Embossing Heat Tool

Tailors Ribbon

DIY Floral and Lace Wedding Invitations by Antiquaria for Oh So Beautiful Paper

This stunning mix of lace paper inner envelopes from Modern Vintage Paperie really adds a touch of luxury to the suite and brings the whole look together!

DIY Floral and Lace Wedding Invitations by Antiquaria for Oh So Beautiful Paper

Step 1: First, stamp all of your invitation suite pieces. We used our Floral Calligraphy Invitation stamp, Floral Calligraphy Reply Card stamp and our Wildflowers Return Address stamp for these items. When stamping your cards, ink the stamp with the stamp facing you. Center the stamp over your card/envelope and press firmly and moderately (not too hard or the image will smudge) and gently lift the stamp off of the paper. Set aside to dry. Please watch this video for more information on inking and stamping an oversized stamp.

DIY Floral and Lace Wedding Invitations by Antiquaria for Oh So Beautiful Paper

DIY Floral and Lace Wedding Invitations by Antiquaria for Oh So Beautiful Paper

Step 2: Gold makes everything better, right? We decided to emboss our return address in gold to coordinate with the suite design and our addressing. Simply stamp your desired return address stamp on the back flap (either in matching ink or with Versamark glue ink, as pictured) dust the powder over it, tap off the excess and heat set the print. For more information about how to emboss using stamps, please watch this instructional video.

DIY Floral and Lace Wedding Invitations by Antiquaria for Oh So Beautiful Paper

DSC_5721

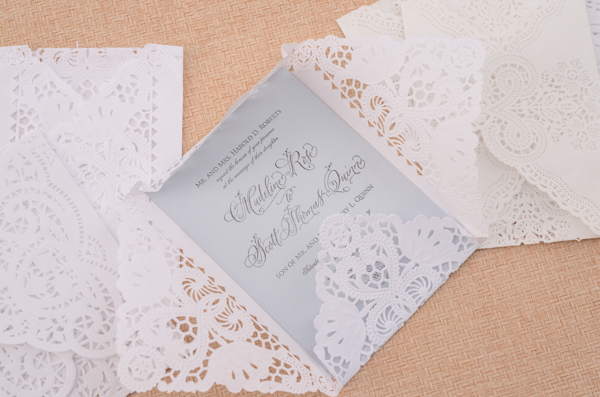
Step 3: Once all of your pieces are printed and dry, assemble them inside your lace paper inner envelope. We used assorted varieties of envelopes because we couldn’t decide on one, but you could select your favorite as well!

DIY Floral and Lace Wedding Invitations by Antiquaria for Oh So Beautiful Paper

Step 4: Address the envelopes to your guests and add postage (we love those little hummingbird stamps). We used our favorite gold calligraphy ink, but to achieve a similar effect you could also use a gold gel pen and your prettiest handwriting!

DIY Floral and Lace Wedding Invitations by Antiquaria for Oh So Beautiful PaperStep 5: Over time, we’ve learned that lining your envelopes after they’re addressed saves time and money! That way, if you mess up on an address, a liner isn’t wasted! Cut out your liner with a template or purchase pre-cut liners for your selected envelope if they’re available. To install the liner (we used our Chamomile Patterned Paper to make them), simply put a line of double sided tape or stick glue along the top edge (the triangle part) and slide it into the envelope. Once it’s positioned correctly, press to adhere the liner to the envelope.

DSC_5726All that’s left  now is to tie up your invitation suite, put them into the envelope and send them along via snail mail!

Photography by Antiquaria for Oh So Beautiful Paper

Seasonal Stationery: Valentine’s Day Cards, Part 6

Today I’m wrapping up my annual Valentine’s Day card round up with one final mini-highlight post! There are so many gorgeous cards this year – you’re bound to find the perfect card for sending your love!

2015 Valentine's Day Card Round Up curated by Oh So Beautiful Paper

1. Egg Press

2. Julie Song Ink

3. Anna Emilia Laitinen for Red Cap Cards

4. The Good Twin

5. Yellow Dot Paper Co.

6. Yellow Owl Workshop

Lots more love cards in the full round up right here! And in case you missed them – the previous Valentine’s Day highlight posts are right here!