DIY Rubber Stamp Floral Wedding Invitations

It’s the ladies of Anti­quaria, back with another cre­ative DIY project for you!  Today they’re sharing a fun tutorial on how to make gorgeous rubber stamp wedding invitations with a floral motif!

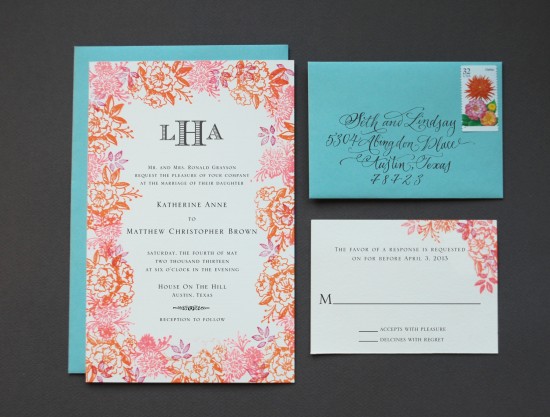
We love the versatility and custom look that rubber stamps can give your invitation suite.  This week, we wanted to show how the same stamp designs can lead to two very different wedding invitation suites: one designed for a festive tropical bash, and the other for more traditional, sophisticated affair!  It’s as simple as changing the stamp pad and envelope colors!  Let us show you…

DIY Tutorial: Floral Rubber Stamp Wedding Invitations

Option 1: For the tropical fete… shades of coral, mango, and berry make the floral border.  Lovely pool colored envelopes complement the suite.

DIY Tutorial: Floral Rubber Stamp Wedding Invitations

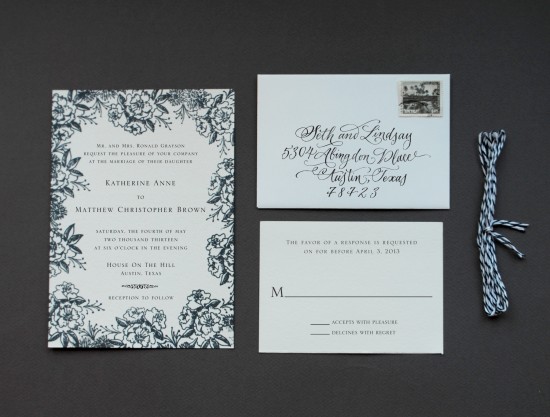
Option 2: Traditional black and white convey elegance and sophistication.

DIY Tutorial: Floral Rubber Stamp Wedding Invitations

Step 1:  You’ll want to stamp your invitation wording first… it makes things much more simple.  Ink your stamp (we used our classic invitation stamp) thoroughly, and center it over your paper.  Press firmly but moderately, using the handle as your primary pressure point to avoid an uneven print.  Let dry.

DIY Tutorial: Floral Rubber Stamp Wedding Invitations

Step 2: Put a sheet of regular text weight paper underneath your already printed invitation. Using your border stamps, (we used our camellia pattern stamp, daisy pattern stamp and small leaves pattern stamp) begin stamping the motifs around the border, making sure not to cover any text.  Go in a clockwise pattern and stamp the images sparsely first… you can always come back in and add more in each circular pass.  It also helps to stamp off of the page, giving the invitation a full bleed effect.  It  would be wise to start with your largest motif and move to the smaller ones to fill in the border.  If you are using multiple colors, be certain to make the overall border balanced in color and design.

DIY Tutorial: Floral Rubber Stamp Wedding Invitations

Step 3: Print your reply card (we used our classic reply card stamp) in the same manner as you did the invitation text.  If you like, you can also add your floral motifs to this card, like in the tropical suite, or keep it simple, as shown above.

DIY Tutorial: Floral Rubber Stamp Wedding Invitations

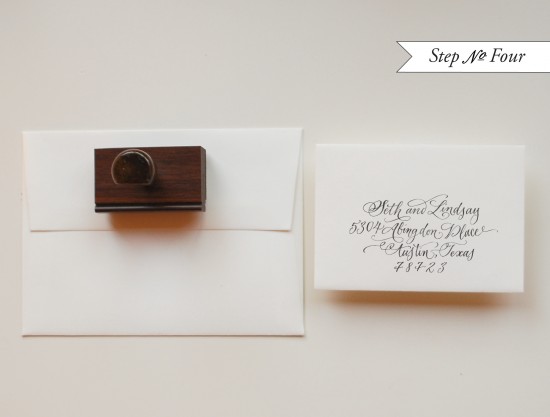
Step 4: Stamp your return and reply addresses (we used our calligraphy return address stamp) on your envelopes.  You can re-use the stamp long  after your wedding is over… maybe on all those thank you notes!!!

DIY Tutorial: Floral Rubber Stamp Wedding Invitations

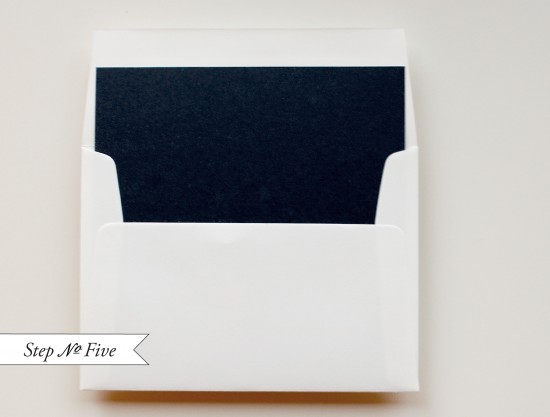
Step 5: We’ve chosen to add a black text weight paper liner to the outer envelope.  This is a great way to bring in some additional color to the suite and to create a nice balance.  It’s simple to do as well… you can find envelope liner template kits or pre-cut liners at Paper Source and local craft stores.  If you’re using square envelopes, you can also have your local print shop cut paper down to your envelope specifications.  Then just put a line  of double stick tape or stick glue across the top, slide them into position and press to secure.  Fold at the crease with a bone folder to get a nice, crisp edge.

DIY Tutorial: Floral Rubber Stamp Wedding Invitations

Now all that’s left is to tie the suite together, address them and hand them off to your post office to deliver to your lovely guests!!

Materials:

For the classic invitation suite

Classic Invitation Stamp

Classic Reply Card Stamp

Calligraphy Return Address Stamp

Camellia Pattern Stamp

Daisy Pattern Stamp

Small Leaves Pattern Stamp

Stamp Pad – in Black

Cover Weight Paper, cut to A7 (5″x7″) and 4bar (3″x5″)

A7 Envelope

4bar Envelope

Liner paper in black, cut to size

Double Stick tape

Twine – in black and white

For the tropical invitation suite

Classic Invitation Stamp

Classic Reply Card Stamp

Calligraphy Return Address Stamp

Classic Monogram Stamp

Camellia Pattern Stamp

Daisy Pattern Stamp

Small Leaves Pattern Stamp

Stamp Pad – in Coral, Mango Tango, Magenta and Antique Pewter

Cover Weight Paper, cut to A9 (5.5″x8.5″) and 4bar (3″x5″)

A9 Envelope – in Pool

4bar Envelope – in Pool
DIY Watercolor Floral Pattern Wedding Invitations

It’s the ladies of Anti­quaria, back with another cre­ative DIY project for you!  Today they’re sharing a gorgeous floral watercolor wedding invitation tutorial!

This week, we are challenging your inner artist and showing you how to design your own floral watercolor print invitation suite.  We have so much fun putting together our artwork and painting watercolors for our online magazine, The Antiquarian Post, we thought, why not incorporate the same technique into a DIY invitation suite?  We’ve chosen a coral, toffee and lavender-grey palate to work with but the options are as endless as your supply of paint!

No need to feel intimidated about this one though…we’ll take you through the process, step-by-step.

DIY Tutorial: Floral Watercolor Wedding Invitations

DIY Tutorial: Floral Watercolor Wedding Invitations

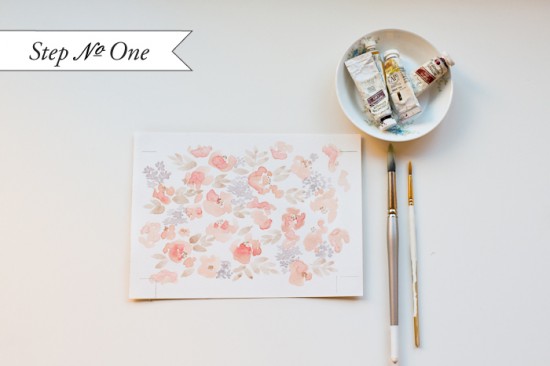
Step One: On an 8.5 x 11″ sheet of heavy watercolor paper, paint your botanical watercolor pattern.  We used a palette of coral, toffee and lavender gray for our floral pattern.  To create watercolor flowers, use 2 different size round brushes, one large and one small.  Wet the large brush, dip it in the coral color and paint petals.  The more non-uniform each petal is, the more organic and natural the flowers turn out.  Wet the small brush, dip it into the toffee paint and add the centers of the flowers.  Also with the small brush, you will want to fill in-between the large coral flowers with clusters of small lavender gray flowers.  Fill in further with toffee leaves (made with the large brush).  Fill the whole sheet of paper, making sure that the overall composition is balanced and full of pattern.  Set aside to dry completely.

DIY Tutorial: Floral Watercolor Wedding Invitations

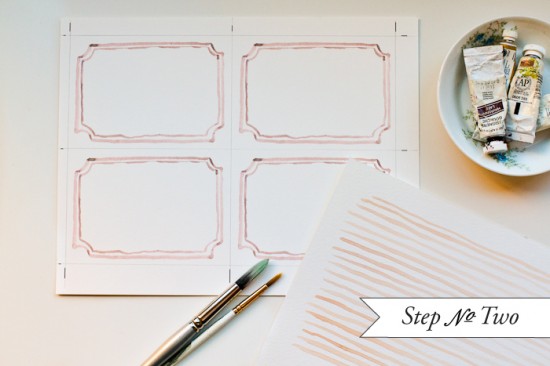
Step Two: On another 8.5 x 11″ sheet of heavy watercolor paper, measure out four 3.5 x 5″ rectangles.  Lightly draw yourself an outline in pencil.  Just outside the lines, draw yourself crop marks which will be used as guides to cut the final printed product.  Paint a coral border in each rectangle making sure not to get to close to the edges.  When the paint dries, erase your pencil guide lines leaving just your crop marks.  For the envelope liner pattern, we used an simple striped pattern.  On a clean 8.5 x 11″ sheet of watercolor paper, simply  paint horizontal coral lines, as even or uneven as you please!

DIY Tutorial: Floral Watercolor Wedding Invitations

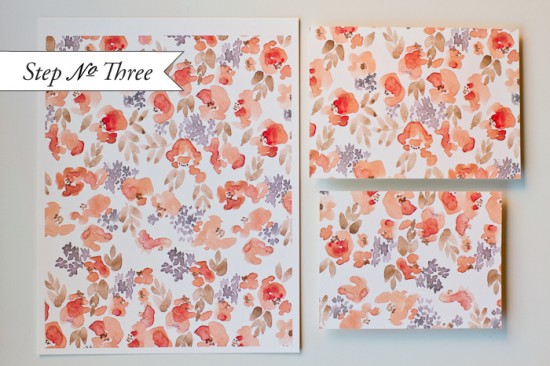
Step Three:  Place each sheet of artwork on a flatbed scanner and scan at 300 dpi.  Print the patterns 100% scale on high quality card stock (the thickest you can get through your printer).  Make sure to set your printer margins to the smallest they will allow to maximize your printable area.  For the striped pattern, print it on high quality text weight paper… you will be installing it later in the envelopes and thinner paper works better for this!

Out of each printed  sheet of the floral pattern paper, cut a 5 x 7″ card and a 4 x 6″ card, as shown above.  You will see that since you’ve created the whole page as a pattern, the cards will have a full bleed (meaning that the pattern will flow off the page).

Alternatively, you can take in your artwork to your local print shop (bring the scans on a zip drive or ask them to scan them for you).  Here they can print out the paintings on card stock and text weight using a high quality digital printer.  You can also have them professionally cut all the pieces down to your desired size!

DIY Tutorial: Floral Watercolor Wedding Invitations

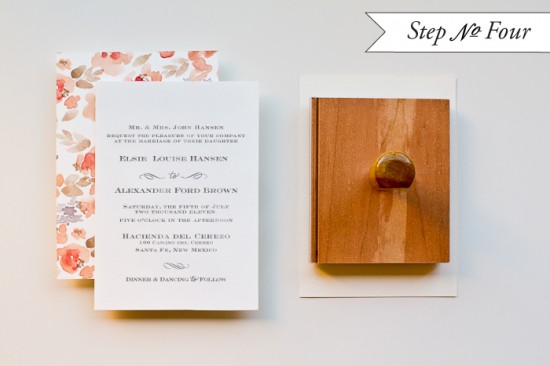
Step Four: Now you can stamp your invitation!  Ink your invitation stamp thoroughly (we used our “Sophisticate” Invitation Stamp) and line it up, centered over your card.  Of course, you will be printing on the “back” blank side of the 5 x 7″ floral card.  Press down on the stamp evenly and moderately with the handle to get a crisp image.  Let dry.

DIY Tutorial: Floral Watercolor Wedding Invitations

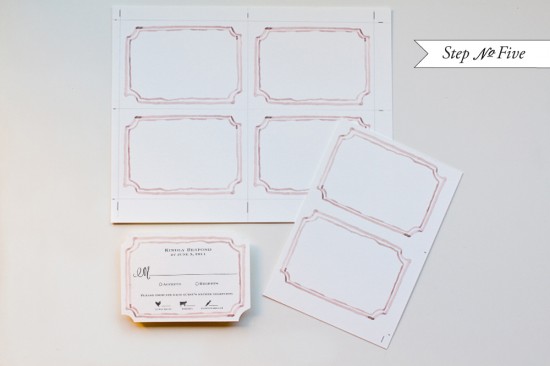
Step Five: Using the crop marks, cut your reply cards (we typically use a paper cutter or x-acto and ruler) to size.  Ink your reply stamp thoroughly (we used our “Sophisticate” Reply Stamp, option B) and line up, centered over your card.  Press down on the stamp evenly and moderately with the handle to get a crisp image.  Let dry.  Notch in the corners, if you like, to create the look of a die cut card.

DIY Tutorial: Floral Watercolor Wedding Invitations

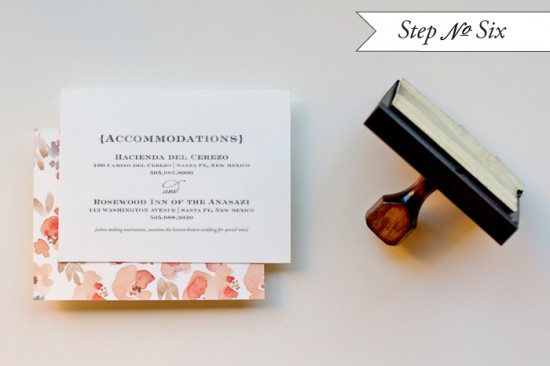
Step Six: On the back of the 4 x 6″ card, ink your accommodations stamp thoroughly (we used our Sophisticate” Accommodations Stamp) and line up, centered over your card.  Press down on the stamp evenly and moderately with the handle to get a crisp image.  Let dry.

DIY Tutorial: Floral Watercolor Wedding Invitations

Step Seven: Cut the liners using a template made for your envelopes.  These do the job well!  Trace the template with a pencil and cut on the line.  Use stick glue or double stick tape along the triangular end to adhere the liner to your envelope.

DIY Tutorial: Floral Watercolor Wedding Invitations

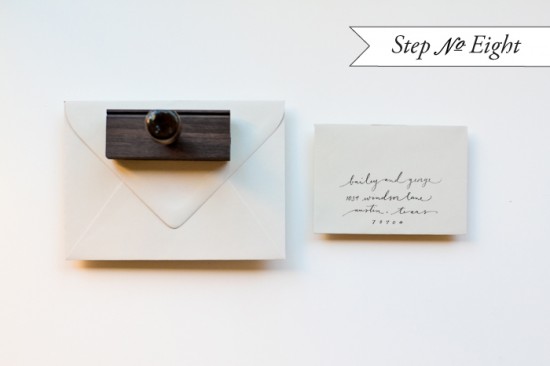
Step Eight: Once again, we are using stamps to save on our invitation budget.  We printed our “Scripted” Return Address stamp for both the return address on the outer envelope and for the reply address.  The great part is that you can also use it on your thank you notes!!

DIY Tutorial: Floral Watercolor Wedding Invitations

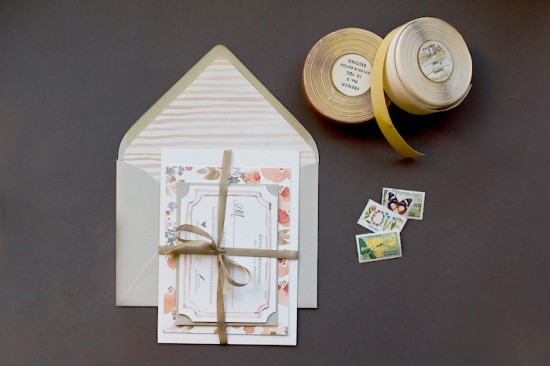
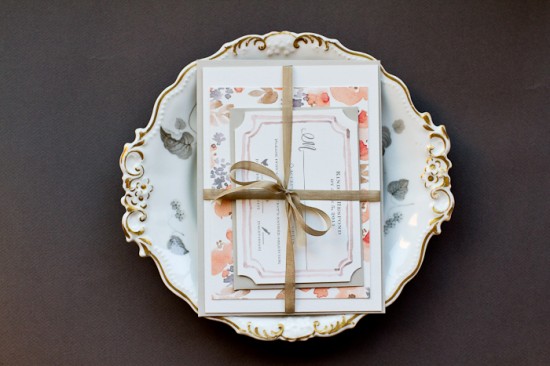
Now all that’s left is to tie them together with a beautiful ribbon, address the envelopes and get them into the post!  Your guests will be thrilled to receive your very own watercolor artwork in the mail.

Materials List:

Sophisticate Wedding Invitation Stamp (from Antiquaria)

Sophisticate Reply Card Stamp (from Antiquaria)

Sophisticate Accommodations Card Stamp (from Antiquaria)

 Scripted Return Address Stamp (from Antiquaria)

Stamp Pad, we used Antique Pewter

Heavy duty watercolor paper

Water color paints (preferably in 3 or more colors)

Paint brushes, 1 large & 1 small

Jar filled with water to wash brushes

Card stock, in soft white

Text Paper, in soft white

Scanner

Printer

Paper cutter or x-acto knife

Ruler

Pencil

A7 Envelopes

4bar Envelopes

Liner template

Scissors

Glue stick or double stick tape

Ribbon

Patterns painted by Emma James for Antiquaria.  Custom watercolor invitations are available from Antiquaria’s Custom Design Division.  Please email them for more information!

Photography by Jamie Simon of Intertwyned

DIY “Little Blue Box” Inspired Rubber Stamp Wedding Invitations

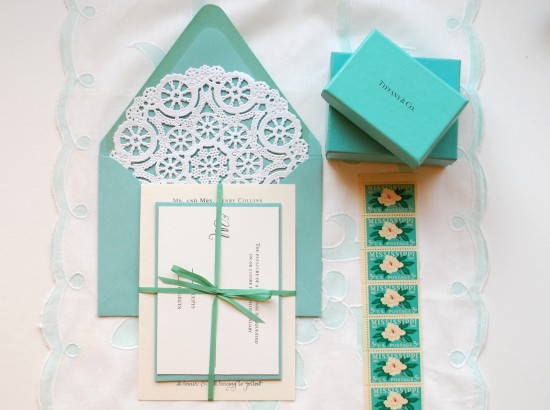
It’s the ladies of Anti­quaria, back with another cre­ative DIY project for you!  Today they’re sharing a wedding invitation tutorial inspired by the signature blue color of Tiffany & Co.

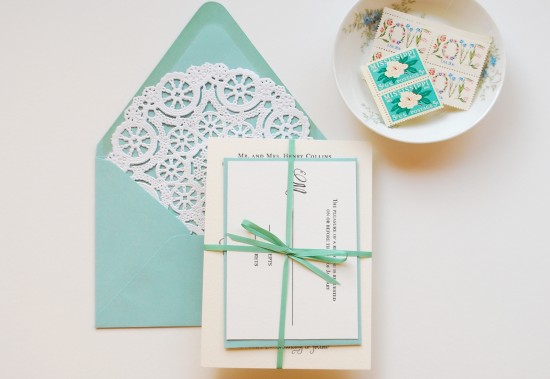
Have you ever felt the rush of excitement when a special friend, spouse, or loved one presents you with a gift packaged in the little blue box?  This wedding invitation suite was designed to elicit that feeling when your guest receives it in the mail.  Imagine their excitement when this feminine and traditional invitation finds its way into their mailbox.  This DIY is fairly simple yet the colors and packaging tie the whole thing together and give it a feeling of luxury.

Tiffany Blue DIY Wedding Invitation Suite

Tiffany Blue DIY Wedding Invitation Suite

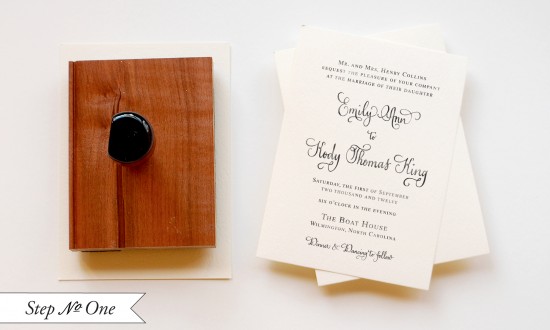
Step One: Cut your paper to size A6 (4.5″x6.25″).  Since this is a luxurious suite, we would suggest a thick high quality cotton watercolor paper.  Ink your stamp (we used our Vintage Calligraphy Invitation Stamp) thoroughly and center it over your card.  Press down moderately to make the print.  Too hard, the image may be blurry and too light and it may be splotchy.  Let dry.

Tiffany Blue DIY Wedding Invitation Suite

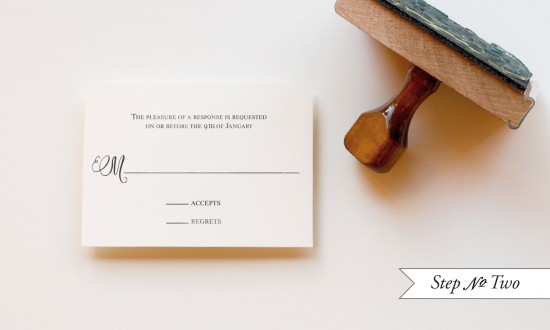
Step Two: In a similar fashion to printing the Invitation piece, you will now print the reply card.  For this piece, you will want to cut a 4bar (3.5″x5″) card out of the same paper used for the invitation.  Again, ink your stamp (we used our Vintage Calligraphy Reply Card stamp) thoroughly and make the print.  Let dry.

Tiffany Blue DIY Wedding Invitation Suite

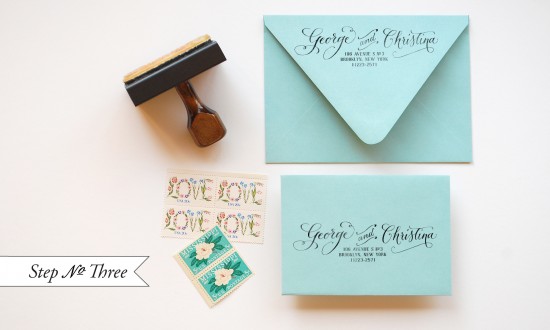
Step Three: Using your return address stamp (we used our Calligraphy Accent Return Address stamp), stamp both the back flap of your A7 envelope and the front of your 4bar envelope.  This is such a great place to pinch pennies in your stationery budget as you are able to use one stamp for both envelopes and you will have it to use after the event is over!

Tiffany Blue DIY Wedding Invitation Suite

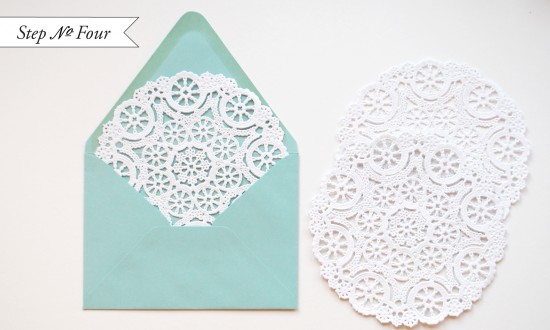
Step Four: To add a little extra flourish to the suite, we’ve used regular round doilies as an envelope liner.  We love the way that the aqua peeks through the lace and think it would be so fun to be the recipient and have this surprise await us once the seal was broken.  To install the doily liners, you will use spray adhesive.  Make sure to do this outside (or in an extremely well ventilated room).  Spray the back of the doily with a light mist of adhesive.  Slide the doily into the envelope, making sure not to press until the doily is placed in its intended spot (as shown above).  Let them dry & cure overnight.

Tiffany Blue DIY Wedding Invitation Suite

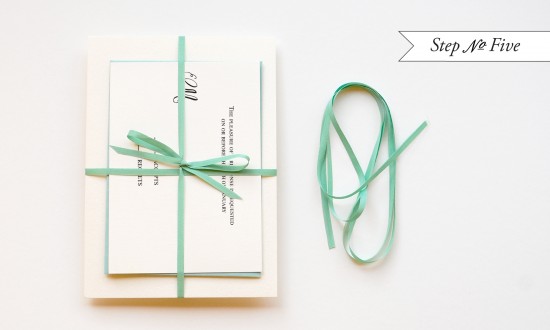
Step Five:  Use a thin ribbon to tie the suite together.  This will keep the components together and give your guest the thrill of “unwrapping” your invitation.

Tiffany Blue DIY Wedding Invitation Suite

Materials

Stamps:

Vintage Calligraphy Invitation stamp

Vintage Calligraphy Reply Card stamp

Calligraphy Accent Return Address stamp

Stamp Pad (we used black)

Heavy Watercolor Paper (for invitations & reply cards)

A6 Envelopes

4bar Envelopes

Ribbon, 1/8″ thickness

6″ Medallion Lace Paper Doilies

Spray Adhesive

Photo Credits: Antiquaria

DIY Rubber Stamp Vintage-Western Wedding Save the Dates + Invitations

It’s the ladies of Anti­quaria, back with their first fab­u­lous and cre­ative DIY project for you in the new year!  This week they’re sharing an awe­some DIY tutorial for Western rubber stamp wedding invitations and save the dates!

It really is true that the second you start sending out your save the dates, you begin setting the tone for your wedding.  It’s always important to think about your venue, colors and tone of the day before deciding on any of your wedding stationery.  Today’s DIY tutorial is for complementing save the dates and wedding invitations!  We utilized many different stamps & paper components to illustrate our theme: A Vintage-Western Wedding Fete!  Here’s how to put it all together:

DIY Rubber Stamp Western Save the Dates and Wedding Invitations

DIY Rubber Stamp Western Save the Dates and Wedding Invitations

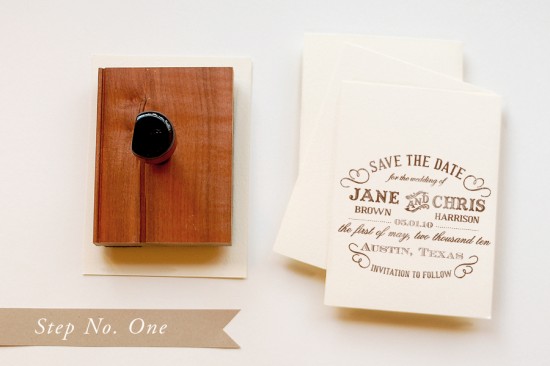
Step 1: Starting with the save the date, use A2 cards or cut paper to 4.25″ x 5.5″”.  Ink the stamp (we used our “Typography” Save the Date stamp) thoroughly and make a print.  When you are making the print, be sure to center the stamp on the paper.  You will want to apply moderate and even pressure to the stamp in order to get a good print.  Also, it is important to stamp on a solid and stable surface.  Any movement can cause shifting.  Let each print dry to avoid smearing.

DIY Rubber Stamp Western Save the Dates and Wedding Invitations

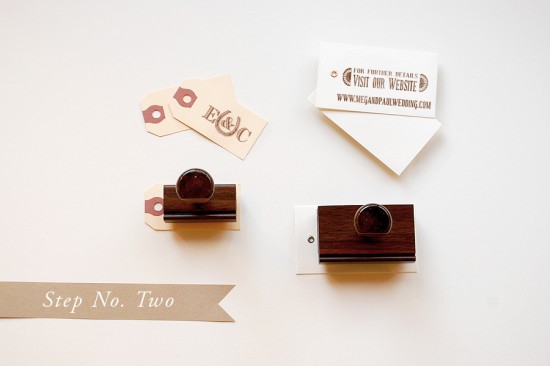
Step 2: Make the tags for the save the date.  We stamped our website card (“Old West” web card stamp) on a grommeted gift tag.  For our monogram tag, we used a small shipping tag and stamped our “Lucky in Love” Initial Monogram stamp on it.

DIY Rubber Stamp Western Save the Dates and Wedding Invitations

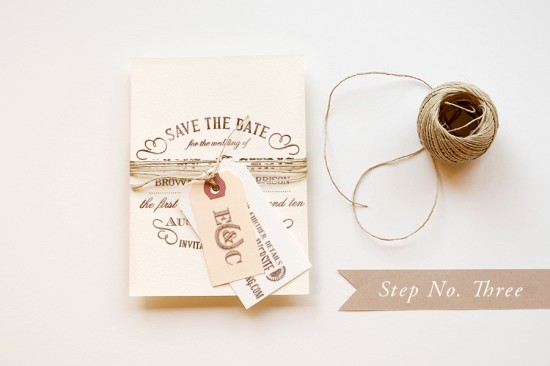
Step 3: This save the date has a fabulous mix of textures and really sets the stage for the invitation and event to come.  To combine all the pieces, simply tie basic thin kitchen twine around the save the date, going around multiple times.  Secure it with a basic knot and trim the ends to desired length.

DIY Rubber Stamp Western Save the Dates and Wedding Invitations

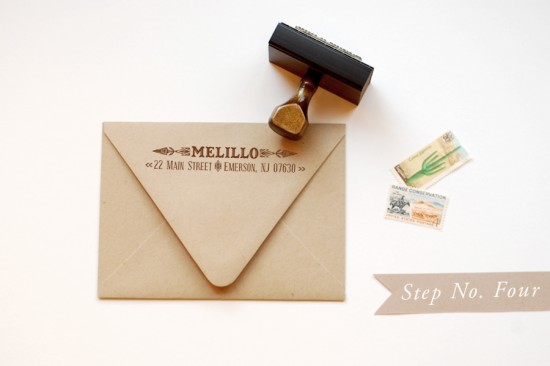
Step 4: A great way to save a little money on your wedding paper (and who doesn’t love doing that!) is to get one return address stamp for all of your envelopes.  You will potentially be able to use it on your save the dates, invitations (even if you have them professionally printed), reply envelopes and lastly, your thank you notes.  It can really help your bottom line in the long run.  Once you’ve stamped your envelopes, simply address them, add postage (there are some fabulous new 2012 stamps out), and send them to your loved ones.

DIY Rubber Stamp Western Save the Dates and Wedding Invitations

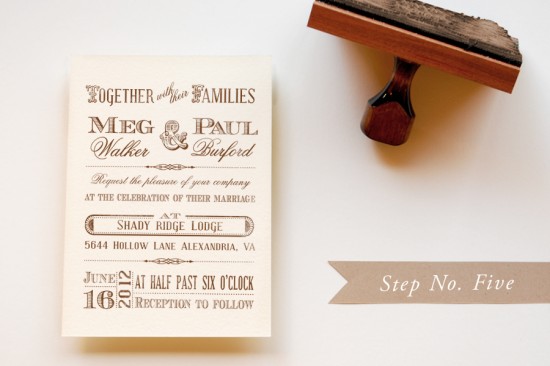
Step 5: Now on to the Invitation suite!  Use and A6 card or cut paper into 4.5″ x 6.25″ rectangles.  Following the same steps as the save the date, make prints of the stamp (we used our “Old West” Invitation stamp) on your cards.

DIY Rubber Stamp Western Save the Dates and Wedding Invitations

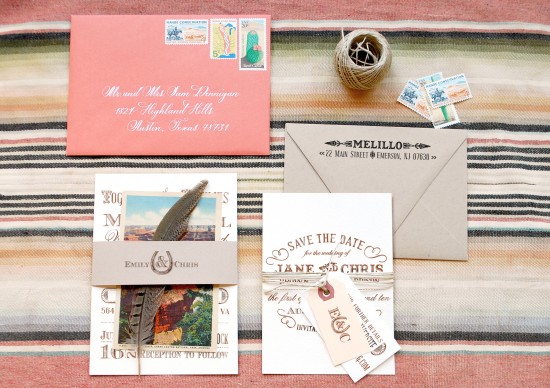
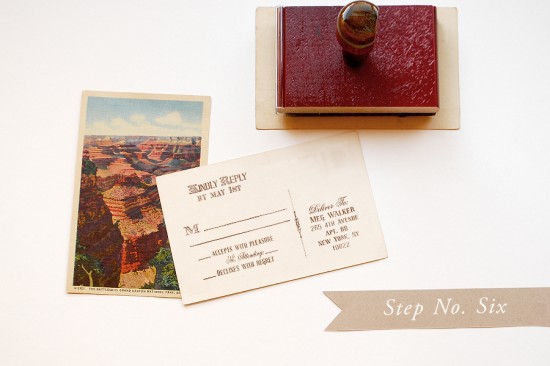
Step 6: Vintage postcards are a great way to incorporate color and personality into your invitation suite.  We chose a great image of the Grand Canyon and had it copied on linen card stock.  On the back, we stamped our “Old West” Reply Postcard stamp.

DIY Rubber Stamp Western Save the Dates and Wedding Invitations

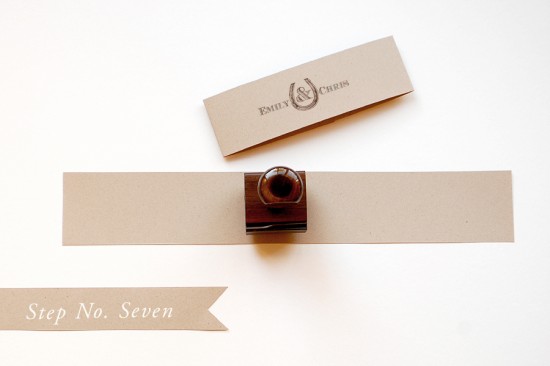
Step 7: To tie it all together, we chose to create a monogram belly band.  To do this, cut a piece of kraft card stock into 2″x11″ pieces (you’ll get 4 out of each 8.5″x11″ sheet).  Then stamp your monogram (we used “Lucky in Love” Name monogram) in the center.

DIY Rubber Stamp Western Save the Dates and Wedding Invitations

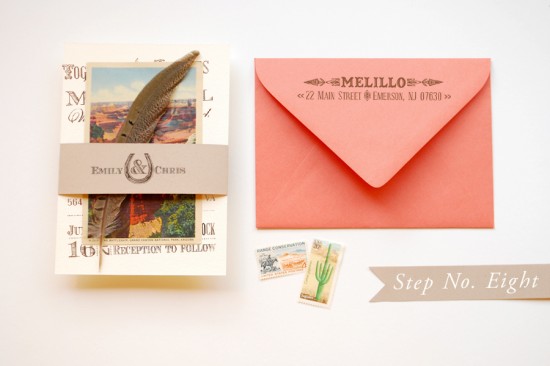
Step 8: Place the invitation, reply postcard, & a feather in a bundle.  Wrap the belly band around the suite, centering the monogram.  When you’re happy with the placement, make hard folds with your nail or a bone folder.  Flip the suite over and secure the belly band with a 1.5″ long piece of double stick tape.  Use the same return address (we used our “Navajo” return address stamp), stamping it this time on a beautiful coral envelope.  Again, address, add postage to your invitation and let the compliments roll in!!

Materials:

Customized Rubber Stamps:

“Typography” Save the Date

“Old West” Web Card

“Lucky in Love” Initial Monogram

“Navajo” Return Address

“Old West” Invitation

“Old West” Reply, postcard option

“Lucky in Love” Names Monogram

Stamp Pad (we used a combination of chestnut and cocoa throughout this tutorial)

A6 Ivory Cards

A2 Ivory Cards

A2 Kraft Envelopes

Pearl White Grommet Tags

Shipping Tags, small

Kitchen Twine

A6 Coral Envelopes

Linen Card Stock (you can find vintage designs online on websites like Café Press)

Kraft Card Stock

Scissors

Feathers

Bone Folder

Double Stick Tape

Anti­quaria is a mem­ber of the Designer Rolodex – you can see more of their beau­ti­ful work right here!

Photo Credits: Antiquaria

p.s. Have you entered the giveaway from One Plus One yet?  Check out the details right here!

DIY Rubber Stamp “Banner” Wedding Invitations

It’s the ladies of Anti­quaria, back with another fab­u­lous and cre­ative DIY project for you!  This week they’re here with some awe­some DIY rubber stamp wedding invitations!

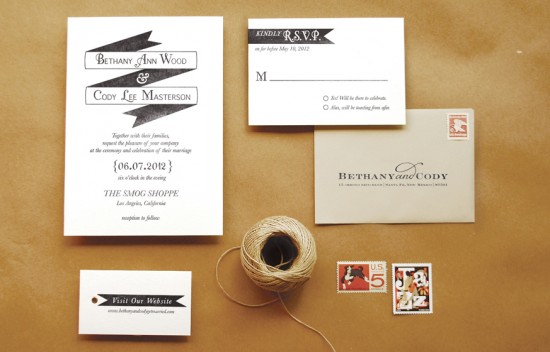
This invitation suite is simple, but it packs a graphic punch!  We wanted to design a suite that looked modern and was easy to execute.  There aren’t any fancy techniques or tools needed for this one, but when all the pieces come together, it looks very high end and custom!  There are so many color options for this invitation suite.  In addition to black and white, think about navy and gray or eggplant and kraft!

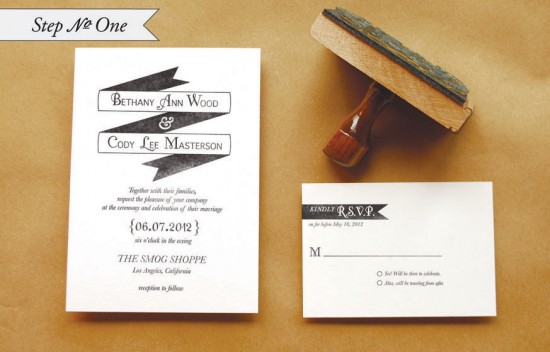
Step One: Stamp the invitation cards.  For the invitation, you will use an A7 card; for the reply, you will use a 4bar card.  When making a print, ink the stamp throughly and apply even pressure for the best results.  On the large stamps, such as the“Modern Banner” invitation and “Modern Banner” reply, cover stamp with both palms and press, focusing on the center (near the handle).  Moderate pressure is required but too much can make for a muddy print.

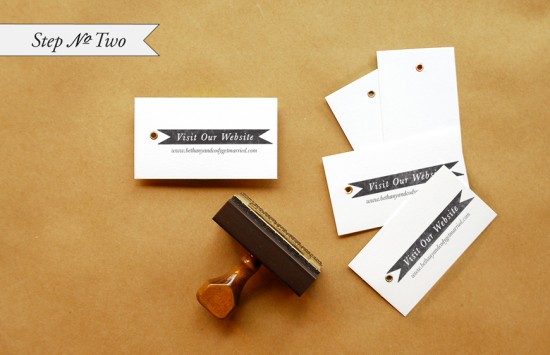
Step 2: Stamp the website cards.  We used our small “Modern Banner” Website stamp.  Follow the directions above for making a good print.

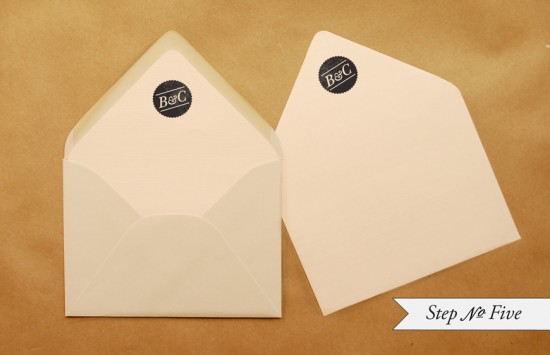
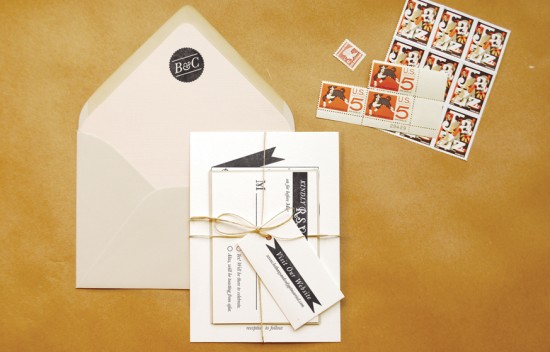
Step 3: Cut your envelope liners.  We used tan text weight paper for a monochromatic neutral look.  To make the liner, trace a template and cut on the traced line.  Be sure to stamp your monogram (we used our “Seal Initial” monogram) on the liner so that when your guests open the envelope there is a lovely surprise!

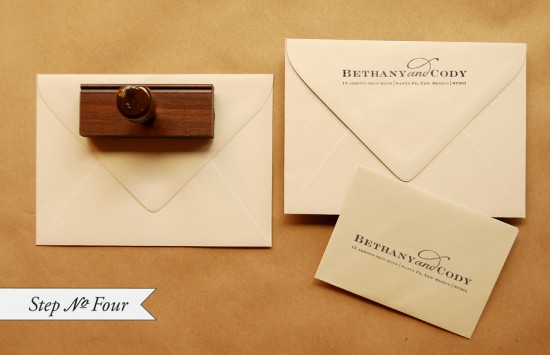
Step 4: Stamp return and reply addresses on the envelopes.  We used our “Sophisticate” Return Address stamp for this suite.  It’s a great money saving tool to be able to use one stamp for both your return and reply address.
Step 5: To install the liner into the envelope, apply double sided tape (or use a glue stick) around the top triangle of the liner (on the back).  Slide the liner into the envelope, holding the taped edge away from the envelope.  Once the liner is positioned correctly, press down on the tape to adhere.

Finishing touches: Tie the whole suite up with twine, address, and add postage!

Materials:

“Modern Banner” Invitation Stamp from Antiquaria 

“Modern Banner” Reply Card Stamp from Antiquaria

“Modern Banner” Website Card Stamp-Large  from Antiquaria

“Seal Initial” Monogram Stamp from Antiquaria

“Sophisticate” Return Address Stamp from Antiquaria

Color Box Stamp Pad in Black

Metal Eyelet Tags for website card

A7 Cardstock,

4Bar Cardstock

A7 Envelopes

4 bar Envelopes

Envelope liner templates

81/2″ x 11″ text paper, for liners

Twine

Postage (we used the Jazz Forever Stamps mixed with vintage stamps)

Photo Credits: Antiquaria