DIY Tutorial: Botanical + Watercolor Save the Dates

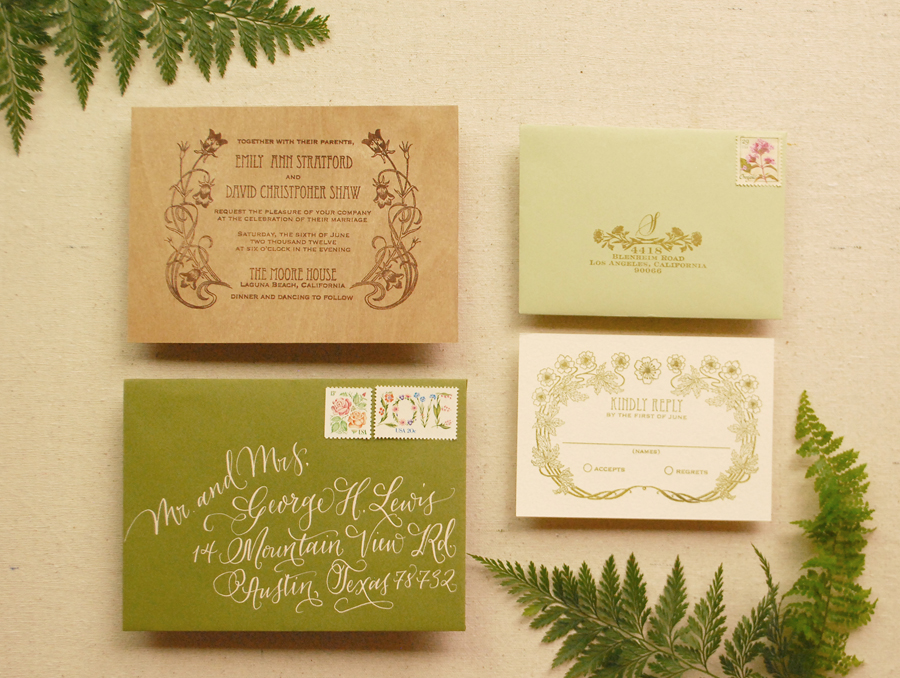
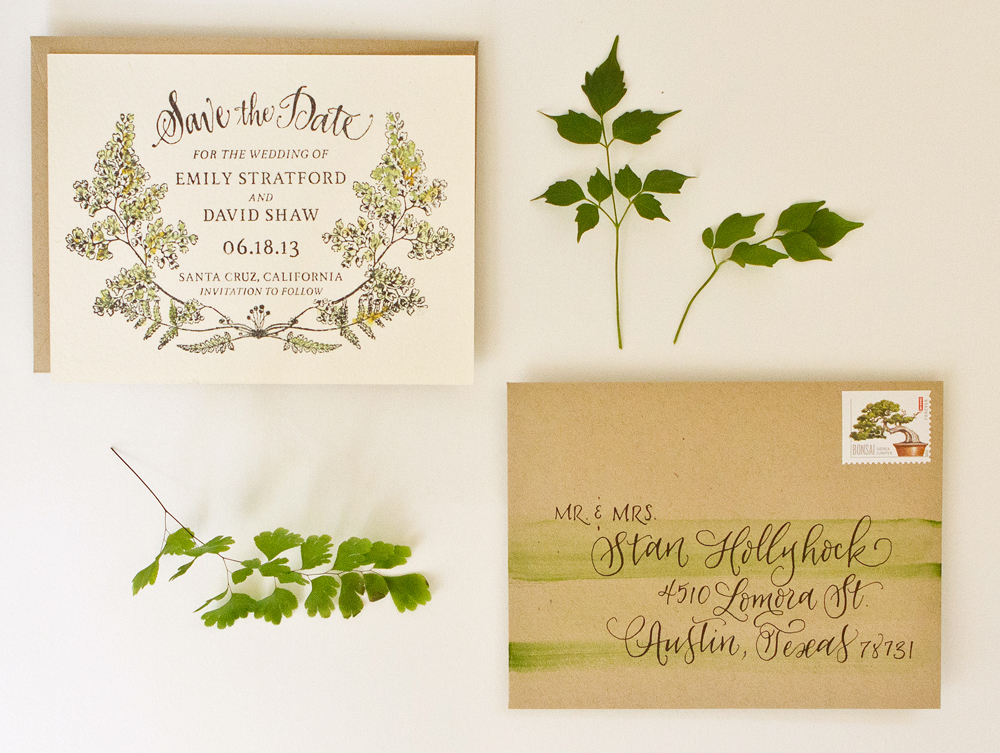
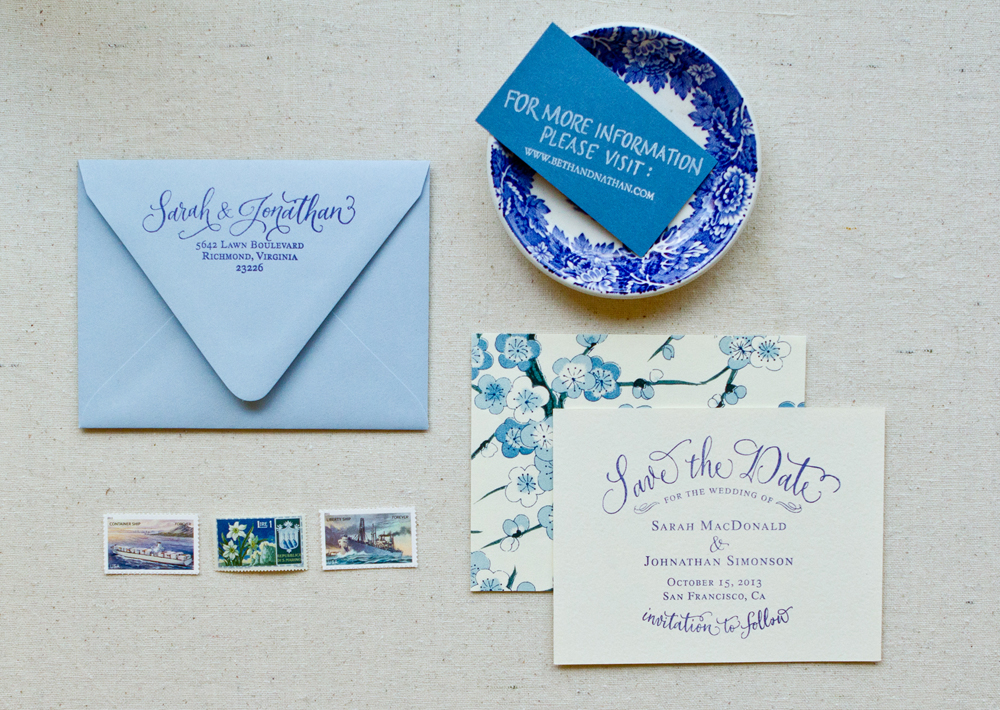
Here at Antiquaria we love ferns. So much so that one of the first china collections that we curated for our vintage shop was dedicated to them! For today’s DIY tutorial, we combined our love for this specific botanical variety and one of our other major obsessions, watercolor, to create a simple and natural save the date.  – Bailey and Emma of Antiquaria

DIY Tutorial: Botanical Watercolor Save the Date by Antiquaria via Oh So Beautiful Paper

DIY Tutorial: Botanical Watercolor Save the Date by Antiquaria via Oh So Beautiful Paper

DIY Tutorial: Botanical Watercolor Save the Date by Antiquaria via Oh So Beautiful Paper

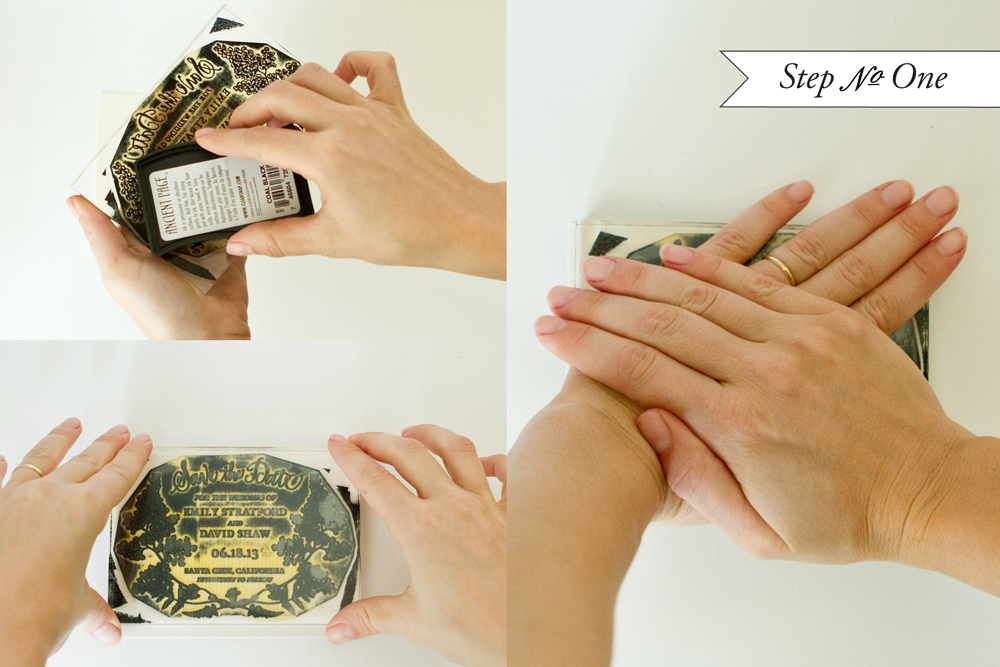
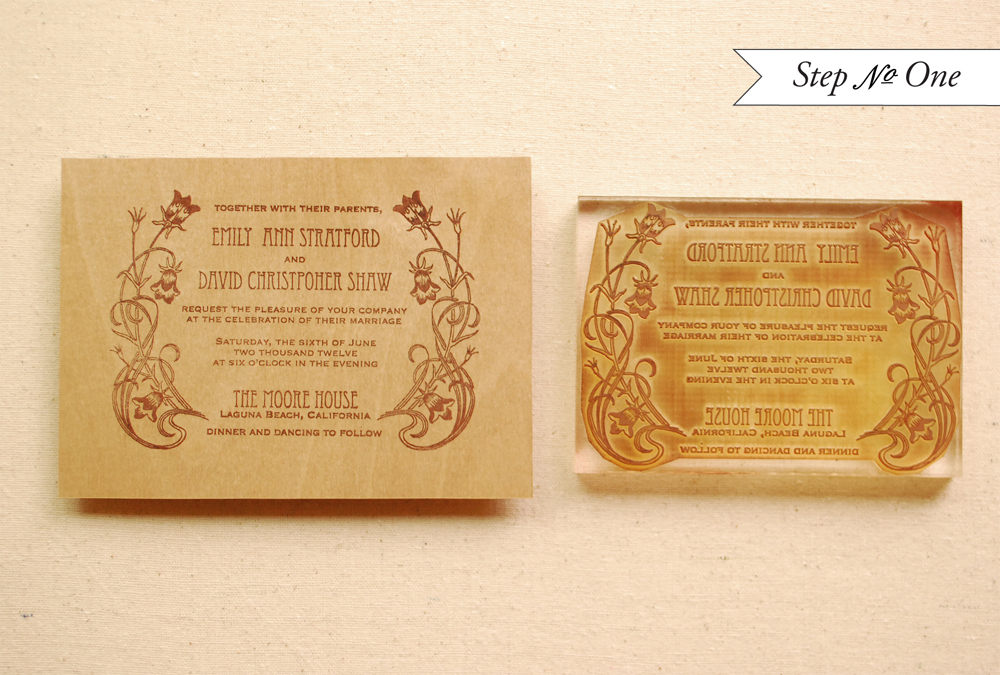
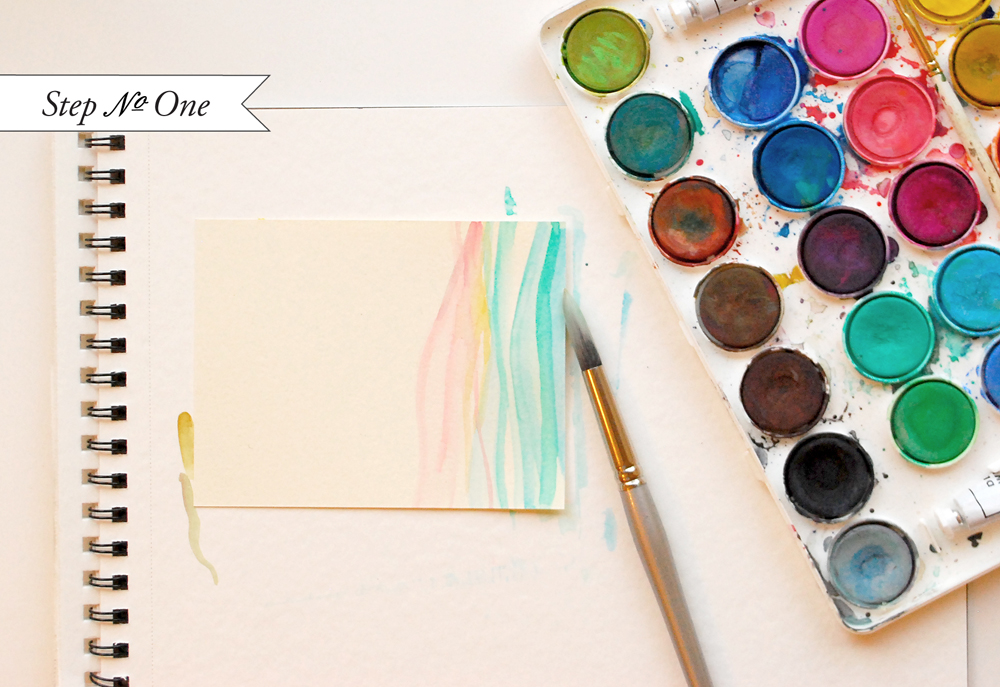
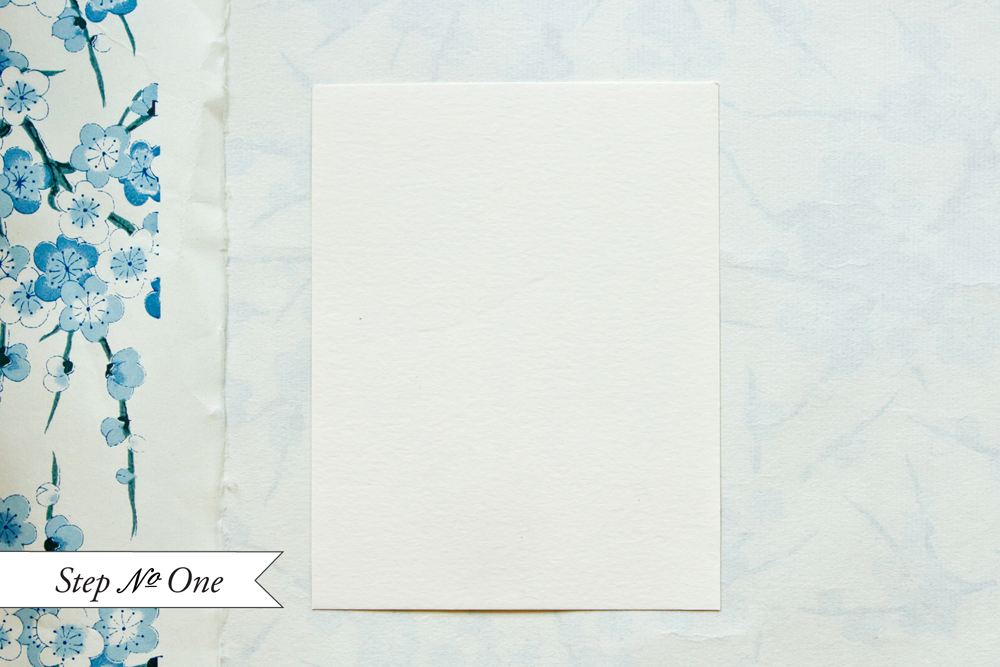
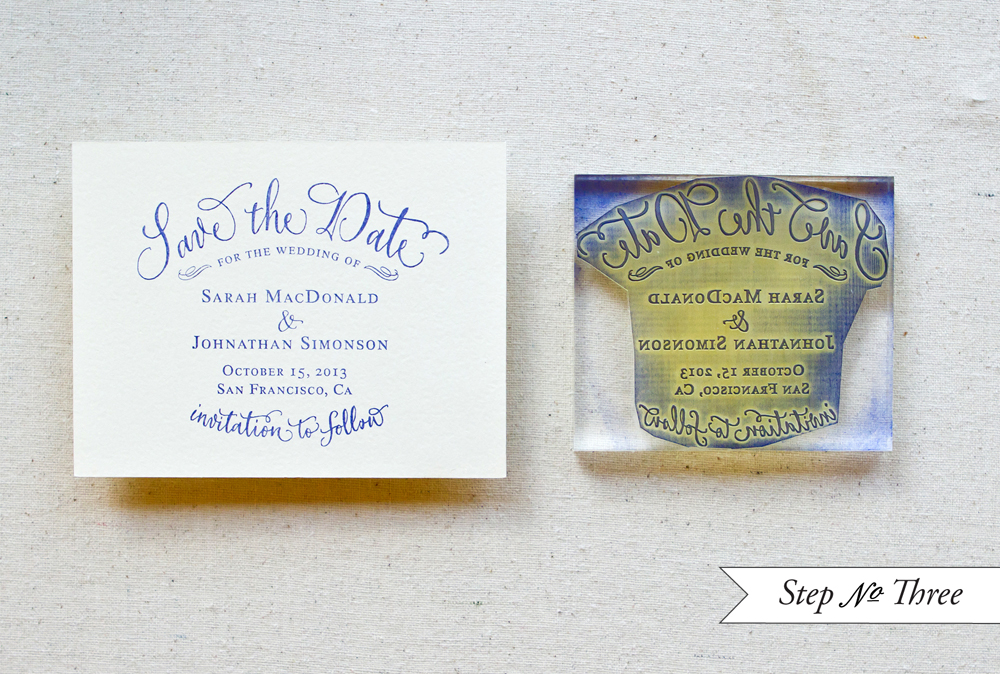
Step One: We get asked the question all the time – “Where do you find a stamp pad large enough for your stamps?” The answer is that any raised bed stamp pad will suffice! Simply flip the stamp (we used our Fern Forest Save the Date Stamp) over in your hand and ink the stamp, dabbing and swiping the pad across it until there is an even layer of ink. Once it is well inked, flip it over and align it over your paper (for this Save the Date you will use an A2 card). Once you’re sure it’s straight, place the stamp down with each hand on either side of the stamp.

DIY Tutorial: Botanical Watercolor Save the Date by Antiquaria via Oh So Beautiful Paper

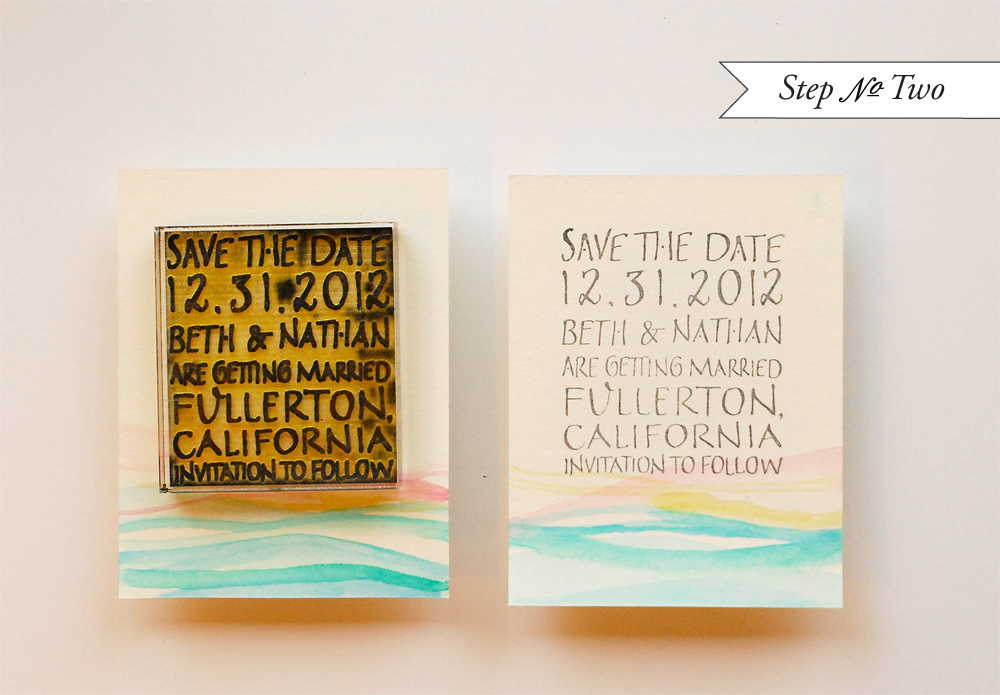
Without moving the stamp, place your hands on the top of the stamp and press down firmly, making sure that you have pressure on all parts of the stamp. Lift the stamp off the paper, set aside and let the print dry. For this design, you will want to use a permanent, waterproof ink.

DIY Tutorial: Botanical Watercolor Save the Date by Antiquaria via Oh So Beautiful Paper

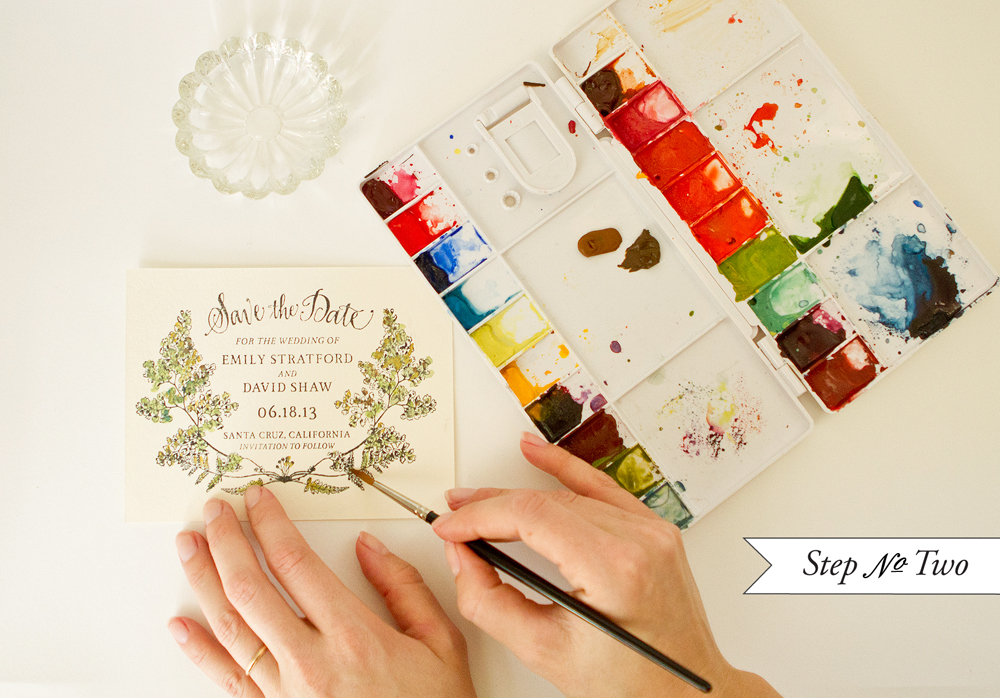
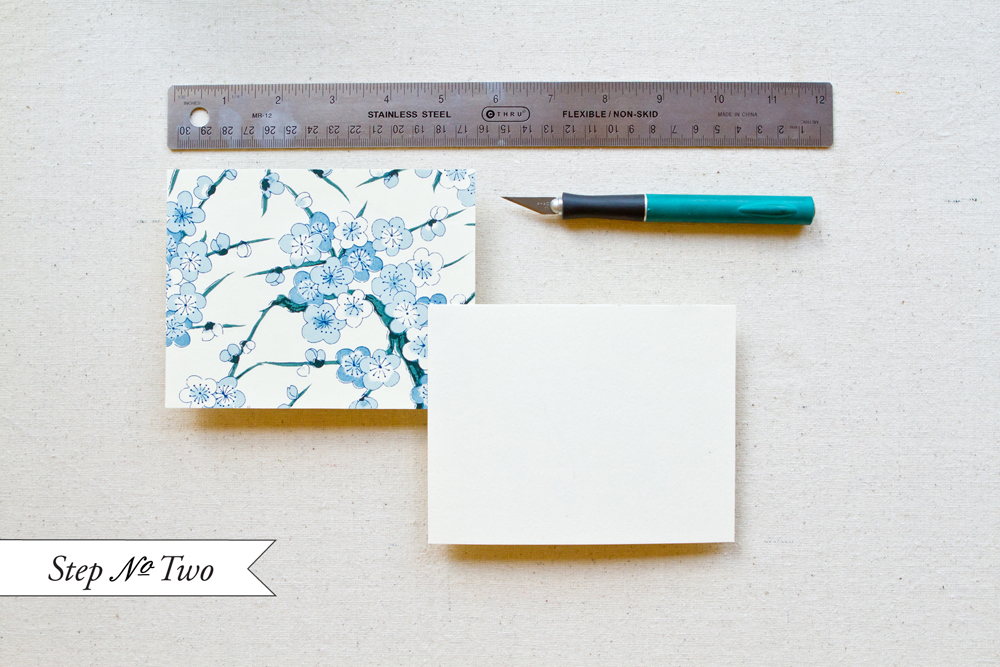
Step Two: Once the print is dry, you will want to fill in the botanical part of the design with color! Using multiple shades of greens and ochres, paint in the leaves with a small fine tip watercolor brush. Try not use too much water in this step to avoid painting too far outside the lines.

DIY Tutorial: Botanical Watercolor Save the Date by Antiquaria via Oh So Beautiful Paper

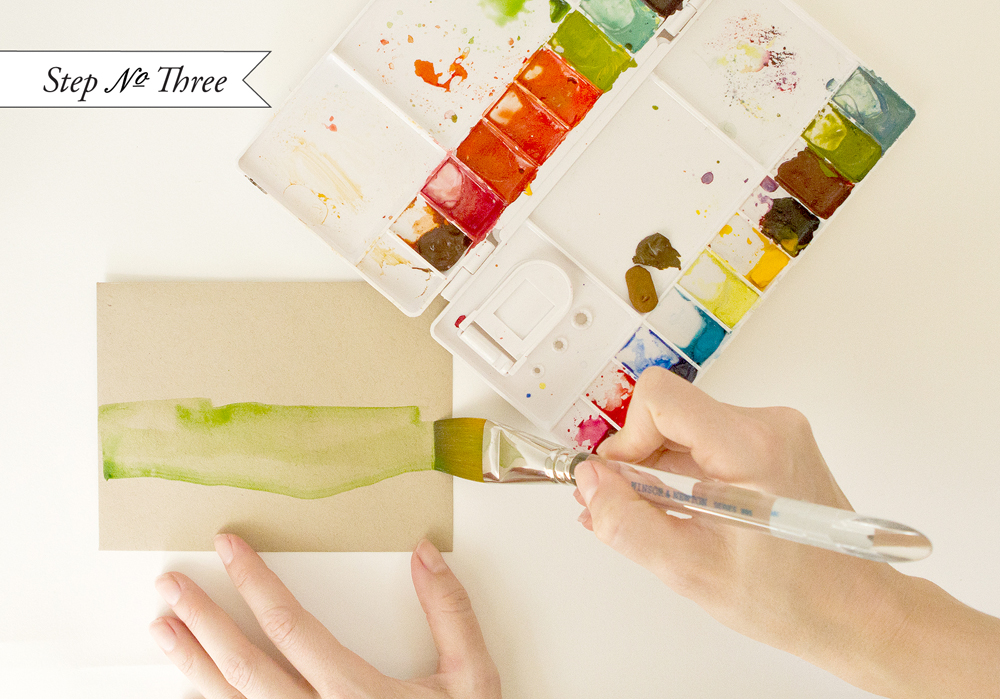
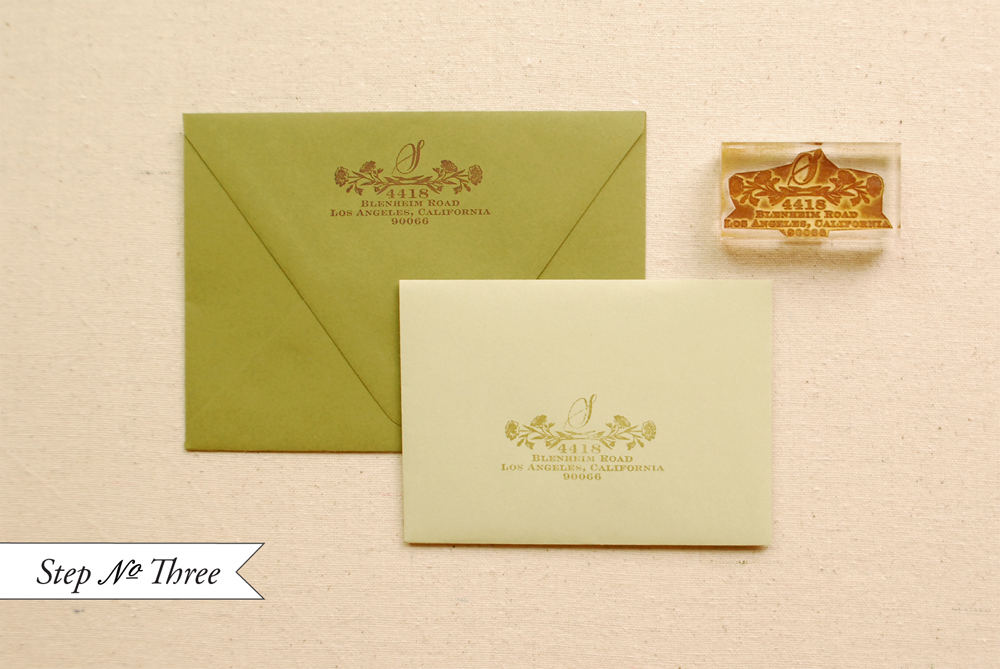
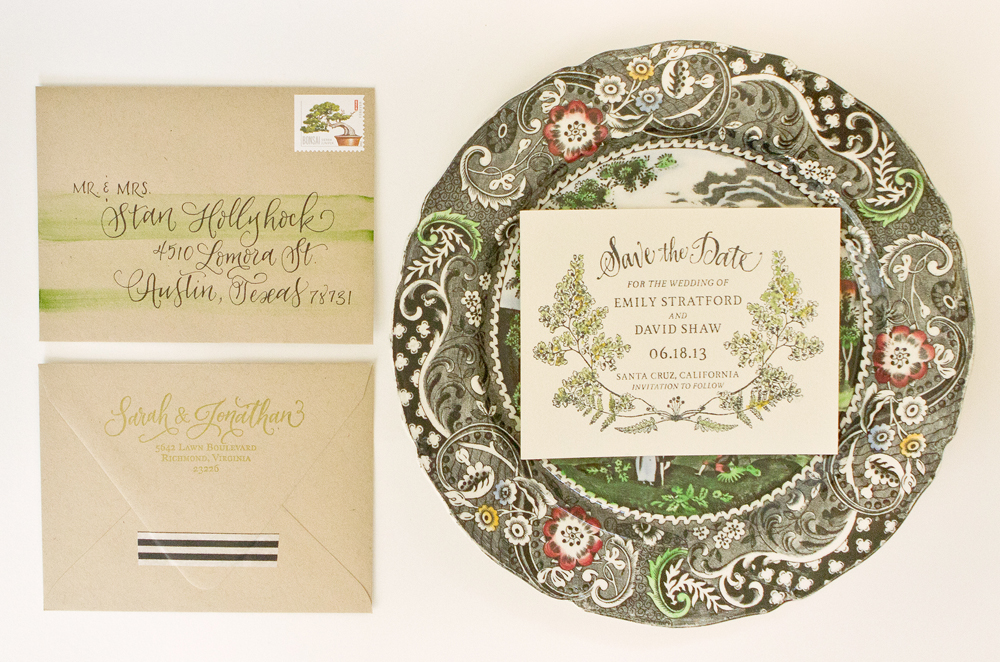
Step Three: Give the lowly envelope a little watercolor flourish as well! Simply sweep a wide, flat watercolor brush loaded with paint across the middle section of your envelope a couple of times and you’re done! Let the paint dry throughly before addressing the envelope.

DIY Tutorial: Botanical Watercolor Save the Date by Antiquaria via Oh So Beautiful Paper

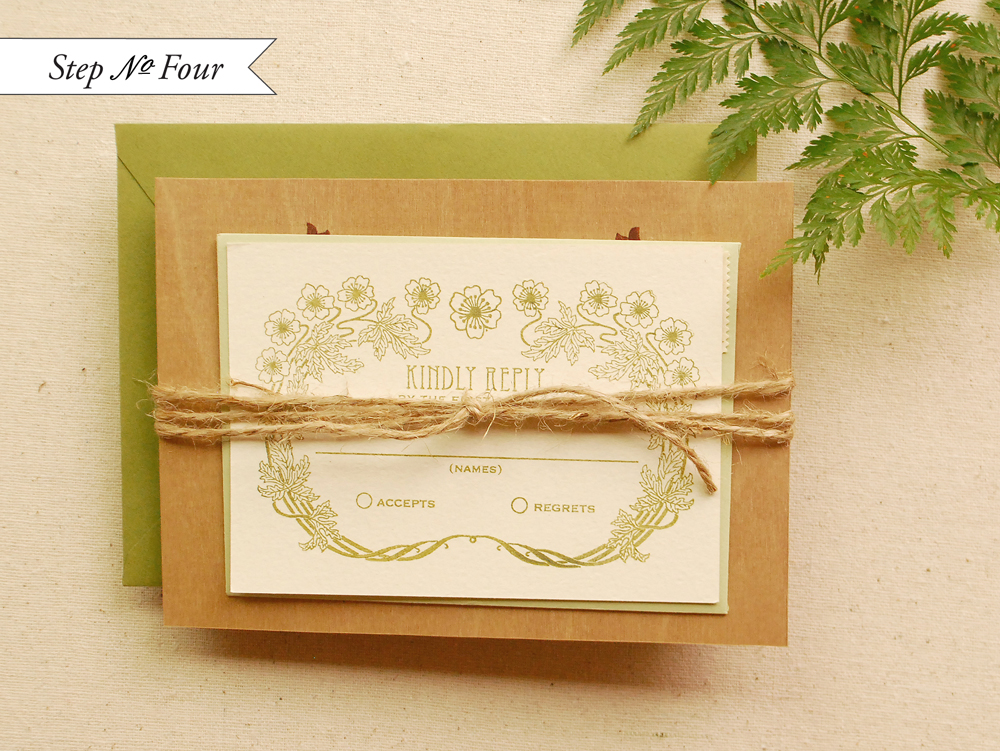
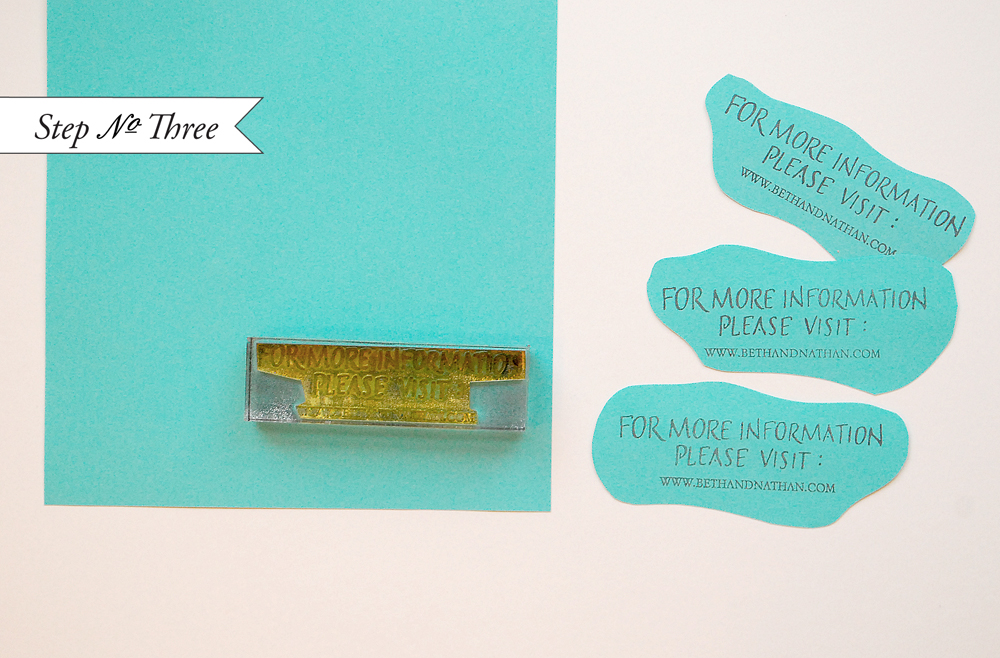
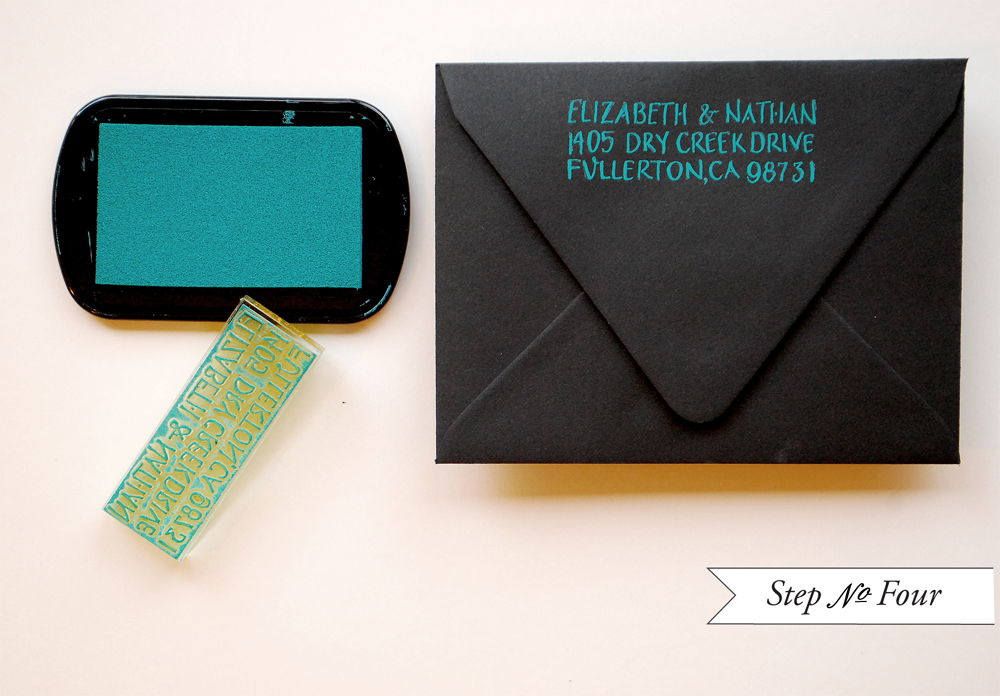
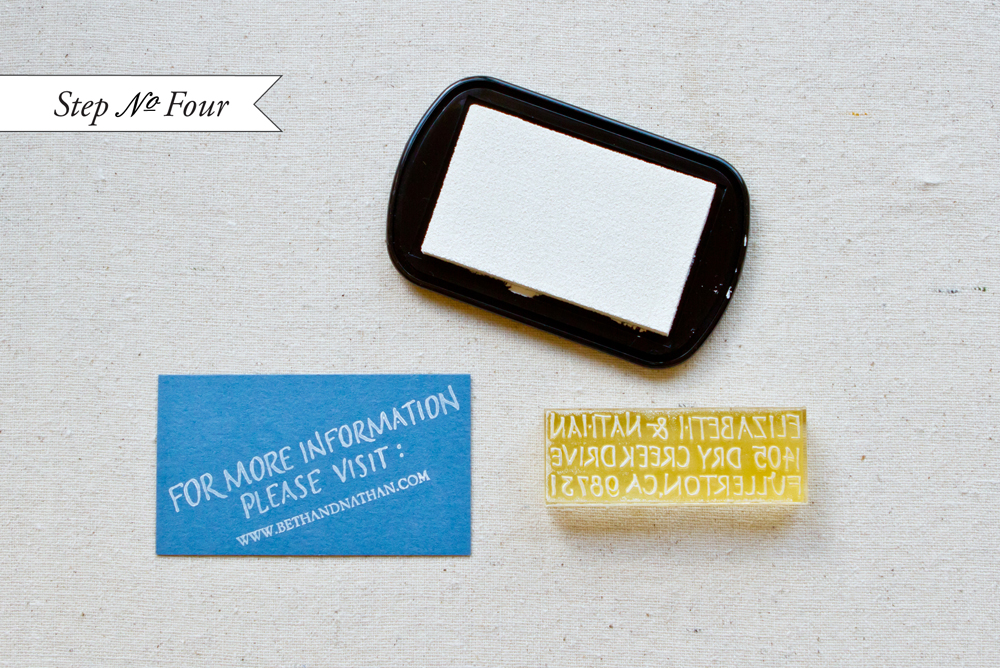
Step Four: Lastly, stamp your return address (we used our Calligraphy Ampersand Return Address Stamp) on the back flap of your envelope in moss-colored ink and let it dry. Use black and white striped washi tape as a decorative seal & send them on their way!

Materials

Fern Forest Save the Date Stamp

Calligraphy Accent Return Address Stamp

Stamp Pad Waterproof black and moss green

Watercolors

Water and Jar

Paint Brushes – fine pointed and 1 in. flat

Washi Tape

Anti­quaria is a mem­ber of the Designer Rolodex – you can see more of their beau­ti­ful work right here or visit the real wedding invitations gallery for more wedding invitation ideas!

Photography by Jamie Simon of Intertwyned

DIY Tutorial: Palm Springs Mod Watercolor Save the Date

Watercolor is one of our favorite DIY techniques to use when putting together a design. The innate softness of the medium naturally lends itself to weddings.  This week, we combined a soft and airy watercolor pattern with one of our more modern hand lettered save the date stamps, printed in black, to achieve a wonderfully retro suite. We’re just loving the combo of chalky pastels combined with inky black… we hope you do too!  As a special bonus to our readers, the watercolor artwork we created for this DIY will be available to download on the Antiquaria Blog. – Bailey and Emma of Antiquaria

DIY Tutorial: Rubber Stamp Retro Watercolor Save the Dates

This save the date suite embodies the retro vibes of Palm Springs! Plus…it’s easy to do!

DIY Tutorial: Rubber Stamp Retro Watercolor Save the Dates

Step One: On an A2 card (you’ll want to use either watercolor paper or this set of precut cards in Luxe White), paint organic lines in varying shades of turquoise, aqua, yellow ochre and ballet pink. For the best and most natural results, hold your paint brush loosely and paint the lines off of the edges of the card. Let the paint dry.

DIY Tutorial: Rubber Stamp Retro Watercolor Save the Dates

Step Two: After you have prepared all of your cards (you’ll want to make some extras), stamp your save the date (we used our Art Deco Save the Date Stamp) toward the top center of the card in black ink. Press firmly across all of the stamp to make certain you get an even print. The acrylic mount really helps you see exactly where you are positioning your stamp within the design. Let the print dry.

DIY Tutorial: Rubber Stamp Retro Watercolor Save the Dates

Step Three: For the website card, we added more retro vibes by printing our stamp (we used our Art Deco Website Card Stamp) on 8.5″x11″ turquoise card stock and cutting out the text in organic shapes, as shown above. We love that each one is different!!

DIY Tutorial: Rubber Stamp Retro Watercolor Save the Dates

Step Four: We finished the suite off by using a black envelope with the return address (we used our Art Deco Return Address Stamp) printed in turquoise ink.

Materials

Rubber Stamps:

Art Deco Save the Date

Art Deco Website Card

Art Deco Return Address

Other Materials:

Stamp Pad in black and turquoise

A2 cards – these  in Luxe White or cut down watercolor paper to, 4.25″x5.5″

A2 envelopes in black

Watercolor paints

Paint brush

Anti­quaria is a mem­ber of the Designer Rolodex – you can see more of their beau­ti­ful work right here or visit the real wedding invitations gallery for more wedding invitation ideas!

Photo Credits: Antiquaria

DIY Tutorial: Blue and White Rubber Stamp Save the Dates

We love blue and white as a color combo. It’s fresh, clean & add a great vintage touch without going overboard. A few weeks ago, while picking up some paper for my moving announcements (which will probably be a future DIY project), I spotted from across the room, some gorgeous floral fine art paper. This blue and white paper instantly reminded me of an inspiration post we’d written a while back about our very popular Copenhagen China Collection. After choosing the paper as my starting point, this lovely, demure, save the date came together quite quickly!  – Bailey and Emma of Antiquaria

DIY Tutorial: Blue and White Rubber Stamp Save the Dates by Antiquaria via Oh So Beautiful Paper

The blue and white floral patterned paper used as backing adds visual interest and a luxurious quality to the design. It could also easily be used as an envelope liner.

DIY Tutorial: Blue and White Rubber Stamp Save the Dates by Antiquaria via Oh So Beautiful Paper

Step One: You’ll want to first adhere the card to the patterned paper. To do this, use permanent spray mount on the back side of your A2 (4.25″ x 5.5″) card. Let the glue get tacky for a few seconds and then place your card onto the backer paper. Let the two pieces adhere well (like overnight) under a heavy book.

DIY Tutorial: Blue and White Rubber Stamp Save the Dates by Antiquaria via Oh So Beautiful Paper

Step Two: Once you’ve waited for the glue to set, carefully trim the card so that the card and backer are the same size. The easiest way to do this is to use a metal ruler and craft knife on a seal healing mat. Take this step slow so that you don’t warp the size of the A2 front.

DIY Tutorial: Blue and White Rubber Stamp Save the Dates by Antiquaria via Oh So Beautiful Paper

Step Three: Lay your backed A2 card on a hard, flat surface. Ink your invitation stamp (we used our Vintage Calligraphy Save the Date Stamp), using a midnight blue stamp pad and center over the backed card. Press down on stamp making certain to apply even pressure on the entire mount (especially the center). Lift stamp and let the print dry thoroughly.

DIY Tutorial: Blue and White Rubber Stamp Save the Dates by Antiquaria via Oh So Beautiful Paper

Step Four: For a reverse effect, stamp your website card using white ink on a blue card. We used our Art Deco Website Stamp on a standard business sized card. This white ink pad really did the trick and was super opaque!

DIY Tutorial: Blue and White Rubber Stamp Save the Dates by Antiquaria via Oh So Beautiful Paper

Step Five: Before addressing the save the dates, we stamped our return address (we used our Calligraphy Ampersand Return Address Stamp) on our light blue A2 envelopes.  All done!

Materials:

Stamps:

Vintage Calligraphy Save the Date Stamp

Art Deco Website Stamp

Calligraphy Ampersand Return Address Stamp

Stamp Pads: Midnight and Frost White

Paper (available at Paper Source):

A2 Notecards in Luxe White

A2 Envelopes in Bluebell

Business Cards in Lake, for the web card

Fine art paper, used for backer

Other Materials:

Permanent Spray Adhesive

Craft knife, metal ruler, and self healing mat

Photo Credits: Intertwyned

Melissa + Todd’s DIY Vintage-Inspired Wedding Invitations

Every couple of weeks, Bailey and Emma of Antiquaria stop by to share some fun DIY ideas using rubber stamps – and today they’re here to share a wedding collaboration with a recent bride!  Designer (and bride) Melissa La Pietra created the vintage-inspired designs for her wedding save the dates and invitations but needed a bit of help with the production.  Bailey and Emma created a rubber stamp that Melissa used for her handkerchief save the dates, then letterpress printed Melissa’s designs for the invitation suite.  Let’s take a look!

DIY Rubber Stamp Wedding Invitations and Save the Dates via Oh So Beautiful Paper (1)

From Bailey and Emma: Melissa + Todd’s wedding venue was The French Laundry in Napa Valley, so the graphics for the invitation were inspired by antique french apothecary labels.  For the invitations, we had Melissa’s designs letterpress printed in charcoal grey ink.  We designed a custom map of Yountville of her favorite places to accompany the suite.

DIY Rubber Stamp Wedding Invitations and Save the Dates via Oh So Beautiful Paper (4)

DIY Rubber Stamp Wedding Invitations and Save the Dates via Oh So Beautiful Paper (7)

The save the dates were sent out in A6 box mailers wrapped in kraft paper and tied with twine.  We made rubber stamps of her save the date designs, which Melissa used to stamp on vintage handkerchiefs.  Mel also embossed their logo on the front of the box and stamped the return address.

DIY Rubber Stamp Wedding Invitations and Save the Dates via Oh So Beautiful Paper (9)

The hankies were wrapped in a variety of patterned papers, tied with bakers twine, and secured with a wooden close pin (from the French Laundry).

DIY Rubber Stamp Wedding Invitations and Save the Dates via Oh So Beautiful Paper (6)

DIY Rubber Stamp Wedding Invitations and Save the Dates via Oh So Beautiful Paper (10)

Thanks Bailey and Emma!

Invitation + Save the Date Design: Melissa LaPietra
Map Design + Rubber Stamps: Antiquaria

Anti­quaria is a mem­ber of the Designer Rolodex – you can see more of their beau­ti­ful work right here or visit the real wedding invitations gallery for more wedding invitation ideas!

Photo Credits: Melissa LaPietra and Intertwyned

DIY Tutorial: Rubber Stamp Wood Veneer Invitation Suite

Every once in a while, we’re fortunate enough to stumble upon a material that is just crying out for us to test our rubber stamps on it.  That’s exactly what happened on a recent trip to our local art supply store.  A lightbulb went off the second we spotted the wood veneer sheets – and this nature-inspired DIY was born! – Bailey and Emma of Antiquaria

DIY Wood Veneer Wedding Invitations by Antiquaria via Oh So Beautiful Paper

The wood veneer material adds a natural warmth to the invitation suite.

DIY Wood Veneer Wedding Invitations by Antiquaria via Oh So Beautiful Paper

Step 1: Lay an A6 (4 1/2″ x 6 1/4″) piece of wood veneer on a hard, flat surface.  Ink your invitation stamp (we used our Art Nouveau Invitation Stamp) evenly, using a brown stamp pad and center over the wooden card.  Press down on stamp making certain to apply even pressure on the entire mount.  Lift stamp and let the print dry overnight.

DIY Wood Veneer Wedding Invitations by Antiquaria via Oh So Beautiful Paper

Step 2: Print your reply card.  We used our Art Nouveau Reply Card stamp printed on a 4bar (3 1/2″ x 4 7/8″) cream card in moss green ink to coordinate with the suite.

DIY Wood Veneer Wedding Invitations by Antiquaria via Oh So Beautiful Paper

Step 3: Stamp your return address and your reply envelope address.  For this, we used our Wildflowers Return Address stamp.  Printing on envelopes can be quite costly, so it’s a great budget saver to use the same return address stamp on both your outer envelope and your reply envelope, as we have above.

DIY Wood Veneer Wedding Invitations by Antiquaria via Oh So Beautiful Paper

Step 4: Using rustic twine, wrap the entire suite to tie it together and secure it with a basic knot.  Address, stamp, and send them on their way to all of your lovely guests.  We guarantee that they will be thrilled to find this unique and natural invitation suite in their mailbox!

DIY Wood Veneer Wedding Invitations by Antiquaria via Oh So Beautiful Paper

Step 5: One thing that you may not think about as you are planning for your wedding is just how many thank you notes will be in your very near future!  A great way to have everything ready to thank your guests after your nuptials is to make your thank you notes as you make your invitation or reception stationery.

On a 4bar (3 1/2″ x 4 7/8″) folded notecard, stamp your monogram (we used our Antique Monogram Stamp) in the center of the card in moss ink.  Use your return address stamp (we re-used our Wildflowers Return Address Stamp from the invitation suite) to stamp on the back of your 4bar envelope.  Now all you need is to sit down and write them!

Materials:

Acrylic Mounted Stamps

Art Nouveau Invitation Stamp

Art Nouveau Reply Card Stamp

Wildflowers Return Address Stamp

Antique Monogram Stamp

Additional Materials

Stamp Pad in Chestnut and Moss

Wood Veneer sheets, cut to A6 (4 1/2″ x 6 1/4″) cards (this material can be easily cut with scissors)

A6 Envelopes in Moss

4Bar Flat Card in Luxe Cream

4Bar Folded Cards in Luxe Cream

4Bar Envelopes in Leaf

Twine

Anti­quaria is a mem­ber of the Designer Rolodex – you can see more of their beau­ti­ful work right here or visit the real wedding invitations gallery for more wedding invitation ideas!

Photo Credits: Antiquaria