Printable Tropical Envelope Liners

Are you ready for something SUPER fun?!? Sakura of America recently released a set of amazing new brush pens called the Pigma Professional Brush, and we wanted to do something really awesome to show you what these babies can do! Nothing makes me smile more than a colorful envelope and patterned envelope liner – and today we have printable tropical envelope liners in TWO gorgeous patterns for you to enjoy!

Printable Tropical Envelope Liners / Illustrated by Swiss Cottage Designs with Sakura Pigma Professional Brush Pens / Oh So Beautiful Paper

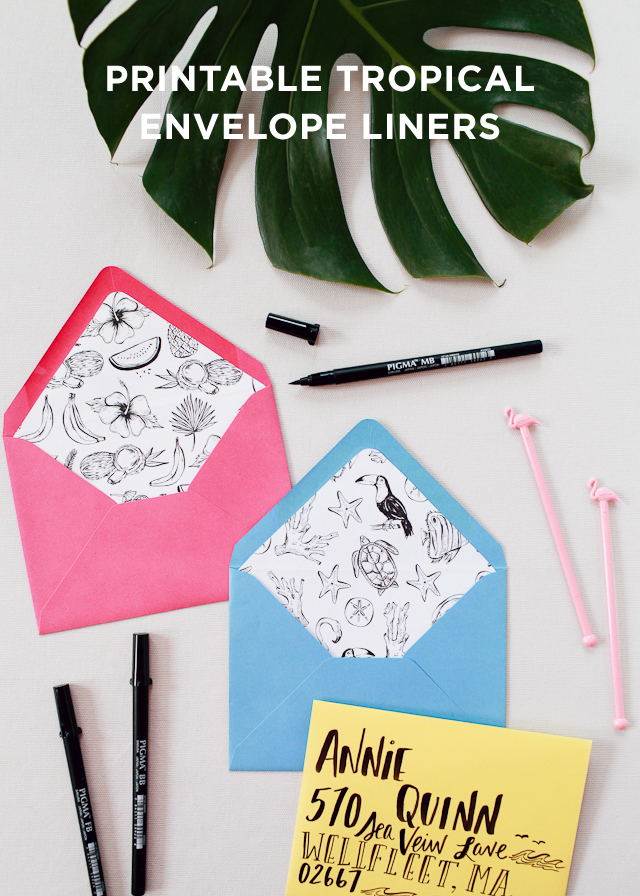
Courtney from Swiss Cottage Designs illustrated the tropical patterns using all three Pigma Professional Brush pen weights – fine, medium, and bold. Courtney and I are still feeling the tropical vibe from the Paper Party so we decided to keep on running with a tropical theme. One pattern features illustrations of watermelons, pineapples, and palm fronds, and the other has flamingos, toucans, coral, and fish! Both patterns make me wish I was somewhere on a beach with a tropical drink in hand!

Printable Tropical Envelope Liners / Illustrated by Swiss Cottage Designs with Sakura Pigma Professional Brush Pens / Oh So Beautiful Paper

You can print the envelope liner patterns on text weight letter size paper. You can leave the patterns black and white – or add a dose of color using colored pencils or your favorite Gelly Roll pen! The Glaze pens almost look like watercolor and are great for coloring in those fine details! You can even use the patterns as coloring sheets just for fun!

Printable Tropical Envelope Liners / Illustrated by Swiss Cottage Designs with Sakura Pigma Professional Brush Pens / Oh So Beautiful Paper

Here are the instructions for making the envelope liners:

Step 1. Lightly trace an outline of the envelope on the back of the liner page. If you’re using Paper Source envelopes, you can use one of these handy envelope liner template kits. Cut out the liner, being careful to cut on the inside of the lines. Trim an additional 1/16″ off each side and 3/4″ off the bottom of the liner.

Step 2. Place the liner in the envelope. Use a glue stick or double sided tape on the back of the liner (along the top triangle and just above the crease) to adhere the liner to the envelope.

Printable Tropical Envelope Liners / Illustrated by Swiss Cottage Designs with Sakura Pigma Professional Brush Pens / Oh So Beautiful Paper

Printable Tropical Envelope Liners / Illustrated by Swiss Cottage Designs with Sakura Pigma Professional Brush Pens / Oh So Beautiful Paper

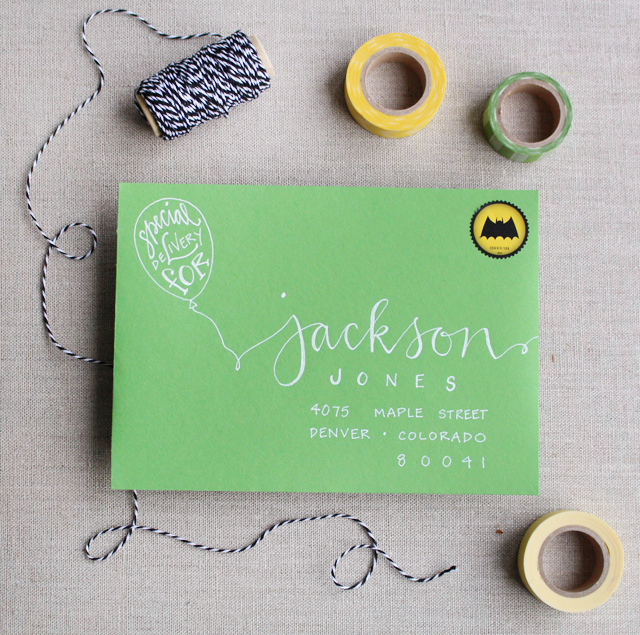
The Pigma Professional Brush pens use archival waterproof ink, which also makes them my new favorite pen for addressing envelopes. The brush nibs respond to changes in pressure or direction while maintaining smooth and consistent ink flow, so they’re super easy to use! The flexible brush nibs offer both thin and thick brush strokes and they won’t smear, feather, or bleed through on most paper. Courtney addressed a few envelopes using the different pen weights – I love the subtle gradient in the bold brush!

Printable Tropical Envelope Liners / Illustrated by Swiss Cottage Designs with Sakura Pigma Professional Brush Pens / Oh So Beautiful Paper

Printable Tropical Envelope Liners / Illustrated by Swiss Cottage Designs with Sakura Pigma Professional Brush Pens / Oh So Beautiful Paper

Printable Tropical Envelope Liners / Illustrated by Swiss Cottage Designs with Sakura Pigma Professional Brush Pens / Oh So Beautiful Paper

And yes, I may have foiled an envelope liner or two (in light pink metallic foil) using my Minc foil applicator. The Minc works with toner ink, so just print the liner patterns on a laser printer, or use a copying machine to make as many copies of the liner as you’ll need, and foil away!

Printable Tropical Envelope Liners / Illustrated by Swiss Cottage Designs with Sakura Pigma Professional Brush Pens / Oh So Beautiful Paper

Download the envelope liner patterns from Swiss Cottage Designs right here! And you can pick up a set of the Pigma Professional Brush pens right here!

All artwork © 2015 Swiss Cottage Designs created exclusively for Oh So Beautiful Paper. All artwork is made available for personal use only. By downloading the patterns you agree to the terms of use.

Swiss Cottage Designs is a mem­ber of the Designer Rolodex â€“ you can see more of Courtney’s beau­ti­ful work right here!

Photos by Nole Garey for Oh So Beautiful Paper

This post is sponsored by Sakura of America. All content and opinions are my own. Thank you for supporting the sponsors that make Oh So Beautiful Paper possible!

Behind the Stationery: Underwood Letterpress

I had the pleasure of meeting Cara of Underwood Letterpress in person at The National Stationery Show this year. Though it was her first show, she is no printmaking or business rookie – she is (very quickly) taking over the California coast! Here’s the scoop on her business prowess, days at work, and design process. –Megan

Behind the Stationery: Underwood Letterpress / Oh So Beautiful Paper

I learned to letterpress print about 10 years ago in a printmaking class during college, but then I took a detour from the world of design for a bit, got my masters in public policy and built a career in philanthropy working with some of the most talented and generous people that I know. I gained skills in management, planning and collaboration that have influenced the way I run my business today. I thrived in my career, but couldn’t be happier about the switch. I love working with my hands again, designing beautiful things and being my own boss. I don’t know what the future holds, but I’m excited to have embraced this non-linear career path and am excited about where it may take me!

Behind the Stationery: Underwood Letterpress / Oh So Beautiful Paper

I officially launched Underwood Letterpress in 2012. When we launched, our custom work took off really quickly and we were fortunate to get some great exposure through various prominent design blogs including Apartment Therapy, One King’s Lane and Design Love Fest. We spent two years building our custom work and with a leap of faith we decided to launch our own greeting card line this year at the National Stationery Show. We were a finalist for Best New Product and had a really great response to our card’s simple, modern designs and playful color palette.

Behind the Stationery: Underwood Letterpress / Oh So Beautiful Paper underwood-38

Underwood Letterpress is located in the arts district in downtown Los Angeles in a shared workspace called The Unique Space. The building is a collective of designers, entrepreneurs, writers and bloggers, and also has a co-working space that brings different creative people to the building every day. While we are all hard at work running our own small business, we often find time to collaborate on projects or just bounce ideas off of one another. It’s a creative utopia!

Behind the Stationery: Underwood Letterpress / Oh So Beautiful Paper

Behind the Stationery: Underwood Letterpress / Oh So Beautiful Paper

Our studio consists of our 12×18 Chandler and Price printing press from 1915 (yes, there’s a 100 year birthday in the house!!), our guillotine paper cutter, workspace, and as much shelving as we could fit to house our paper, inks, and other wares. We are lucky to have access to storage in the building’s basement which has allowed us to house a ton of inventory and grow our product line without crowding us out of the studio.
Behind the Stationery: Underwood Letterpress / Oh So Beautiful Paper

Our incredibly talented studio associate Mallory is running the show in L.A., while I work on expanding our business in the Bay Area. With a “minor” turn of events, my husband was recruited to northern California for a new job early this year, so I figured I would take on the challenge of bringing the business to another part of California that I love. I have set up a home studio and am fortunate to be printing at the San Francisco Center for the Book until I set up a permanent studio there. I travel to L.A. every other month for various projects and to meet with clients.Behind the Stationery: Underwood Letterpress / Oh So Beautiful Paper

Running a business in two locations means there is no “typical” day in the office. Each day is a unique combination of client consultations, emails, and designing. I am on the press about twice per week and spend the rest of the time building the business. I’ve found that I actually love working on the business side of things — finances, marketing, planning — all of it. This is an area I want to grow in and can’t wait to attend Business Boot Camp organized by the paper industry’s amazing professional network TSBC.

Behind the Stationery: Underwood Letterpress / Oh So Beautiful Paper

Our greeting card line incorporates bold color, pattern, geometry and juxtaposition. I take a lot of cues from fashion, home and lifestyle trends and love Scandinavian design. When designing a new card, I focus on color and design first. The sentiment or occasion comes next and usually organically pops right out at me.
Behind the Stationery: Underwood Letterpress / Oh So Beautiful Paper

All of the cards are hand drawn which means that I start the process with a trusty Sharpie pen. I like to lay out a large piece of paper on my workspace and cover it with doodles, to do lists and reminders. That way, I have access to a canvas all day long and can sketch my ideas as they come to me. From there, I convert the images to digital artwork, refine the designs in Illustrator and then determine the color palette.

Behind the Stationery: Underwood Letterpress / Oh So Beautiful PaperUnderwoodLetterpressStudioTour058-9UnderwoodLetterpressStudioTour069-11UnderwoodLetterpressStudioTour066-10

We specialize in letterpress printing, but offer foil printing, edge painting and embossing. We dip dye in house using a special technique that allows us to get really rich and textured color. We also work with handmade papers to create custom envelope liners and other special finishes. I’ve had a lot of people tell me that they like to frame our cards and I love that! We work hard to make sure everything we touch turns in to a piece of art which I think makes our card line unique.

Behind the Stationery: Underwood Letterpress / Oh So Beautiful Paper

We also have a love affair with vintage postage and offer curated postage sets through our Etsy shop. We believe that the outside of our mail should be just as pretty as the inside. The U.S. Postal Service has been issuing beautiful stamps for the last 150+ years, so why not send them out in to the world so they can be enjoyed! We just started selling our curated postage through card shops all over the country this year, so definitely be on the lookout!Behind the Stationery: Underwood Letterpress / Oh So Beautiful Paper

All photos by Jen Emerling.

Interested in being featured on the Behind the Stationery column? Please contact Megan at [email protected].

Behind the Stationery: Hello Tenfold

The talented Ellie of well-respected stationery brand, Hello Tenfold, is here sharing how she turned the key of an unfortunate situation and opened the door into a full-time custom wedding invitation business. Full of behind the scenes client inspiration boards, Ellie shares how having a toddler has affected her workday and where she goes to get inspired (clue: shopping is involved!). –Megan
hellotenfold-elegant-letterpress-wedding-invitation-set

I’m Ellie Snow, and I’m thrilled to be on this beautiful blog today! I started my stationery company Hello Tenfold in 2009, around the time that I got married and designed my first set of wedding invitations – my own! – alongside my then-boyfriend. We got some encouraging feedback on our work and my business was born. Although it didn’t feel lucky at the time, soon after our wedding and the launch of Hello Tenfold, my husband and I were laid off from our graphic design jobs and self employment became a reality. It had always been a goal of mine to be self employed, and life went ahead and gave me the shove I needed! Since then, I’ve been lucky to have my work featured in magazines like Martha Stewart Weddings, Southern Living, Brides Magazine, and HOW Magazine, among others. More importantly, I get to spend my days doing something I absolutely adore.

hellotenfold-desk

hellotenfold-studio

After working from home for a few years, I began to rent a studio space, which was an enormous help for productivity (not to mention mental health and, um, cleanliness). Today my studio is located in a part of Durham, North Carolina dubbed the “DIY District.” The studio is next door to a boutique selling handmade NC goods, and a stone’s throw from a favorite coffee shop, a brewery, a music venue, a ballpark, and too much good food to mention. As a bonus, the studio’s store front windows make for excellent sunset watching. My coworkers are my husband, who started his own design business last Fall, Harbor, our studio-mate, photographer Jessie Gladdek, and the various local business owners who make my job possible — printers, shippers, baristas.

hellotenfold-gold-foil-wedding-invitations

Over the years Hello Tenfold’s collection of invitations has grown to be over 25 different suites, and most of the jobs I take involve customizing those suites to fit the weddings of the couples I work with. Sometimes it’s as simple as changing a color scheme, and other times we use the invitation design as a basic starting place and create something totally different by changing the layout, fonts, envelope liner pattern, printing method, and so on. Occasionally a client’s request for a design will get my wheels spinning and turns into a new design for the shop — Florentine, for example, started as a custom invitation for a couple in Chapel Hill, and last week a bride asked me for a vegetable-and-animal themed suite (hmm… stay tuned!).

hellotenfold-watercolor-painting

One of the things I love about designing wedding invitations in particular is the opportunity to have so many different paper items, each with a unique look but cohesiveness throughout the suite. I love mixing patterns, and many of my designs start with inspiration from some bygone era. In the summer, I love spending Saturday mornings at antique stores, and my phone is full of photos of details in wood furniture or interesting patterns found in rugs, fabric swatches, or book covers.
hellotenfold-inspiration

A typical week at Hello Tenfold starts mid-morning. I was never an early riser, but my one-and-a-half year old is working on it. We spend the morning getting the three of us fed, bathed, dressed, and packing various bags that we each need for the day ahead. My daughter goes to her nanny’s house and my husband and I head to our studio. At work, my day starts with emails. I send out quotes for potential new clients, answer questions, and then start in on design work. This means making edits to proofs, sending clients new designs and variations, and sometimes it means an impromptu photo shoot. Like, showing a bride the subtle difference between Bright White and Soft White paper and how each of those look in gold foil, alongside 8 different neutral paper options for the corresponding envelope liner.

hellotenfold-invitation-styling

Since most of my clients are not local, photos and phone calls can be key! I save projects like shop updates, social media, packaging and shipping orders, assembling envelope liners and invitation bands, checking on printer’s proofs, and assembling sample packs for the afternoons. If needed, I call in back-up… I’ve got a few trusty ladies with tape gun talent. Just before 5pm there’s a mad dash to pick up our daughter from daycare on time. We play outside or run errands, cook dinner, and do the bedtime routine. A few nights a week, my husband and I work after our daughter is in bed, unless the couch calls our names and we snuggle in with some TV or good books.

hellotenfold-vintage-stamps

I love sharing the projects I’m working on (and a few cute baby pictures for good measure)! You can follow along on instagram, pinterest, facebook, twitter, or my blog Mint. Thanks for having me!

Photos by Lissa Gotwals and Ellie Snow, styling by Michelle Smith and Ellie Snow, calligraphy by Layers of Loveliness.

Interested in participating in the Behind the Stationery column? Reach out to Megan at [email protected].

DIY Blue and Gold Embossed Save the Dates

In our last DIY post, we shared a gorgeous free pattern download for envelopes liners and place cards. We thought it would be fun this week to actually use the pattern as a launching point and design an awesome save the date that utilizes it in the design. The mixed shades of blue feels fresh and spring-y and we used our favorite embossing technique to incorporate lots of gold into the design (our favorite if you haven’t noticed). The result is a stunning and custom looking suite which can all be easily accomplished on your own with a few key materials! –Bailey and Emma of Antiquaria

DIY Blue and Gold Wedding Save the Dates by Antiquaria for Oh So Beautiful Paper

Materials

Laurel Wreath Save the Date Stamp

Laurel Wreath Return Address Stamp

Embossing Stamp Pad

Embossing Heat Tool

Embossing Powder in Gold

A2 Cards (we used Lake)

A2 Envelopes (we used Bluebell)

Gold Dot Washi Tape

Gold Glitter Heart Stickers

Liner (free download, printed on white text weight paper)

Envelope Liner Templates

Pencil and Scissors

Stick Glue or Double Sided Tape

Gold Calligraphy Ink

Vintage Postage

DIY Blue and Gold Wedding Save the Dates by Antiquaria for Oh So Beautiful Paper

DIY Blue and Gold Wedding Save the Dates by Antiquaria for Oh So Beautiful Paper

Step One: We embossed our Laurel Wreath Save the Date stamp and our Laurel Wreath Return Address Stamp for this save the date design. All of the pieces were embossed with our favorite gold embossing powder which gives lovely, fine results. Simply stamp your design on your card (Lake A2) and envelope (Bluebell A2) (either in matching ink or with Versamark glue ink, as pictured), dust the powder over it, tap off the excess, and heat set the print. For more information about how to emboss using stamps, please watch this instructional video.

DIY Blue and Gold Wedding Save the Dates by Antiquaria for Oh So Beautiful Paper

DIY Blue and Gold Wedding Save the Dates by Antiquaria for Oh So Beautiful Paper

Step Two: To add personality to the design, we added an envelope liner made from our latest free pattern download. It really helps dress up the whole suite! Print the pattern out on your home printer using a high quality text weight paper, then trace the A2 envelope liner template onto the paper and cut it out with scissors. To install, simply use stick glue or double sided tape to adhere them into your envelope.

DIY Blue and Gold Wedding Save the Dates by Antiquaria for Oh So Beautiful Paper

Step Three: All that’s left now is the finishing touches! We addressed them using our favorite gold calligraphy ink and a dip pen – but your could also use a gold gel pen and your prettiest cursive to achieve a similar look. We added gold polka dot washi tape, a glitter heart sticker and vintage postage to tie everything together and make the envelope just as gorgeous as the save the date.

DIY Blue and Gold Wedding Save the Dates by Antiquaria for Oh So Beautiful Paper

We know your guests will love getting these beauties in the mail!

All artwork © 2015 Antiquaria, with DIY tutorials created exclusively for Oh So Beautiful Paper. All artwork is made available for personal use only. Anti­quaria is a mem­ber of the Designer Rolodex – you can see more of their beau­ti­ful work right here!

Photo Credits: Antiquaria for Oh So Beautiful Paper

Hudson’s Hand Lettered Birthday Party Invitations

I love seeing all these wonderful kid birthday party invitations! These 4th birthday party invitations from Grey Snail Press feature a citrus-inspired color palette of orange, yellow, and green, whimsical hand lettering, and a whole lot of balloons!

Hand-Lettered-Birthday-Party-Invitations-Grey-Snail-Press-OSBP

From J: I had so much fun creating these invitations! We came up with the verse “pizza, cake, bouncing & more” to give guests a taste of what to expect at the party, followed by all the important details. Everything was hand-lettered and drawn before adding watercolor accents.

Hand-Lettered-Birthday-Party-Invitations-Grey-Snail-Press-OSBP5

Hand-Lettered-Birthday-Party-Invitations-Grey-Snail-Press-OSBP3

The invitations were printed flat on 110# cotton Lettra paper and paired with a bright green envelope. We created a custom pattern for the envelope liners in orange and white covered in fours. RSVPs weren’t needed, but we included a phone number for which to direct any questions. We played up the balloons and printed the information on lime paper cut in the shape of a balloon and added baker’s twine to each balloon.

Hand-Lettered-Birthday-Party-Invitations-Grey-Snail-Press-OSBP4

We hand lettered the envelopes in white ink while carrying over the balloon motif. One of my favorite parts was the round Batman stamp, perfect for a 4-year-old superhero.

Hand-Lettered-Birthday-Party-Invitations-Grey-Snail-Press-OSBP2

Hand-Lettered-Birthday-Party-Invitations-Grey-Snail-Press-OSBP6

Thanks J!

Grey Snail Press is a member of the Designer Rolodex – you can see more of their beautiful work right here!

Photo Credits: Grey Snail Press