Kris + Lowell’s St. Patrick’s Day Wedding Invitations

Is it really possible that I’ve been blogging for nearly 5 years without featuring some St. Patrick’s Day wedding invitations?!? Well, better late than never! J from Grey Snail Press sent over these beautiful invitations that she designed for a St. Patrick’s Day wedding. The design combines a stylized shamrock (a must!) with J’s whimsical hand lettering and watercolor accents. Beautiful!

St. Patricks Day Wedding Invitations by Grey Snail Press via Oh So Beautiful Paper (1)

From J: These wedding invitations were a nod to both the bride’s Irish heritage and the St. Patrick’s Day nuptials. A stylized shamrock illustration and hand lettering were letterpress printed in Kelly green by Hound Dog Press on Crane’s 110# Lettra in fluorescent white.

St. Patricks Day Wedding Invitations by Grey Snail Press via Oh So Beautiful Paper (3) St. Patricks Day Wedding Invitations by Grey Snail Press via Oh So Beautiful Paper (4)

A Kelly green envelope was chosen with custom watercolor and ink shamrocks digitally printed on lightweight cerulean paper for liners. RSVP cards were printed digitally, along with two shamrock accents and complementing cerulean envelopes.

St. Patricks Day Wedding Invitations by Grey Snail Press via Oh So Beautiful Paper (5)

Thanks J!

Design and Hand Lettering: Grey Snail Press

Letterpress Printing: Hound Dog Press

Grey Snail Press is a member of the Designer Rolodex – you can see more of their beautiful work right here or visit the real invi­ta­tions gallery for more wedding invitation ideas!

Photo Credits: Grey Snail Press

Wedding Stationery Inspiration: Colorfully Illustrated Menus

So I’ve talked a lot in the past about black and white day-of wedding stationery because, really, can you go wrong with that combination!? But today, prepare for a full on color-fest! An illustrated color-fest, to be exact. I’m a sucker for illustration, especially when it’s whimsical and colorful. While you may have already considered it for your wedding invitations, have you thought about added a little hand-drawn or watercolored detail to your wedding menus? You will after this!  — Kelly

Day-Of Wedding Stationery Inspiration and Ideas: Colorfully Illustrated Menus via Oh So Beautiful Paper (4)

Photo by Jose Villa, Menu by Julie Song Ink via Elizabeth Anne Designs

Day-Of Wedding Stationery Inspiration and Ideas: Colorfully Illustrated Menus via Oh So Beautiful Paper Day-Of Wedding Stationery Inspiration and Ideas: Colorfully Illustrated Menus via Oh So Beautiful Paper (10)

Photo by Jose Villa, Menu by Julie Song Ink via Elizabeth Anne Designs (left), Photo by Elisa B Photography, Menu by Rock Paper Scissors via Ruffled (right)

Day-Of Wedding Stationery Inspiration and Ideas: Colorfully Illustrated Menus via Oh So Beautiful Paper (1)

Menu by Cheree Berry Paper

 Day-Of Wedding Stationery Inspiration and Ideas: Colorfully Illustrated Menus via Oh So Beautiful Paper (11)

Photo by Brea McDonald Photography, Menu by Griffin-vites

Day-Of Wedding Stationery Inspiration and Ideas: Colorfully Illustrated Menus via Oh So Beautiful Paper Day-Of Wedding Stationery Inspiration and Ideas: Colorfully Illustrated Menus via Oh So Beautiful Paper (2)

Photo by Steep Street, Menu by Ryan Barnachea via Ruffled (left), Photo by Jose Villa, Menu by Yellow Owl Workshop via Style Me Pretty (right)

Day-Of Wedding Stationery Inspiration and Ideas: Colorfully Illustrated Menus via Oh So Beautiful Paper (8)

Photo by Weddings by Two, Menu by Rifle Paper Co. via Style Me Pretty

Day-Of Wedding Stationery Inspiration and Ideas: Colorfully Illustrated Menus via Oh So Beautiful Paper (12)

Photo by Kristen Weaver Photography, Menu by 9th Letter Press via Every Last Detail

Day-Of Wedding Stationery Inspiration and Ideas: Colorfully Illustrated Menus via Oh So Beautiful Paper (5) Day-Of Wedding Stationery Inspiration and Ideas: Colorfully Illustrated Menus via Oh So Beautiful Paper (7)

Photo by Sutherland Kovach Studio via Style Me Pretty (left), Photo by Chesterton Smith Photography, Menu by Stand Tall Design (right)

Day-Of Wedding Stationery Inspiration and Ideas: Colorfully Illustrated Menus via Oh So Beautiful Paper (6)

Menu by The Indigo Bunting

{images via their respective sources}

DIY Tutorial: Vintage Fern Wedding Invitations

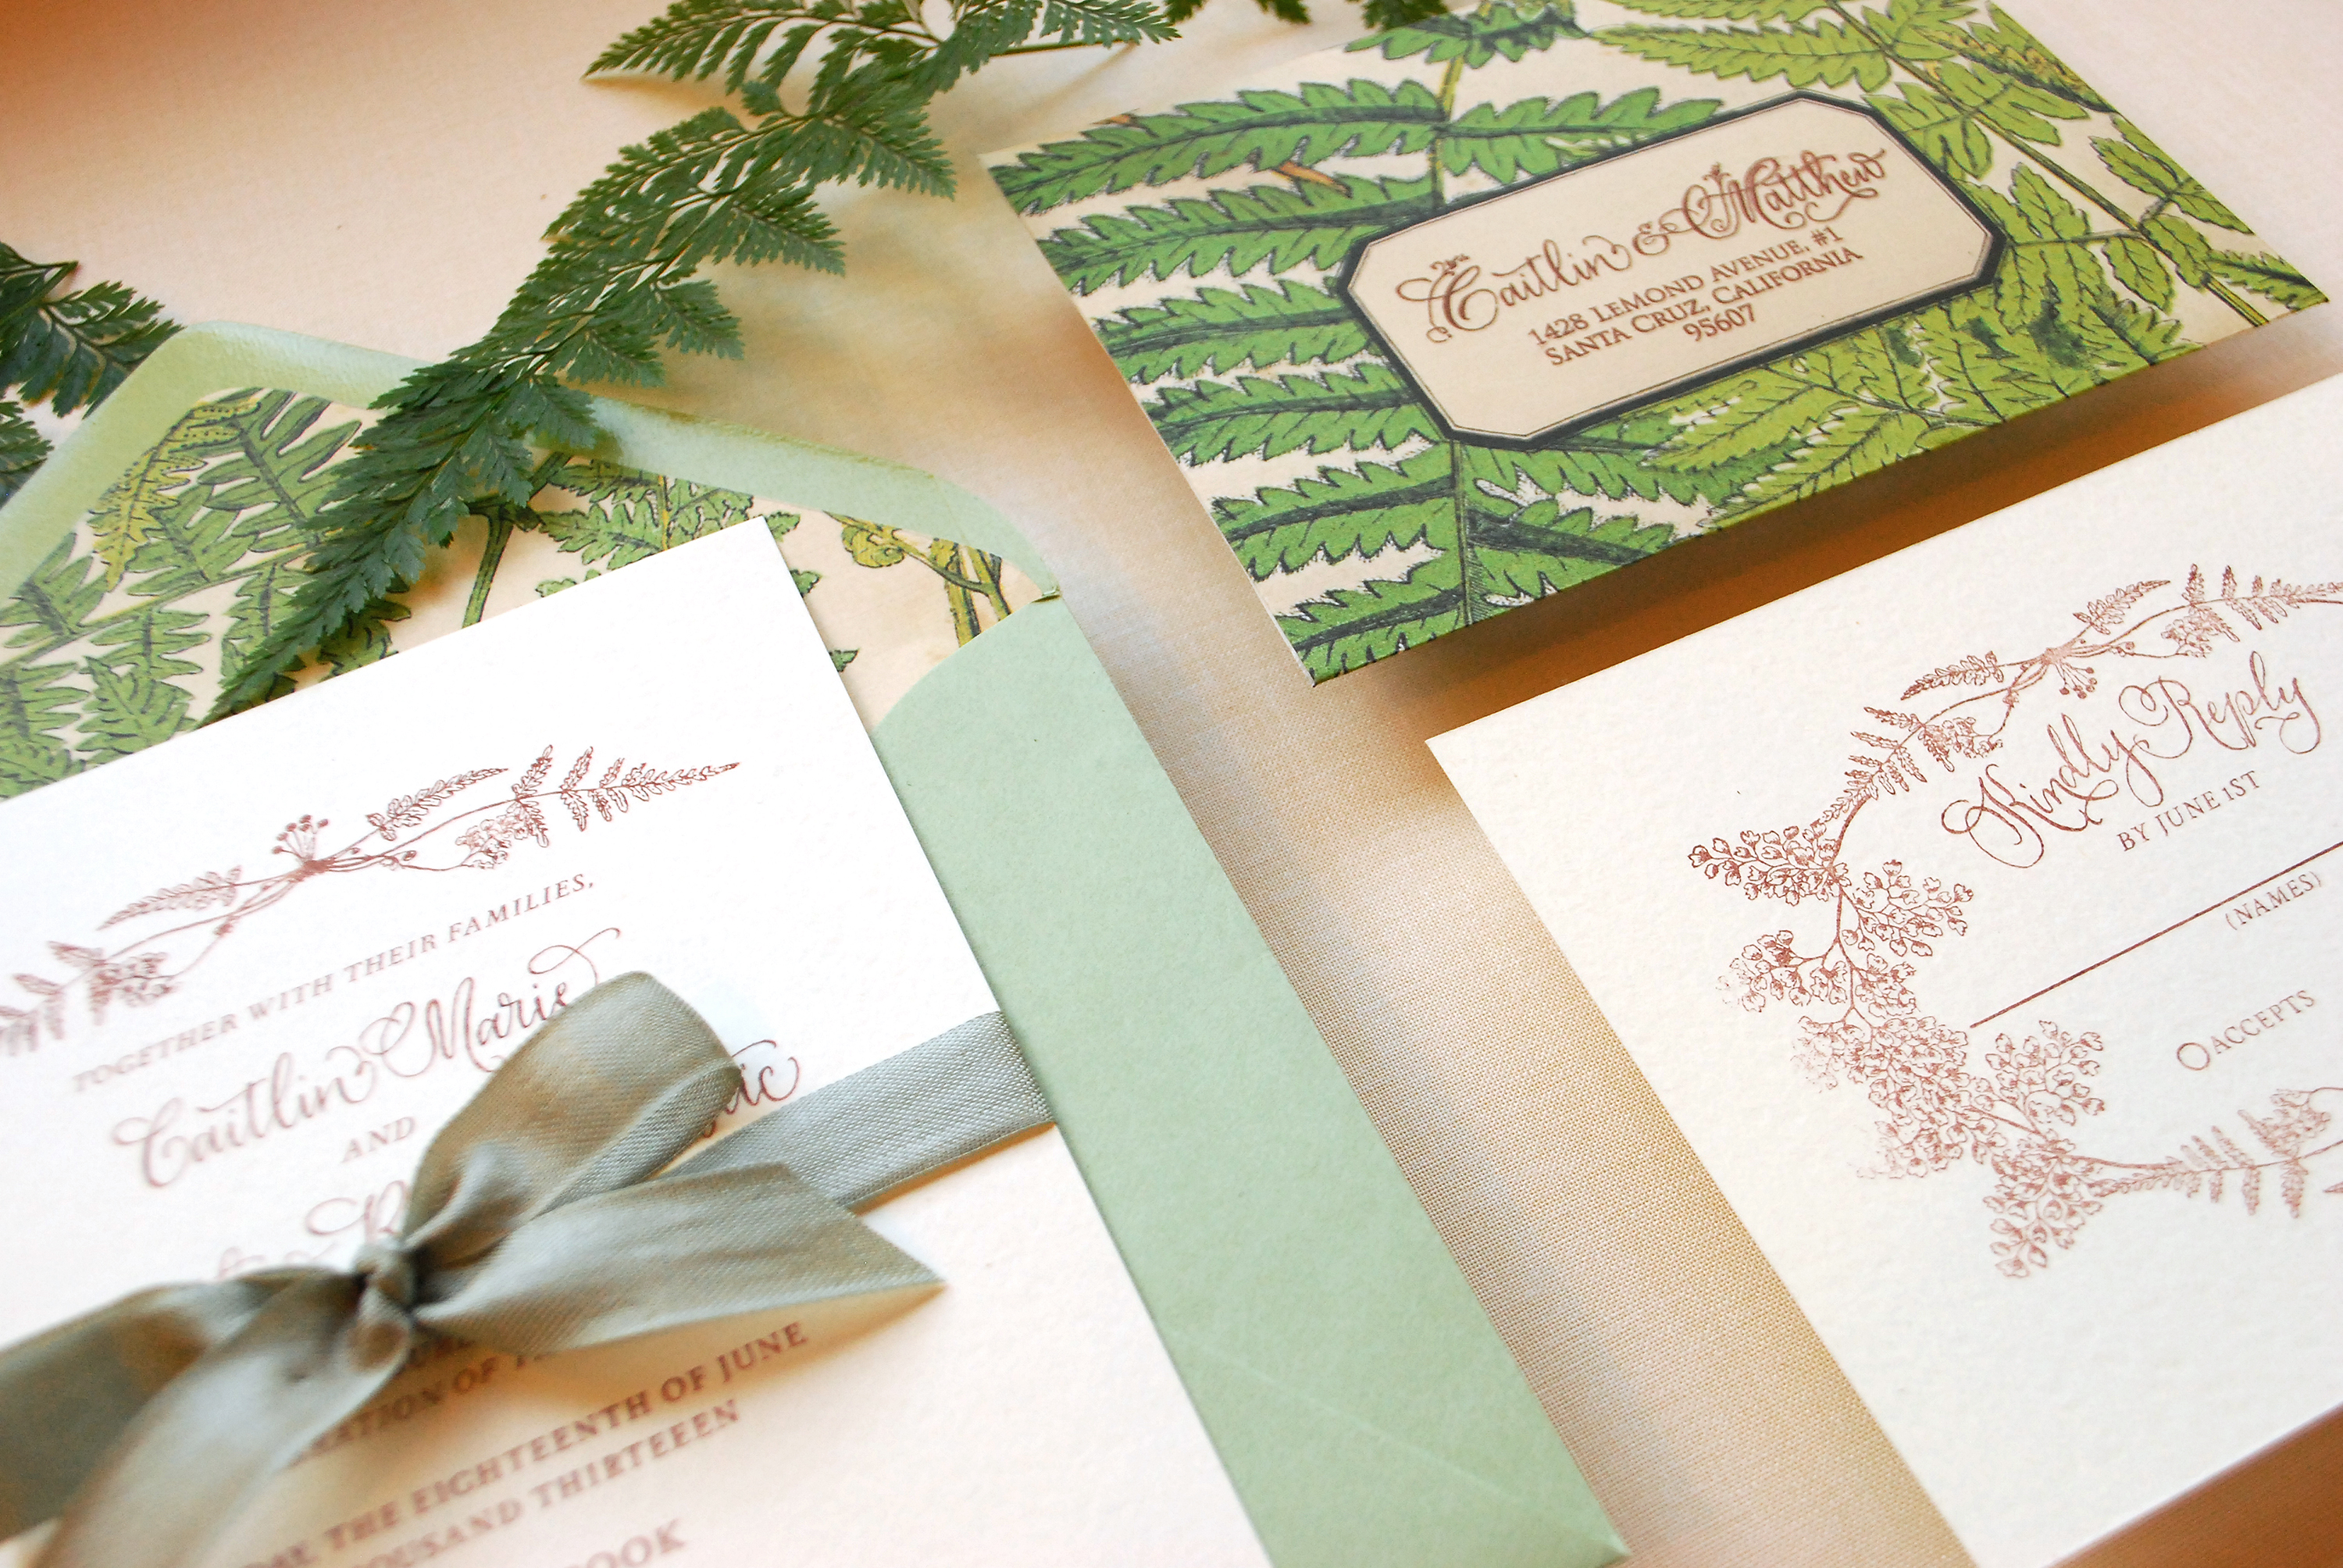
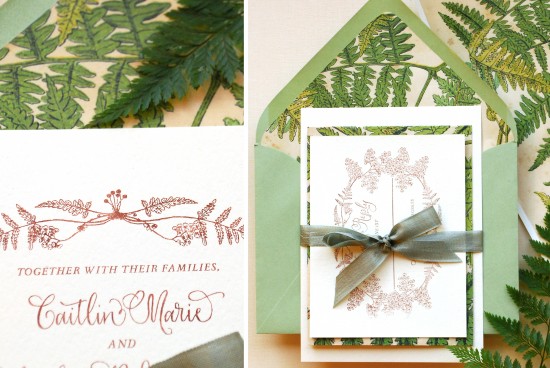
Vintage botanical artwork is one of those things that truly never goes out of style. The lifelike renderings of plants and flowers take a very skilled hand to create and happily bring the outdoors into an indoor space (without the upkeep of real plants!). With the outdoor wedding season approaching, we were inspired to create this lush and lovely suite that is like sending a beautiful garden through the mail! – Bailey and Emma of Antiquaria

DIY Tutorial: Fern Inspired Wedding Invitations by Antiquaria via Oh So Beautiful Paper

This fern invitation suite is a wonderful compliment to our Botanical + Watercolor Save the Date Tutorial!

DIY Tutorial: Fern Inspired Wedding Invitations by Antiquaria via Oh So Beautiful Paper

DIY Tutorial: Fern Inspired Wedding Invitations by Antiquaria via Oh So Beautiful Paper

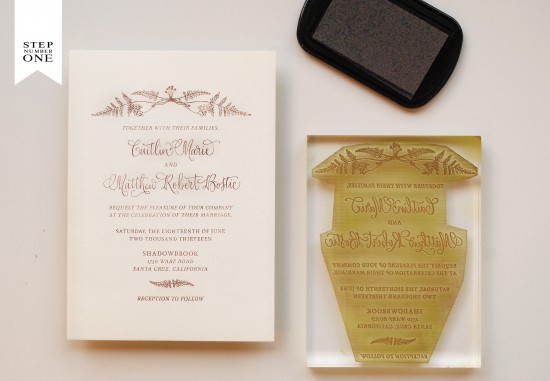
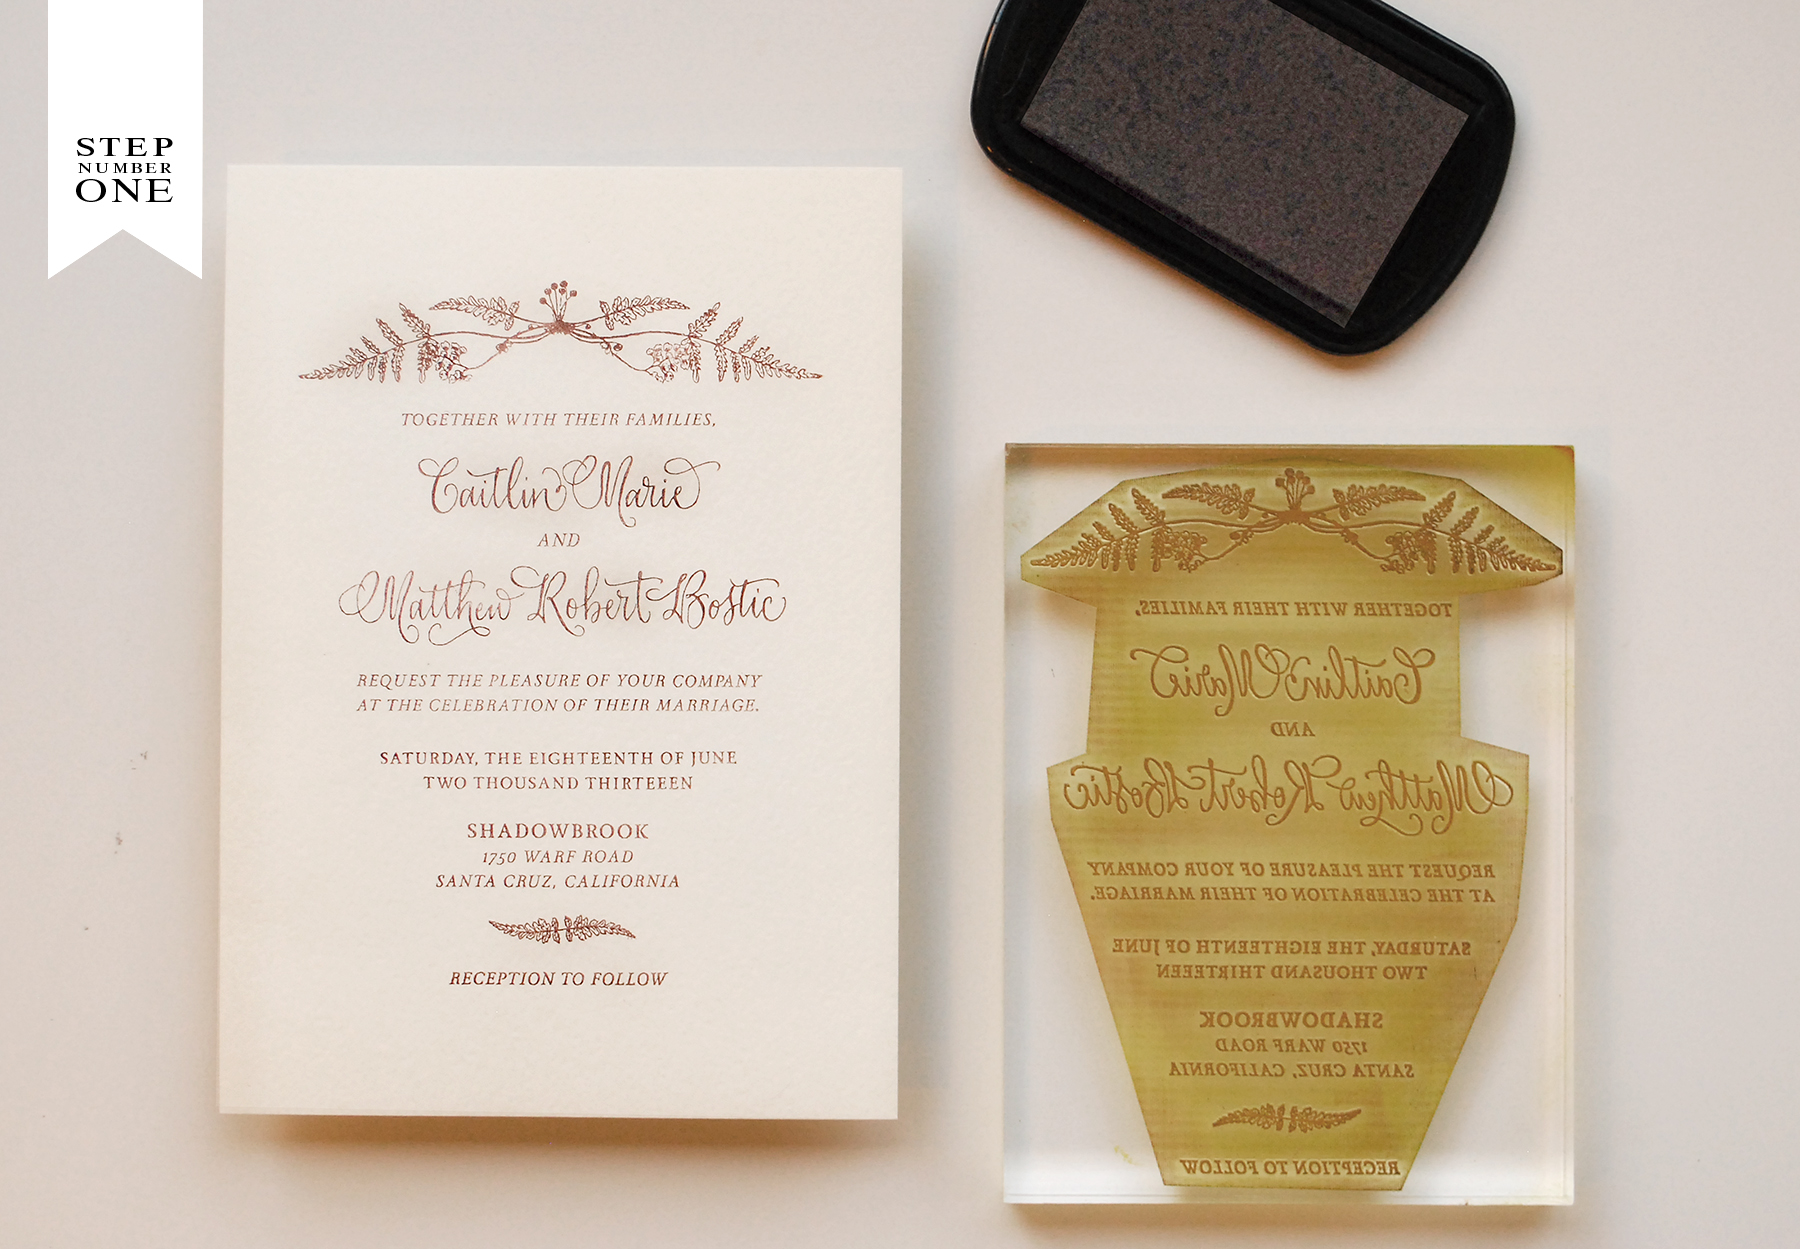
Step One: Lay an A7 (5″ x 7″) card down on a firm surface. Ink your stamp (we used our Fern Forrest Invitation Stamp) thoroughly and center it over your card. Once it is positioned correctly, press down to make a print. use both hands to ensure even pressure. Lift off and let the print dry. For more information on this process go here.

DIY Tutorial: Fern Inspired Wedding Invitations by Antiquaria via Oh So Beautiful Paper

Step Two: Repeat the same process from step 1 for your reply card (we used our Fern Forrest Reply Card stamp) on an A2 (4 1/4″ x 5 1/2″) card.

DIY Tutorial: Fern Inspired Wedding Invitations by Antiquaria via Oh So Beautiful Paper

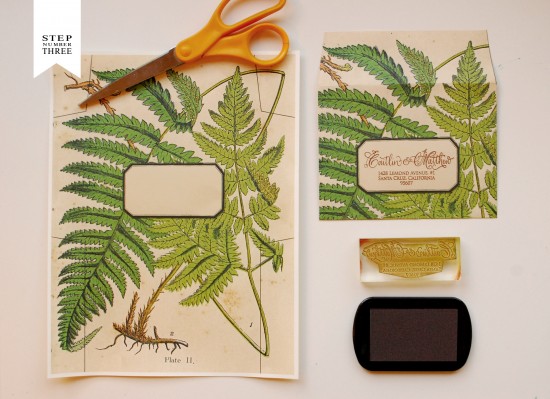
Step Three: To incorporate more botanical elements to the suite, we used our fern A2 envelope template as our reply envelope. Simply cut the pattern on the lines, fold in the sides and glue the bottom to the side flaps to create your own envelopes! Stamp your address (we used our Floral Calligraphy Return Address Stamp) on the front so that guests can easily return the reply card to you.

DIY Tutorial: Fern Inspired Wedding Invitations by Antiquaria via Oh So Beautiful Paper

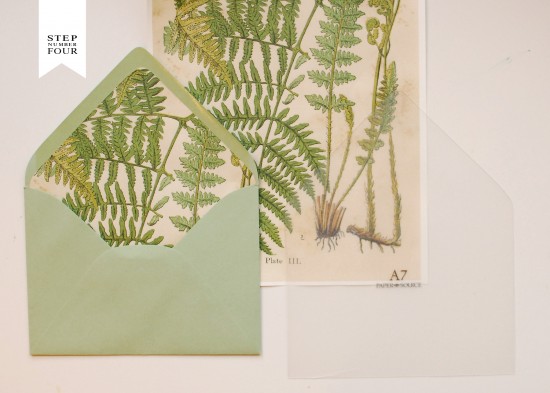
Step Four: Adding an envelope liner adds a bit of luxury to your invitation suite. It’s also really easy to do yourself! Simply trace the shape (using a liner template) onto your paper and cut along the line. Use stick glue or double sided tape to affix the paper into your envelope.

DIY Tutorial: Fern Inspired Wedding Invitations by Antiquaria via Oh So Beautiful Paper

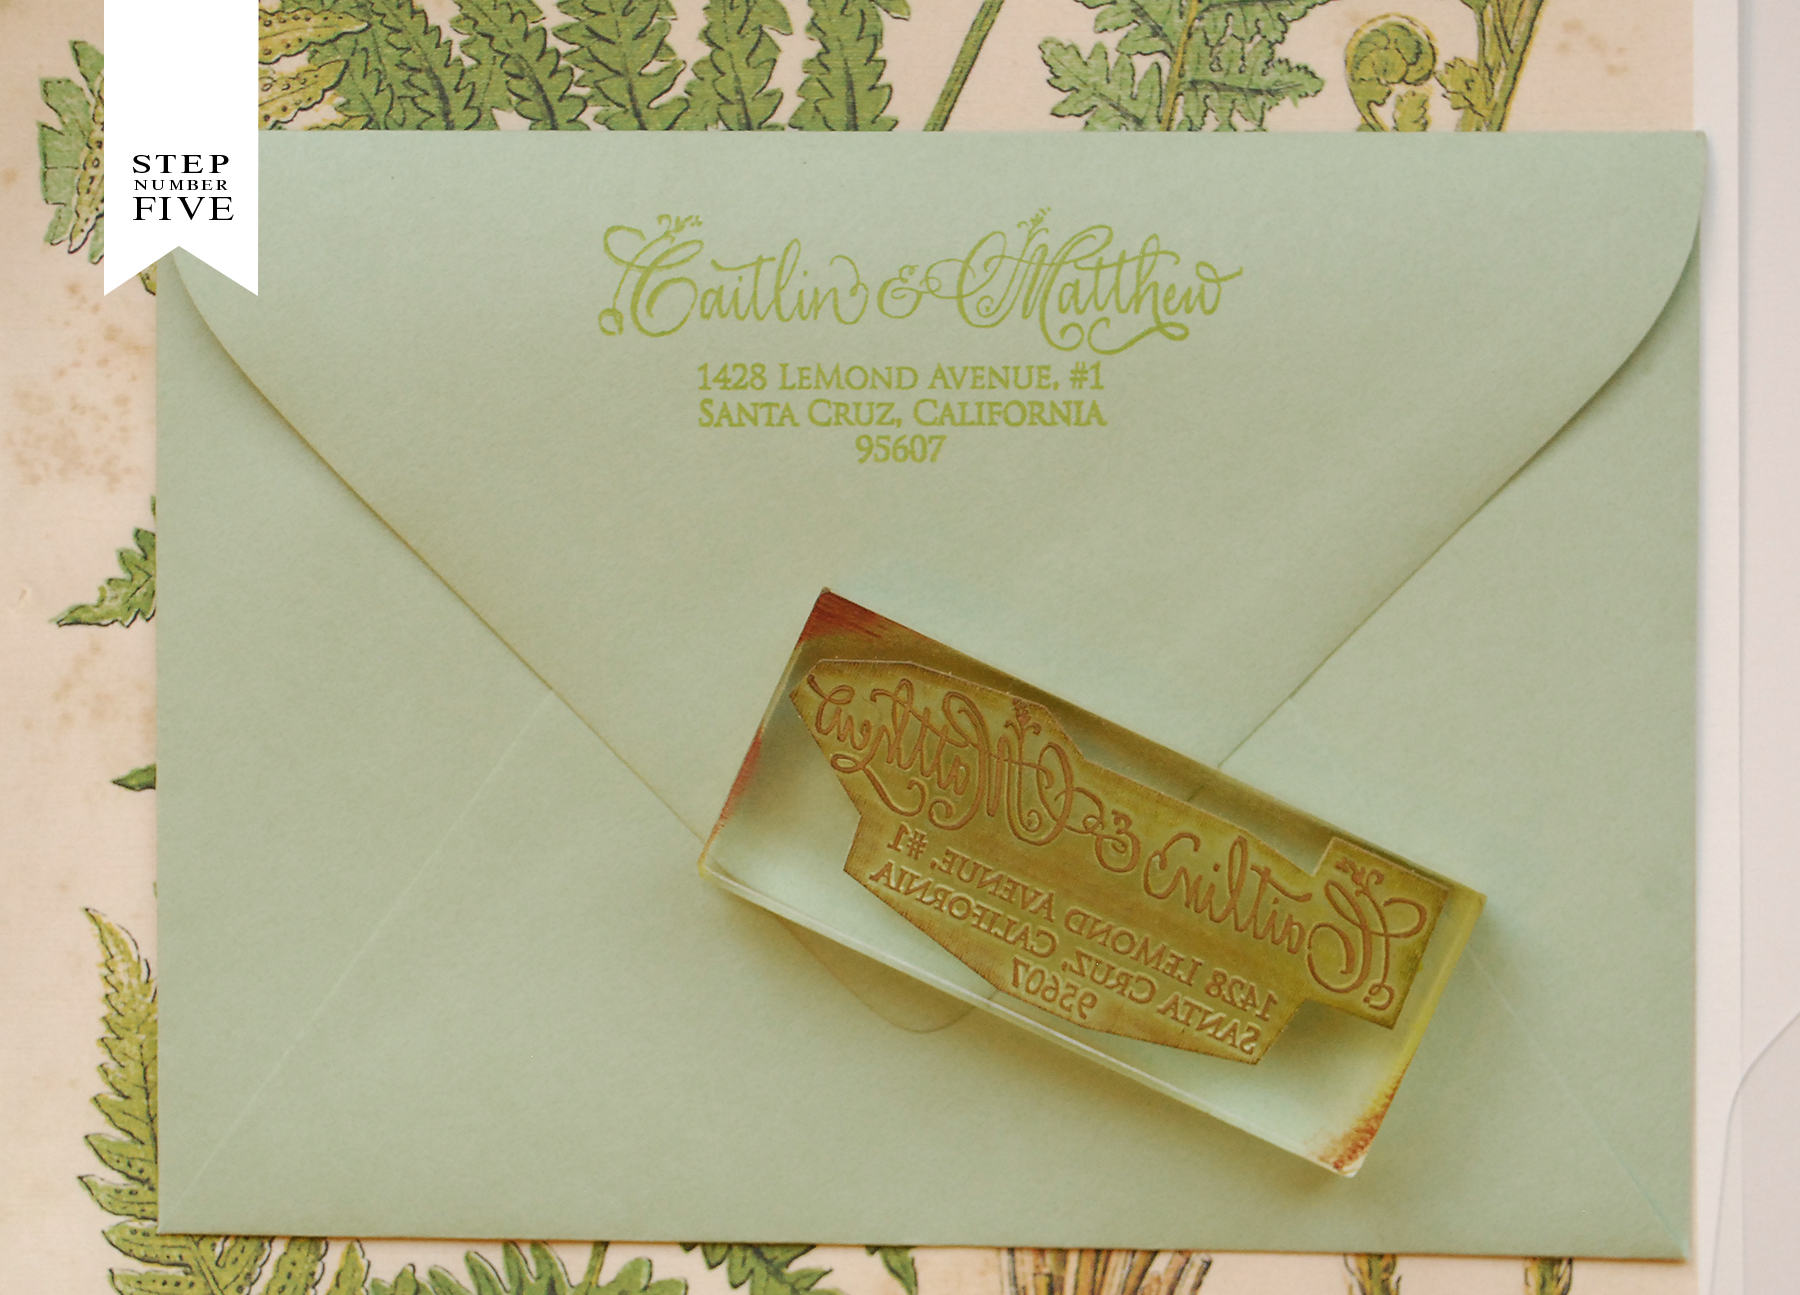
Step Five: Lastly, you’ll want to stamp your return address onto your A7 outer envelope. We used the same stamp as the reply address (our Floral Calligraphy Return Address stamp) but used a different color ink for this piece. In order to change ink colors, you’ll want to clean your stamp. To do so only requires making a paper towel damp and wiping off the acetate stamp image. Never use anything other than water to clean the stamp as it can damage your print image. You also never want to submerge your stamp in water as it could dislodge from the mount.

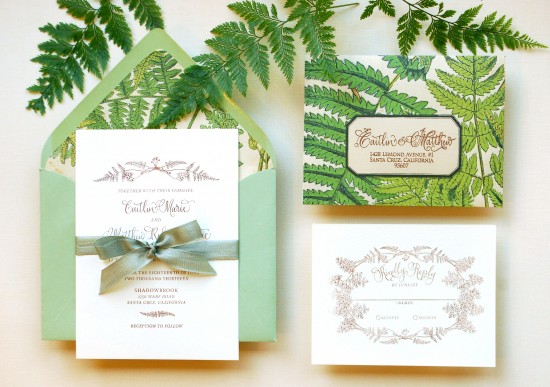
Address those bad boys, add postage, and send them off to delight your guests! You can also tie the suite together with a nice ribbon if you like!

Materials:

Fern Forrest Invitation Stamp

Fern Forrest Reply Card Stamp

Floral Calligraphy Return Address Stamp

Stamp Pad in Chestnut and Moss

A7 cards in Luxe White

A7 envelopes in Sage

A2 cards in Luxe White

A2 DIY fern envelopes: available soon from Antiquaria

Liner paper – available soon from Antiquaria

Envelope liner template:

Ribbon

Anti­quaria is a mem­ber of the Designer Rolodex – you can see more of their beau­ti­ful work right here or visit the real wedding invitations gallery for more wedding invitation ideas!

Photo Credits: Antiquaria

{happy weekend!}

I’m beginning to suspect that I’m coming down with a case of the winter blues, which definitely isn’t helped by the lack of progress in our house hunt. So I’m actually really excited to break up our routine this weekend – we’re heading to New York City for a few days! My husband and Sophie are coming along, so I’ll be attending the New York International Gift Fair and serving as a judge for the Louie Awards during the day and then meeting back up with them later in the afternoon. We’re taking the train (my favorite way to travel from DC to NYC), so right now I’m trying to figure out how on earth I’m going to fit all of our clothes and baby gear into a reasonable amount of luggage. Next week I’ll report back with some of my favorites from NYIGF! But in the meantime…

Tabletop Made

You’re My Favorite card by Tabletop Made

…a few links for your weekend!

This week on Oh So Beautiful Paper:

That’s it for me this week! I hope you all have a lovely weekend, and I’ll see you back here on Monday! xoxo

DIY Tutorial: Pink Polka Dot Watercolor Save the Date

With Valentine’s Day speedily approaching, we’ve got definitely got  love on the brain. Today’s save the date DIY tutorial is a great example of pattern mixing in stationery – and of course includes a ton of pink! This look is super easy to achieve, and the colorful design will help set the tone for a fun nuptial bash!  – Bailey and Emma of Antiquaria

DIY Tutorial: Pink Polka Dot Watercolor Save the Dates by Antiquaria via Oh So Beautiful Paper

DIY Tutorial: Pink Polka Dot Watercolor Save the Dates by Antiquaria via Oh So Beautiful Paper

Step One: Lay a 5 1/2″ square notecard down on a firm, clean work surface. Ink your stamp (we used our Vintage Calligraphy Save the Date stamp) and center it over the square card. When ready, press the stamp down on the card, using moderate pressure (too much can give a muddy image). Lift stamp off and set aside to let the print dry. For more details on how to ink and print the stamp please visit here (see step 1).

DIY Tutorial: Pink Polka Dot Watercolor Save the Dates by Antiquaria via Oh So Beautiful Paper

Step Two: Once you’ve made all of your prints and they are dry, you will move on to the watercoloring. With a pastel pink watercolor, paint dots in vertical rows from left to right (if right handed or right to left if left handed). Be cautious not to use too much water as it may run or warp the paper.

DIY Tutorial: Pink Polka Dot Watercolor Save the Dates by Antiquaria via Oh So Beautiful Paper

Step Three: Using envelope liner templates, cut liners out of a fun pattern. Simply use stick glue or double sided tape to install the liners into the envelopes (adhere around the top triangle).

DIY Tutorial: Pink Polka Dot Watercolor Save the Dates by Antiquaria via Oh So Beautiful Paper

Step Four: Lastly, you’ll want to stamp your return address (we used our Calligraphy Ampersand Return Address stamp) on the back flap of the envelope. We’ve been loving the tonal look lately (gold on gold, pink on pink…etc.) so that what we’ve chosen here with this design. Now all you have to do is address them, add postage, and send them on their merry way!

Materials:

Vintage Calligraphy Save the Date Stamp

Calligraphy Ampersand Return Address Stamp

Stamp Pad

5 1/2″ square cards

Watercolors, paintbrush, and water jar

5 3/4″ square envelopes

Liner Paper – custom watercolor floral pattern from Antiquaria Design Studio

Liner Templates

Anti­quaria is a mem­ber of the Designer Rolodex – you can see more of their beau­ti­ful work right here or visit the real wedding invitations gallery for more wedding invitation ideas!

Photo Credits: Antiquaria