Happy Weekend!

Happy Friday everyone! Thank you all so much for the toddler sleep tips last week – we’re making incremental progress with Sophie’s bedtime routine, but these days I still feel like I spend about half my day putting either a toddler or a newborn down to sleep. Gah! This weekend I’m looking forward to celebrating a very special first birthday and working on a brand new project that I’m excited to share here in a couple of weeks! But in the meantime…

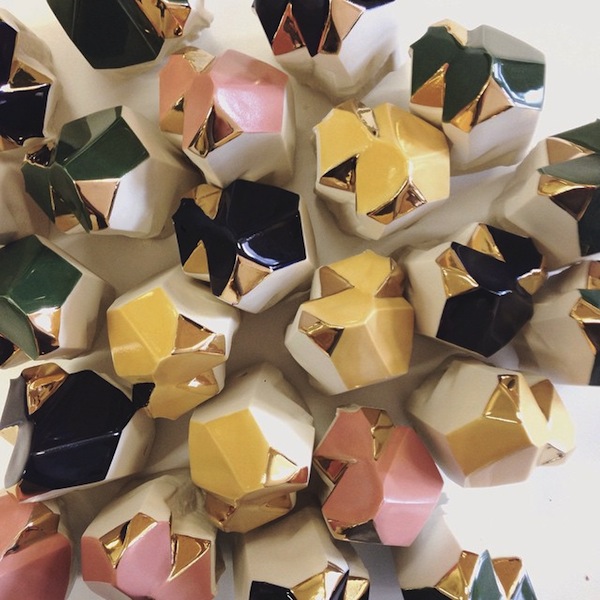
redravenstudios-ceramic-crystals

Beautiful ceramic crystals by Redraven Studios

…a few links for your weekend:

This week on Oh So Beautiful Paper:

DIY Tutorial: Holiday Envelope Addressing Ideas

As you might be able to guess, we send quite a lot of snail mail in our line of work. Whether it’s thank you notes, catalogs, color samples, or a letter to our loved ones, we try to make all of our outgoing mail a treat for the recipient to receive. Since we have holiday cards on the brain, we decided to come up with some fun and easy addressing options suited to the season. They incorporate fun lettering styles as well as stamping and we just love them all! Want more DIY addressing styles? Check out our first envelope addressing post here. Have fun with the designs and happy addressing! –Bailey and Emma of Antiquaria
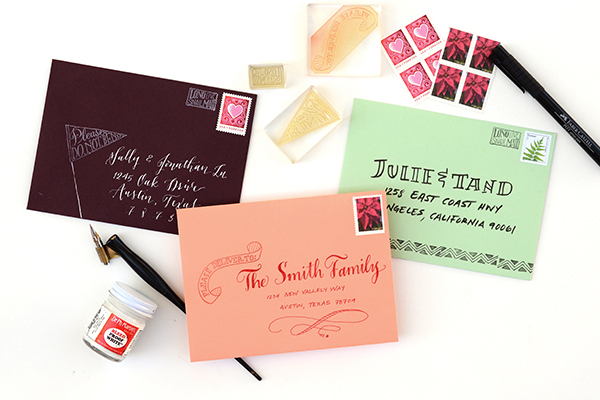
DIY Tutorial: Holiday Envelope Addressing Ideas by Antiquaria for Oh So Beautiful Paper

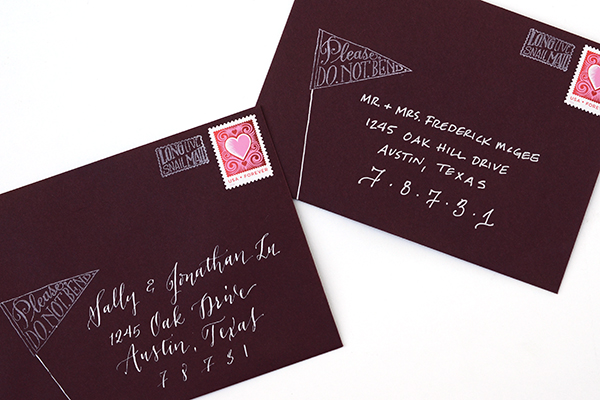
Option One: Do Not Bend Pennant Stamp + White DIY Pointed Pen Calligraphy Addressing. White stamping and white calligraphy ink really pop off of this gorgeous fig colored envelope. While it takes time to perfect using a pointed calligraphy pen, feel free to experiment also with white or silver gel pens for a similar (and easier) effect.
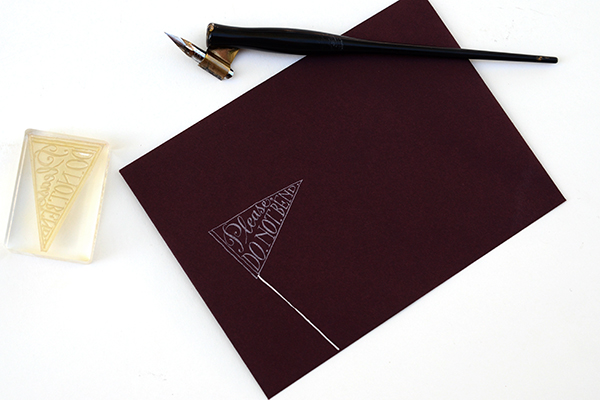
DIY Tutorial: Holiday Envelope Addressing Styles by Antiquaria for Oh So Beautiful Paper

Stamp your Please Do Not Bend Pennant Stamp on the lefthand side of your envelope, just a hair above the center. With your pen, draw a line to the bottom with white ink.
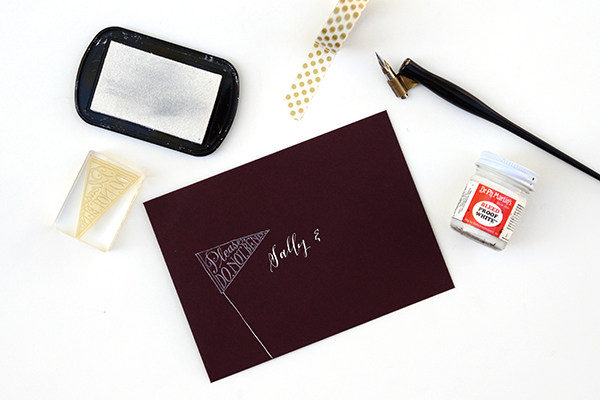
DIY Tutorial: Holiday Envelope Addressing Styles by Antiquaria for Oh So Beautiful Paper

Next, address the envelope to your loved one using a pointed calligraphy pen and white ink. Start your addressing right below the pennant stamp, as shown above.
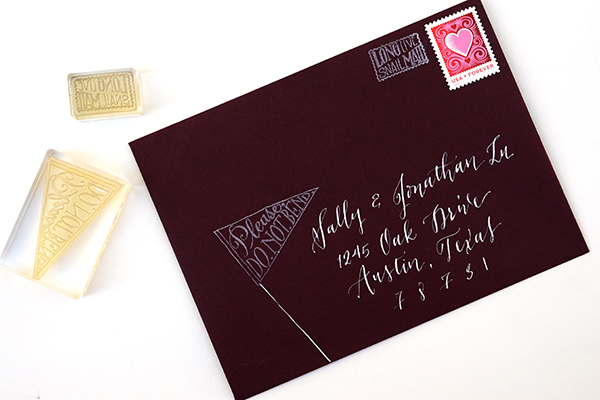
DIY Tutorial: Holiday Envelope Addressing Styles by Antiquaria for Oh So Beautiful Paper

Let the addressing dry completely (with white calligraphy ink this can take a few hours). Once it’s dry, add your postage and then stamp our Long Live Snail Mail Stamp to the left. Feel free to play with the lettering style of addressing on this design! A simple hand-written block print with white or silver gel ink also looks lovely (see below)!
DIY Tutorial: Holiday Envelope Addressing Styles by Antiquaria for Oh So Beautiful Paper

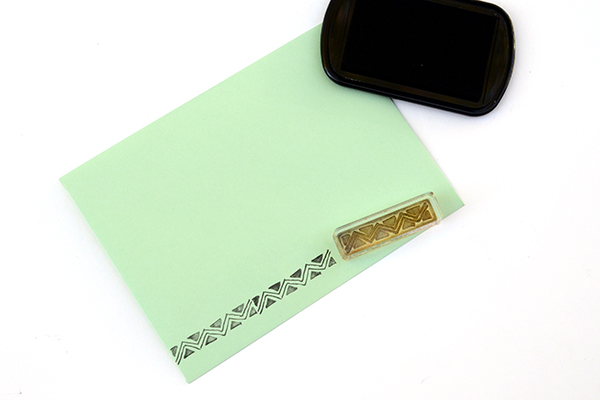
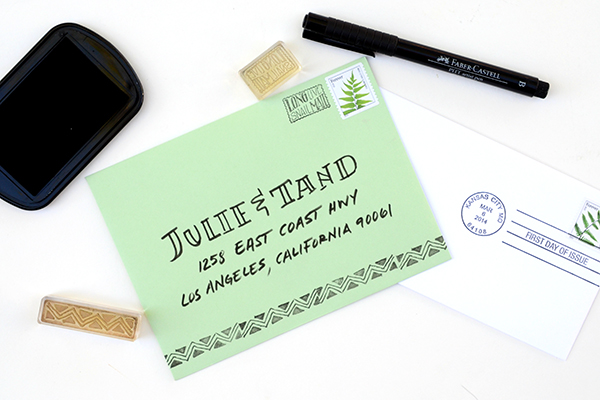
Option Two: Zig-Zag Stamp + Bold Brush Block Lettering. Adding a line of pattern along the bottom of the envelope instantly adds an air of “fun” to the design. When paired with an easy brushed address, the effect is bold and will stand out instantly among the bills and junk mail!
Mint-AddressingDIY Tutorial: Holiday Envelope Addressing Styles by Antiquaria for Oh So Beautiful Paper

Print your zig-zag stamp in black ink along the bottom edge of the mint colored envelope. You’ll want to make sure that each printing is close together but not overlapping.
DIY Tutorial: Holiday Envelope Addressing Styles by Antiquaria for Oh So Beautiful Paper

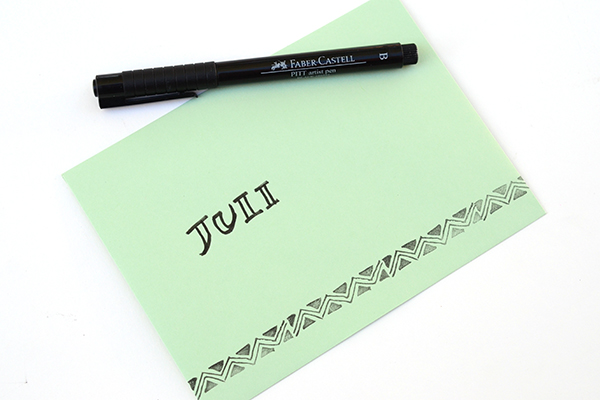
With a black brush pen, write out your loved one’s name. We decided to make big block letters for their name (with the mint color showing in the center) and a simple italic print for the address. Once the address is done, add your postage and our Long Live Snail Mail Stamp to complete the look!
DIY Tutorial: Holiday Envelope Addressing Styles by Antiquaria for Oh So Beautiful Paper

Option Three: Deliver To Banner Stamp + Hand-lettered Script. Bailey actually designed this adorable “Please Deliver To” stamp to use on her save the date a while back and we think that it makes the perfect snail mail statement on this coral envelope when combined with red addressing. The fun part of this design is that you get the look of calligraphy but with simpler tools! A common felt tipped pen made this gorgeous script. Incredible, right?
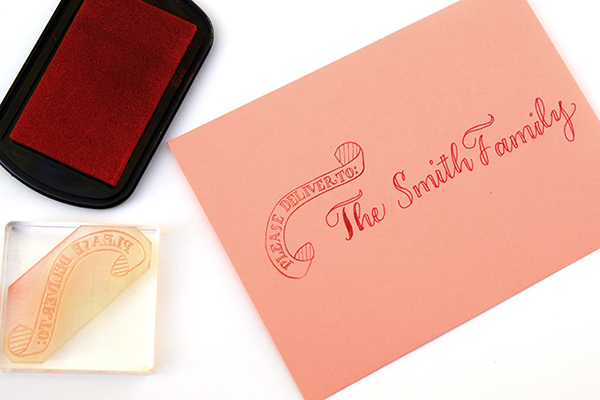
DIY Tutorial: Holiday Envelope Addressing Styles by Antiquaria for Oh So Beautiful Paper

Start by stamping your Deliver To Banner Stamp on the left hand side of the envelope, a little above center. Angle it so that you can nestle the lettering in underneath it. To make the hand lettered script, use your prettiest cursive and write the name across your envelope. Then, draw a second line along each letter, creating the thick and thin look (as shown above). Refer to a favorite script font for letter shape and style, if needed.
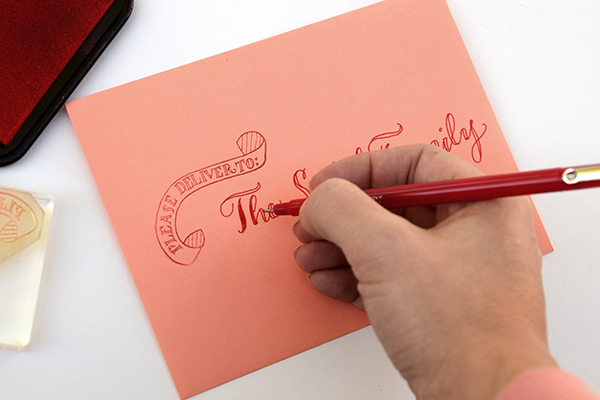
DIY Tutorial: Holiday Envelope Addressing Styles by Antiquaria for Oh So Beautiful Paper

Once you’ve done that for the entire name, color in the letters so that they are solid red. Finish out the addressing with a simple italic print for the address. We also added a fun flourish underneath the last address line to gussy the envelope up even more! Draw it in pencil first or practice on a scrap piece of paper if you need to before executing it on your envelope.
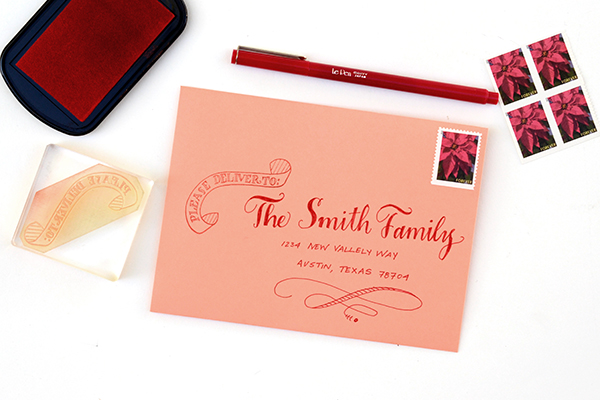
DIY Tutorial: Holiday Envelope Addressing Styles by Antiquaria for Oh So Beautiful Paper

While we think all of these styles would be perfectly suited to holiday greetings, we also think that they could be adapted and used on save the dates and Invitations as well! Play around with the techniques and find out what you like best with the cards that you’re sending. We hope that you have just as much fun addressing your cards as you do selecting them!

Materials and Resources

Special Delivery Stamp Kit: Deliver To Banner, Long Live Snail Mail and Do Not Bend Pennant

Feathers & Arrows Stamp Kit: contains the zig-zag stamp

Calligraphy Starter Kit

White Calligraphy Ink

Calligraphy Resources: Setting up your Tools,  Lower Case Alphabet by Bailey Rivera, Calligraphy Supplies

Brush and Felt Tipped Pens

For envelopes, we discuss many different envelope resources and options in a previous post, found here.

Current USPS Postage

Vintage Postage

Photography by Antiquaria for Oh So Beautiful Paper
Gift Wrap Tips + Techniques with Craftsy!

How-To-Wrap-the-Perfect-Gift-OSBP-Craftsy-Title4

Today we’re continuing our series with Craftsy, an online community for makers with classes, patterns, templates, and supplies. I’ve been collaborating with Craftsy over the past few weeks to take a few of their online classes and learn some new skills – and since we’re getting close to the holidays I thought we’d focus on the gift wrap tips and techniques that I learned from Paper Arts with Alton DuLaney! And for those of you looking to brush up your gift wrap skills before the holidays, Craftsy is offering a huge discount (50% off!) just for Oh So Beautiful Paper readers through November 24!

How-To-Wrap-the-Perfect-Gift-OSBP-Craftsy-42

I’ve always considered gift presentation to be just as important as the gift itself – and I have several friends that always impress me with their gift wrapping and gift presentation skills. I hoard beautiful gift wrap sheets ribbons and gift tags throughout the year, but when it comes to actual gift wrap construction I’ve always fallen a bit short. My corners are wonky, paper bunches up in weird places, and I never know where to properly place paper seams – until now! I learned so much from Craftsy’s Paper Arts with Alton DuLaney, including some essential gift wrap techniques that really elevated my gift giving game. You can click here to take the Craftsy Paper Arts class – and take advantage of the wonderful discount!

How-To-Wrap-the-Perfect-Gift-OSBP-Craftsy-63

How-To-Wrap-the-Perfect-Gift-OSBP-Craftsy-19

 How-To-Wrap-the-Perfect-Gift-OSBP-Craftsy-49

I love that you can watch portions of a Craftsy class over and over whenever you want – I must have watched the tutorial on how to tie the perfect bow a dozen times! And you can even watch on your phone or tablet with the Craftsy app while you’re in the middle of a project. I focused on the gift wrap lesson here, but the Paper Arts class is organized into twelve (!!) lessons covering everything from gift wrap to the art of letter writing to home decor ideas, and each lesson is divided into subsections for easy reference later on.

How-To-Wrap-the-Perfect-Gift-OSBP-Craftsy-57

I love mixing a neutral paper with beautiful ribbon for a pop of color or metallic sparkle. I used a technique that I learned in Alton’s class – layering two ribbons – to pair hand-dyed grosgrain ribbons with frayed denim and raw linen ribbons over a warm gray wrapping paper. I also mixed a soft gray twine with metallic silver and gold ribbon on a smaller gift box. I love the combination of the subtle gradient color in the hand-dyed grosgrain ribbon with the texture of the linen and denim ribbons.

How-To-Wrap-the-Perfect-Gift-OSBP-Craftsy-38

How-To-Wrap-the-Perfect-Gift-OSBP-Craftsy-34

I sadly don’t have any photos of the hand dying process (it happened too fast to take photos!), but it’s really simple if you want to recreate it at home. Just wind your ribbon into a coil around two fingers, then dip one edge of your ribbon coil into a small container filled with just a tiny amount of liquid fabric dye in your chosen colors. I used fuchsia and teal dye diluted with just a little bit of water. Once your ribbon has absorbed the fabric dye (usually just a few seconds), run it under cold water and allow to dry. And that’s it!

How-To-Wrap-the-Perfect-Gift-OSBP-Craftsy-51

How-To-Wrap-the-Perfect-Gift-OSBP-Craftsy-28

Click here to take the Craftsy Paper Arts class – with a discount for Oh So Beautiful Paper readers! Craftsy has generously offered 50% off the Paper Arts class, so this is a great opportunity to learn a ton of new paper skills for just $14.99. This discount is only available through midnight MST on November 24 – so sign up soon!

Styling + Photos by Nole Garey for Oh So Beautiful Paper

This post is sponsored by Craftsy. All content, photos, ideas, and words are our own. Thank you for supporting the sponsors that help make Oh So Beautiful Paper possible!

Urbanic Faves | All That Glitters

With the holiday season quickly approaching, we’re gravitating towards things with a little more sparkle and shine around here at Urbanic. Okay, who are we kidding?!  — we actually kind of *always* are, but this is the perfect time of year to do a round up on it.  This month, I  decided to start the project of organizing, re-arranging, and fancying up my desk area for a fresh perspective going into the new year. Below are some top picks from Urbanic and beyond that have that perfect golden touch.  xo  â€“Audrey

Urbanic Faves | All That Glitters via Oh So Beautiful Paper

 1. Light + Ladder planter; 2. Meri Meri treat bags; 3. The Social Type notepad; 4. Kate Spade mail tray; 5. Galison pencils; 6. Illume candles;  7. The Social Type matches; 8. Umbra geometric wall decor 9. Nightingale Press card;  10. Wondermade marshmallows; 11. Haute Papier scissors; 12. Kate Spade stapler; 13. Sugar Paper notebook; 14. One Canoe Two calendar; 15. Meri Meri plates; 16. Meri Meri glitter stickers; 17. Galison noteset

DIY Tutorial: Printable Thanksgiving Table Décor

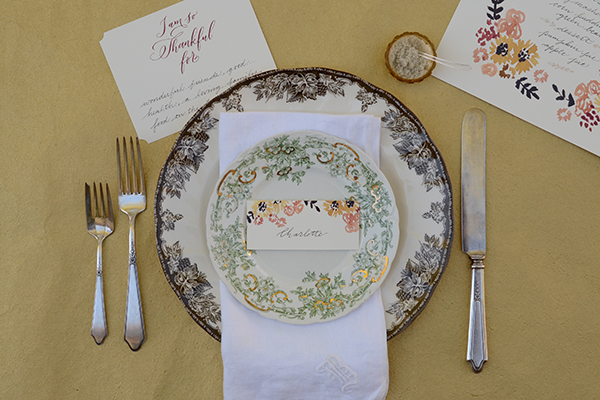
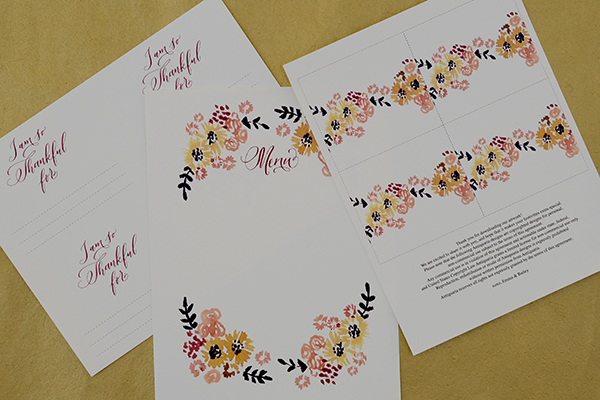
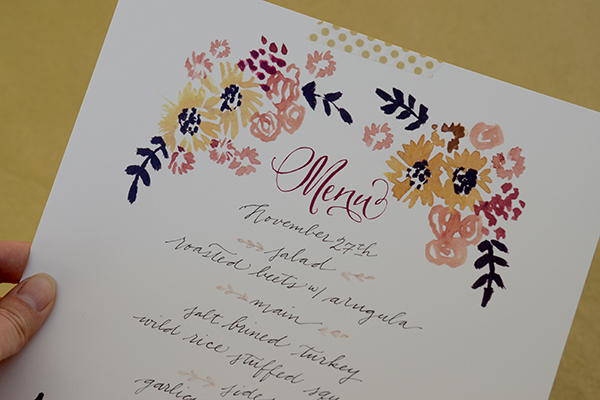
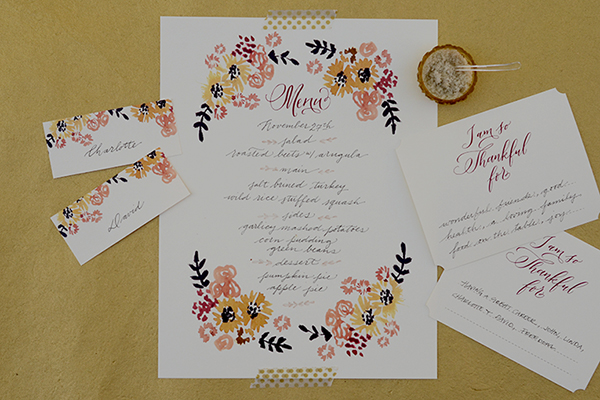
With shorter days and a chill in the air, we know that Thanksgiving is right around the corner. This holiday is a favorite of ours; a day filled with great food, friends and family. A day where we slow down to give thanks and reflect upon all of the great things that fill our lives. As lovers of décor, we always like to dress up the table with beautiful dishes, linens, and paper accents. This year, we decided to design a coordinating set of paper items that you can use on your table! The downloadable set includes place cards, a menu, and A2 Thankfulness cards. We are excited to share our designs with you, and hope that they make your festivities extra special! –Bailey and Emma of Antiquaria

Printable Thanksgiving Table Décor by Antiquaria for Oh So Beautiful Paper


Printable Thanksgiving Table Décor by Antiquaria for Oh So Beautiful Paper


You can download the set of designs by following this link.  Once downloaded, print them out on your home printer, making sure that the settings are for the best color quality and on 100% scale. We printed them out on a lovely cream uncoated card stock.

Printable Thanksgiving Table Décor by Antiquaria for Oh So Beautiful Paper

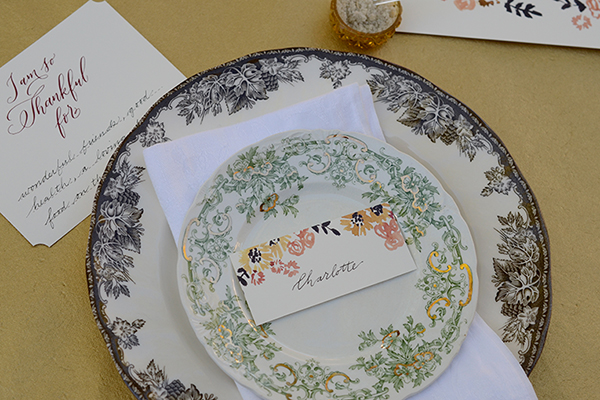
The place cards can be used either as a tented card by cutting out the card along the lines and folding the design in half (it helps to score the middle first) or as a flat card, as we’ve shown, by cutting the design in half.

Printable Thanksgiving Table Décor by Antiquaria for Oh So Beautiful Paper


Printable Thanksgiving Table Décor by Antiquaria for Oh So Beautiful Paper

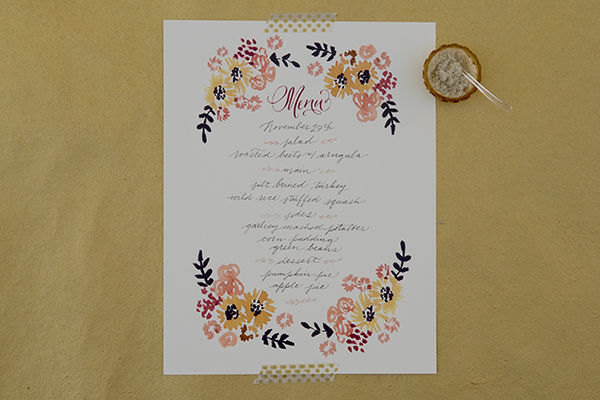
Fill out the menu with all of the dishes in your Thanksgiving feast in your prettiest handwriting. It helps to pencil the words in lightly first, before writing them in ink. That way, you will be sure that the lines are generally centered!

Printable Thanksgiving Table Décor by Antiquaria for Oh So Beautiful Paper

Printable Thanksgiving Table Décor by Antiquaria for Oh So Beautiful Paper


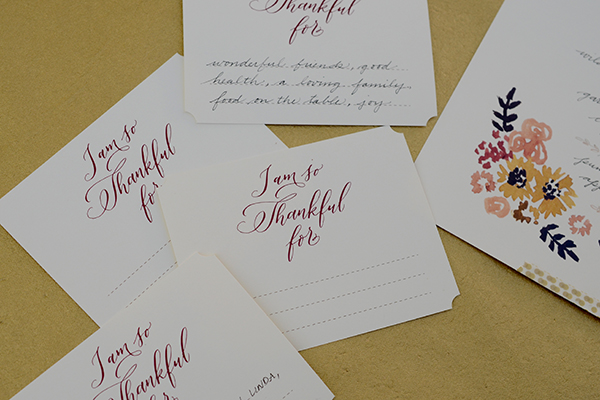
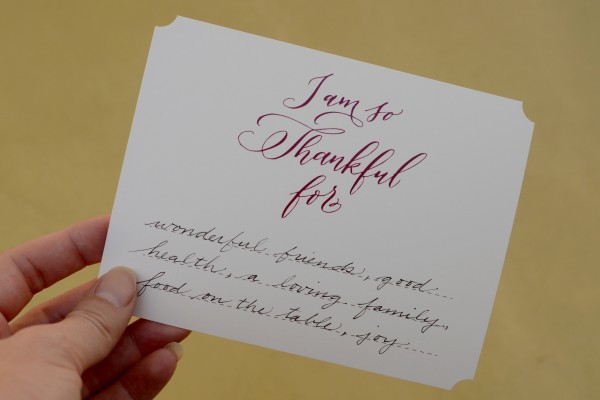
These Thankfulness cards are the perfect way that you and your guests can take a moment to reflect on all of the things that bring joy into their lives. To make them, just cut the printed letter size page into four equal cards (4.25″ x 5.5″). We added a further finishing touch by notching in the corners with a specialty punch. These will also fit inside an A2 envelope so feel free to print some out to mail to friends and family that can’t celebrate with you in person!

Printable Thanksgiving Table Décor by Antiquaria for Oh So Beautiful Paper


Printable Thanksgiving Table Décor by Antiquaria for Oh So Beautiful Paper


We hope that you have a beautiful holiday and above all are able to share a warm meal with those you hold dear. Enjoy!

Please note that the designs in this tutorial are © Antiquaria and intended for personal, non-commercial use only.

Photography by Antiquaria for Oh So Beautiful Paper