Andrea + Henry’s Illustrated “The Giving Tree” Wedding Invitations

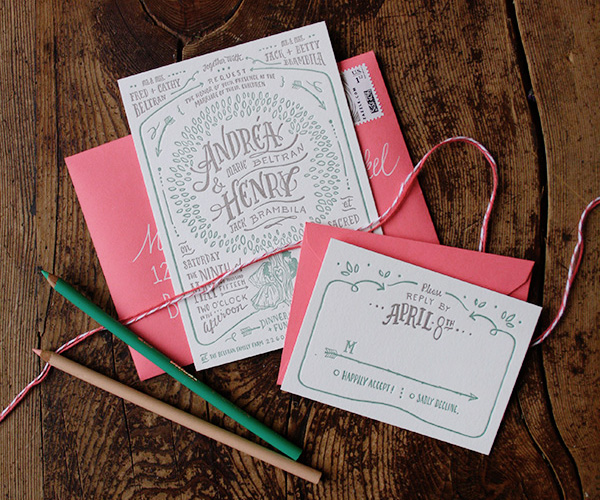
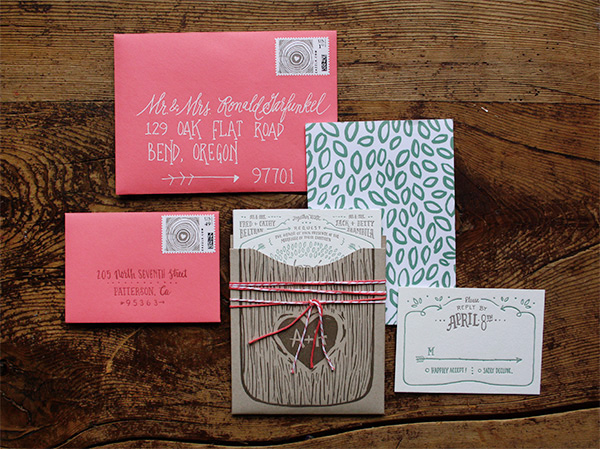
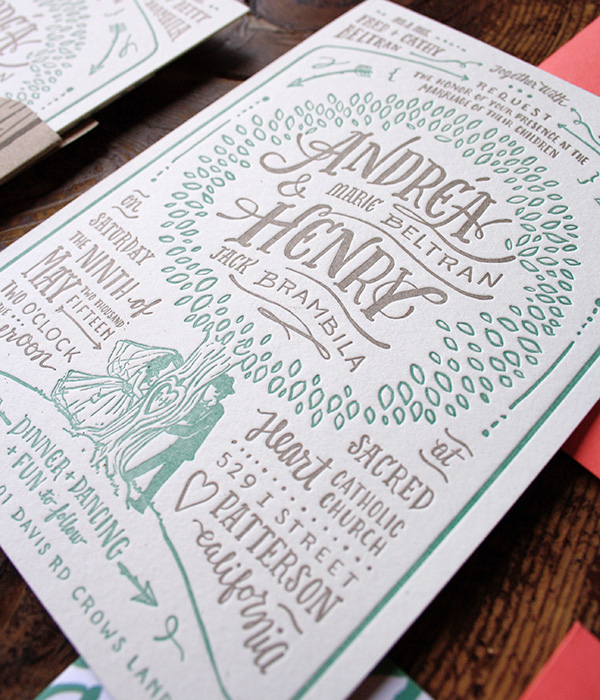
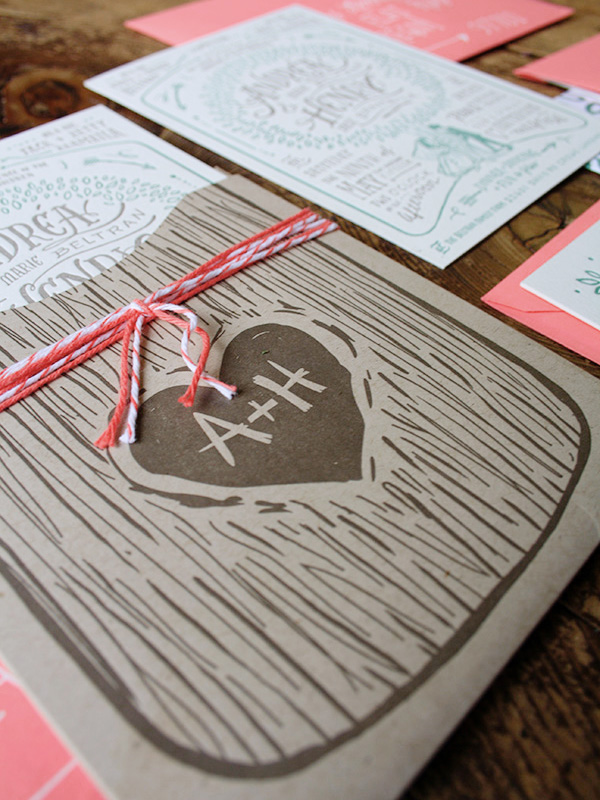
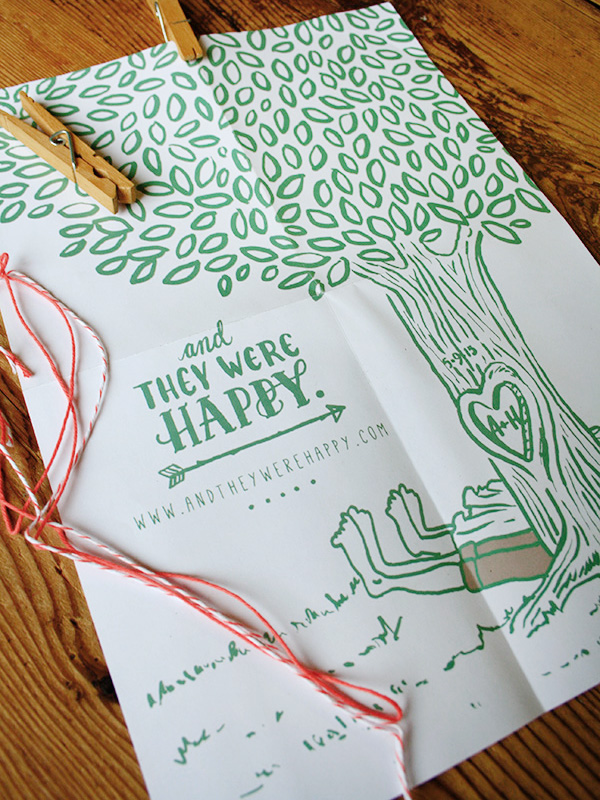
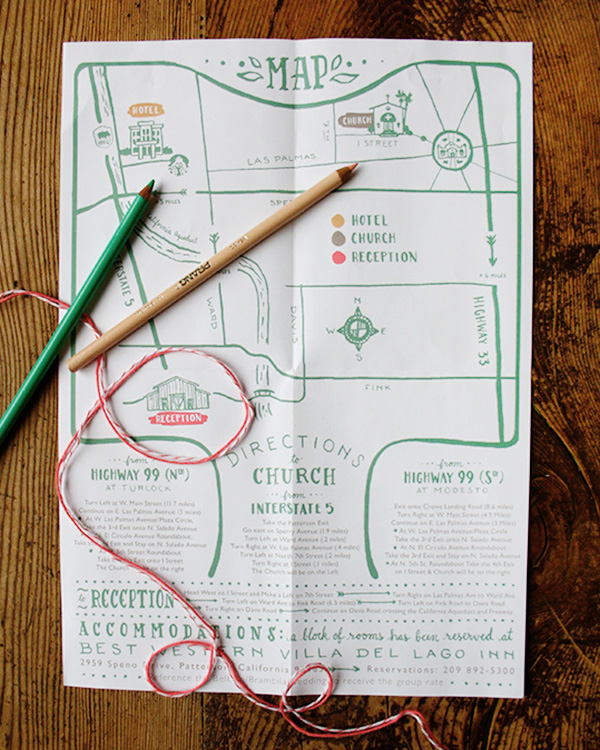
So many of us have wonderful childhood memories of The Giving Tree by Shel Silverstein – and today we get to see that book re-imagined in wedding invitation form! Clayton Beltran is the in-house illustrator at Smudge Ink and created these invitations for his sister’s wedding. The entire team at Smudge Ink helped bring these invitations to life, from design guidance to letterpress printing!

Illustrated-The-Giving-Tree-Wedding-Invitations-Smudge-Ink-OSBP

From Clayton: My sister’s favorite children’s book growing up, and surely still to this day, would hands down be none other than beloved Shel Silverstein’s “The Giving Tree.” Our Uncle (and her godfather) gifted her first and only copy when she was just a wee little whipper snapper still rocking the Punky-Brooster-esque pig tails. Flash forward 28 plus years… one of her most sentimental possessions has now become the inspiration for her wedding and her wedding invitations.

Illustrated-The-Giving-Tree-Wedding-Invitations-Smudge-Ink-OSBP4

Illustrated-The-Giving-Tree-Wedding-Invitations-Smudge-Ink-OSBP2

Illustrated-The-Giving-Tree-Wedding-Invitations-Smudge-Ink-OSBP6

Illustrated-The-Giving-Tree-Wedding-Invitations-Smudge-Ink-OSBP7

The designing and execution of these invitations has definitely been a family affair involving my blood-related family on the West Coast and my new family of creatives here on the East Coast here at Smudge Ink. Sabrina and Emily at Smudge provided guidance and an injection of realism into my initial overly ambitious layout — especially given the stingy two-week time frame I allotted myself. My bosses at Smudge, Deb and Kate, were so understanding as to let me take last minute half days during the crunch time of production!

Illustrated-The-Giving-Tree-Wedding-Invitations-Smudge-Ink-OSBP9

Illustrated-The-Giving-Tree-Wedding-Invitations-Smudge-Ink-OSBP8

Thanks Clayton!

Invitation Design: Clayton Beltran of Smudge Ink

Letterpress Printing: Margaret and Emily of Smudge Ink

Die Cutting: Classic Letterpress in Billerica Massachusetts

Calligraphy: Marilyn Sarasqueta

Paper: Soho Paper

Envelopes: letterpresspaper.com

Custom Postage Stamps: Zazzle

Coral Baker’s Twine: Whisker Graphics

Smudge Ink is a member of the Designer Rolodex – you can see more of their beautiful work right here or visit the real invi­ta­tions gallery for more wedding invitation ideas!

Photo Credits: Clayton Beltran

DIY Tutorial: Holiday Envelope Addressing Ideas

As you might be able to guess, we send quite a lot of snail mail in our line of work. Whether it’s thank you notes, catalogs, color samples, or a letter to our loved ones, we try to make all of our outgoing mail a treat for the recipient to receive. Since we have holiday cards on the brain, we decided to come up with some fun and easy addressing options suited to the season. They incorporate fun lettering styles as well as stamping and we just love them all! Want more DIY addressing styles? Check out our first envelope addressing post here. Have fun with the designs and happy addressing! –Bailey and Emma of Antiquaria

DIY Tutorial: Holiday Envelope Addressing Ideas by Antiquaria for Oh So Beautiful Paper

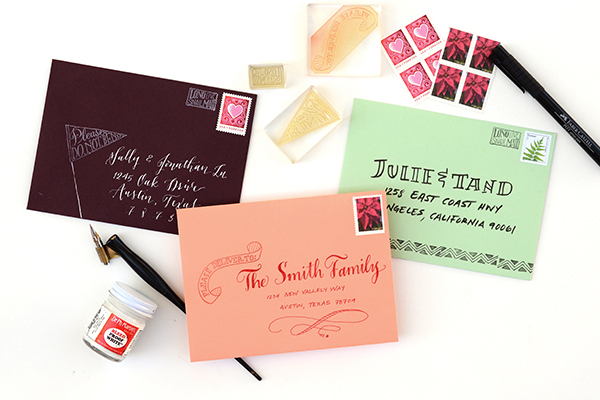
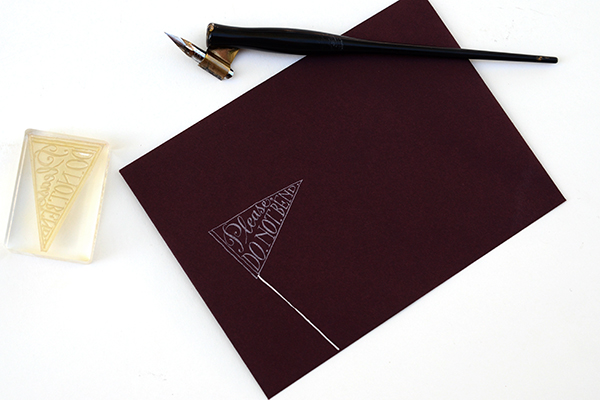
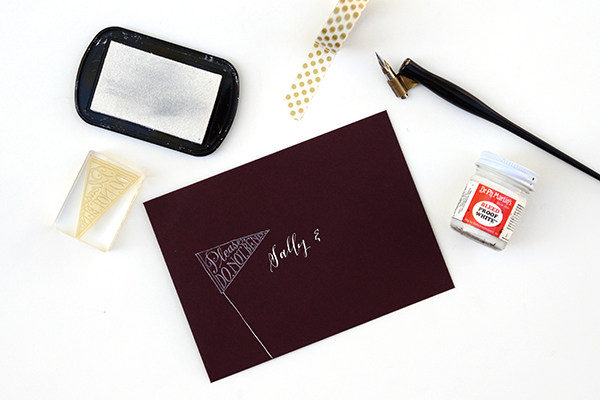
Option One: Do Not Bend Pennant Stamp + White DIY Pointed Pen Calligraphy Addressing. White stamping and white calligraphy ink really pop off of this gorgeous fig colored envelope. While it takes time to perfect using a pointed calligraphy pen, feel free to experiment also with white or silver gel pens for a similar (and easier) effect.

DIY Tutorial: Holiday Envelope Addressing Styles by Antiquaria for Oh So Beautiful Paper

Stamp your Please Do Not Bend Pennant Stamp on the lefthand side of your envelope, just a hair above the center. With your pen, draw a line to the bottom with white ink.
DIY Tutorial: Holiday Envelope Addressing Styles by Antiquaria for Oh So Beautiful Paper

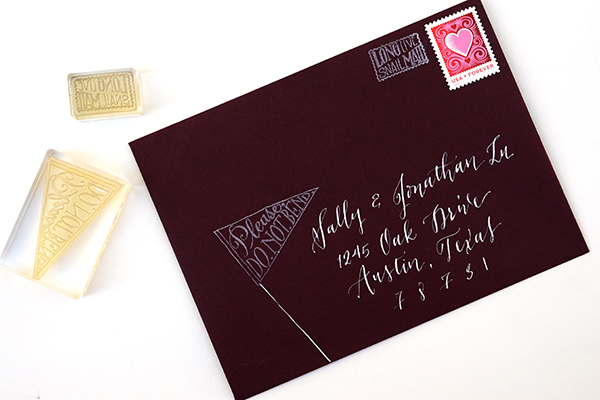
Next, address the envelope to your loved one using a pointed calligraphy pen and white ink. Start your addressing right below the pennant stamp, as shown above.

DIY Tutorial: Holiday Envelope Addressing Styles by Antiquaria for Oh So Beautiful Paper

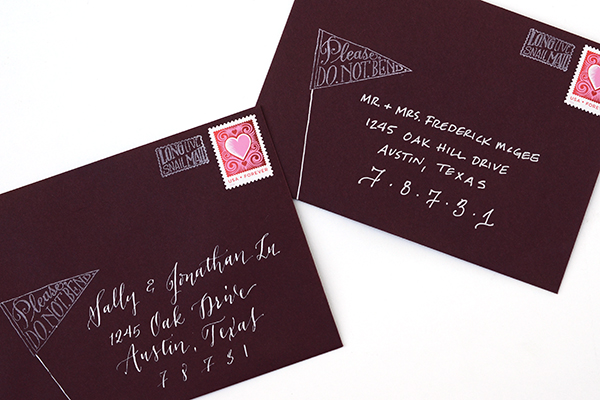
Let the addressing dry completely (with white calligraphy ink this can take a few hours). Once it’s dry, add your postage and then stamp our Long Live Snail Mail Stamp to the left. Feel free to play with the lettering style of addressing on this design! A simple hand-written block print with white or silver gel ink also looks lovely (see below)!
DIY Tutorial: Holiday Envelope Addressing Styles by Antiquaria for Oh So Beautiful Paper

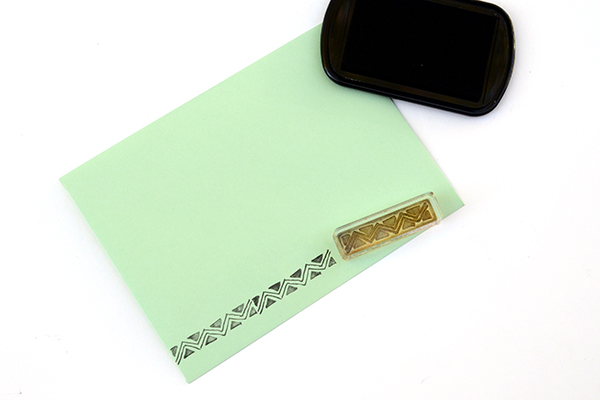
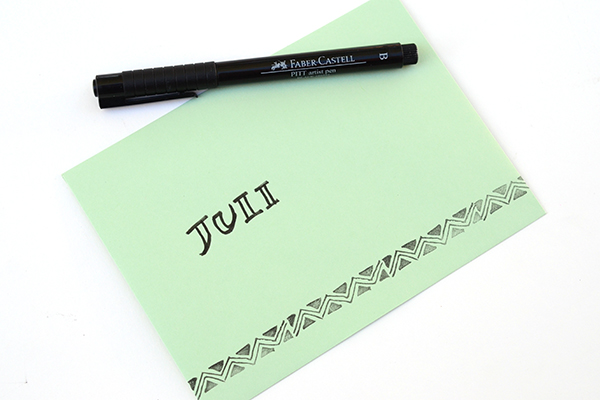
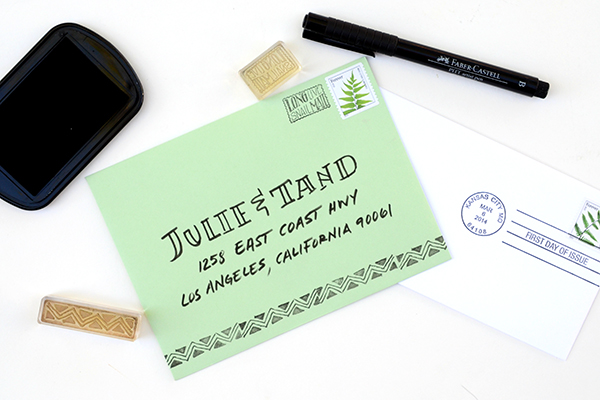
Option Two: Zig-Zag Stamp + Bold Brush Block Lettering. Adding a line of pattern along the bottom of the envelope instantly adds an air of “fun” to the design. When paired with an easy brushed address, the effect is bold and will stand out instantly among the bills and junk mail!

Mint-AddressingDIY Tutorial: Holiday Envelope Addressing Styles by Antiquaria for Oh So Beautiful Paper

Print your zig-zag stamp in black ink along the bottom edge of the mint colored envelope. You’ll want to make sure that each printing is close together but not overlapping.
DIY Tutorial: Holiday Envelope Addressing Styles by Antiquaria for Oh So Beautiful Paper

With a black brush pen, write out your loved one’s name. We decided to make big block letters for their name (with the mint color showing in the center) and a simple italic print for the address. Once the address is done, add your postage and our Long Live Snail Mail Stamp to complete the look!
DIY Tutorial: Holiday Envelope Addressing Styles by Antiquaria for Oh So Beautiful Paper

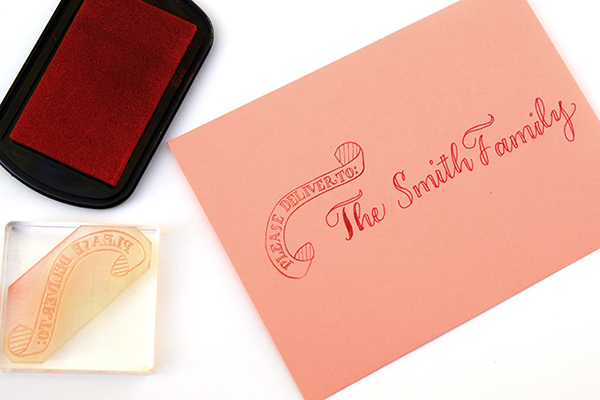
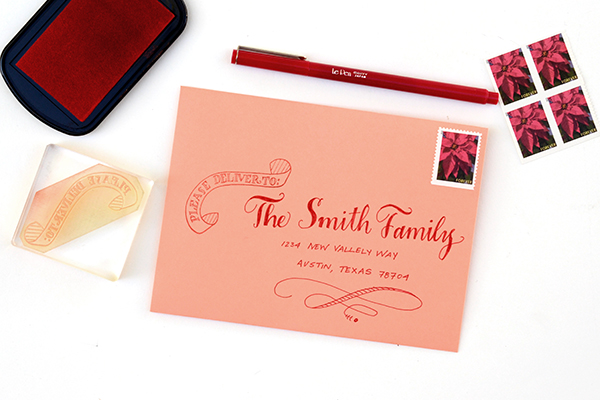
Option Three: Deliver To Banner Stamp + Hand-lettered Script. Bailey actually designed this adorable “Please Deliver To” stamp to use on her save the date a while back and we think that it makes the perfect snail mail statement on this coral envelope when combined with red addressing. The fun part of this design is that you get the look of calligraphy but with simpler tools! A common felt tipped pen made this gorgeous script. Incredible, right?

DIY Tutorial: Holiday Envelope Addressing Styles by Antiquaria for Oh So Beautiful Paper

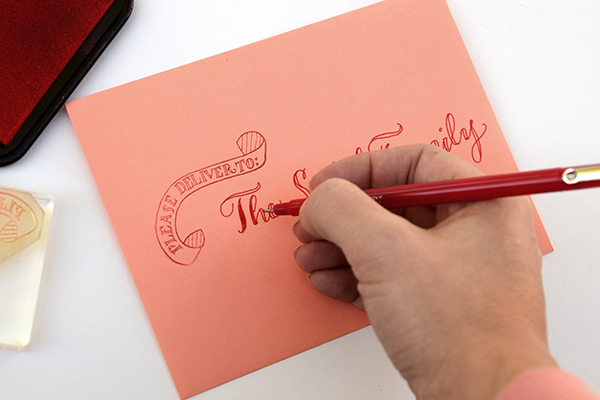
Start by stamping your Deliver To Banner Stamp on the left hand side of the envelope, a little above center. Angle it so that you can nestle the lettering in underneath it. To make the hand lettered script, use your prettiest cursive and write the name across your envelope. Then, draw a second line along each letter, creating the thick and thin look (as shown above). Refer to a favorite script font for letter shape and style, if needed.

DIY Tutorial: Holiday Envelope Addressing Styles by Antiquaria for Oh So Beautiful Paper

Once you’ve done that for the entire name, color in the letters so that they are solid red. Finish out the addressing with a simple italic print for the address. We also added a fun flourish underneath the last address line to gussy the envelope up even more! Draw it in pencil first or practice on a scrap piece of paper if you need to before executing it on your envelope.

DIY Tutorial: Holiday Envelope Addressing Styles by Antiquaria for Oh So Beautiful Paper

While we think all of these styles would be perfectly suited to holiday greetings, we also think that they could be adapted and used on save the dates and Invitations as well! Play around with the techniques and find out what you like best with the cards that you’re sending. We hope that you have just as much fun addressing your cards as you do selecting them!

Materials and Resources

Special Delivery Stamp Kit: Deliver To Banner, Long Live Snail Mail and Do Not Bend Pennant

Feathers & Arrows Stamp Kit: contains the zig-zag stamp

Calligraphy Starter Kit

White Calligraphy Ink

Calligraphy Resources: Setting up your Tools,  Lower Case Alphabet by Bailey Rivera, Calligraphy Supplies

Brush and Felt Tipped Pens

For envelopes, we discuss many different envelope resources and options in a previous post, found here.

Current USPS Postage

Vintage Postage

Photography by Antiquaria for Oh So Beautiful Paper

Mary + Kosta’s Luggage Tag Save the Dates

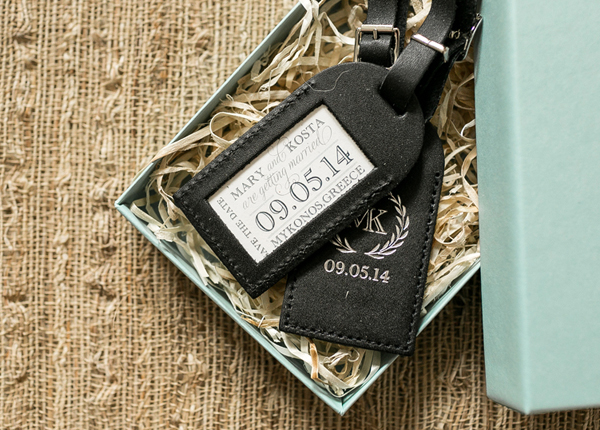
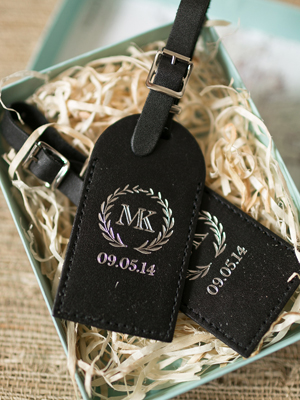
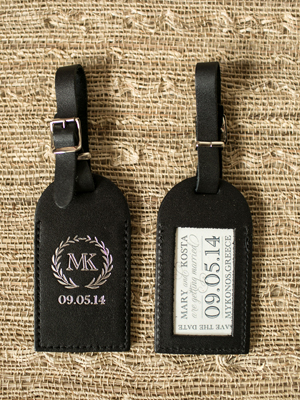
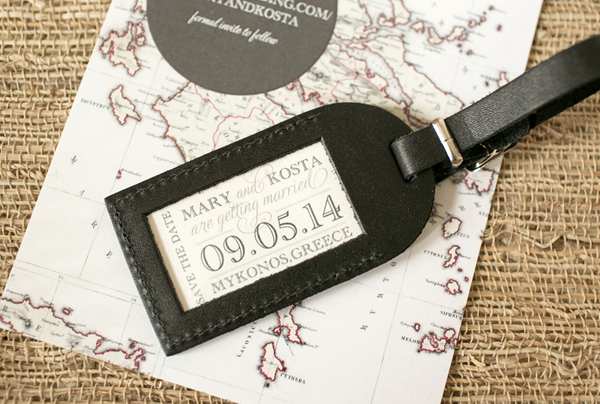
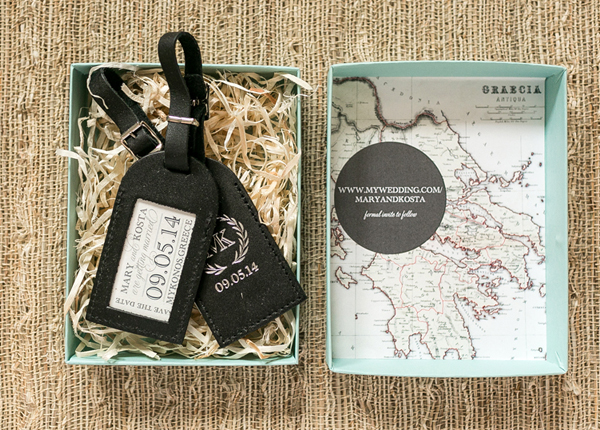
Luggage tag save the dates for a destination wedding in Greece? Simple idea, and 100% effective! Melissa from Atheneum Creative incorporated an elegant silver monogram on real luggage tags, then put the entire save the date together in pool blue mailer boxes with a liner showing a map of Greece!

Black-Silver-Luggage-Tag-Save-the-Dates-Atheneum-Creative5

From Melissa: Mary and Kosta are getting married in Greece and wanted to set the tone for their destination wedding with a luggage tag. We printed real luggage tags with a custom monogram and created an insert with the wedding details.

Black-Silver-Luggage-Tag-Save-the-Dates-Atheneum-CreativeBlack-Silver-Luggage-Tag-Save-the-Dates-Atheneum-Creative4

The luggage tag save the dates were mailed in a pool blue box with the inside cover showing a map of the wedding location. A simple design, a simple save the date, but it definitely left a great first impression with the guests who will be traveling to attend the wedding!

Black-Silver-Luggage-Tag-Save-the-Dates-Atheneum-Creative6

Black-Silver-Luggage-Tag-Save-the-Dates-Atheneum-Creative7

Thanks Melissa!

Atheneum Creative is a member of the Designer Rolodex – you can see more of their beautiful work right here or visit the real invitations gallery for more wedding invitation ideas!

Photo Credits: Chelsea Davis Photography

Envelope Addressing Styles

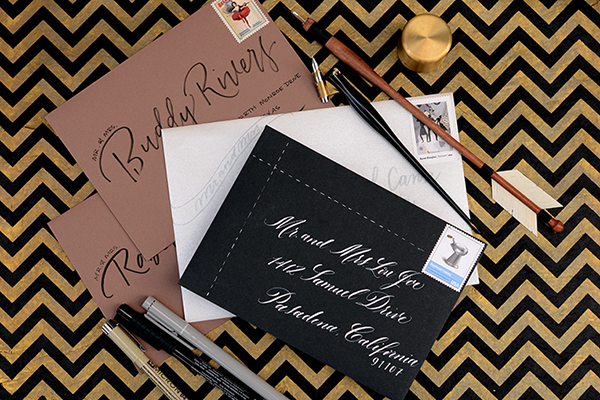
We’re often (very often) asked about addressing options for wedding invitations. Many of our clients are DIY couples and it’s simply not in their budget to hire a professional or to pay for digital addressing. Believe us: even if you or a loved one are planning address them yourself, they can still be creative and cohesive with your invitation! It’s simply a matter of the right tools, methods, and a some practice! – Bailey and Emma of Antiquaria
DIY Envelope Addressing Styles by Antiquaria via Oh So Beautiful Paper

Option One: DIY Pointed Pen Calligraphy. For someone that has a little experience already with a dip pen and ink or for someone with plenty of time to practice before the invitations need mailing, calligraphy addressing can actually be a great DIY option. One hundred years ago, everyone who wanted to write had to use a dip pen and ink. We’re certainly used to modern pens these days, but it’s inspiring to think that it can be done with practice! It takes years and years of practice to truly master the art – so don’t hold yourself to expectations of perfection for the project. Try playing with your unique hand writing and see what is most natural for you with the tools.
DIY Envelope Addressing Styles by Antiquaria via Oh So Beautiful Paper

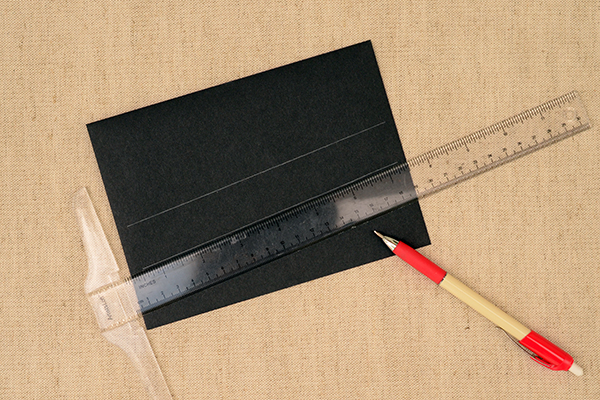
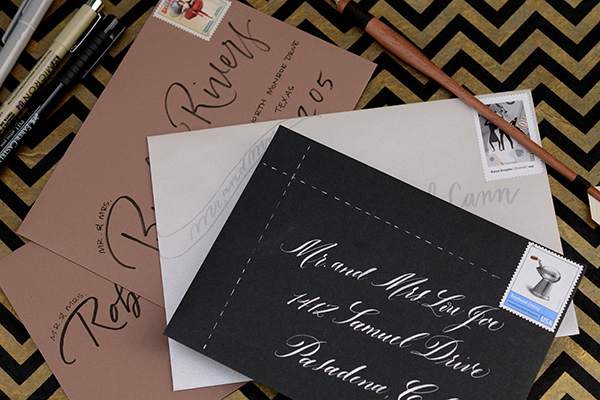
It’s really helpful to give yourself guidelines when writing with pen and ink (your focus will be more on the writing than keeping the lines straight). For a playful look, we drew them at a slant, leaving a ruler’s width between them. Three lines will suffice for most U.S. addresses but occasionally you’ll need four. Just count up how many 3 and 4 liners you need on your list and tackle all of the “ruling up” first.
DIY Envelope Addressing Styles by Antiquaria via Oh So Beautiful Paper

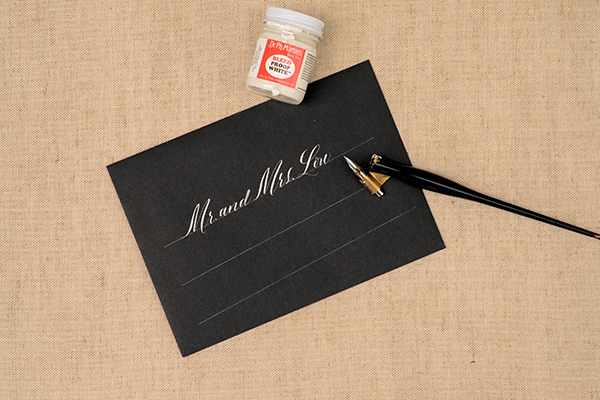
Address each envelope on your guest list. Set aside to dry. This can take minutes to a day depending on the ink and weather, so don’t be too anxious. The last thing you want is to smear you hard work! We used our favorite white ink on these gorgeous black envelopes. It’s the loveliest and most opaque that we’ve found but it must be diluted quite a bit to use with a pointed pen and nib. Add (distilled) water with an eyedropper to the bottle. Stir the ink with the water until it reaches the consistency of heavy cream.
DIY Envelope Addressing Styles by Antiquaria via Oh So Beautiful Paper

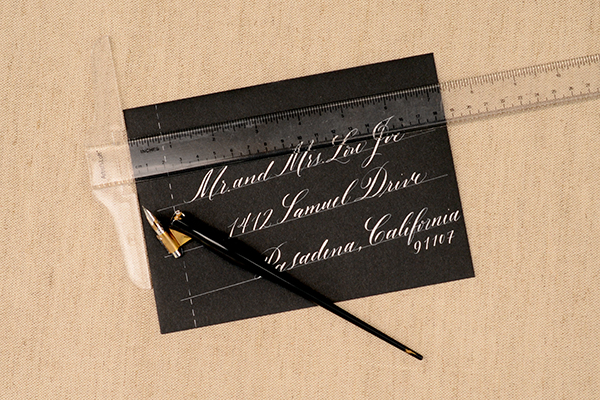
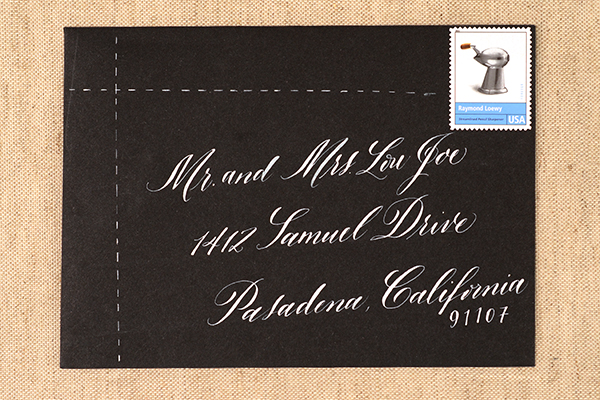
Once they’re all addressed, we added a fun little dashed line to further decorate and modernize the envelope. Use a T-square ruler and dash along the straight line with the white ink loaded into the dip pen. Let them all dry once more.
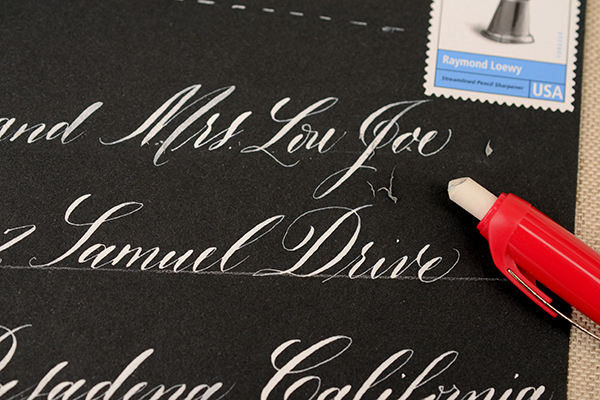
DIY Envelope Addressing Styles by Antiquaria via Oh So Beautiful Paper

Erase the lines gently once everything is good and dry.

You can find more information about DIY calligraphy on our blog. You can also search for local calligraphy classes to get you started. The key to calligraphy is practice, practice, and more practice!
DIY Envelope Addressing Styles by Antiquaria via Oh So Beautiful Paper

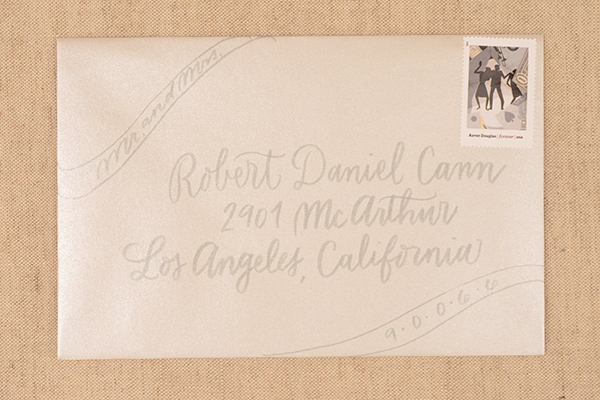
Option Two: Brush Pen Lettering. Brush pens can be a great option for addressing without the mess of an actual brush and ink. A lot of them are actually felt tipped (like the ones in this tutorial) which makes controlling them much easier. This silver and gray design is lovely, soft and tonal. Play with the brush lettering a bit and find a style that’s comfortable for you. You can print or use cursive with them, so the options are endless!
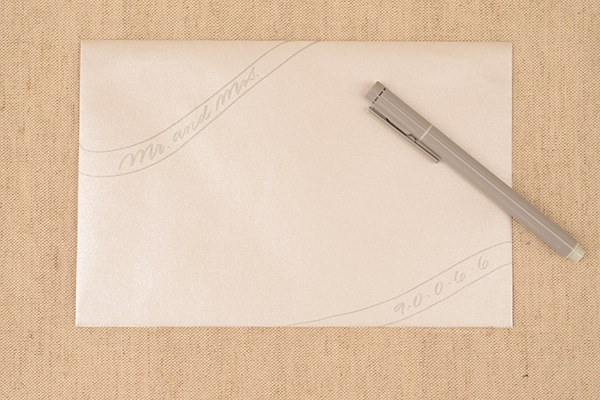
DIY Envelope Addressing Styles by Antiquaria via Oh So Beautiful Paper

Draw “ribbons” in the upper left and lower right corners. Then write the title(s) (i.e. Mr., Miss, Ms., or Mr. and Mrs.) in the upper left banner. Move to the lower right and write the zip code, spacing out each number with a small dot.
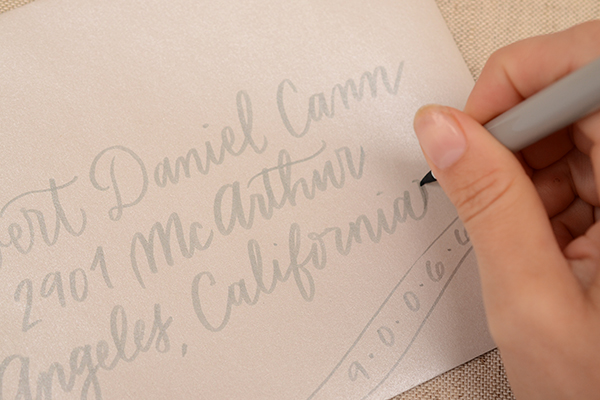
DIY Envelope Addressing Styles by Antiquaria via Oh So Beautiful Paper

In the middle of the envelope, you’ll write the guest(s) name and address. We used a simple handwriting cursive. Because the brush pen gives the lines weight variation, it looks fancier than a ball point pen, which we love. One key to writing with a brush pen is to write on its point, as shown in the photo above. This will help keep the writing thin and legible. Center the address as much as you can, but the banners in the corners will help keep the design looking balanced even if it’s not perfect.
DIY Envelope Addressing Styles by Antiquaria via Oh So Beautiful Paper

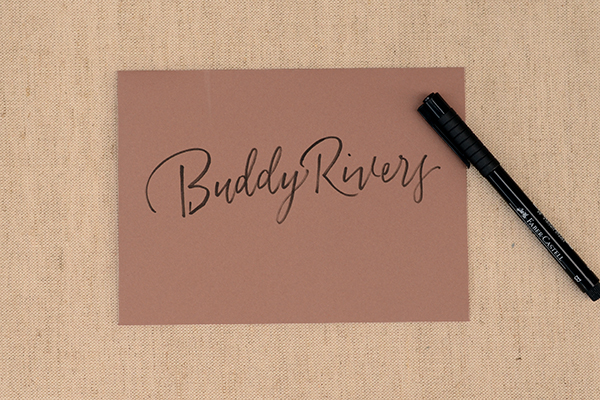
Option Three: Mixed Pen Lettering. This design uses two different kinds of pens to achieve a very custom look. We again used a brush pen, this time in black, as well as a thin felt tipped pen for variation in line quality and so that we could make some text much smaller.
DIY Envelope Addressing Styles by Antiquaria via Oh So Beautiful Paper

Write your guests name fairly large across the envelope. Vary the size of lettering depending on the length of their name (you’ll get the hang of this with practice).
DIY Envelope Addressing Styles by Antiquaria via Oh So Beautiful Paper

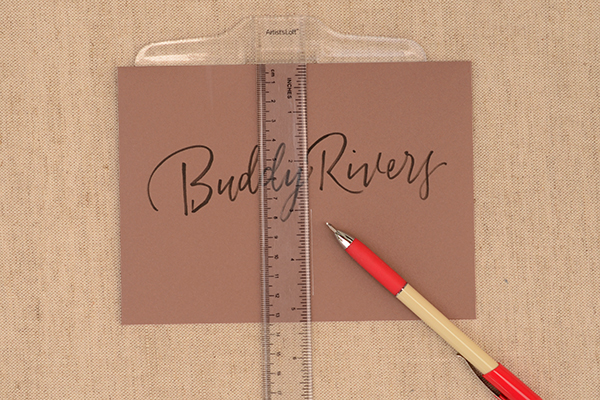
Then, draw straight line down, using a T-square ruler a little right of center. You will use this line to left justify the address.
DIY Envelope Addressing Styles by Antiquaria via Oh So Beautiful Paper

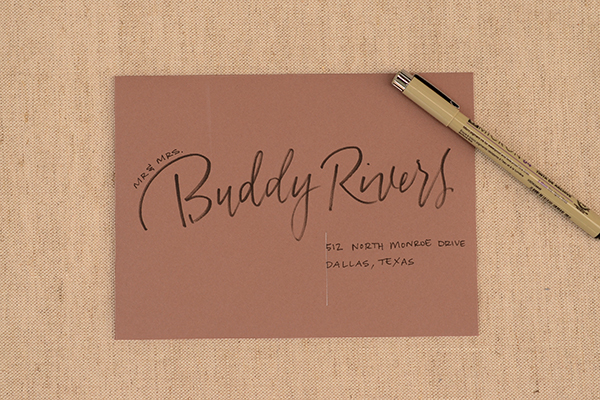
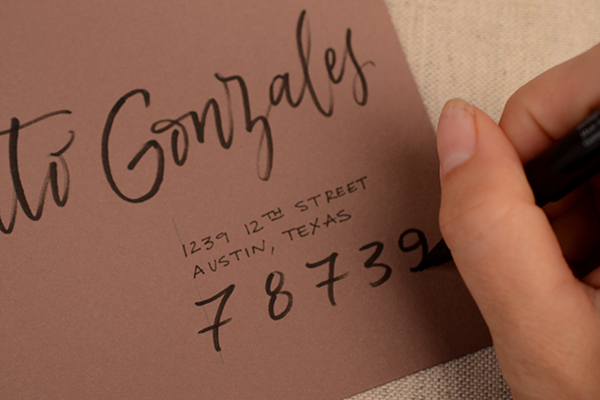
With the vertical lines as your guide, print the street, city and state portion of the address using the felt tipped marker. Add the appropriate title(s) to the left hand side of the guests name.
DIY Envelope Addressing Styles by Antiquaria via Oh So Beautiful Paper

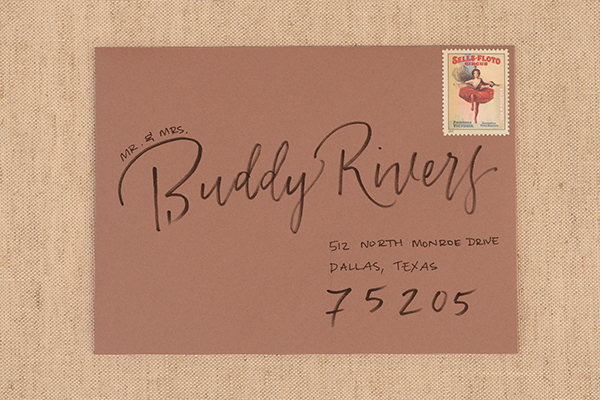
With the brush pen, add the guest’s zip code in large numbers below the address. Erase your vertical line and the envelope is done!
DIY Envelope Addressing Styles by Antiquaria via Oh So Beautiful Paper

DIY Envelope Addressing Styles by Antiquaria via Oh So Beautiful Paper

Addressing options really are limitless. Play around with ideas until you find something that works for you and coordinates well with your invitation suite. It can help to experiment with addressing your own save the dates (usually they’re less formal) to determine if you want to tackle the process of addressing your wedding invitations.

Materials & Resources

Calligraphy Starter Kit

White Calligraphy Ink

Calligraphy Resources: Setting up your Tools,  Lower Case Alphabet by Bailey Rivera, Calligraphy Supplies

Brush and Felt Tipped Pens

For envelopes, we discuss many different envelope resources and options in a previous post, found here.

T-square Ruler

White Mechanical Pencil or Graphite Pencil

Photo Credits: Antiquaria for Oh So Beautiful Paper
Tori + Dan’s Purple Woodland Fabric Wedding Invitations

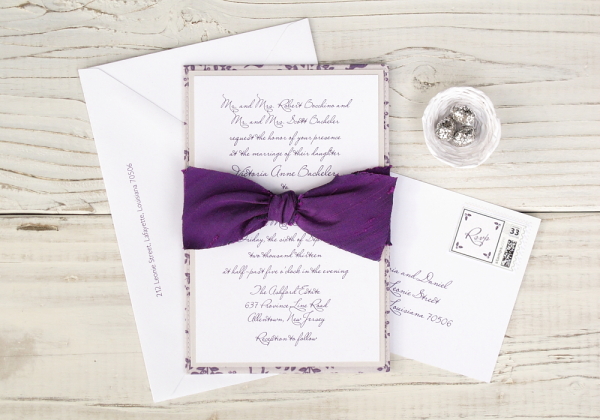
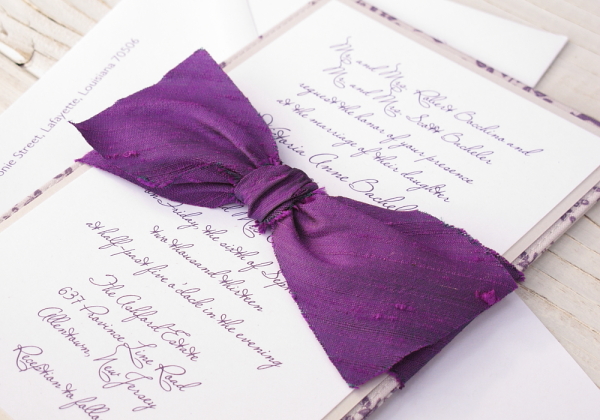
This wedding sounds like such a dream: a beautiful garden estate, with the ceremony in a rustic converted barn and followed by an elegant ballroom reception. Jeannine from Blue Magpie had the responsibility of designing wedding invitations to fit all aspects of the wedding – elegant, rustic, and a little bit glamorous. Jeannine designed a custom woodland fabric featuring horses and Carolina Wrens, then finished the suite with a deep purple ribbon and silver card stock!

Purple-Woodland-Wedding-invitations-Blue-Magpie-OSBP

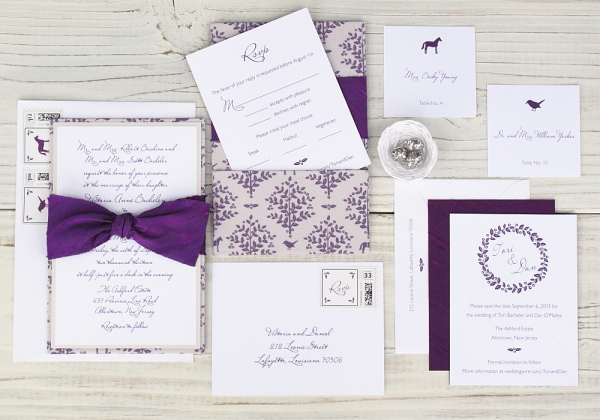
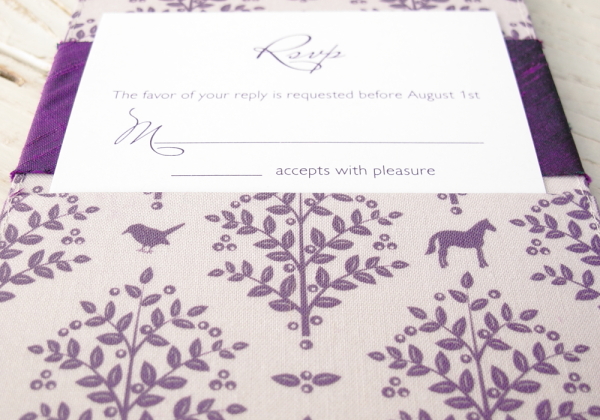
From Jeannine: My bride fell in love with a particular fabric we featured on our website, but unfortunately, it was no longer in print and we just couldn’t find enough for her wedding invitations. After going through several rounds looking for a good substitute, it dawned on me that we should design a fabric just for her! The bride loved horses, the groom loved birds, so they requested that the fabric feature both – and specifically, the Carolina Wren because it mates for life.

Purple-Woodland-Wedding-invitations-Blue-Magpie-OSBP7

The wedding was to be held on a beautiful garden estate with an amazing ballroom for the reception, but the ceremony was to be held in a converted barn with rustic white wooden beams, so the invitation had to be both elegant and rustic to match the amazing venue and tone of the wedding. We settled on a beautiful printed cotton featuring birds, horses, and woodland branches for the whimsical and rustic elements and paired it with a rich purple silk ribbon and a shimmery silver card stock border for glamour and elegance.

Purple-Woodland-Wedding-invitations-Blue-Magpie-OSBP2

Purple-Woodland-Wedding-invitations-Blue-Magpie-OSBP4

Purple-Woodland-Wedding-invitations-Blue-Magpie-OSBP5

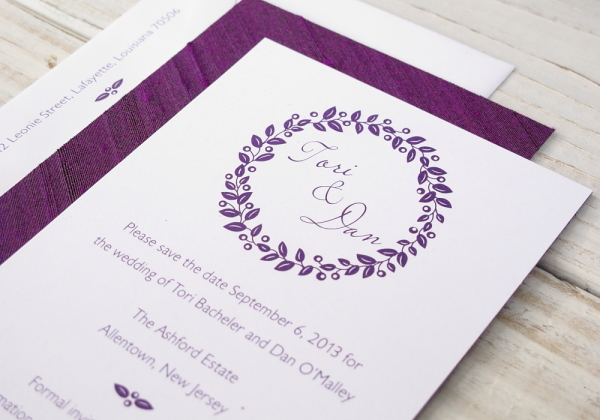
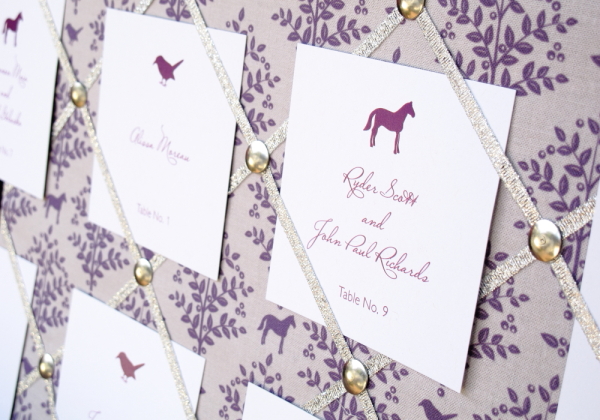
For the save the dates, we decided to bring in some graphic elements from the printed cotton and to back it in the same rich purple silk as the ribbon to provide guests with a subtle hint of what was to come! And of course, the birds and horses had to make their appearances again on their custom postage and escort cards!

Purple-Woodland-Wedding-invitations-Blue-Magpie-OSBP8

Thanks Jeannine!

Blue Magpie is a member of the Designer Rolodex – you can see more of Jeannine’s beautiful work right here or visit the real invi­ta­tions gallery for more wedding invitation ideas!

Photo Credits: Blue Magpie