Seasonal Stationery: Valentine’s Day Cards, Part 2

Hi again everyone! If yesterday’s Valentine’s Day card round up didn’t quite have what you were looking for – you’re in luck! Today I’m back with even more beautiful Valentine’s Day cards to help spread the love.

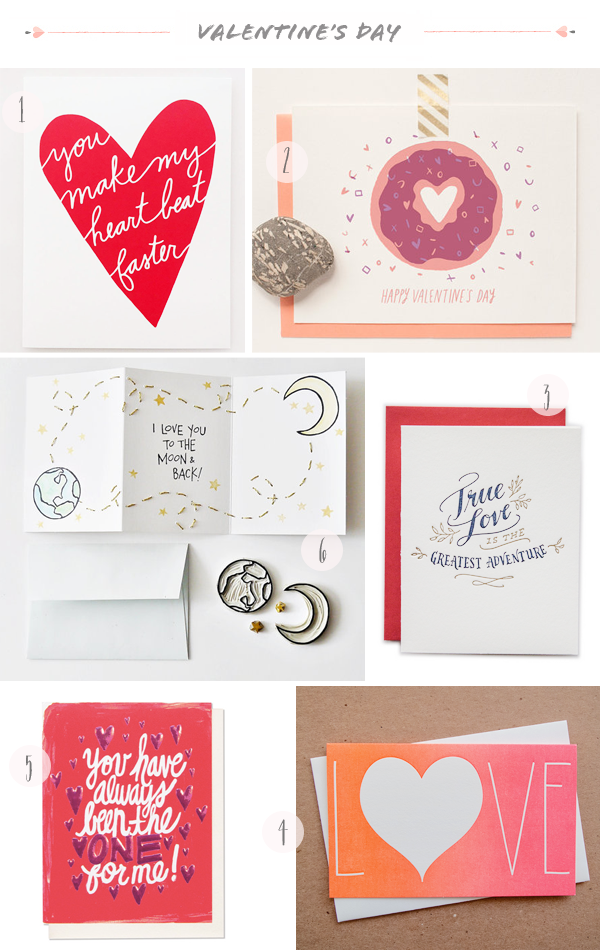
Valentine's Day Card Round Up by Oh So Beautiful Paper

1. Happy Cactus

2. Erin Wallace

3. Ladyfingers Letterpress

4. Anemone Letterpress

5. Thimblepress

6. Atiliay – Each card is made from hand carved stamps and the proceeds help support schools overseas!

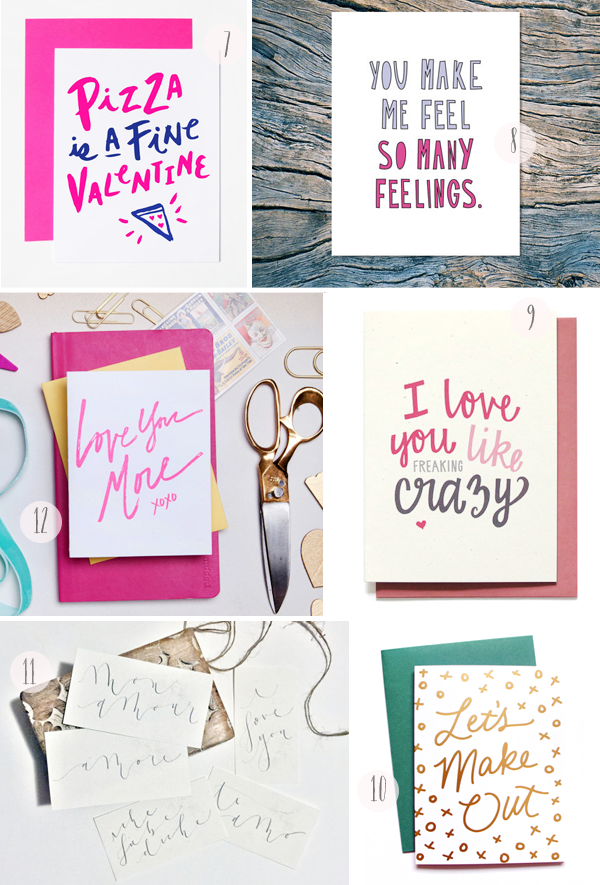
2015 Valentine's Day Card Round Up by Oh So Beautiful Paper

7. The Paper Cub

8. Near Modern Disaster

9. Hennel Paper Co

10. Little Arrow Studio

11. The Hive Studio â€“ words of love calligraphed in four languages!

12. Richie Designs

For even more Valentine’s Day cards – check out the 300+ cards in the full round up right here!

Seasonal Stationery: 2014 Holiday Card Round Up Part 4

Today I’m wrapping up my 2014 holiday card round up with one mega post with more beautiful cards! In case you missed them – you can find the previous round up highlights right here and the full holiday card round up page right here!

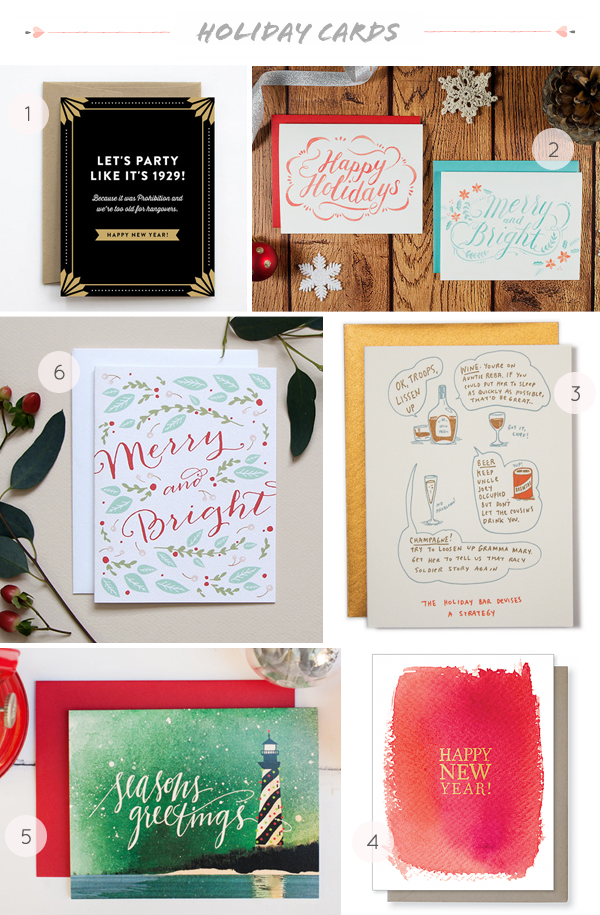
2014 Holiday Card Round Up by Oh So Beautiful Paper

1. Detroit Card Co.

2. Four Wet Feet

3. Ladyfingers Letterpress

4. E.Frances Paper

5. An Open Sketchbook

6. Little Arrow

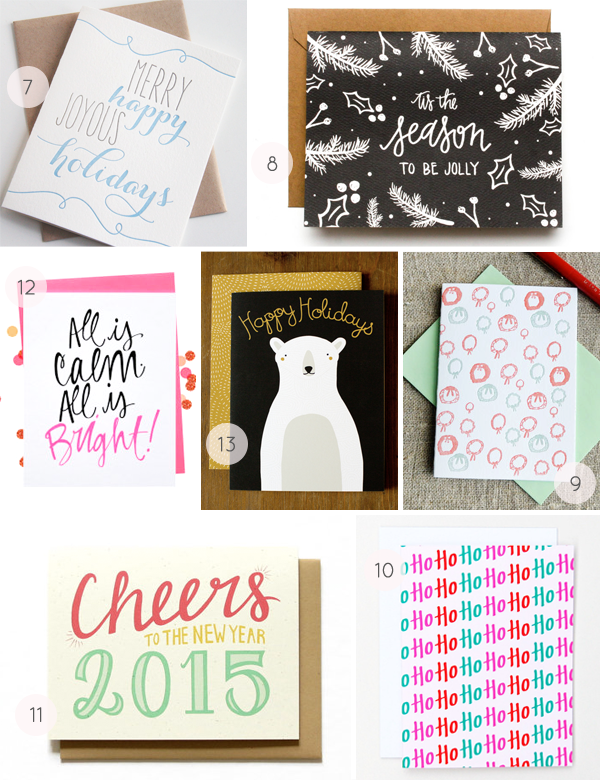
2014 Holiday Card Round Up by Oh So Beautiful Paper

7. Steel Petal Press

8. Green Tie Studio

9. Grey Moggie

10. Happy Cactus

11. Hennel Paper Co

12. Paperfelt

13. Gingiber

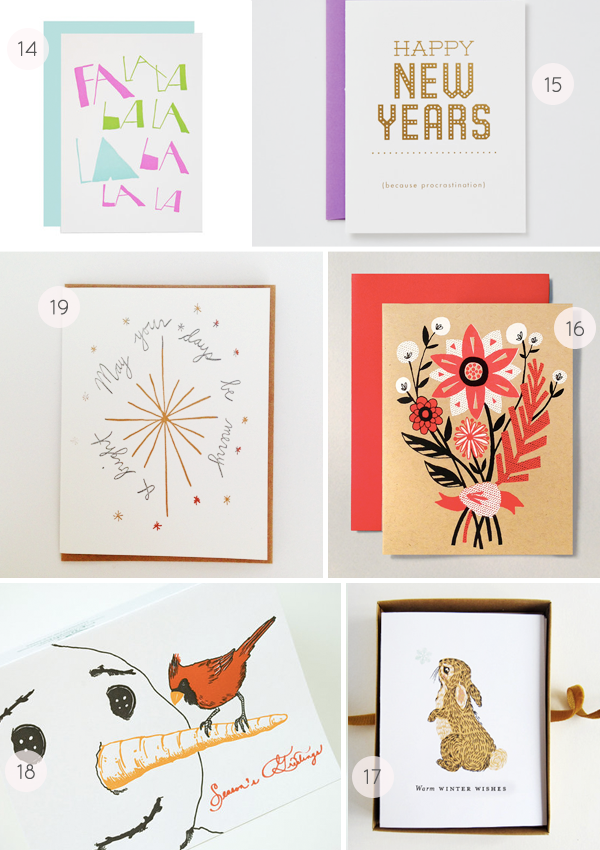
2014 Holiday Card Round Up by Oh So Beautiful Paper

14. 417 Press

15. Farewell Paperie

16. Allison Cole

17. Snow & Ivy

18. Papillon Press

19. The Great Lakes Goods

Check out the full holiday card round up – with 400+ holiday cards – right here!

DIY Tutorial: Holiday Envelope Addressing Ideas

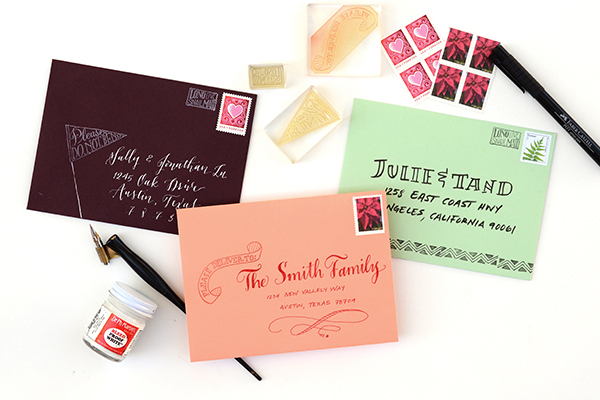
As you might be able to guess, we send quite a lot of snail mail in our line of work. Whether it’s thank you notes, catalogs, color samples, or a letter to our loved ones, we try to make all of our outgoing mail a treat for the recipient to receive. Since we have holiday cards on the brain, we decided to come up with some fun and easy addressing options suited to the season. They incorporate fun lettering styles as well as stamping and we just love them all! Want more DIY addressing styles? Check out our first envelope addressing post here. Have fun with the designs and happy addressing! –Bailey and Emma of Antiquaria

DIY Tutorial: Holiday Envelope Addressing Ideas by Antiquaria for Oh So Beautiful Paper

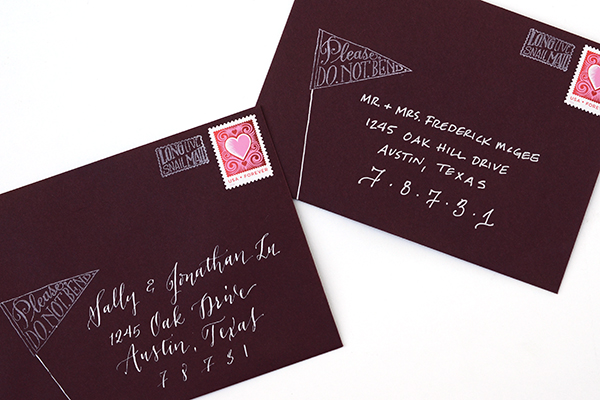
Option One: Do Not Bend Pennant Stamp + White DIY Pointed Pen Calligraphy Addressing. White stamping and white calligraphy ink really pop off of this gorgeous fig colored envelope. While it takes time to perfect using a pointed calligraphy pen, feel free to experiment also with white or silver gel pens for a similar (and easier) effect.

DIY Tutorial: Holiday Envelope Addressing Styles by Antiquaria for Oh So Beautiful Paper

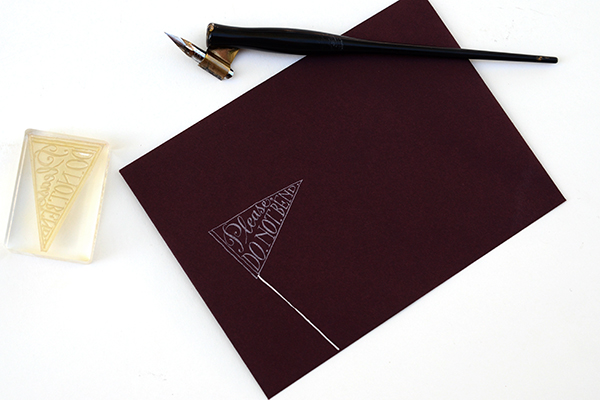
Stamp your Please Do Not Bend Pennant Stamp on the lefthand side of your envelope, just a hair above the center. With your pen, draw a line to the bottom with white ink.
DIY Tutorial: Holiday Envelope Addressing Styles by Antiquaria for Oh So Beautiful Paper

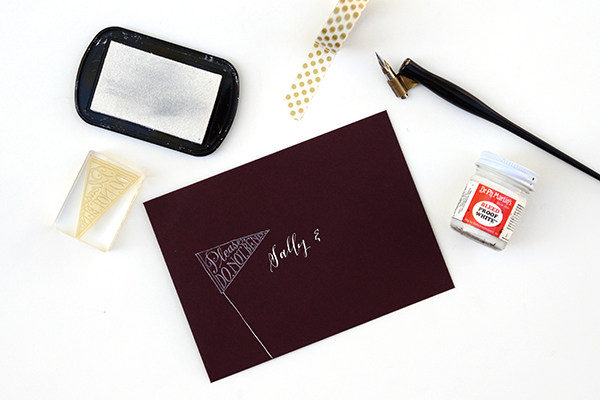
Next, address the envelope to your loved one using a pointed calligraphy pen and white ink. Start your addressing right below the pennant stamp, as shown above.

DIY Tutorial: Holiday Envelope Addressing Styles by Antiquaria for Oh So Beautiful Paper

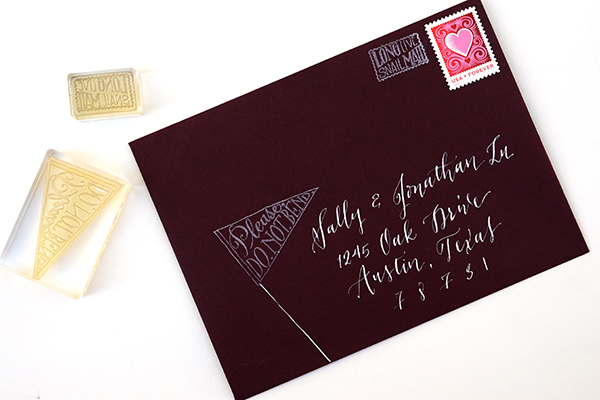
Let the addressing dry completely (with white calligraphy ink this can take a few hours). Once it’s dry, add your postage and then stamp our Long Live Snail Mail Stamp to the left. Feel free to play with the lettering style of addressing on this design! A simple hand-written block print with white or silver gel ink also looks lovely (see below)!
DIY Tutorial: Holiday Envelope Addressing Styles by Antiquaria for Oh So Beautiful Paper

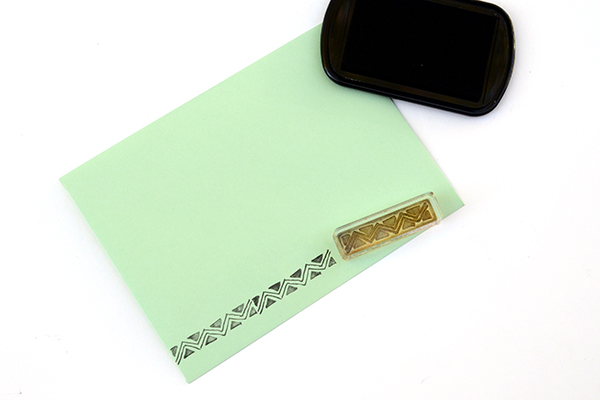
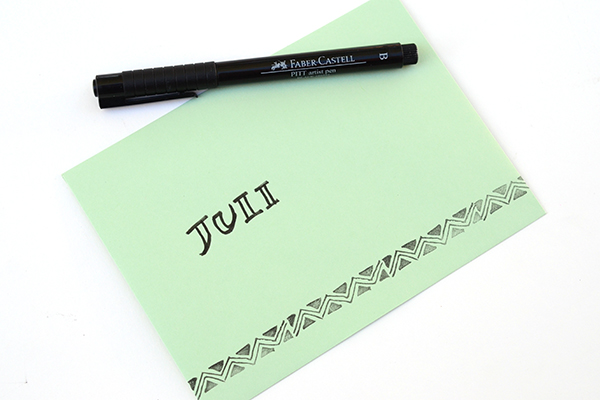
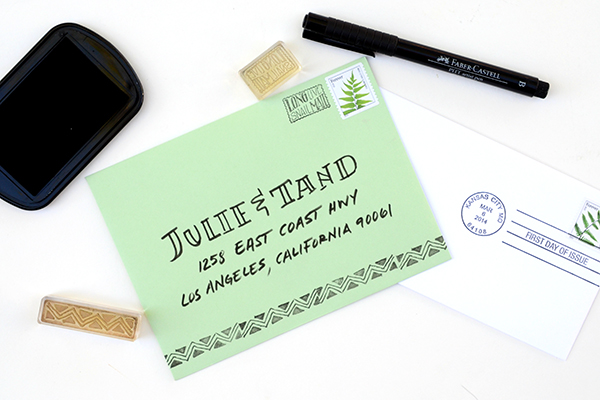
Option Two: Zig-Zag Stamp + Bold Brush Block Lettering. Adding a line of pattern along the bottom of the envelope instantly adds an air of “fun” to the design. When paired with an easy brushed address, the effect is bold and will stand out instantly among the bills and junk mail!

Mint-AddressingDIY Tutorial: Holiday Envelope Addressing Styles by Antiquaria for Oh So Beautiful Paper

Print your zig-zag stamp in black ink along the bottom edge of the mint colored envelope. You’ll want to make sure that each printing is close together but not overlapping.
DIY Tutorial: Holiday Envelope Addressing Styles by Antiquaria for Oh So Beautiful Paper

With a black brush pen, write out your loved one’s name. We decided to make big block letters for their name (with the mint color showing in the center) and a simple italic print for the address. Once the address is done, add your postage and our Long Live Snail Mail Stamp to complete the look!
DIY Tutorial: Holiday Envelope Addressing Styles by Antiquaria for Oh So Beautiful Paper

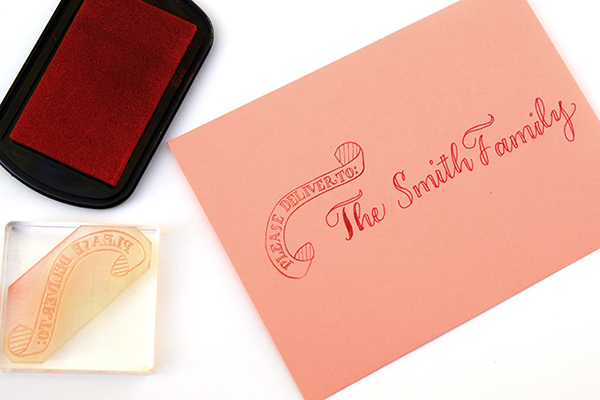
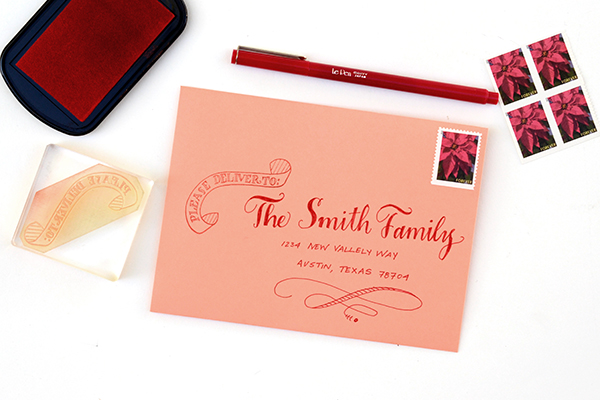
Option Three: Deliver To Banner Stamp + Hand-lettered Script. Bailey actually designed this adorable “Please Deliver To” stamp to use on her save the date a while back and we think that it makes the perfect snail mail statement on this coral envelope when combined with red addressing. The fun part of this design is that you get the look of calligraphy but with simpler tools! A common felt tipped pen made this gorgeous script. Incredible, right?

DIY Tutorial: Holiday Envelope Addressing Styles by Antiquaria for Oh So Beautiful Paper

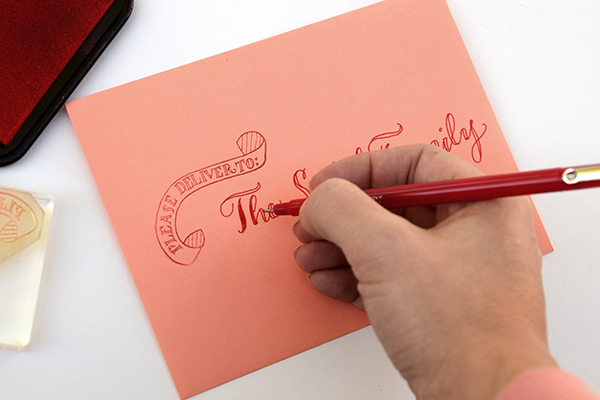
Start by stamping your Deliver To Banner Stamp on the left hand side of the envelope, a little above center. Angle it so that you can nestle the lettering in underneath it. To make the hand lettered script, use your prettiest cursive and write the name across your envelope. Then, draw a second line along each letter, creating the thick and thin look (as shown above). Refer to a favorite script font for letter shape and style, if needed.

DIY Tutorial: Holiday Envelope Addressing Styles by Antiquaria for Oh So Beautiful Paper

Once you’ve done that for the entire name, color in the letters so that they are solid red. Finish out the addressing with a simple italic print for the address. We also added a fun flourish underneath the last address line to gussy the envelope up even more! Draw it in pencil first or practice on a scrap piece of paper if you need to before executing it on your envelope.

DIY Tutorial: Holiday Envelope Addressing Styles by Antiquaria for Oh So Beautiful Paper

While we think all of these styles would be perfectly suited to holiday greetings, we also think that they could be adapted and used on save the dates and Invitations as well! Play around with the techniques and find out what you like best with the cards that you’re sending. We hope that you have just as much fun addressing your cards as you do selecting them!

Materials and Resources

Special Delivery Stamp Kit: Deliver To Banner, Long Live Snail Mail and Do Not Bend Pennant

Feathers & Arrows Stamp Kit: contains the zig-zag stamp

Calligraphy Starter Kit

White Calligraphy Ink

Calligraphy Resources: Setting up your Tools,  Lower Case Alphabet by Bailey Rivera, Calligraphy Supplies

Brush and Felt Tipped Pens

For envelopes, we discuss many different envelope resources and options in a previous post, found here.

Current USPS Postage

Vintage Postage

Photography by Antiquaria for Oh So Beautiful Paper

Hello!Lucky: San Francisco Guide

Hello-Lucky-San-Francisco-Guide-OSBP

It can be tricky planning a trip to a city chock full of restaurants, shops, and coffee stops. If you’re anything like us then you love a day spent perusing the places the locals love. San Francisco is a vibrant city with some of the most contrasting enclaves, and this is what makes it so special. We are excited to share our go-to spots nestled in a few of our favorite nooks. â€“ Eunice and Sabrina of Hello!Lucky

THE MISSION

Eat

Foreign Cinema– Amazing food and even better ambience. This is our go-to for group dinners.

Lolo’s– Great food, great drinks, great atmosphere. Jalisco spices with California vibes.

Lolinda– Argentinian cuisine. For dinner- or head upstairs for rooftop brunch.

Trick Dog– The best bar food you have ever had, drinks to match.

Flour + Water – Delicious with a cool ambience and the Dough Room, their private dining room, it’s a fantastic venue for special occasions

Sip

Stable Caf̩РLovely outdoor patio with WIFI

Four Barrel– You will find a line outside almost any time of the day, and yes, it’s that good!

Shop

Voyager – Women and men’s fashion & accessories from local craftsmen.

Bell Jar– Great for gifts! Women’s fashion and home decor.

Taylor Stitch– Lovely and locally made men’s fashion.

Paxton Gate – A quirky cabinet of curiosities full of fascinating finds such as a taxidermy unicorn, a wall of pinned insects, and drawers full of nifty rocks and minerals.

See/Do

Mission Bowling Club – Family friendly until 7!

Urban Putt – SF-themed miniature golf with cocktails, burgers and pizza. Family friendly until 8!

Dolores Park/ Mission Dolores- A jungle gym with a view. Something you and the kids will enjoy.


HAYES VALLEY

Eat

Rich Table – A block away from the hustle & bustle of Hayes- wonderful space & food.

Smitten Ice Cream– Tasty and trendy- surrounded by boutiques, beer gardens, and juiceries.

Bar Jules – a cozy little café that serves delicious plates created from local and seasonal produce.

Sip

Blue Bottle Coffee– Down an alley, in a garage kiosk, you will find one of the best fresh cups of coffee.

Ritual– Another great coffee shop!

Biergarten– Great spot for lunch! They serve German brews & cider, sausages & pretzels.

Shop

Welcome Stranger– Cool camp themed boutique for men.

Rand & Statler– For the fancier things in life.

Reliquary– Every time you enter it’s like Indiana Jones’ greatest adventure!

Lavish– Lovely paper goods and gifts shop.


NOPA/ WESTERN ADDITION

Eat

Nopa– Make a reservation for dinner or hop on their family table. Try the burger and a blue bottle martini!

State Bird – This spot has gotten a ton of attention since its opening so grabbing a table isn’t easy. Not exactly a last minute restaurant, but well worth planning ahead!

La Urbana – Delicious modern Mexican cuisine.

Mojo – A great place to grab lunch & has a patio.

Little Star Pizza– Not your average pizzeria! Their deep dish is a game changer.

Sip

The Mill – You will question the $4 toast until you try it. The is the type of coffee shop you could hang in all day – but bring a book or a friend, it’s a wifi free zone.

Madrone Art Bar – It’s a fun place for a cocktail, and they have themed nights like Motown Monday.

Shop

The Perish Trust– Old treasures and new, The Perish Trust is a place to feast your eyes! Right next door to The Mill.

Rare Device– Great finds by local artists! Cards, prints and home decor.


HAIGHT/ASHBURY

Eat

Off the Grid– It’s a seasonal gathering of food trucks at a cul de sac off Haight. Offerings stretch from dinner to dessert. There’s live music to get things moving!

Alembic – This menu is not your average, with options like bone marrow and pickled quail eggs, your adventurous side will thank you.

Magnolia Gastropub – A great microbrewery and restaurant – great atmosphere and food!

Second Act – This market is located in the old theatre, it’s a compilation of vendors selling an array of food & drink.

Haight Street Market – They have a deli that makes great sandwiches & a place to rest your feet.

Sip

Club Deluxe – Pizza, drinks, & jazz.

Shop

The Booksmith– Lovely bookstore where you can also get your paper fix!

Tantrum – A quick walk from Haight will land you at this circus themed kids boutique in Cole Valley. It can’t be missed!

Crossroads – One of the many consignment stores on Haight. If you feel like hunting there are always treasures to be found!

Mystery Mister – Great mix of carefully curated vintage clothes and curiosities.

La Rosa Vintage – Another fantastic spot for well curated vintage clothes.

See

The Conservatory of Flowers Very Alice in Wonderland.

The DeYoung Museum– For fine art & they have wonderful exhibits.

The Academy of Sciences– A great science museum with a planetarium, aquarium, and rainforest.

Stow Lake– A boathouse with rowboat rentals.


Where to Stay & How to Get Around

Stay

There’s is no better way to be immersed than to stay at an Airbnb. You will get to experience the real spirit & charm through an authentic San Francisco home.

Get Around

We are one of the best cities for public transportation! Muni & Bart make commuting a breeze, take Bart in from the airport and use Muni around town. If that’s not your thing, get techy and download one of the many rideshare apps- we recommend Lift, Sidecar, and Uber.


Enjoy your visit!
Paper Flowers with Craftsy!

Craftsy-Paper-Flower-Class-Inspiration-OSBP-77

By now, you probably already know that I love paper flowers: I used some in the décor for this year’s Paper Party and in the bar sign for our frozen cocktail party last month, along with a few other occasions. But here’s a secret: I’ve always either used a pre-made kit or relied on the craftiness of others to create the flowers! So when Craftsy reached out to see if I’d be interested in taking some of their classes – and sharing the results with all of you – I jumped at the chance to really learn how to make paper flowers myself through Paper Arts with Alton DuLaney!

I’m sharing some inspiration from the class below, and Craftsy is offering a very generous discount exclusively for Oh So Beautiful Paper readers (for a limited time only!) who might also be interested in taking the class! This is the first post in a four part series with Craftsy – I’m so excited to share more ideas in future posts!

Craftsy-Paper-Flower-Class-Inspiration-OSBP-66

If you aren’t already familiar with Craftsy, they offer a wide range of interactive online classes that you can take from the comfort and convenience of the your own home. The thing that I like about Craftsy is that you can go at your own speed and even focus on different sections of the class when you want to. So if you have a party coming up you can focus on the entertaining components first, then go back to the art of letter writing section if you’re having trouble figuring out what to say in your thank you notes. The class is yours to keep forever – so you can revisit previously viewed course materials at any time (and multiple times), and if you’re not satisfied you can return your class for a full refund. Such great features!

The Paper Arts class contains a lot of really useful information and techniques – everything from how to make paper flowers and paper entertaining ideas to the art of letter writing. Since that’s a pretty wide range of topics, today I thought we’d focus in specifically on the paper flower component of the class. Here’s a little bit of what you can expect to learn:

  • methods for creating two types of flowers from tissue paper (carnation and spider mum)
  • methods for creating two types of flowers from heavier card stock (daffodil and rose)
  • how to layer colors together to achieve your desired floral design
  • templates for the petal and leaf shapes
  • instructions on building the flowers with floral tape and a hot glue gun

Craftsy-Paper-Flower-Class-Inspiration-OSBP-5

With fall on the horizon and the holidays in the not-too-distant future, my first thought was to use the paper flowers to create a beautiful table runner centerpiece for fall entertaining! I chose to keep my paper flowers fairly simple and small so that they would both lay flat and could be grouped together for the centerpiece, but in Alton’s class you’ll learn how to make flowers big and small.

You can click here to take the Craftsy Paper Arts class – and take advantage of the wonderful discount! You’ll learn the specific techniques in Alton’s class, but you can continue reading below to learn more about the materials and techniques that I decided to use for my project.

Craftsy-Paper-Flower-Class-Inspiration-OSBP-95-2

Materials

Crepe paper (I used hot pink, light pink, and brown)

Text weight kraft paper sheets

Scissors (I like to use precision scissors with smaller blades for more control)

Hot glue gun

Sparkly pom poms (optional)

White craft paint + paint pen (optional)

Craftsy-Paper-Flower-Class-Inspiration-OSBP-102

I used a mix of crepe paper and text weight kraft paper for my flowers. I love the stretchiness of crepe paper, and the kraft paper tends to run on the heavier side anyway so it was the perfect weight for this project. I started by cutting the paper down into small rectangles: because my flowers were on the smaller side each petal ended up being between 2″ – 4″ tall and 1″-2″ wide. You’ll find petal templates in the materials section of the class, but I chose to freehand most of my petals with a soft ruffly top edge for a more whimsical look.

Craftsy-Paper-Flower-Class-Inspiration-OSBP-24

Once you have 5-6 small rectangles, you can usually stack them and cut out several petals at the same time. The most important thing is to remember to cut the crepe paper so that the grain runs vertically along each petal and to make the base of each petal fairly narrow – which helps when assembling and layering the flowers. Each final flower had between five and ten petals. I used either small balled up pieces of crepe paper or sparkly little pom poms as the flower centers. Both were really cute! Finally, for a bit of added texture I splattered some white acrylic craft paint on some of the petals and used a white paint pen to draw lines on some of the other petals. But you can absolutely skip this part if that’s not your style!

Craftsy-Paper-Flower-Class-Inspiration-OSBP-58

Craftsy-Paper-Flower-Class-Inspiration-OSBP-14

Craftsy-Paper-Flower-Class-Inspiration-OSBP-53

Click here to take the Craftsy Paper Arts class – with a big discount for Oh So Beautiful Paper readers! This discount is only available for a week – so sign up soon!

Styling + Photos by Nole Garey for Oh So Beautiful Paper

This post is sponsored by Craftsy. All content, photos, ideas, and words are our own. Thank you for supporting the sponsors that help make Oh So Beautiful Paper possible!