Ti’ Punch

Earlier this week, we featured our first Tiki recipes on Oh So Beautiful paper. We went through a lot of tropical recipes before we settled on the three we featured, and there were lots of delicious drinks that didn’t make the cut – not because they weren’t great, but because we only have so much space. But we figured a few were worth holding on to. So, here’s one more: the Ti’ Punch, a traditional rum drink from the French Caribbean islands. – Andrew

Ti-Punch-Tiki-Cocktail-Recipe-OSBP-14

Ti-Punch-Cocktail-Recipe-Card-Shauna-Lynn-Illustration-OSBP

Illustration by Shauna Lynn for Oh So Beautiful Paper

Ti’ Punch

2 oz Rhum Agricole
Half a Lime
1/4 oz Cane Syrup

Add the rhum to a glass filled with ice, then squeeze the lime over the drink. Add the cane syrup and give it a gentle stir. Enjoy!

Ti’ Punch – the Creole for petite punch – is the French Caribbean’s answer to Cuba’s Daiquiri and Brazil’s Caipirinha. Rum tempered by lime and sugar is such a fantastic combination that it’s no surprise it was discovered over and over again throughout Latin America.

Ti-Punch-Tiki-Cocktail-Recipe-OSBP-24Ti-Punch-Tiki-Cocktail-Recipe-OSBP-19

Ti’ Punch uses rhum agricole, rum distilled directly from sugar cane juice. Rhum is a bit drier and a bit tangier than rums distilled from molasses, and carries more sugar cane flavor. (In this, it’s a lot like Brazilian Cachaça or Batavian Arrack.) Ti’ Punch also uses just a squeeze of lime juice, unlike the Daiquiri. I like to drop the lime after it’s been squeezed. Uniquely among these drinks, Ti’ Punch also uses cane syrup. Real cane syrup is made by slowly cooking down fresh sugar cane juice into a syrup and isn’t always easy to find. You can approximate it at home by making a rich 2:1 simple syrup using raw sugar.

Ti-Punch-Tiki-Cocktail-Recipe-OSBP-33

The result is a crisp and delicious drink meant for knocking back. A fun and traditional way to serve up Ti’ Punch to guests is to provide all the ingredients – a bottle of rhum, fresh cut limes, and cane syrup – and let your friends prepare their own. You could also throw in a spicy syrup or Caribbean liqueur – some falernum or allspice dram – to kick it up a notch.

Photo Credits: Nole Garey for Oh So Beautiful Paper

Happy Weekend!

Happy Friday everyone! I’m still in a festive mood after our modern Tiki party earlier this week – I hope you enjoyed it as much as we enjoyed putting all the details together! And the gorgeous (totally unseasonal) weather we’re experiencing in DC this week definitely helps me stay in a happy mood. This weekend I’m excited to check out the annual Lotus Festival at the Aquatic Gardens, especially since the lotus and water lilies are at peak bloom this time of year! But in the meantime…

Tiki-Cocktail-Party-Inspiration-OSBP-Bacardi-StGermain-131

Photo by me from our modern Tiki cocktail party!

…a few links for your weekend!

This week on Oh So Beautiful Paper:

Check back soon for this week’s cocktail! I hope you all have a wonderful weekend, and I’ll see you back here next week! xoxo

OSBP At Home: Garden Update

It’s been well over a year since we moved into our house, and while progress inside the house has been a bit slower than I would have liked, I’ve been spending a lot of time out in the garden. It’s the first time I’ve had any real gardening space since I moved to DC more than 10 years ago, and I’m really really enjoying it. Last year I shared some of my plans for our outdoor space. Time for an update!

OSBP-At-Home-Garden-Update-Summer-2014-23

Our house is a typical DC rowhouse: long and narrow. We don’t have a ton of space to work with, but I’ve been trying to maximize what we’ve got. We have a small garden bed in our backyard patio, which I’ve filled with lilacs, peonies, roses, and a few other perennial varieties. I save annuals for pots arranged along the fence on the other side of the patio so that I don’t have to worry too much about them once the cold weather sets in.

OSBP-At-Home-Garden-Update-Lilacs-Instagram

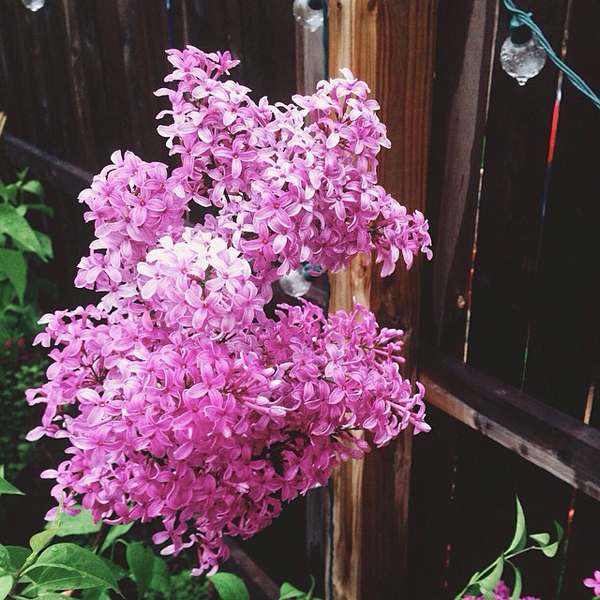
Our backyard garden is my happy place in mid-to-late spring when the peonies and lilacs are blooming. Everything was late this year thanks to the neverending winter, but once the warmer weather arrived in April everything just exploded – especially my lilacs. I have a total of four lilac bushes, all planted in the back of the garden bed closest to the fence, and the smell was positively intoxicating when they all bloomed. I wish they lasted forever!

OSBP-At-Home-Garden-Update-Peony-Coral-Instagram

OSBP-At-Home-Garden-Update-Peony-Hot-Pink-Instagram

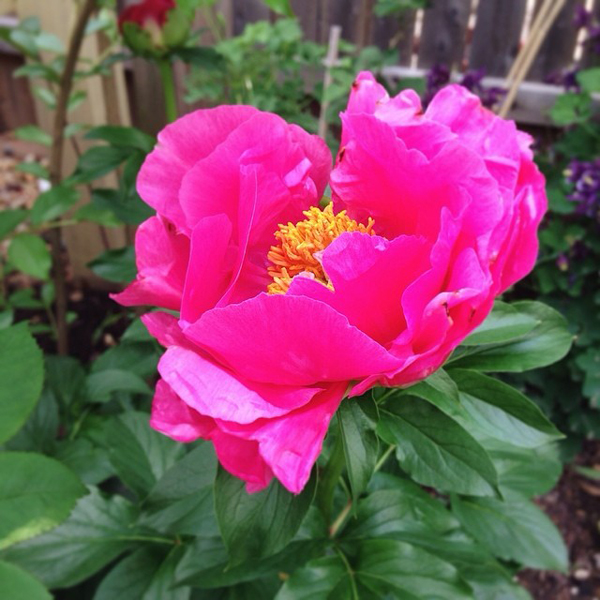
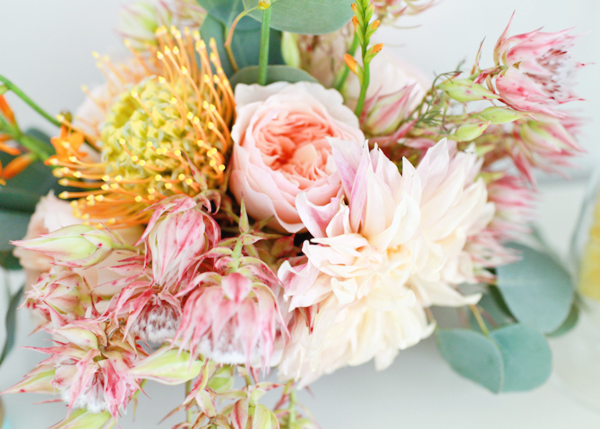
The lilacs were quickly followed by peonies – I have five plants in varying colors of white and pink (pale pink Sarah Bernhardt, Coral and Gold, and a hot pink variety whose name I’ve forgotten). This was the view that greeted me when I came home from the National Stationery Show in late May:

OSBP-At-Home-Garden-Update-Peonies-Instagram

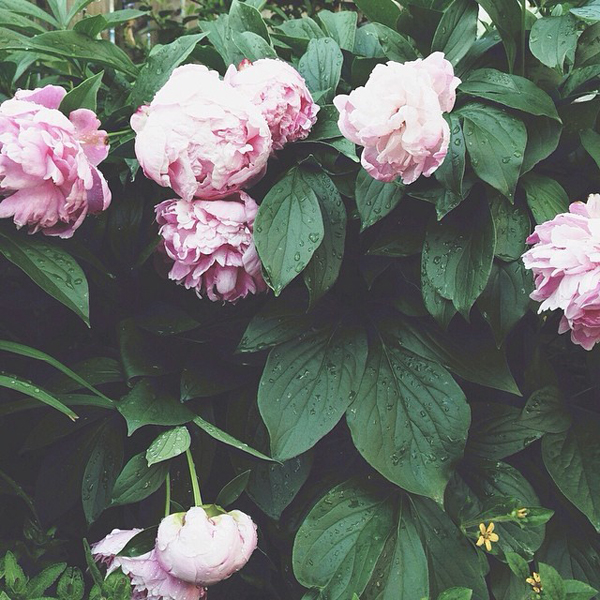
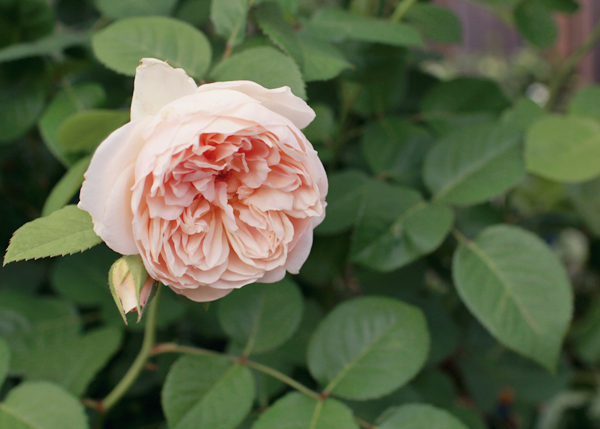
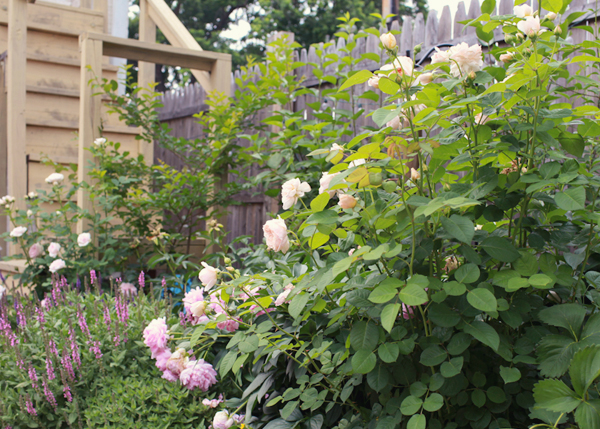
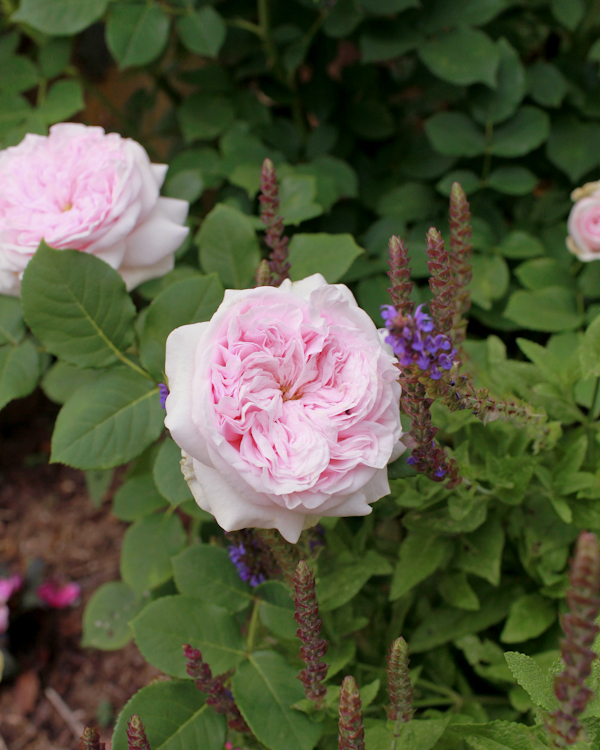
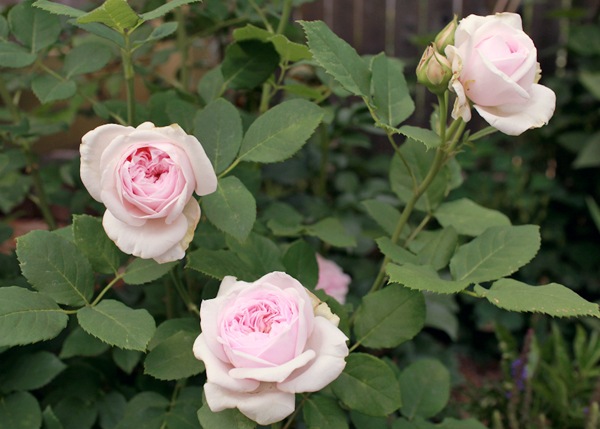
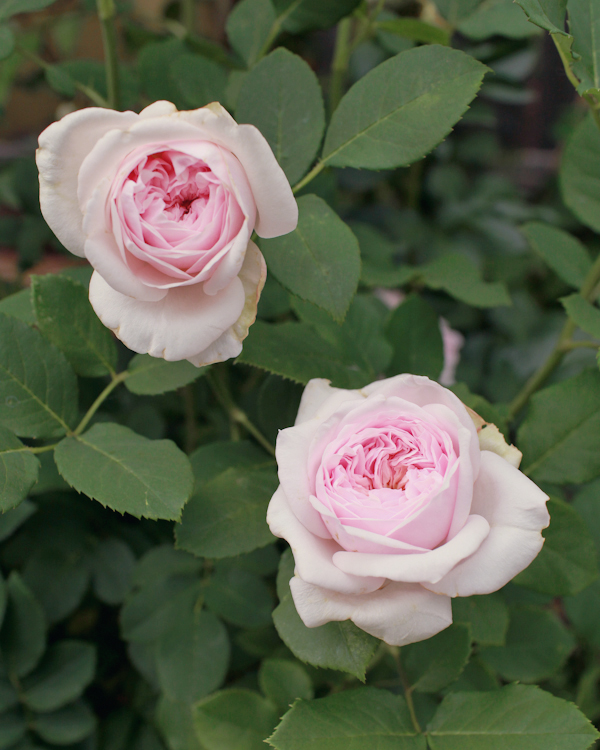
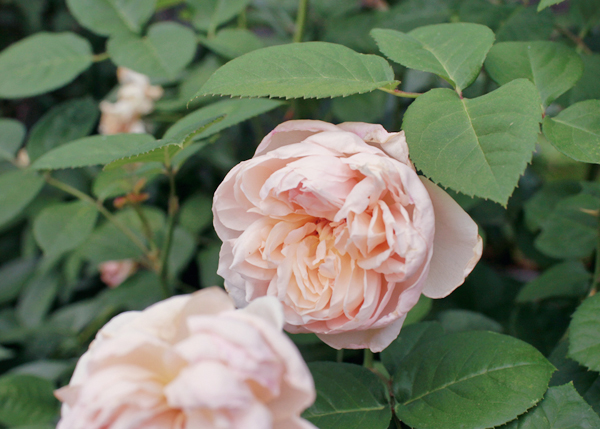
I snapped some more photos a few weeks ago, at the very tail end of peony season, and with the exception of the peonies most of these flowers are still going pretty strong in the garden. We planted a border of pink and purple saliva in the garden bed, and my David Austin rose bushes bloom frequently as long as I deadhead regularly. I planted some impatiens under the rosebushes for a bit of added color, all of which seem to be growing quite happily. There is a small white crape myrtle in the back corner, which has been in bloom the last few weeks and I hope will grow to provide some much-needed shade over the next couple of years. Since these photos were taken, some yellow dinner plate dahlias have grown in around the peonies and are slowly taking over the garden much to my dismay – I need to do more research on (successfully) growing those big monsters!

OSBP-At-Home-Garden-Update-Summer-2014-5

OSBP-At-Home-Garden-Update-Summer-2014-16

OSBP-At-Home-Garden-Update-Summer-2014-19

OSBP-At-Home-Garden-Update-Summer-2014-18

OSBP-At-Home-Garden-Update-Summer-2014-22

OSBP-At-Home-Garden-Update-Summer-2014-7OSBP-At-Home-Garden-Update-Summer-2014-8

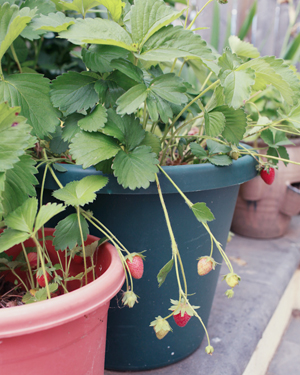
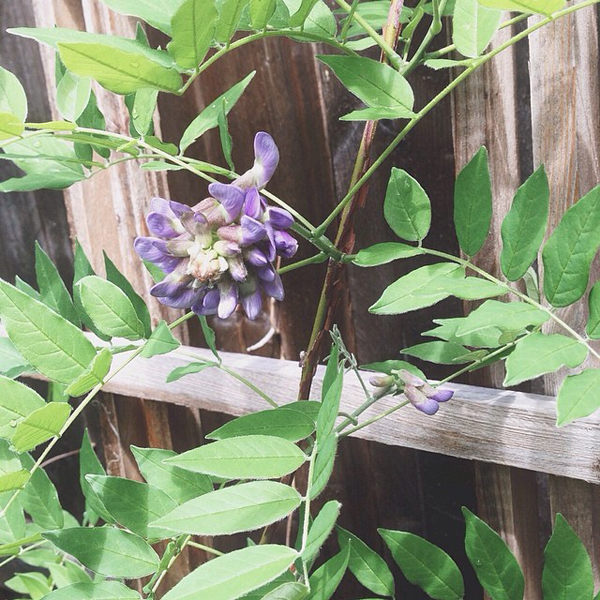
We also have a few potted strawberry plants – Sophie LOVED picking the fresh berries when they were in season. There’s a small bed that runs along the stairs down to our unfinished basement, where I’ve planted a wisteria vine – which surprised me by blooming the tiniest little wisteria this spring! – and a few other partial-sun perennials. I’d love to eventually build a pergola over our back door and train the wisteria to grow over it. I also have a small potted viburnum; I’m waiting for it to get a bit larger before transplanting to its permanent home in the front garden.

OSBP-At-Home-Garden-Update-Wisteria-Instagram

OSBP-At-Home-Garden-Update-Summer-2014-24

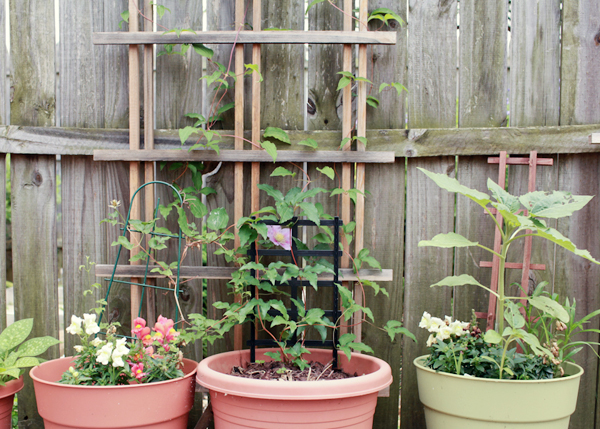
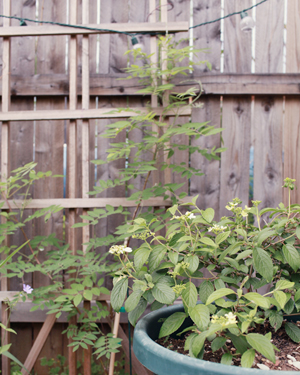
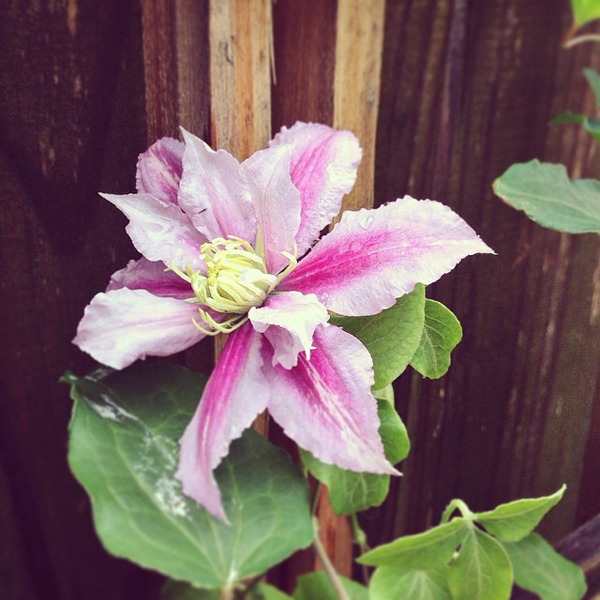
Potted plants along the fence on the opposite side of the backyard. We recently added a few marigolds (to help deter flower-eating pests), a dark purple opal basil plant, and a couple of zinnia for some additional summer color. The clematis vine is one of my favorites in the entire garden. The flowers are so romantic! Future plans for this area include a vertical herb garden and possibly a small vertical vegetable garden – next year!

OSBP-At-Home-Garden-Update-Clematis-Instagram

OSBP-At-Home-Garden-Update-Summer-2014-29

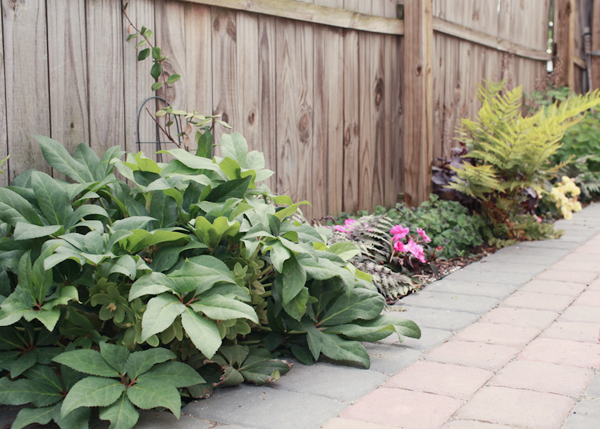
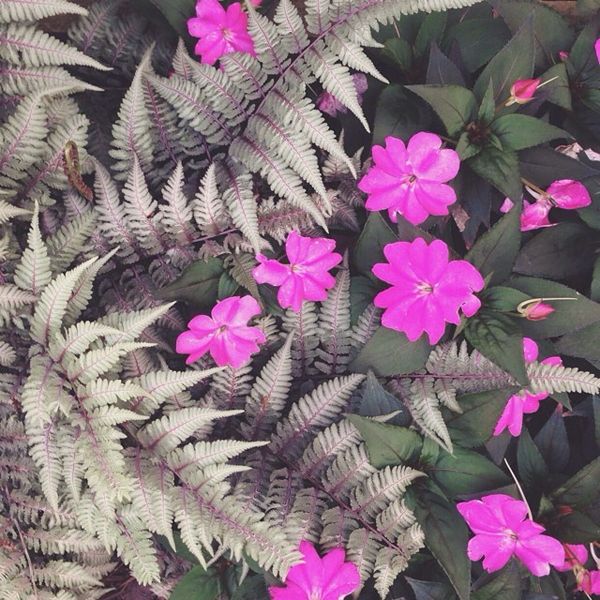
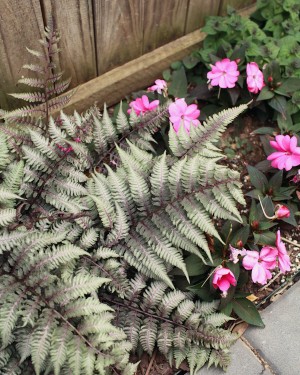
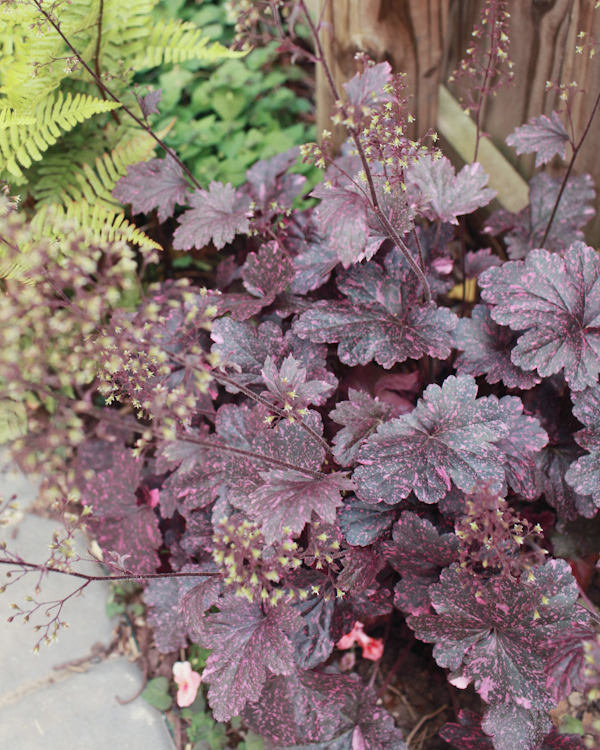
Finally, another small partial sun garden bed that runs along the path next to our garage. I planted a hellebore, some jasmine, a couple of Japanese painted ferns, some impatiens, begonias, purple coral bells, and a bleeding heart all the way in the back (which is now the size of a small hydrangea!). I love love love the combination of the painted fern and impatiens!

OSBP-At-Home-Garden-Update-Japanese-Painted-Fern-Instagram

OSBP-At-Home-Garden-Update-Summer-2014-33OSBP-At-Home-Garden-Update-Summer-2014-36

OSBP-At-Home-Garden-Update-Summer-2014-41

And that’s our garden – at least for the moment! Sadly, along with DC summer heat and humidity, the mosquitos and earwigs have arrived in force. The mosquitos in particular make it difficult to enjoy the backyard for long periods of time, so I haven’t been spending as much time outdoors as I’d normally like to. I’m trying to learn more about garden pest control in general, since I’ve also battled rose slugs and normal slugs in the backyard. We’ve also been contending with an infestation of the horrible-sounding Dead Man’s Fingers in one corner of the garden bed. It pre-dates any of the plants in the garden bed (we started fresh when we moved in last year), so I’m worried there might be some dead tree root buried deep in the soil causing the fungus. Anyone out there have any experience successfully battling Dead Man’s Fingers?? I have so much to learn about gardening!

All photos by me, via my Canon DSLR and via Instagram

Penelope’s Floral Letterpress Baby Announcements

Aaaah! How cute are these red, white, and kraft paper floral birth announcements for a sweet baby girl?!? Created by designer Lauren Chism for her new niece Penelope, the beautiful announcements feature simple letterpress printed text paired with a matte black and white photograph and floral envelope liners. So pretty!

Floral-Letterpress-Baby-Announcements-Lauren-Chism-OSBP

From Lauren: My sister, Carley, and her husband John welcomed their adorable daughter, Penelope, at the end of April and we all couldn’t be more in love with her. As Carley’s ‘personal stationer’ I was dreaming up ideas for the announcements the moment we found out they were having a girl. They are my favorite gift to give friends and family – quite a bit more fun to give than diapers and wipes!

Floral-Letterpress-Baby-Announcements-Lauren-Chism-OSBP2

When it came to the design, Carley was drawn to the clean look and simplicity of letterpress, which is my personal favorite form of printing. Penelope’s nursery incorporated brighter colors of red, blue and yellow with floral details, and I wanted to incorporate those things without being too literal. We ended up going with red letterpress text with a black and white photo, paired with kraft envelopes. The announcements were printed on 118# cotton Savoy and the gorgeous matte photos were attached to each card.

Floral-Letterpress-Baby-Announcements-Lauren-Chism-OSBP4

To balance the minimalist design of the announcement, I created a floral pattern for the envelope liners to add a little playful, feminine element to the suite. When doing custom announcements, I love trying something new, so I decided to have the liners letterpress printed as well. I was so torn about which color way to print: the red and white backgrounds both offered a unique look. With the red background, I love the salty texture and mottled look that resulted from flooding the press with so much ink, but also loved the contrast of white against the kraft envelopes. Indecision won out and I ended up using a mix of both – I still can’t decide which one I like best!

Floral-Letterpress-Baby-Announcements-Lauren-Chism-OSBP6

For the envelopes, instead of my usual go-to washi tape, I closed each with little heart stickers from Thatch and Thistle. They were so cute and tiny – the perfect final touch to the announcements.

Floral-Letterpress-Baby-Announcements-Lauren-Chism-OSBP9

Thanks Lauren!

Design: Lauren Chism

Baby Photography: Photography by Brea

Letterpress Printing: Elefant Press

Lauren Chism Fine Papers is a member of the Designer Rolodex – you can check out more of Lauren’s work right here!

Photo Credits: Lauren Chism Fine Papers

DIY Wedding Reception Table Numbers

Summer brings wedding galore, and for us…that means party decor! We’ve been helping clients create gorgeous day of stationery and in the process have come up with some fun and festive table numbers that you can do yourself! We know that by the time couples usually think about reception stationery, they’re usually over their budget and are short on time. Luckily, these table numbers are not costly or time consuming. You could easily knock them out in an afternoon. There are endless options once you have the basics of creating them…so the only limit to the project is your imagination! We’ll show you three different styles to kick start your creativity. To complete your tablescape, we’ll also show you place cards to complement to each design. – Bailey and Emma of Antiquaria

DIY Tutorial: Wedding Reception Table Numbers by Antiquaria for Oh So Beautiful Paper

Up until adding the actual numbers to the cards, the process is exactly the same. We will be making 5.5″ square tented cards (showing the pattern on both sides) and the size works perfectly with a standard 8.5″ x 11″ piece of card stock.

DIY Tutorial: Wedding Reception Table Numbers by Antiquaria for Oh So Beautiful Paper

Step One: Select your paper and cut the cards to size. Cut a rectangle measuring 5.5″ x 11″. If you’re using a standard sheet of paper like we did, that is only one cut (since the length is already 11″).

DIY Tutorial: Wedding Reception Table Numbers by Antiquaria for Oh So Beautiful Paper

Step Two: To make the tented card and have a clean fold, you’ll want to score the paper at the 5.5″ mark on a score board. Repeat steps one and two until you have enough cards to accommodate all of your tables (usually between 8-25 for a standard wedding).

Option One: Painted Script Floral

For the first version that we put together, we used our “Paloma” Blue Floral Card Stock and painted the table numbers (spelled out) in navy blue acrylic paint. The effect is playful and traditional at the same time.

DIY Tutorial: Wedding Reception Table Numbers by Antiquaria for Oh So Beautiful Paper

With a small pointed paint brush, write out the table number in cursive across the middle of the card. Go back over the letters, adding weight to the lines (as shown above). If you need help finding out where the weights should go or what shape to paint the letters, refer to a favorite script font or perhaps your invitation suite! That way, everything will coordinate.

DIY Tutorial: Wedding Reception Table Numbers by Antiquaria for Oh So Beautiful Paper

DIY Tutorial: Wedding Reception Table Numbers by Antiquaria for Oh So Beautiful Paper

Option Two: Modern Neon Geometric

In this interpretation, we’ve put a modern spin on the technique. We used our “Geo” patterned card stock and wrote the number in a simplistic style to create the look. Pops of neon pink painted on help add some punch to the cards.

DIY Tutorial: Wedding Reception Table Numbers by Antiquaria for Oh So Beautiful Paper

First you’ll write the table number in the center using a permanent black marker. Fill in and bulk up the number as needed (shown above).

DIY Tutorial: Wedding Reception Table Numbers by Antiquaria for Oh So Beautiful Paper

Next you’ll add the final touch of neon using hot pink gouache. We painted into different shapes already printed on the paper making sure they all balanced with one another.

DIY Tutorial: Wedding Reception Table Numbers by Antiquaria for Oh So Beautiful Paper

DIY Tutorial: Wedding Reception Table Numbers by Antiquaria for Oh So Beautiful Paper

Option Three: Autumn Garden Floral

For our final interpretation, we used our “Diana” floral card stock to create the perfect garden inspired table decor. The gorgeous rich shades of the pattern mean that this style would just as easily work for fall and winter weddings.

DIY Tutorial: Wedding Reception Table Numbers by Antiquaria for Oh So Beautiful Paper

With a small pointed paint brush, paint the word “TABLE” about 1 inch from the fold with white acrylic paint. Below that, in cursive, paint the word “Number,” trying to center it as much as possible. Finally, you’ll add the numeral centered below. Go back over the number, adding weight to the lines (as shown above). It would be extremely helpful to have these cards planned out on a separate sheet of paper before painting on the lettering. That way, you can know exactly how to center the text, and how large you should make it.

DIY Tutorial: Wedding Reception Table Numbers by Antiquaria for Oh So Beautiful Paper

TableNumberDIY-Diana-Placecard-2

TableNumberDIY-Diana-Final-2

Materials

Patterned Paper

Self Healing Mat

Craft Knife

Metal Ruler

Scoreboard

Acrylic paints

Permanent Marker

Anti­quaria is a mem­ber of the Designer Rolodex – you can see more of their beau­ti­ful work right here!

Photo Credits: Antiquaria for Oh So Beautiful Paper