Inspiring Calligraphers: Sable and Gray Paper Co.

Hello everyone! I have something light and bright to share with you, and of course, it comes in the way of paper inspiration. We’re focusing on the work of Kristin Hussey, a calligrapher who runs Sable & Gray Paper Co. I think you’re going to love this uplifting inspiration as we take a peek at her lettering work. Let’s dive in! – Jen

Inspiring Calligraphers: Sable & Gray

Photo Credit: Tifani Lyn Photography

From Kristin: I got my degree in Architecture, and after I graduated from school, I worked for a firm that I had dreamed of working at. It was fascinating and such a great opportunity, but I didn’t realize the reality of being a modern-day architect until I was working there: it had become a very computer-driven career with all of the models and drawings being done in computer programs. I really missed working with my hands so I decided to try out a different career path that would be more hands-on. So I got a job at a florist, which was just the change I needed. While I was working there, the florist merged with a stationery company, and asked if I would take over the custom stationery designs since I had a background in design, and I completely fell in love.

Inspiring Calligraphers: Sable & Gray

Photo Credit: Luxlight Photography

About a year later I went off on my own and started Sable & Gray, which has been such a beautiful adventure. I try to make each invitation a real work of art, incorporating as many hand-crafted details as possible. It only felt natural to learn calligraphy as well so I wouldn’t need to rely only on predesigned fonts. I took a calligraphy course from Molly Jacques (who is a true modern calligraphy legend!) about 4 years ago and never looked back!

Inspiring Calligraphers: Sable & Gray

Photo Credit: Luxlight Photography

I’ve developed my calligraphy style over the past four years with a goal to create a look that is elevated, yet approachable (and also legible!). I’ve looked up to other calligraphers like Molly Jacques (who taught me pointed-pen calligraphy) and Jenny Sanders (who is just amazing), but have tried to develop a style that is uniquely my own.

Inspiring Calligraphers: Sable & Gray

Photo Credit: Elizabeth Laduca Photography


Here’s a peek at Kristin in her element:

Inspiring Calligraphers: Sable & Gray

Photo Credit: Corey Weber Photography

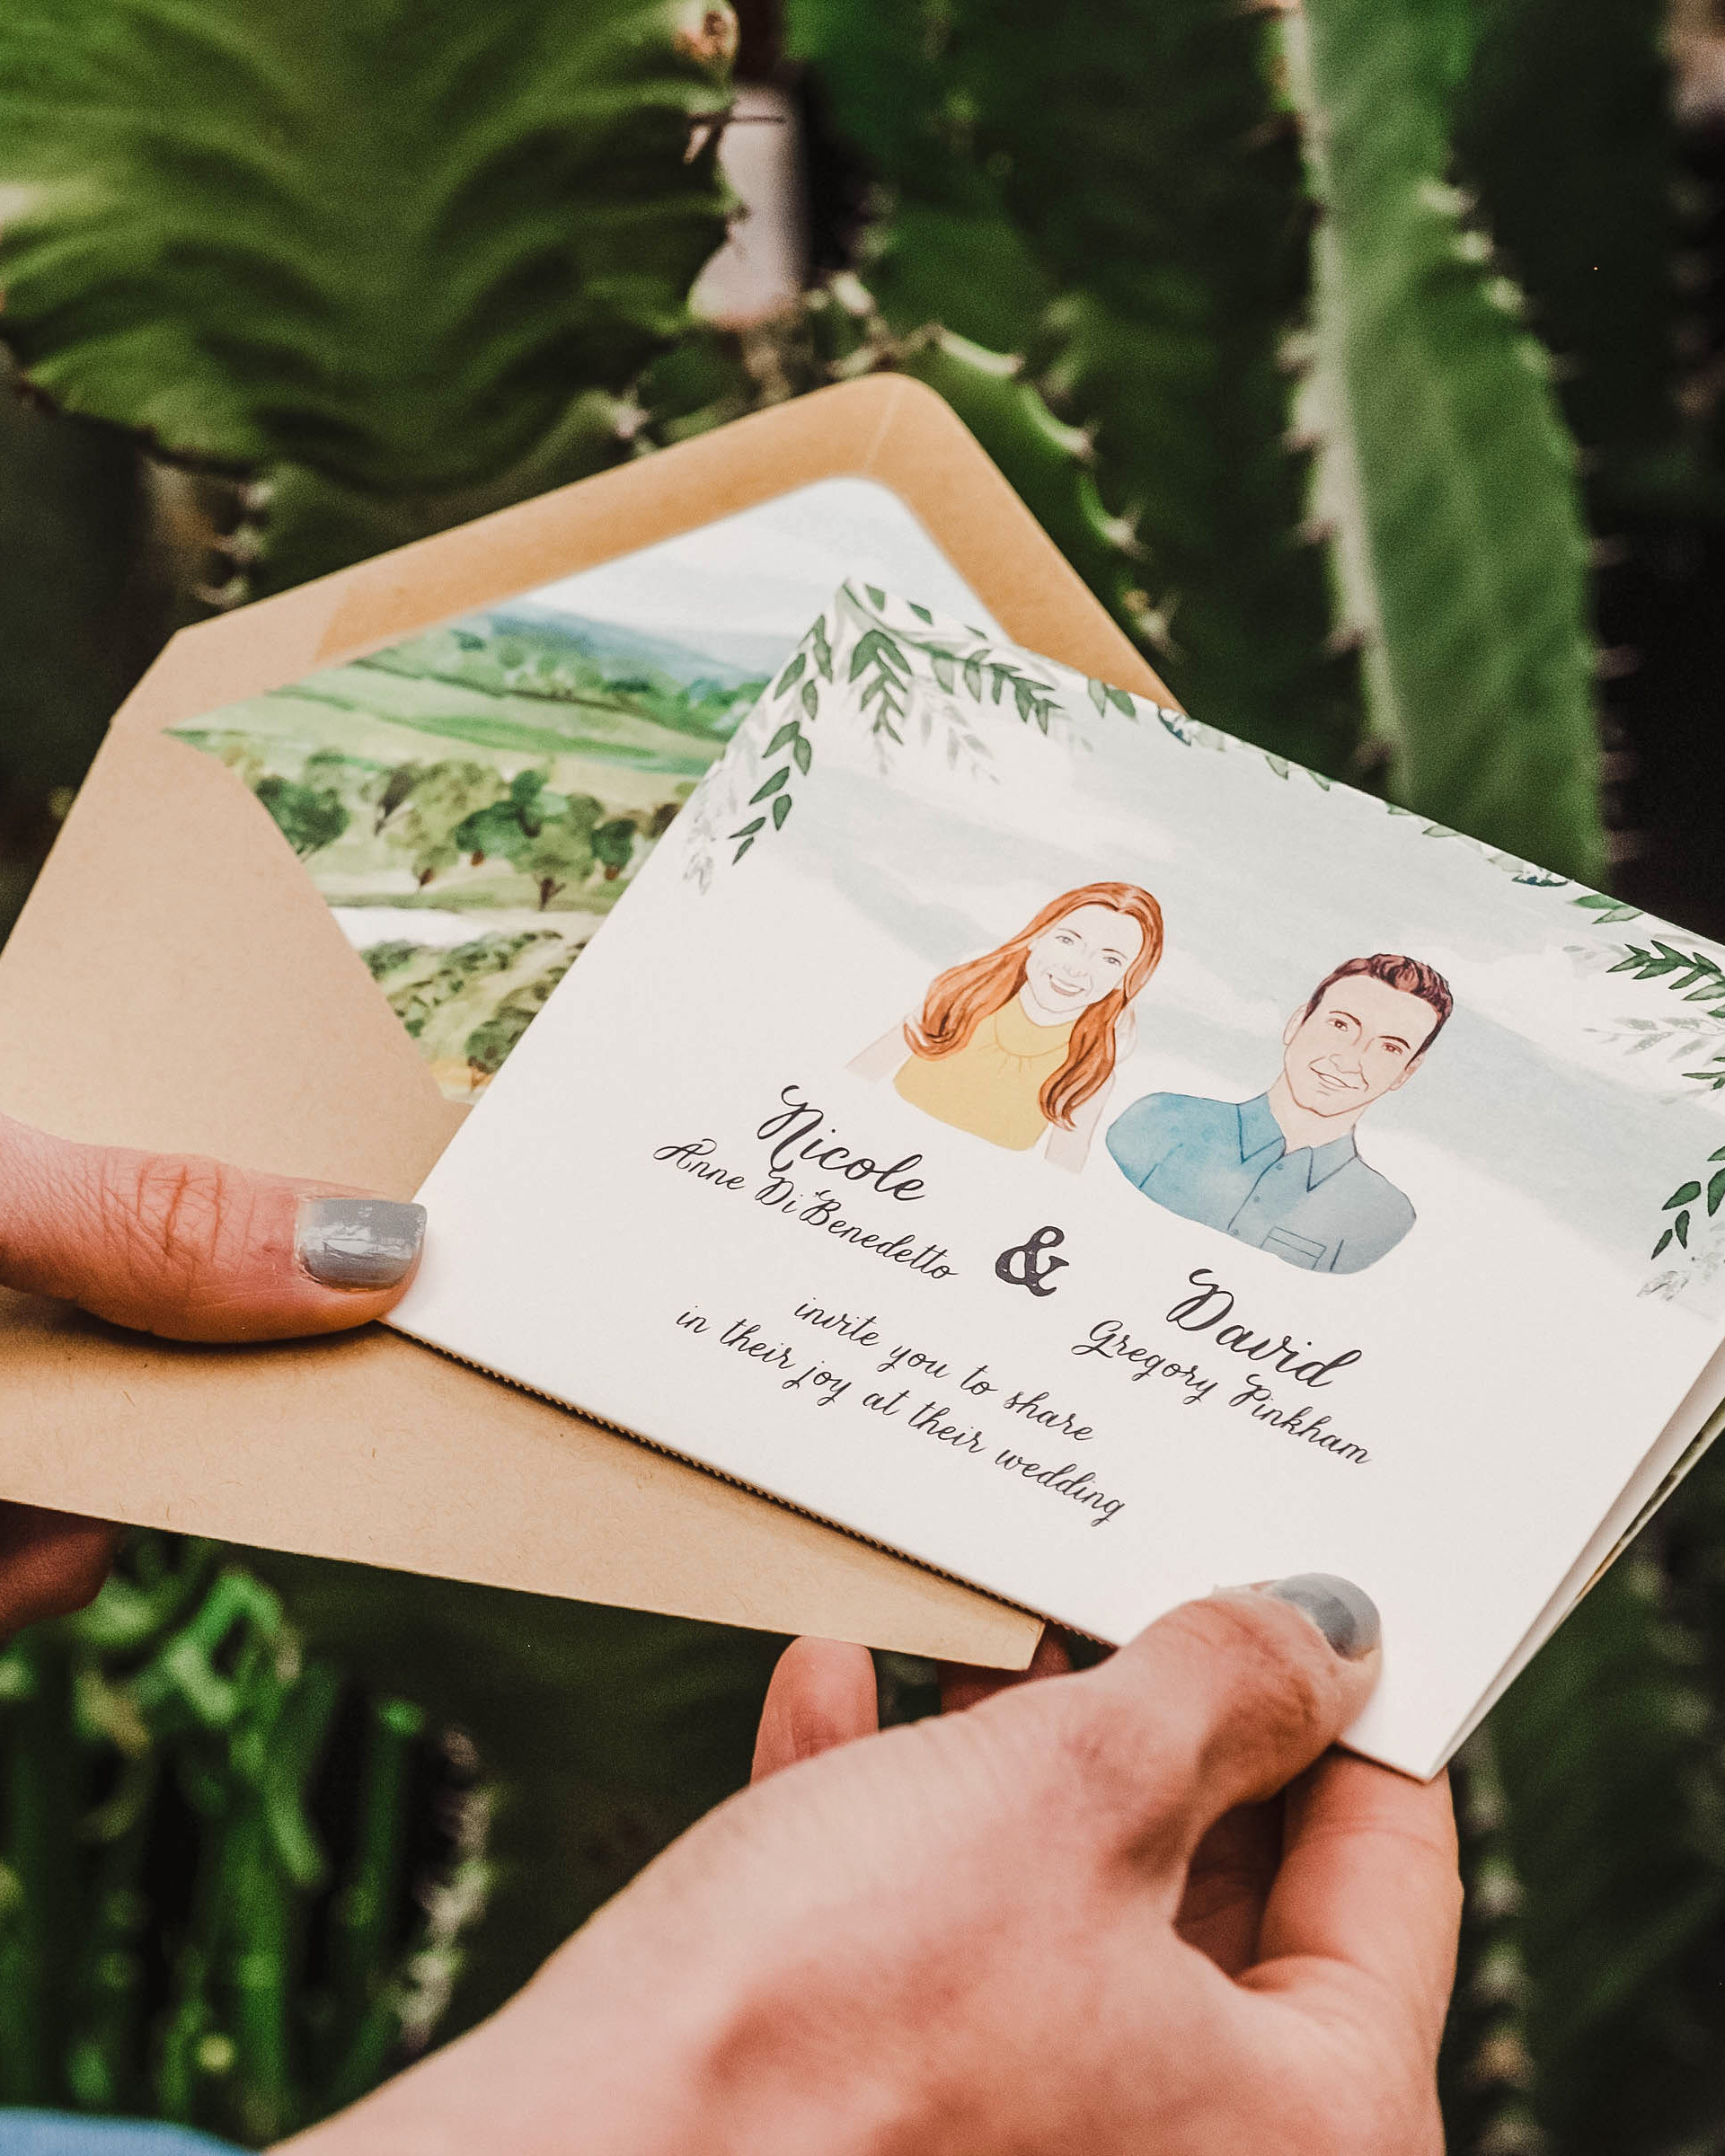
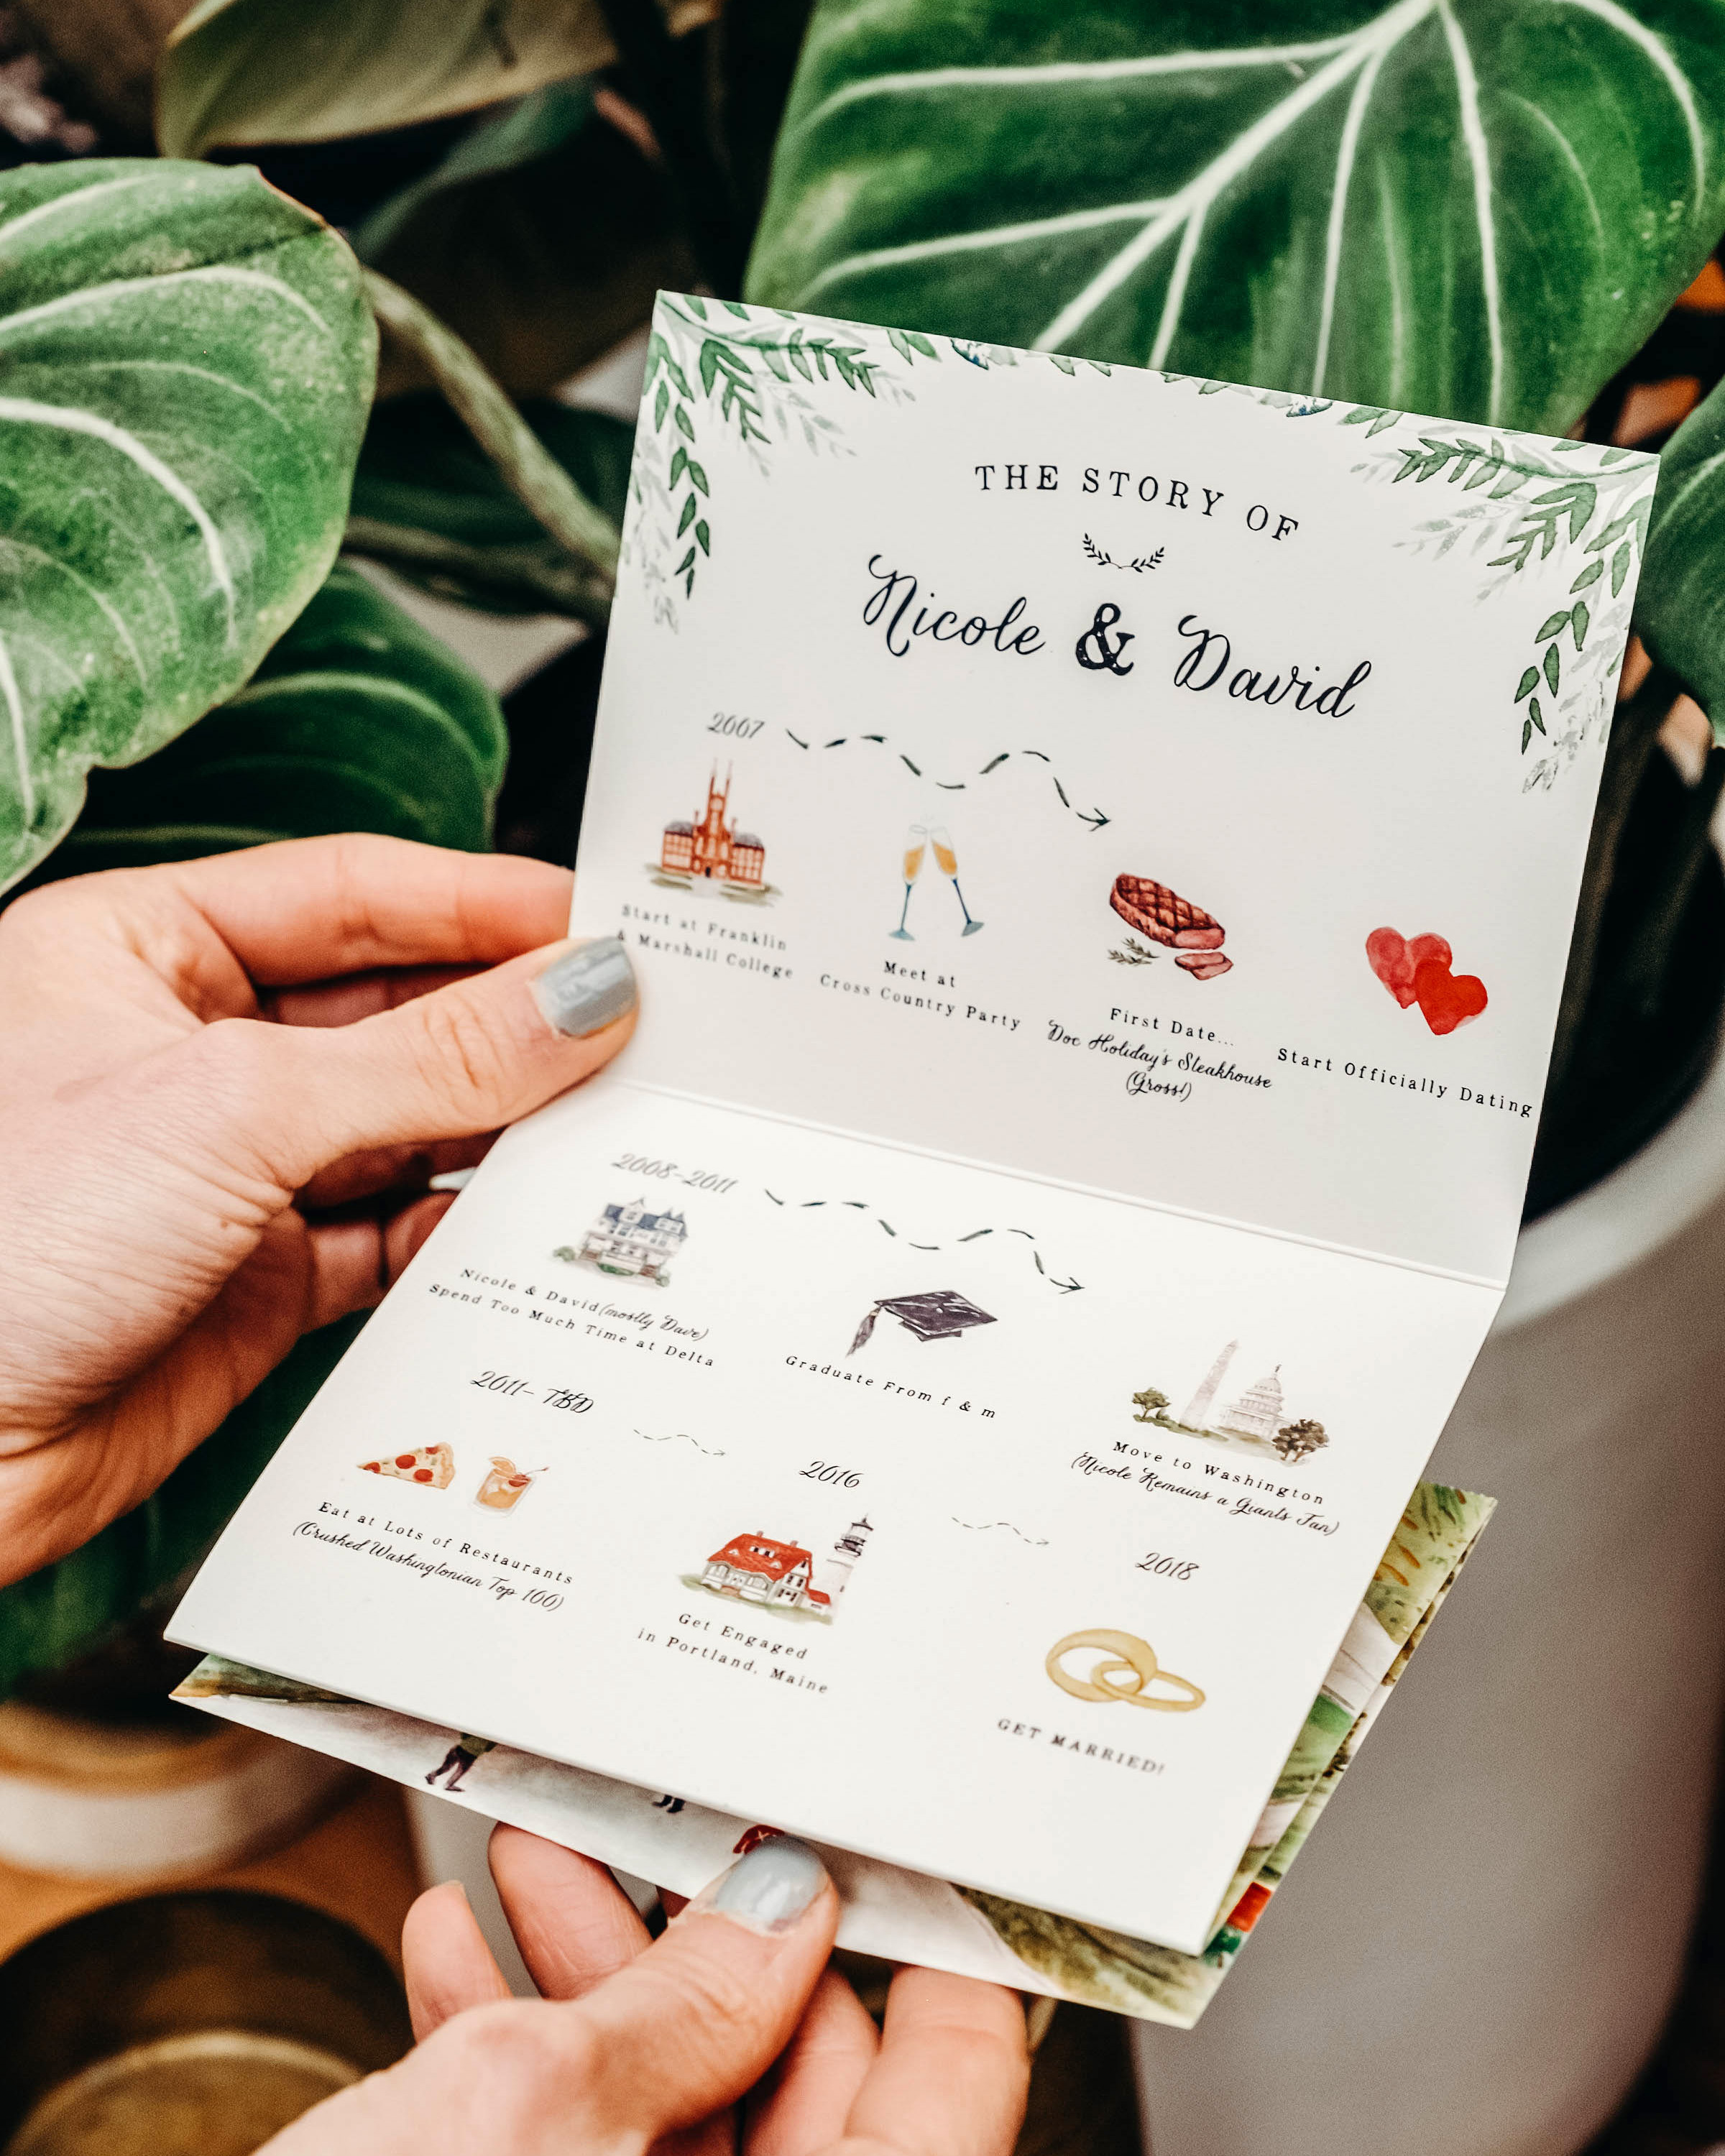
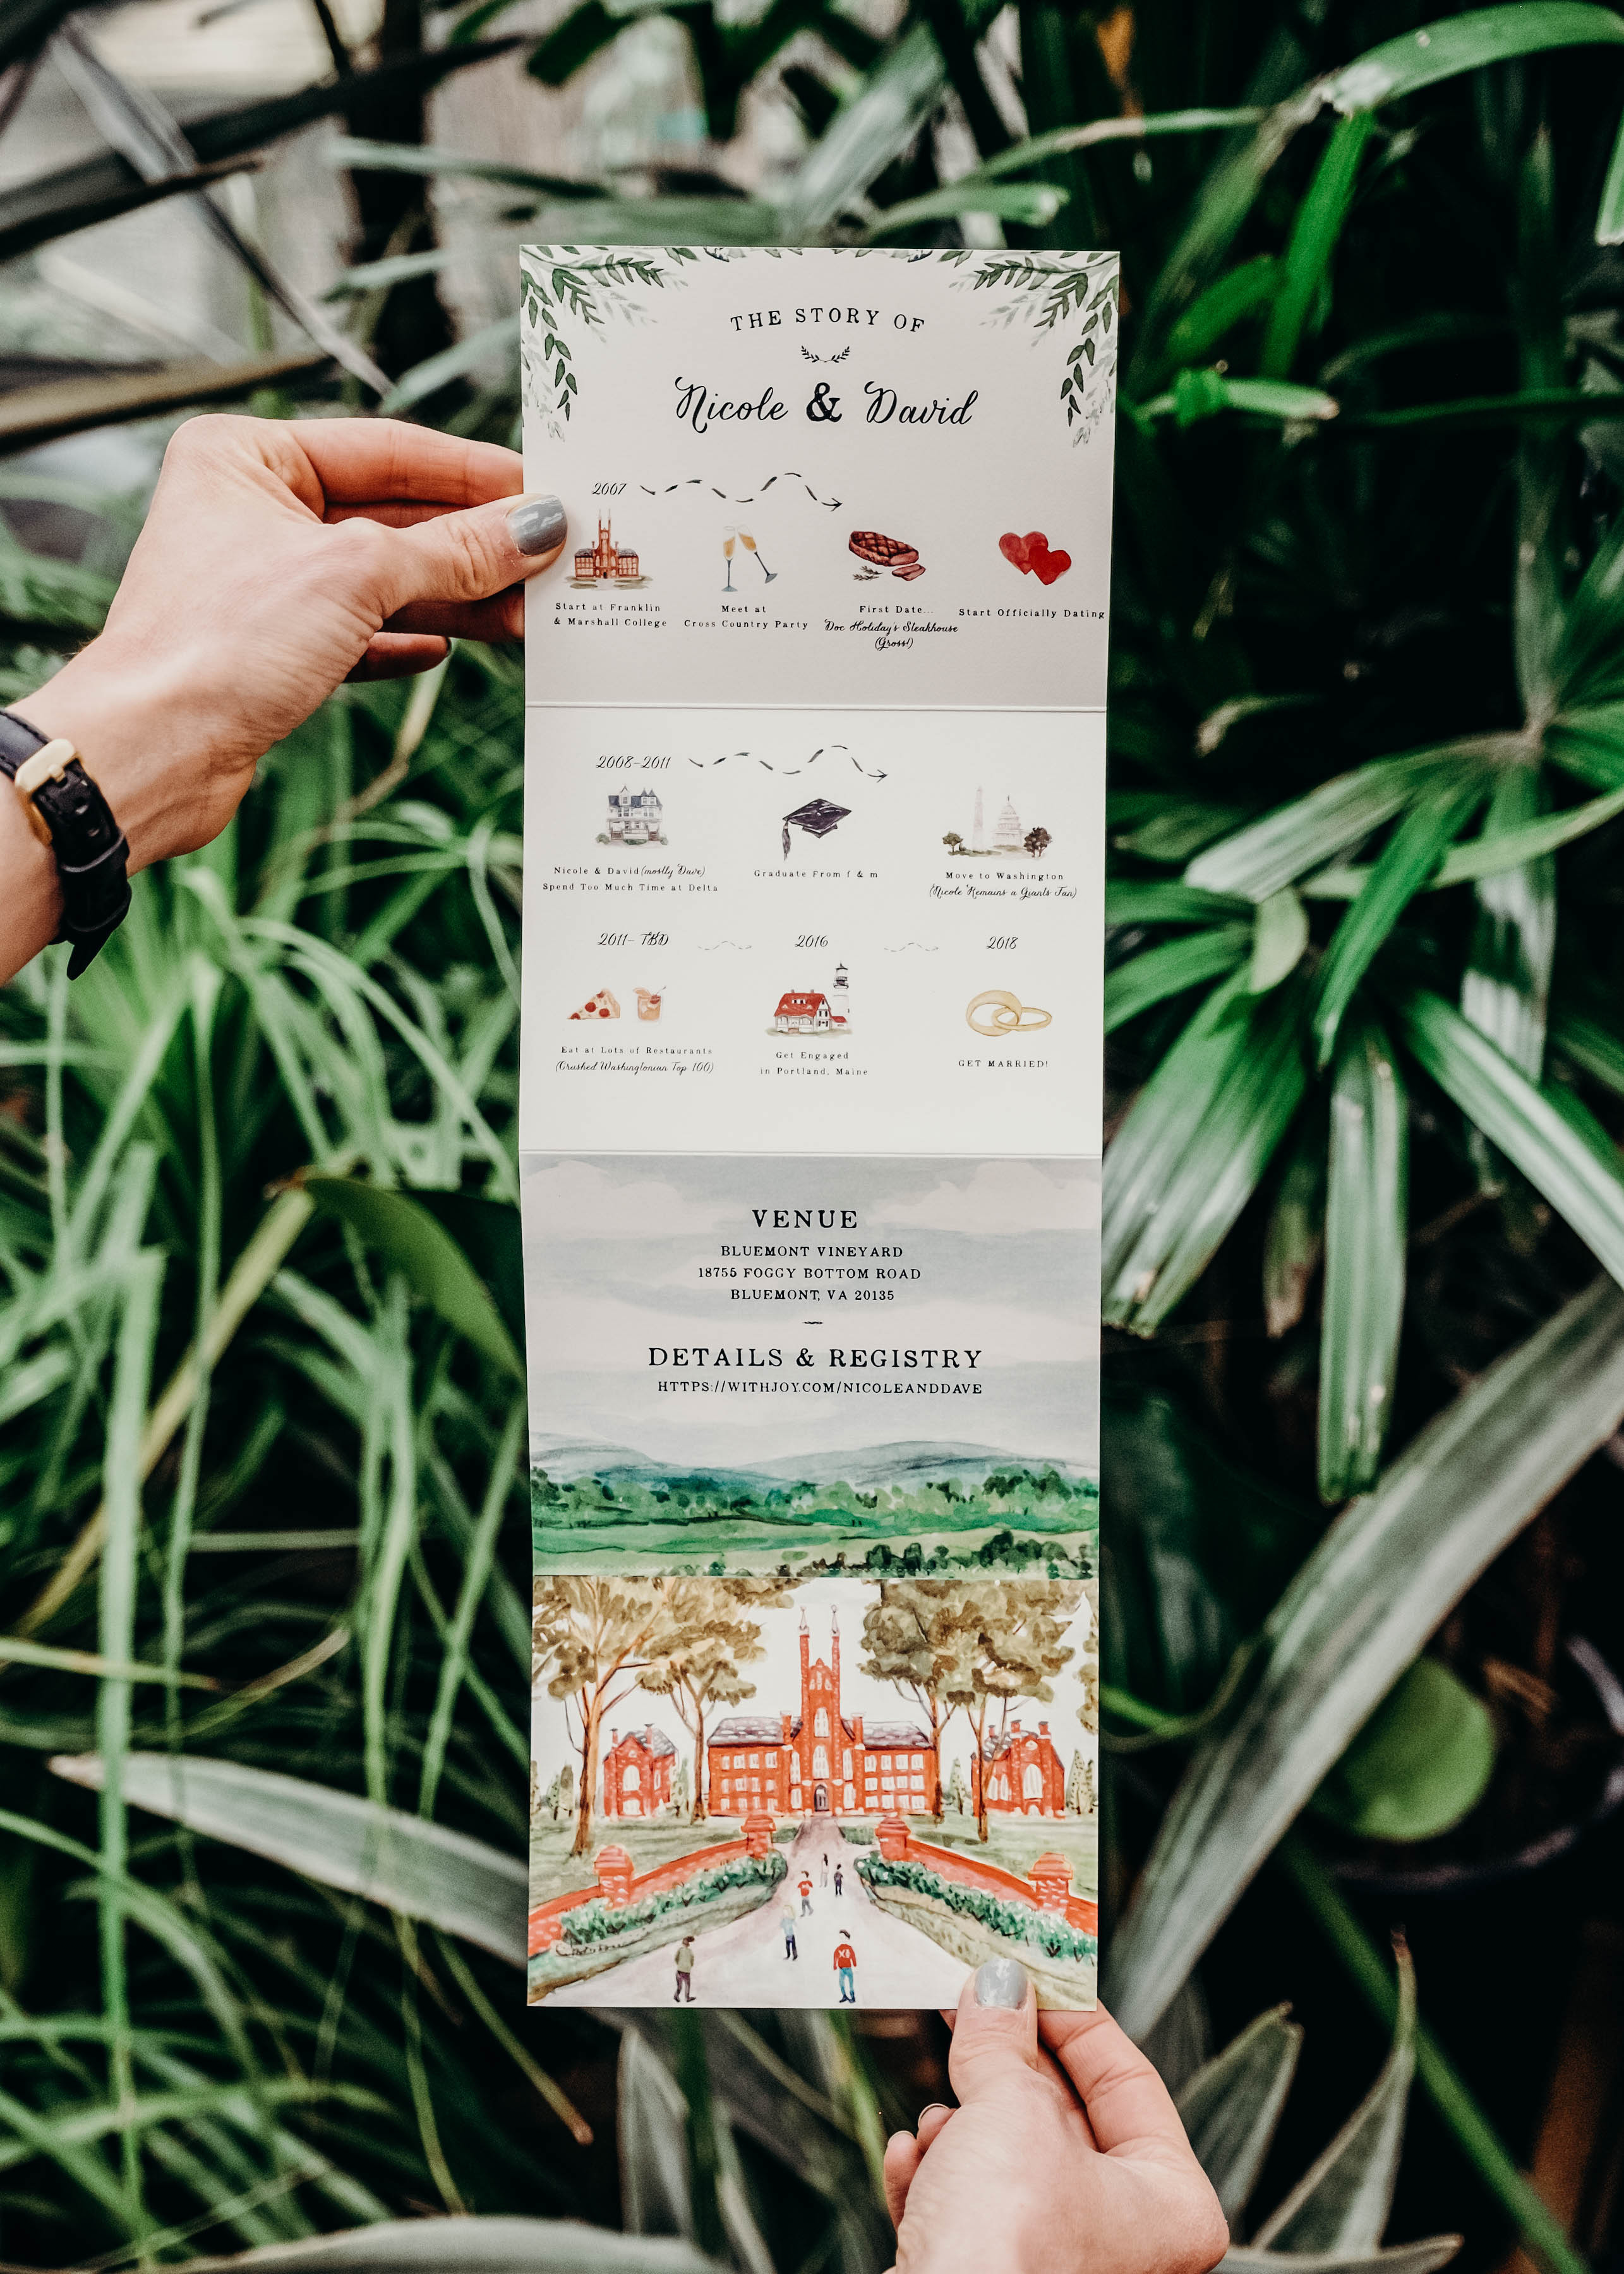
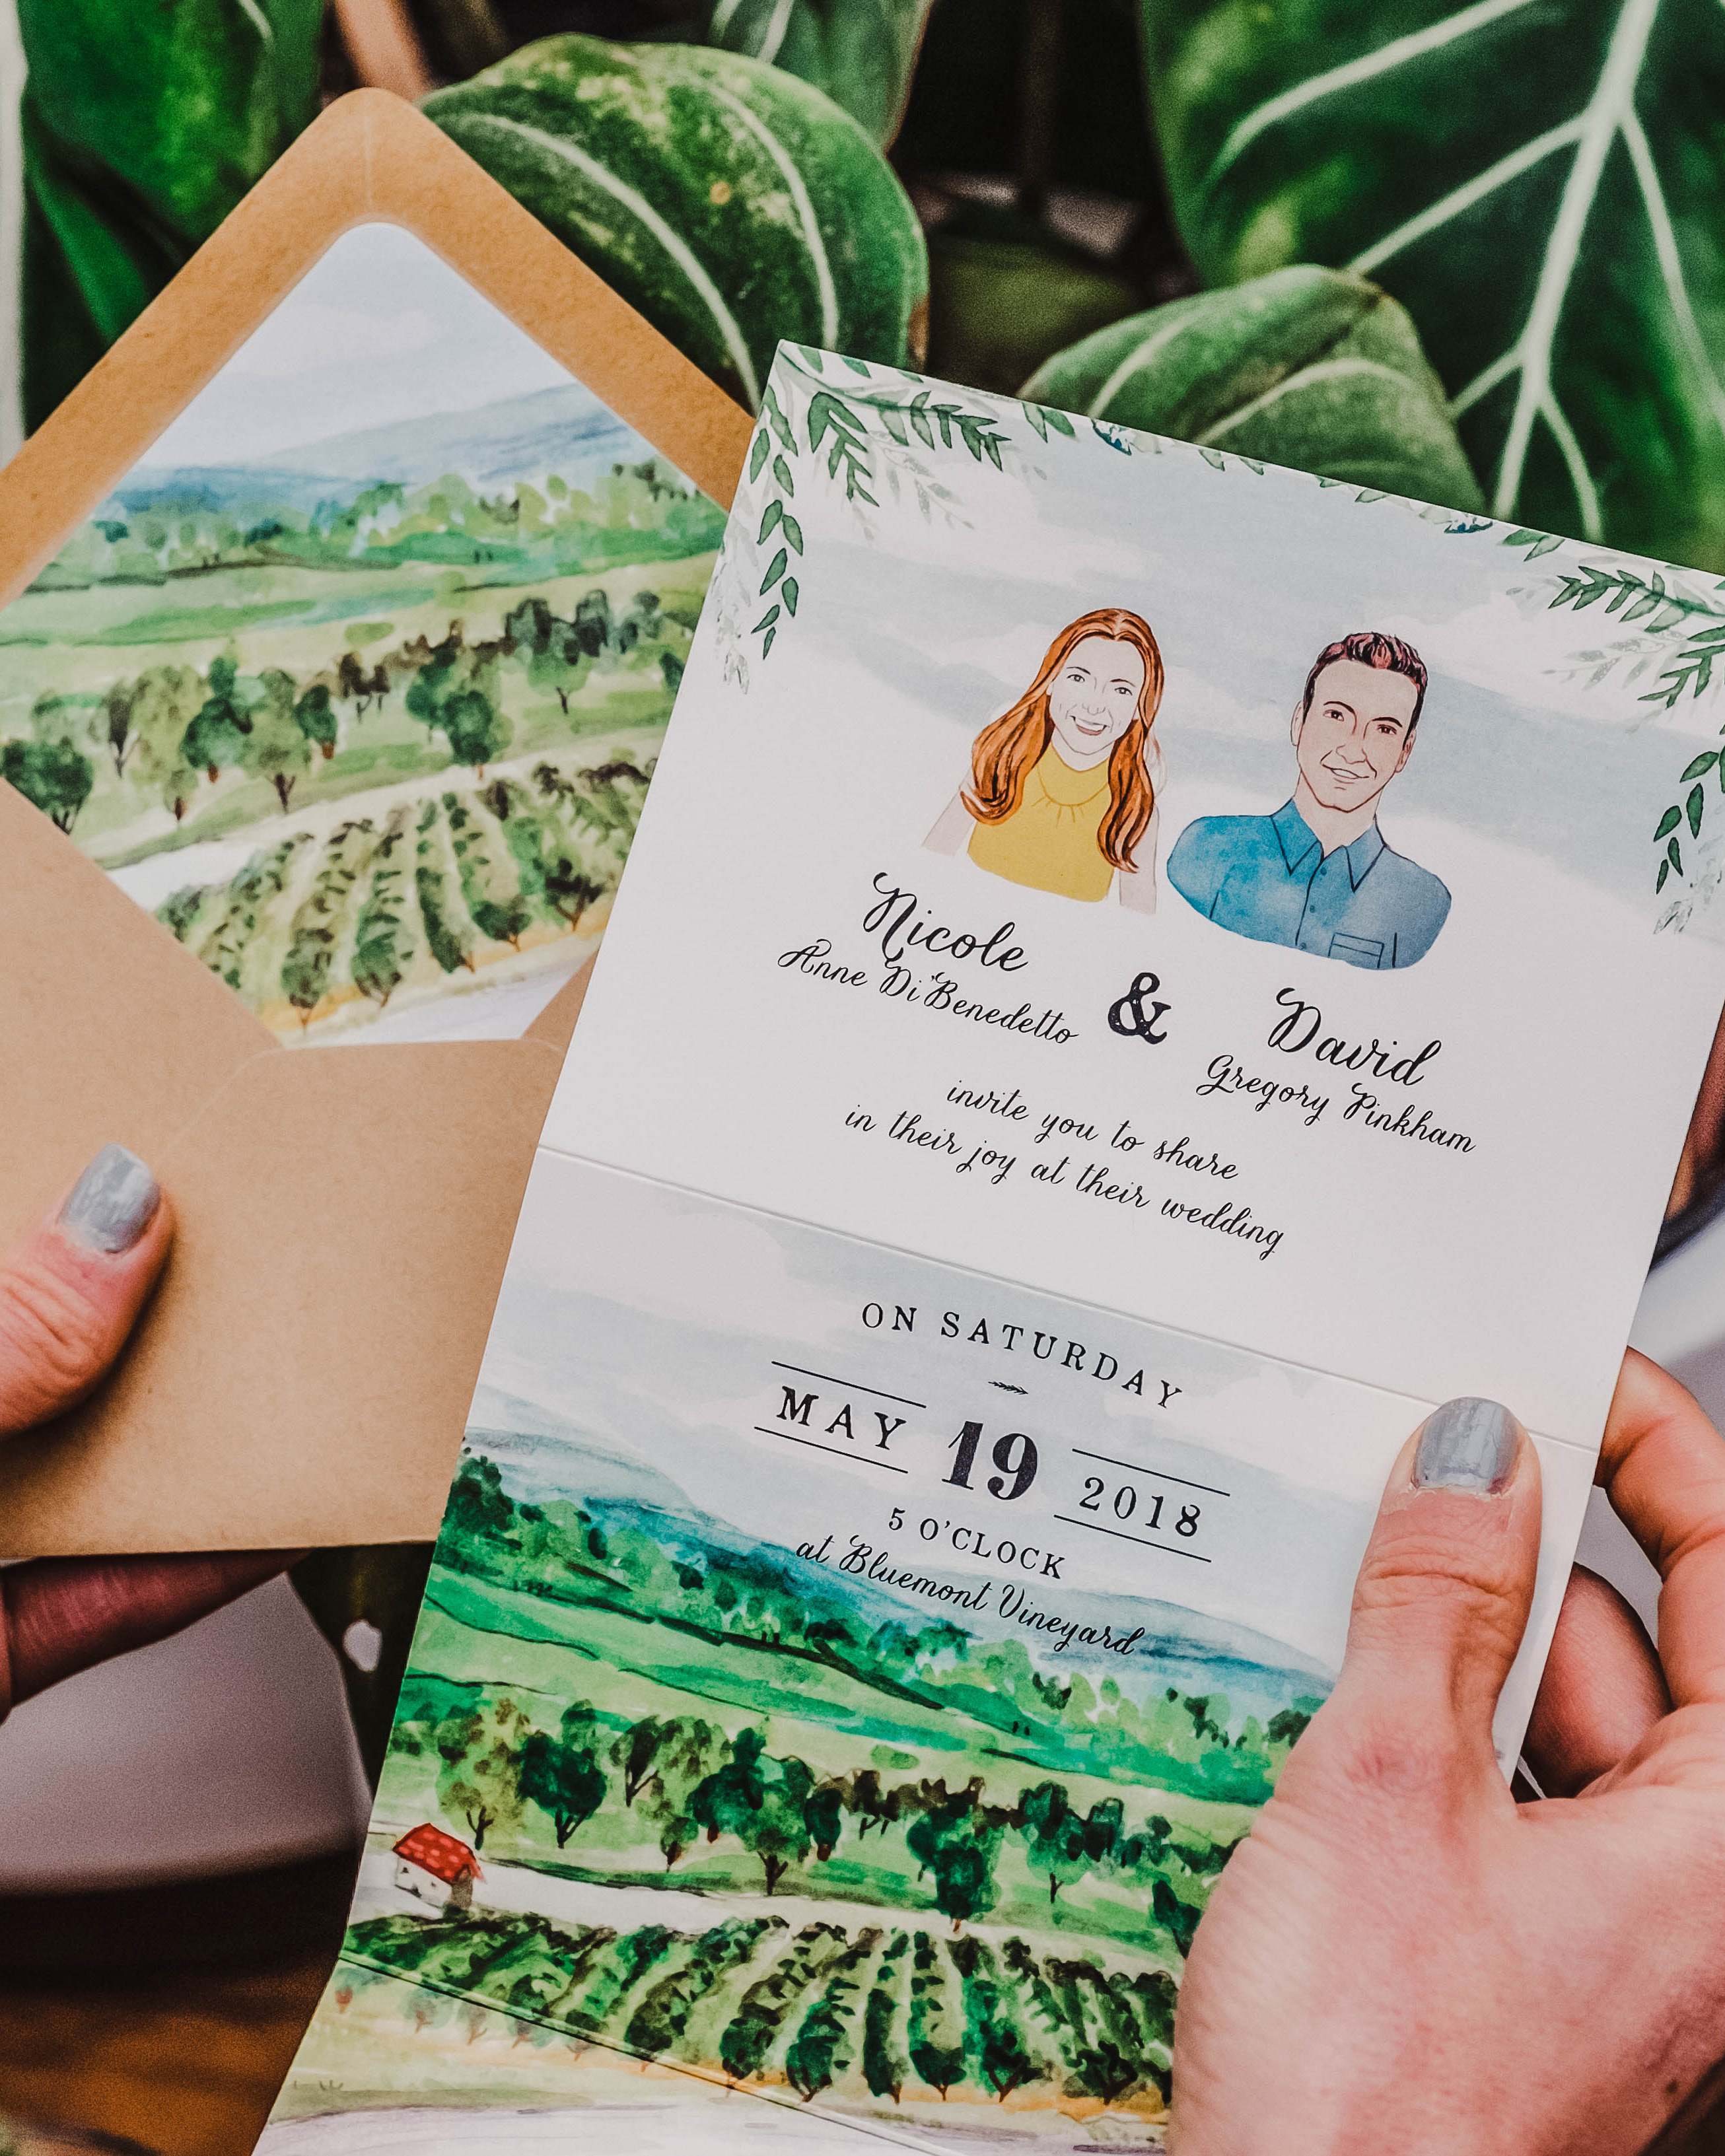
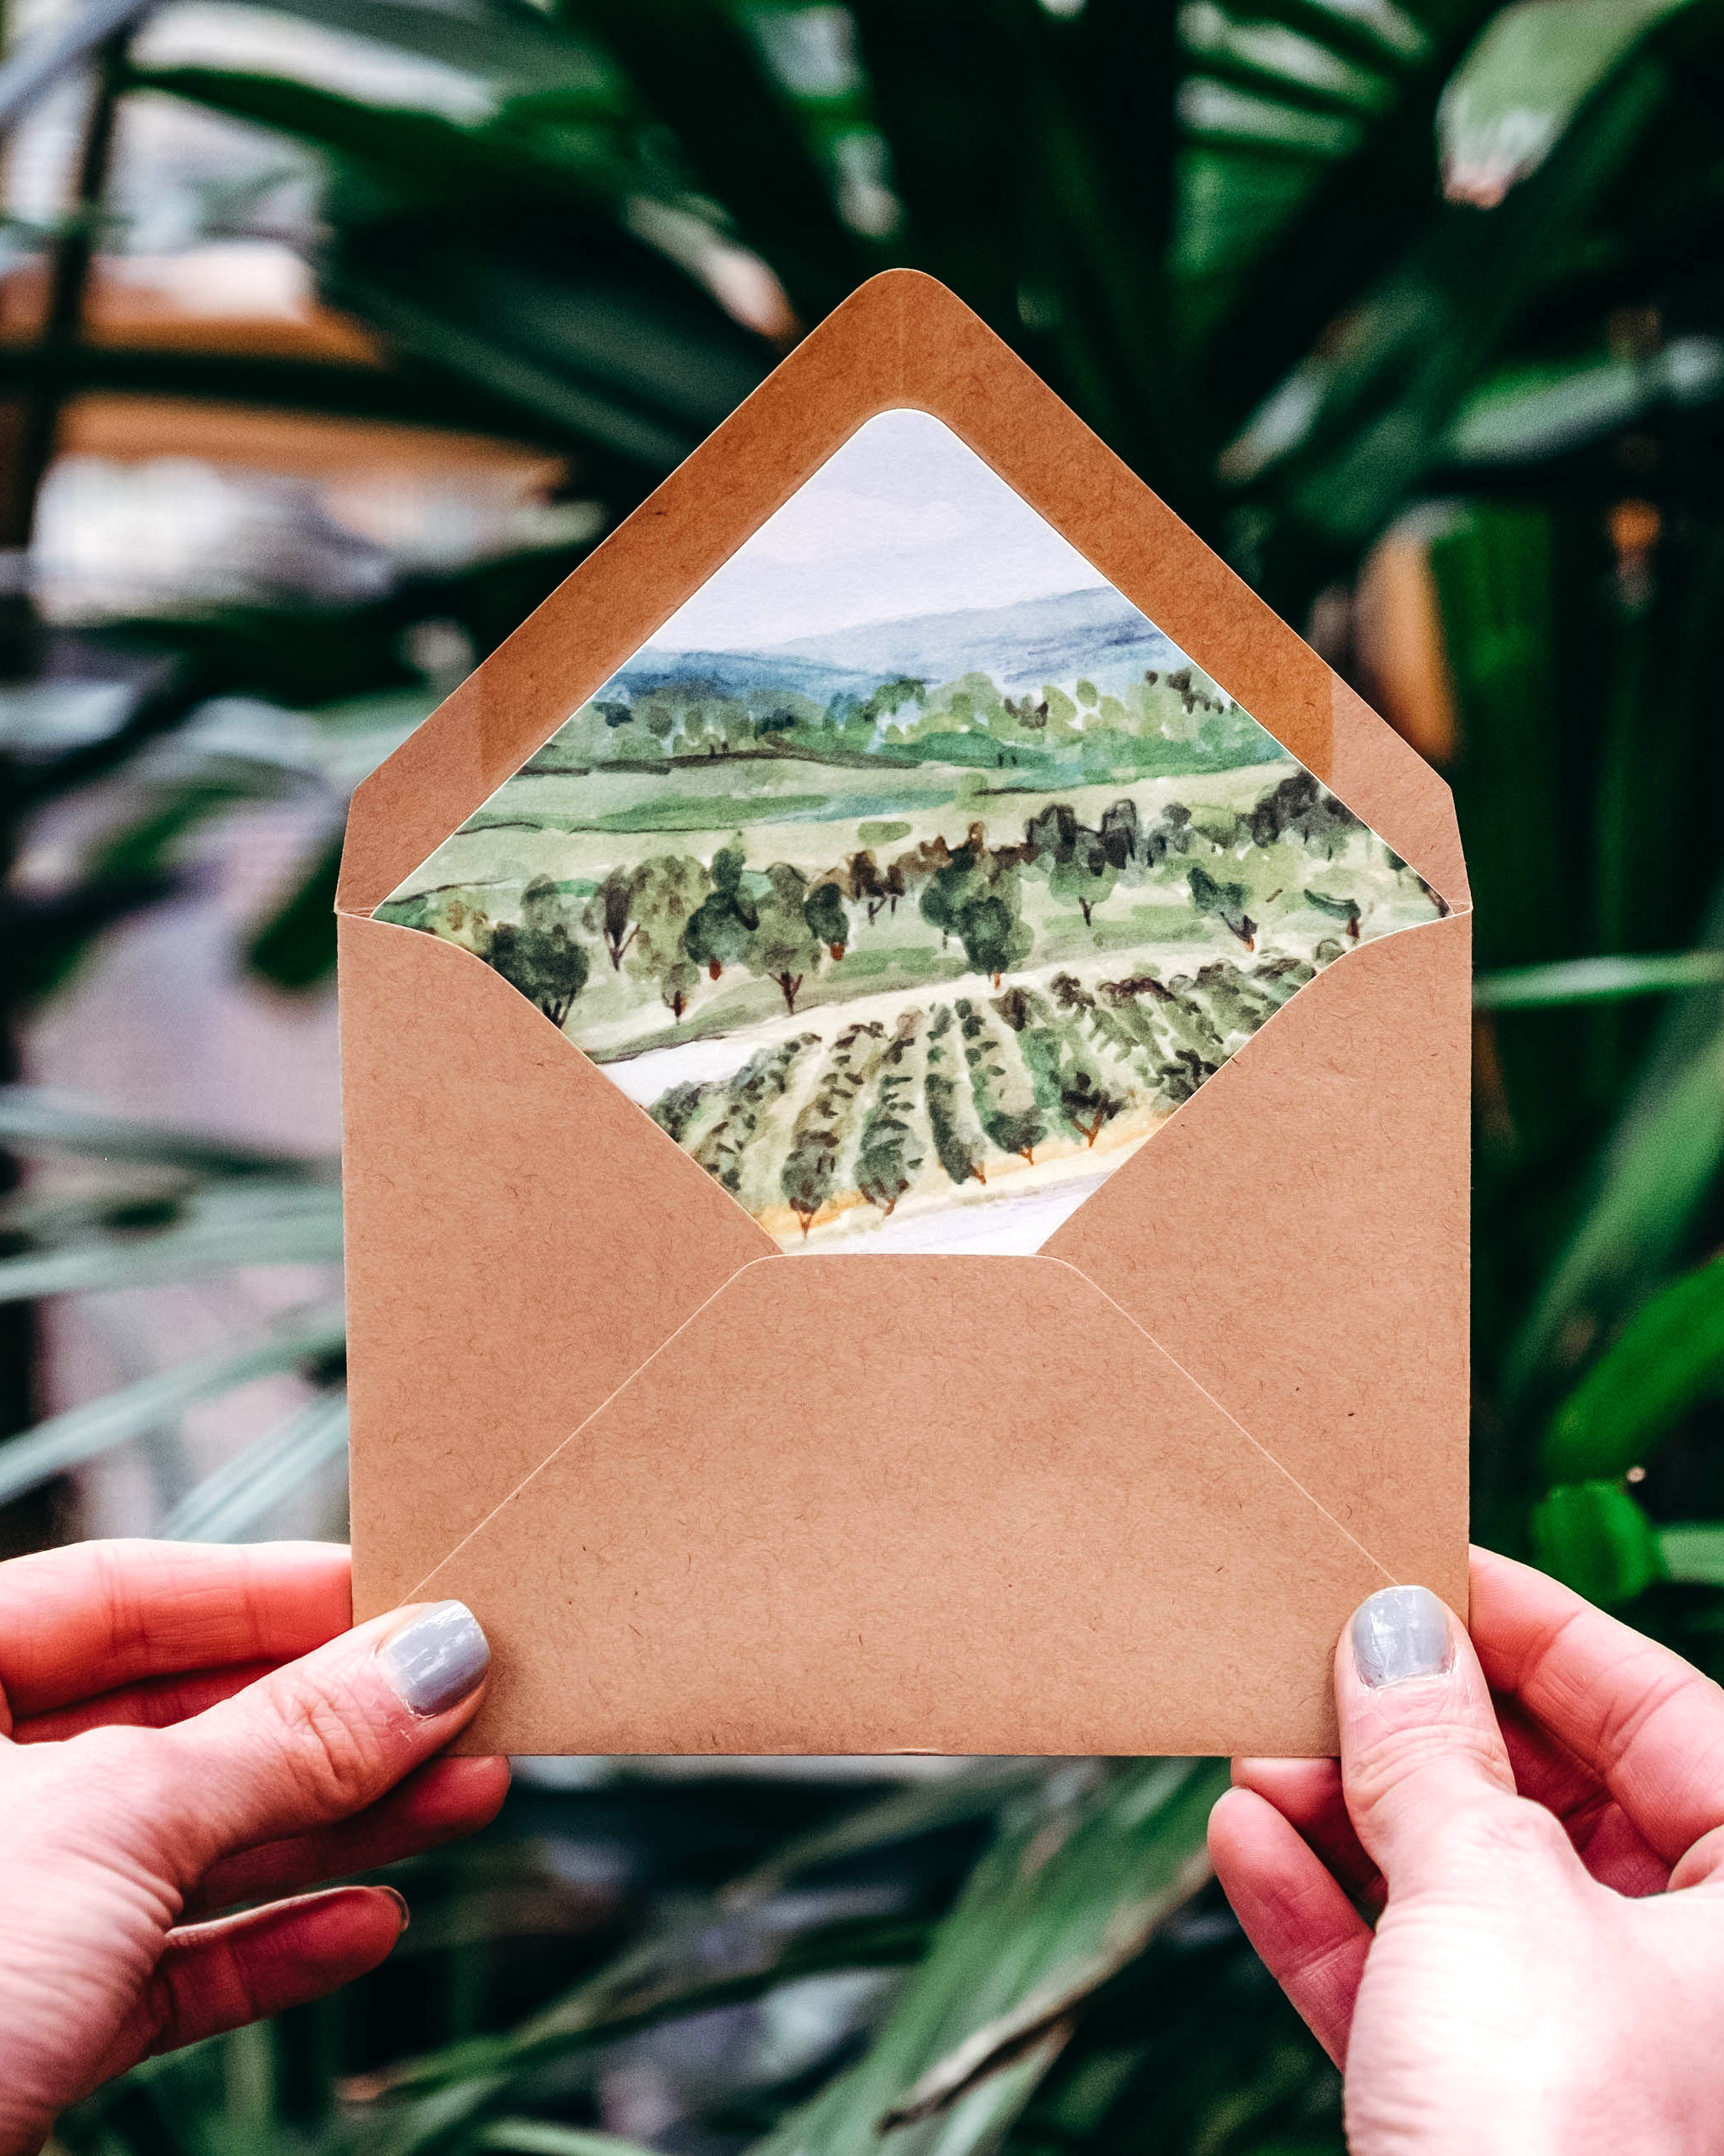
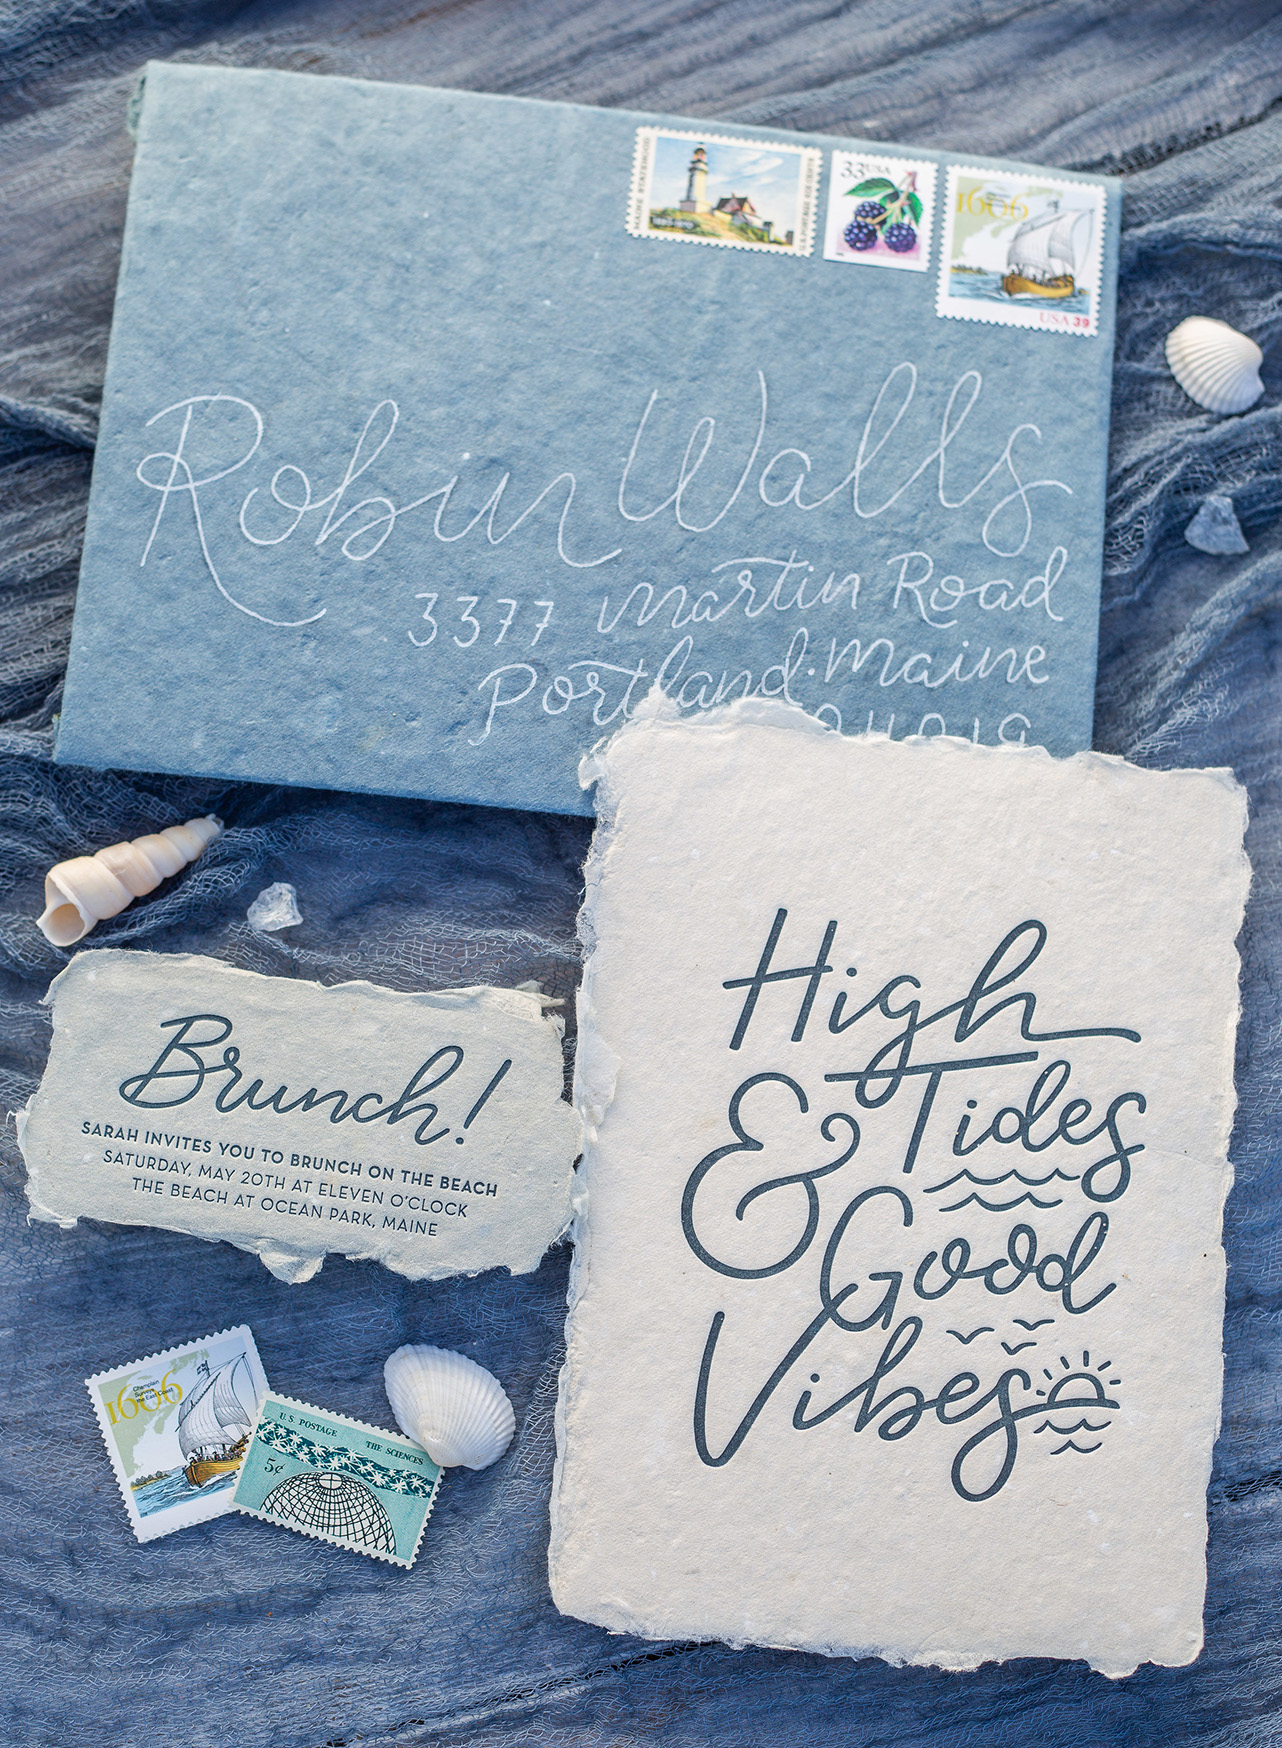
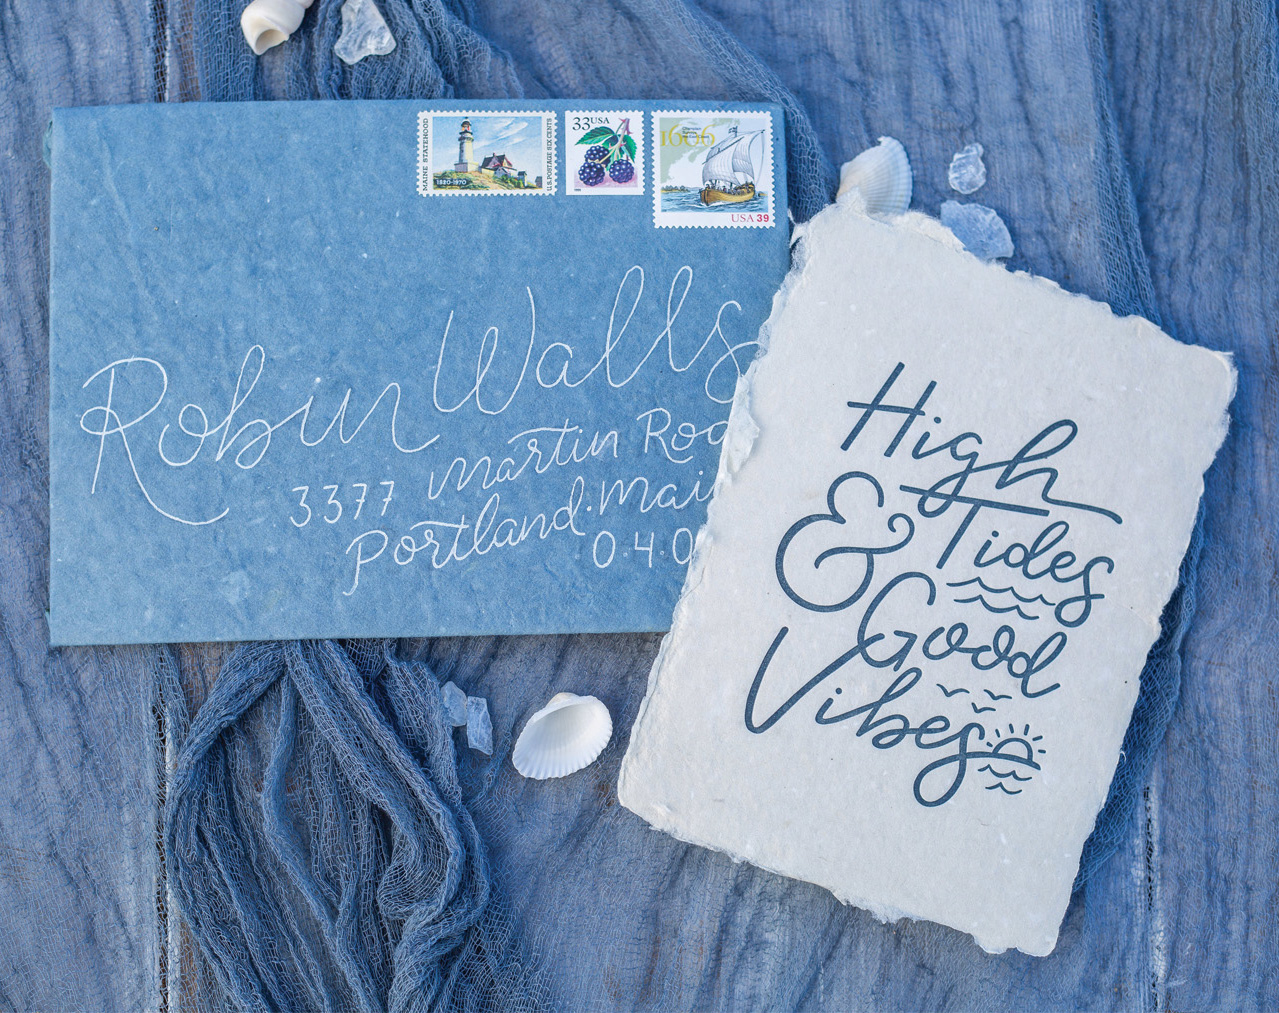
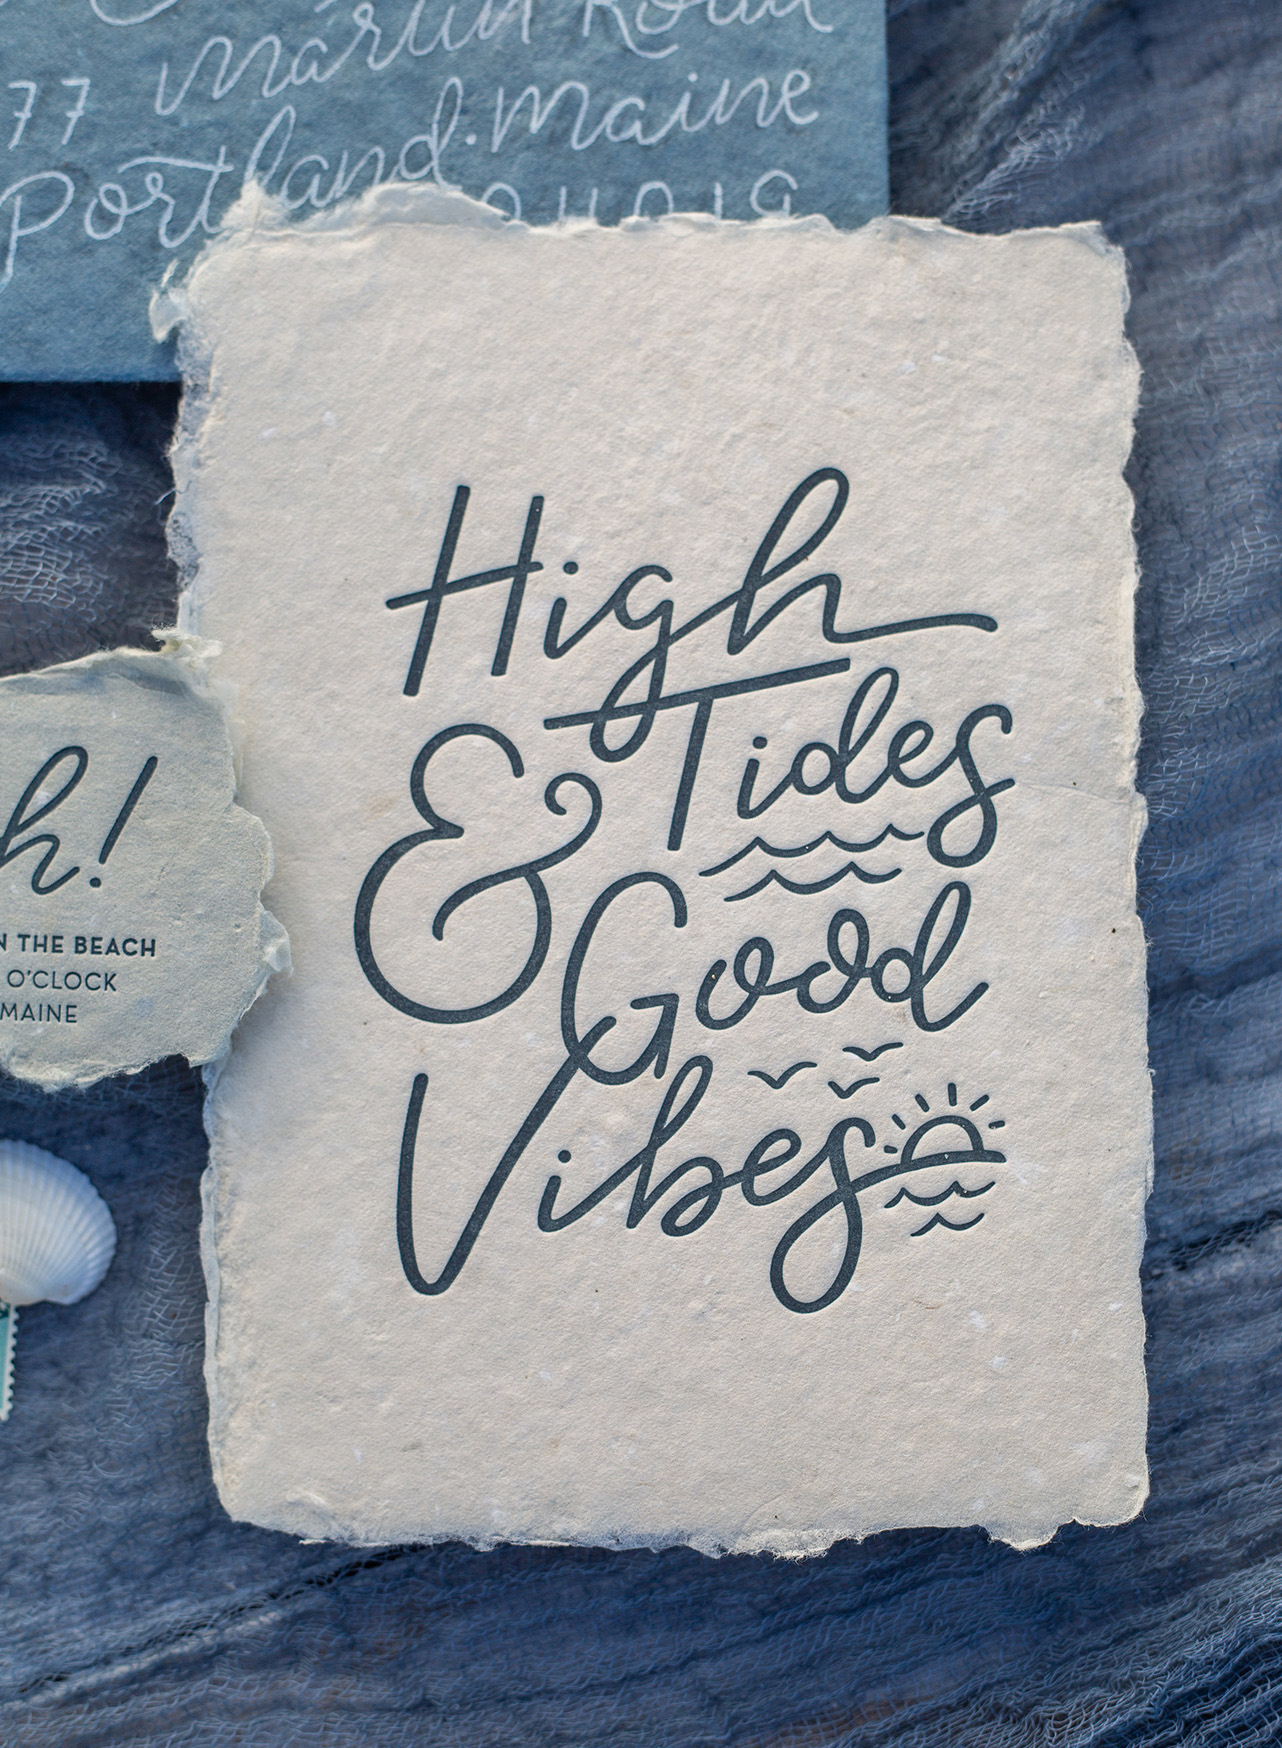
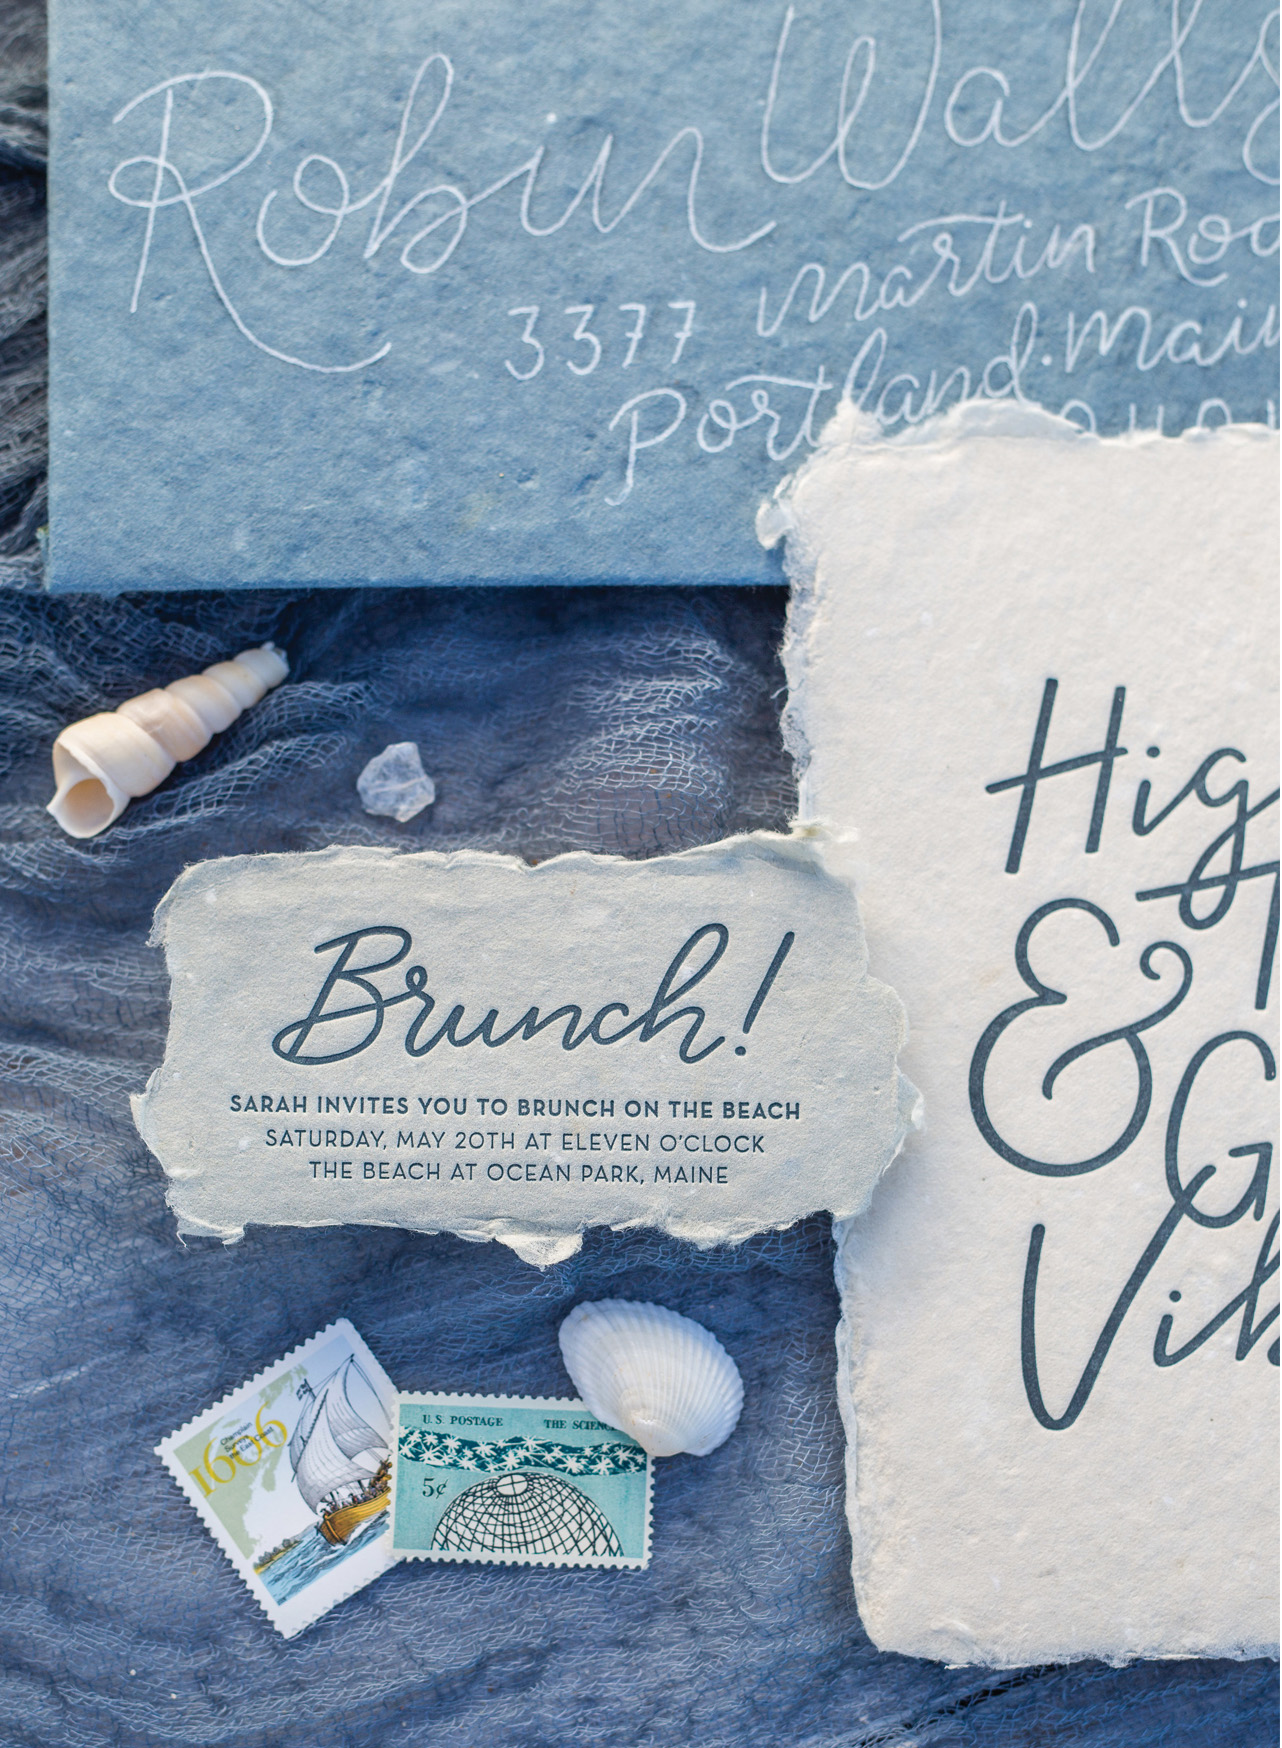
I love to incorporate calligraphy into my custom wedding invitation designs and will tweak my style a bit to fit the mood and aesthetic of each invitation suite. I especially love doing watercolor brush calligraphy because it’s so beautiful seeing the gradient and watching the colors bleed together throughout each word. They really look like a little piece of art in and of themselves.

Inspiring Calligraphers: Sable & Gray

Photo Credit: The Weber Photographers

Inspiring Calligraphers: Sable & Gray

It’s tough to pick a favorite project! I really love this custom invitation suite that features a combination of watercolor brush calligraphy and letterpress printing on double-thick paper (and it has gorgeous dusty-blue edge painting, too!). The custom die-cut Michigan-shaped response card is an extra special cherry on top of this dreamy suite.

Inspiring Calligraphers: Sable & Gray

Photo Credit: Luxlight Photography

Inspiring Calligraphers: Sable & Gray

Thanks so much for sharing your work, Kristin! Looking for even more beautiful calligraphy? Check out our calligraphy archive right here!

Photo credits, except where noted: Kristin Hussey of Sable & Gray Paper Co.

Want to be featured in our calligraphy column? Reach out to us at submissions [at] ohsobeautifulpaper [dot] com with the subject line “Calligraphy Feature” for more details!

Election Night Bingo: Midterms 2018

I’ve always been a political nerd. When I was little, my parents took me with them to vote and talked to me about the importance of voting in elections. I remember being in middle school and looking forward to turning eighteen so I could cast my own vote. I voted for the first time in the 2000 presidential election (in Florida no less!) and in every election since. Two years ago, I started a little tradition with Election Night Bingo 2016 – and now it’s time for Election Night Bingo: Midterms 2018 edition!

It has been a long couple of years and the world feels like a very scary place these days, but we can do something about it. We can choose leaders who share our values and will pursue the right policies. We’re lucky enough to live in a place where we get to choose our own leaders and help determine the kind of country we live in – and it’s never been more important to exercise our collective voice. If you voted early, good for you! Otherwise, let’s all go vote on Tuesday and play Election Night Bingo: Midterms 2018 edition together in the evening!

If you’ve already voted or know you’ll definitely vote on Tuesday, work on making sure your closest friends and family will vote! Create a voting squad. Start a group text with at least five people or DM at least five people on Facebook or Instagram – either local or across the country. Check in with each other on Tuesday. Does each friend know where their polling station is? What time is each friend planning to vote? Have they seen a sample ballot? Do they know about the candidates and issues on the ballot? Be sure to check in with each other after you vote so you can send virtual high-fives – whatever it takes to get out the vote!

I’ll be watching the election results closely on Tuesday night, hopefully with a cocktail in one hand and my bingo boards in the other to help with election night anxiety! You can grab the printable bingo boards right here, print them out on letter size cover weight or text weight paper, then trim down to size using scissors or a paper trimmer! There are four different game boards, so you can play with a small group if you’re hosting an election night party with friends â€“ or play twice with your significant other if it’s just the two of you!

While I’m hoping for as many Democratic victories as possible on Tuesday night, this midterm election night bingo is meant to be non-partisan so that anyone can play along. I tried to incorporate buzzwords that you might hear from the pundits on any network, including the names of states with key House or Senate races, election terms, and keywords from some current policy issues.

Voting is both a civic responsibility and an immense privilege, and I sincerely hope all of you will be voting on Tuesday (if you haven’t already). Our government is in need of some serious checks and balances, so if you’re not sure who to vote for, I encourage you to vote blue. If you’re normally Republican, instead of staying home, I encourage you to vote as an act of protest against Trump’s hateful rhetoric and bigotry. The New York Times has a couple of awesome maps of the most competitive House races and toss up Senate races. Here are a few of the Congressional races that I’ll be following most closely on election night (and the candidates I’m rooting for):

Andrew Janz, California 22nd (running against incumbent Devin Nunes, a Trump enabler)

Harley Rouda, California 48th (running against pro-Russia incumbent Dana Rorabacher)

Ammar Campa-Najjar, California 50th (running against incumbent Duncan Hunter – indicted for campaign finance violations, among other violations)

JD Scholten, Iowa 4th (running against incumbent Steve King, one of the most hateful and racist members of Congress)

Amy McGrath, Kentucky 6th

Andy Kim, New Jersey 3rd

Mikie Sherrill, New Jersey 11th

Anthony Brindisi, New York 22nd

Danny O’Connor, Ohio 12th

Joe Cunningham, South Carolina 1st

Lizzie Fletcher, Texas 7th

Gina Ortiz Jones, Texas 23rd

MJ Hegar, Texas 31st

Leslie Cockburn, Virginia 5th

Abigail Spanberger, Virginia 7th

Richard Ojeda, West Virginia 3rd


p.s. For any readers with eagle eyes, yes, I’m aware of the typo in one of the boards and fixed it already!

Illustrated Vineyard Wedding Invitations

Watercolor illustrations and dreamy vineyard scenery sounds like the perfect way to start the week. These illustrated vineyard wedding invitations come to us from Designer Rolodex member Wide Eyes Paper Co. I’m loving the fold-out invitation design that shares all the wedding details (and the couple’s love story!) on a single page – and Amanda always creates the most beautiful illustrated envelope liners!

Illustrated Vineyard Wedding Invitations by Wide Eyes Paper Co.

From Amanda: Nicole and David decided on a fully custom eight panel quad-fold invitation that captures every beautiful detail of their vineyard wedding. The opening page of the invitation shows the gleaming watercolor portraits of Nicole and David with hand painted greenery adorning the corners. Such a fun way to get everyone excited for this couple to walk the aisle!

Illustrated Vineyard Wedding Invitations by Wide Eyes Paper Co.

As the pages unfold you are whisked away to a hand painted watercolor scene of the Bluemont Vineyard, their lovely wedding location. I am tempted to hop in the car right now and head to Virginia! Our new favorite feature we have added to our invitations are the tiny custom icons that we curate for each couple.

Illustrated Vineyard Wedding Invitations by Wide Eyes Paper Co.

The back panels of these illustrated vineyard wedding invitations tell “The Story of Nicole and David” with every detail from inception to real time. We loved painting everything from the college where they met, to the tender steak on their first date, to their graduation caps and, of course pizza. Talk about a fun love story. For all of the special watercolor details this set is simple on the verbiage. Sometimes a picture says it all.

Illustrated Vineyard Wedding Invitations by Wide Eyes Paper Co.

The perforated RSVP is a good indicator that you should send your answer in the mail ASAP, because this wedding will be one for the record books. We love that the quad-fold invite allows the RSVP to be right on the bottom of the invitation for safe keeping and the fact that it is a postcard means it’s ready to be dropped right in the mail.

Illustrated Vineyard Wedding Invitations by Wide Eyes Paper Co.

Lastly, we incorporated the watercolor scenery of Bluemont Vineyard on the custom envelope liners for that special extra added touch. One of our favorite details of the entire suite!

Illustrated Vineyard Wedding Invitations by Wide Eyes Paper Co.

Thanks Amanda!

Design: Wide Eyes Paper Co.

Printing: Paper Jam Press

Wide Eyes Paper Co. is a member of the Designer Rolodex – you can see more of their beautiful work right here or visit the real invi­ta­tions gallery for more wedding invitation ideas!

Photo Credits: Jordan Hughes

Seaside Brunch Invitations

A seaside brunch with a few of your closest friends – doesn’t that sound like a dream? I love this brunch idea for birthday parties, bridal showers, or really any occasion. The romantic seaside brunch invitations by Jen of Chatty Press were printed on handmade paper from Farmette Press to mimic the rugged Maine coastline and feature Jen’s whimsical hand lettering on a fun keepsake print (the best kind of keepsake, IMHO). Take a look! 

Seaside Brunch Invitations by The Chatty Press

From JenThe coast of Maine is often thought of as rocky and rugged, so we wanted to showcase the romantic vibes of the sandy seacoast for this seaside brunch invitation. While it’s easy to thrown down a blanket and a cooler and have a great time together, this group of gals wanted a day together that was a little more fanciful. So with windswept skirts four good friends spent the morning noshing on baked goods and fruit on a whitewashed farm table.

Seaside Brunch Invitations by The Chatty Press

I wanted the ladies invited to this brunch to feel special and have something aside from the memories to remember the day, so I decided to make a keepsake print inspired by the seacoast. After reading a ton of quotes about the seaside, the ocean, friendship and love, I decided that this short and sweet saying “High tides and good vibes” was the perfect sentiment that perfectly fit the feeling of the day.

Seaside Brunch Invitations by The Chatty Press

I hand lettered the quote, first as a pencil sketch, and then digitally, to be letterpress printed onto some very pillowy and soft handmade paper from Farmette Press. I didn’t quite want the ink color to match the handmade envelopes, but I wanted something that complimented it, so I chose a blue that was a tad bit darker and really popped on the off-white paper.

Seaside Brunch Invitations by The Chatty Press

Of course, the invitation still had to convey the important details, so I decided to create a small card printed on a sandstone grey handmade paper, that was concise and to the point. Each card was printed by hand on my antique golding pearl. I absolutely love adding something special and memorable to an invitation that guests won’t just throw away, and this keepsake print is my current favorite.

Seaside Brunch Invitations by The Chatty Press

Seaside Brunch Invitations by The Chatty Press

Seaside Brunch Invitations by The Chatty Press

Thanks Jen!

Design and Printing: Chatty Press

Paper: Farmette Press

Event Design: Aulette Events


Photo Credit: Ellysia Francovitch Photography

DIY No Carve Terrazzo-Inspired Pumpkins

When it comes to pumpkin decorating ideas, I tend to draw my inspiration from design trends. Last year it was Matisse-inspired pumpkins, the year before that it was fun iridescent pumpkins. Terrazzo is my favorite design trend this year, so naturally I decided to do a terrazzo-inspired pumpkin! These DIY no carve terrazzo-inspired pumpkins are super easy to make, only require a couple of easy-to-find materials, and are a great way to bring a pop of color to your holiday décor!

DIY No Carve Terrazzo-Inspired Pumpkins

DIY No Carve Terrazzo-Inspired Pumpkins

Aren’t they so cute?? I just love the colors! I used white pumpkins since the colors would pop more against a white surface, but you could also paint orange pumpkins and go for ALL the color. Oooh, that would be so fun – someone please do it and send me photos!

DIY No Carve Terrazzo-Inspired Pumpkins

DIY No Carve Terrazzo-Inspired Pumpkins

DIY No Carve Terrazzo-Inspired Pumpkins

I actually started with the intent of making these pumpkins just with craft vinyl, but I was a bit frustrated by the lack of control over my color palette. I really wanted to use some nature-inspired fall tones along with soft muted pinks and greens. Color is so important for anything terrazzo inspired! You can still make these pumpkins with craft vinyl (especially if you’re decorating faux pumpkins), but you’ll probably want to choose a brighter color palette. The pink and purple pumpkin above was made entirely with craft vinyl on a faux white pumpkin.

DIY No Carve Terrazzo-Inspired Pumpkins

Materials

Craft paint in your chosen color palette

Paint brushes (the smaller the better! Size 0 and 1 for corners and smaller pieces, probably no larger than size 4 or 5 for some of the larger pieces)

Paint palette or paper plate

Craft vinyl and scissors (optional)

Pumpkins in varying shapes and sizes

DIY No Carve Terrazzo-Inspired Pumpkins

To make the DIY No Carve Terrazzo-inspired Pumpkins:

Step 1. Choose your color palette. I recommend selecting 4-6 colors per pumpkin. You can keep the color palette the same for each pumpkin, or mix things up a bit and choose several color combinations with some overlapping colors. I chose a mix of pinks, peach, ochre (deep yellow), navy blue, shades of green, and rust. Each pumpkin had some pink and ochre, but otherwise I mixed things up a bit!

Step 2. Squeeze a small amount of each paint color onto a paint palette or paper plate. If necessary, mix colors to achieve the perfect shade of a particular color. Starting with the first color, paint a few terrazzo-inspired geometric shapes around the pumpkin. You want these shapes to look like stone fragments, so geometric shapes with softer corners are definitely your friend here. Trapezoids, diamonds, irregular circles and rectangles, and triangles. I found it easiest to paint a few larger shapes around the pumpkin to make sure the colors were evenly distributed, then fill in with smaller shapes. 

Note: If you’re using craft vinyl, you’ll basically do the same thing, except instead of painting you’ll use your scissors to cut terrazzo-inspired shapes from your craft vinyl. Once you have a variety of shapes and colors cut, carefully peel the adhesive backing and apply to the pumpkin like a sticker. I found it easiest to start with some of the larger shapes randomly scattered around the pumpkin surface, then fill in with the smaller shapes as I went. I really didn’t have a plan, so you can totally just wing it! If you place a shape and then change your mind, you should be able to move it by very carefully peeling the vinyl from the pumpkin and moving it to a new spot.

Step 3. Continue painting the entire pumpkin, and if necessary apply a second or third coat of paint to ensure full color coverage. Allow the paint to dry completely and enjoy!

DIY No Carve Terrazzo-Inspired Pumpkins

DIY No Carve Terrazzo-Inspired Pumpkins

DIY No Carve Terrazzo-Inspired Pumpkins

I scattered these pumpkins across our mantel and bookshelves, but these would be so cute as a holiday centerpiece. Paint a bunch (like a dozen) and line them all in a row down a table!

DIY No Carve Terrazzo-Inspired Pumpkins

DIY No Carve Terrazzo-Inspired Pumpkins

DIY No Carve Terrazzo-Inspired Pumpkins

Yay! Happy Halloween decorating everyone!

p.s. DIY Iridescent Pumpkins and DIY Rainbow Halloween Treat Bags

Photo Credits: Nole Garey for Oh So Beautiful Paper