Spring Flower Arranging Tips

I love flowers. I just always have. As a little girl I would stop and literally smell all of the roses during walks around my neighborhood with my dad. As an adult, I try to always have a vase (or two!) of fresh flowers at home. Pretty flowers are the perfect addition to dinner parties and family gatherings – after delicious food and great cocktails, of course. And with Passover and Easter coming up this weekend, I thought I’d share a few of my favorite flower arranging tips for your next get together!

Flower Arranging Tips

1. Keep Things Simple

Flowers don’t need to be complicated. Stick to a single color (mono-chromatic) or a single type of flower (mono-botanical) – or both! My favorite floral arranging trick is to pick up a few bunches of the same in-season flower and drop them into a low vase. My favorite flowers for mono-botanical arrangements include anemones (pictured below), peonies, ranunculus, garden roses, and hellebores (pictured above).

Flower Arranging Tips

Similarly, a large quantity of a very small flower – like chamomile, wax flower, or baby’s breath – looks impressive without being visually cluttered. These smaller flowers also tend to be inexpensive, making them the perfect solution for a party on a budget.

2. Go Small

Huge floral centerpieces can look out of place at an intimate dinner party or cocktail party. Instead, try using several small arrangements with just 3-4 stems each. You’ll be surprised how a few small vases can brighten and transform a room!

Flower Arranging Tips

3. Mix and Match Vessels

I love using similar, but slightly mismatched vases and vessels to help elevate your floral arrangements and tie everything together. Vintage white milk glass vases are the perfect neutral backdrop for colorful flowers, while vintage glass jars collected over time are my preferred vessel for wildflower arrangements. You can even mix and match vase shapes and sizes if you stick to a common material (glass, ceramic, brass, copper, etc.) or a consistent color palette.

Flower Arranging Tips

4. Use a Statement Flower

Single stems of a large beautiful bloom look amazing in vintage bud vases or other vessels repurposed as vases – like the antique crystal perfume bottles seen here. Try placing individual blooms of a single variety, like peonies, dahlias, or even sunflowers, in groups of three for visual impact.

Flower Arranging Tips

5. Mix Things Up

Don’t be afraid to mix different flower varieties together. But try to stay within a specific color palette to make sure things look cohesive. Roses, peonies, dahlias, and ranunculus are all extremely versatile and look amazing mixed with tropical flowers (like the protea below) or combined with wildflower-style blooms like Queen Anne’s Lace, foxglove, scabiosa, or even fresh herbs and berries. Bottom line: if you think it’s pretty, go for it!

Flower Arranging Tips

6. Don’t Forget the Green!

Greens are an essential part of any floral arrangement – you could even create an entire arrangement with just a few greens from the flower market or grocery store! My favorite greens are seeded eucalyptus and silver dollar eucalyptus, maiden hair fern and ming fern, plumosa, geranium leaves, and dusty miller.

Flower Arranging Tips

7. One Big Statement Piece

Every party needs one big statement piece. For cocktail parties, place one large floral arrangement near the entrance or by the bar, with smaller arrangements of 3-4 stems scattered around the room. This is also a great opportunity to bring in a tall floral arrangement that might look out of place elsewhere in the room.

Flower Arranging Tips

Floral Design and Photo Credit: Sweet Root Village for Oh So Beautiful Paper

For dinner parties, keep things low and wide with a single large centerpiece at the center of the table. You could even try arranging in a vintage compote, using floral foam or a wire pillow to keep the flowers stable.

Flower Arranging Tips

Floral Design: Soirée Floral, Photo Credit: Charlie-Juliet Photography for Oh So Beautiful Paper

Those are my favorite flower arranging tips! If you have any tips to add, please share them in the comments!

DIY Rainbow Watercolor Crepe Paper Backdrop

This post was sponsored, and paid for, by Rit Dye. All opinions are my own. Thank you for supporting the sponsors that make Oh So Beautiful Paper possible!

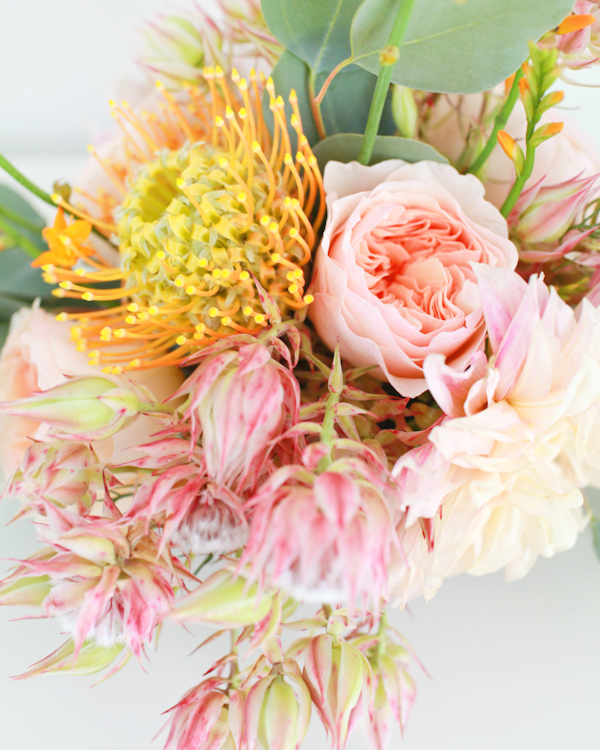
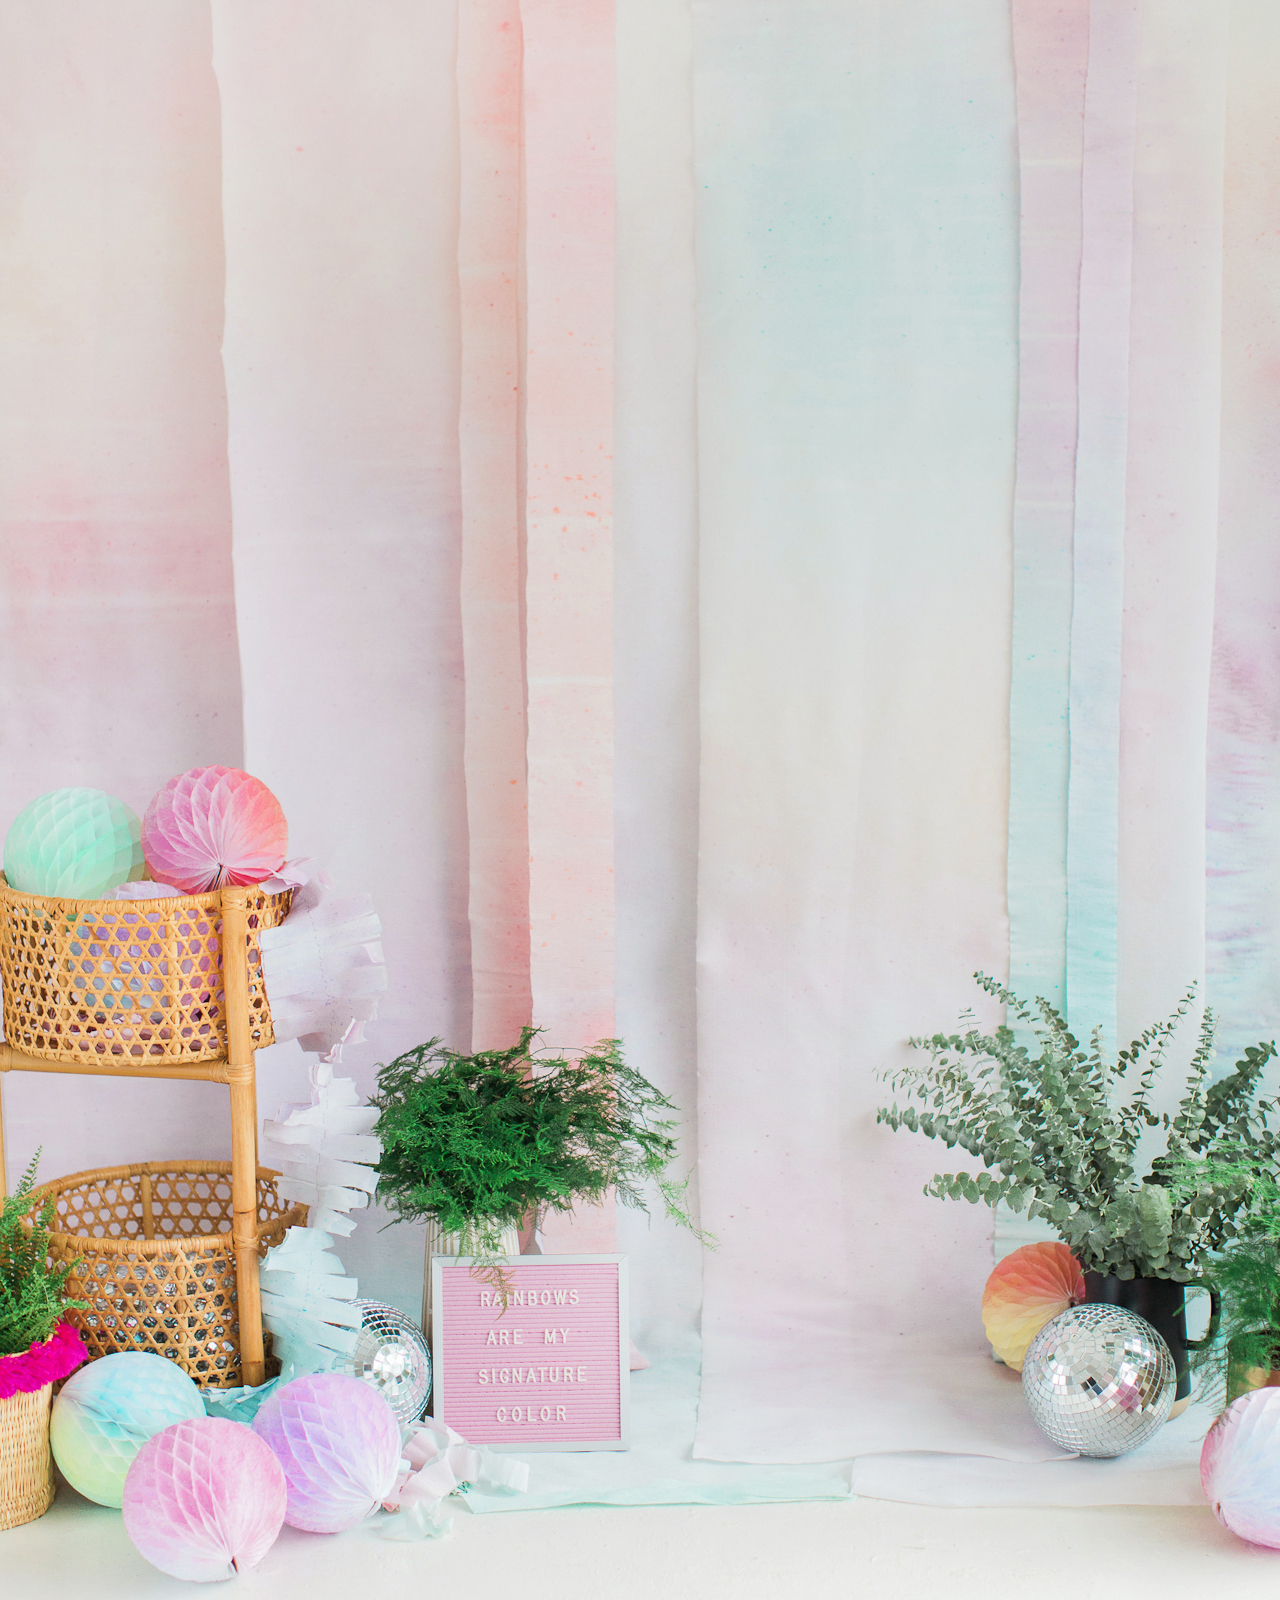
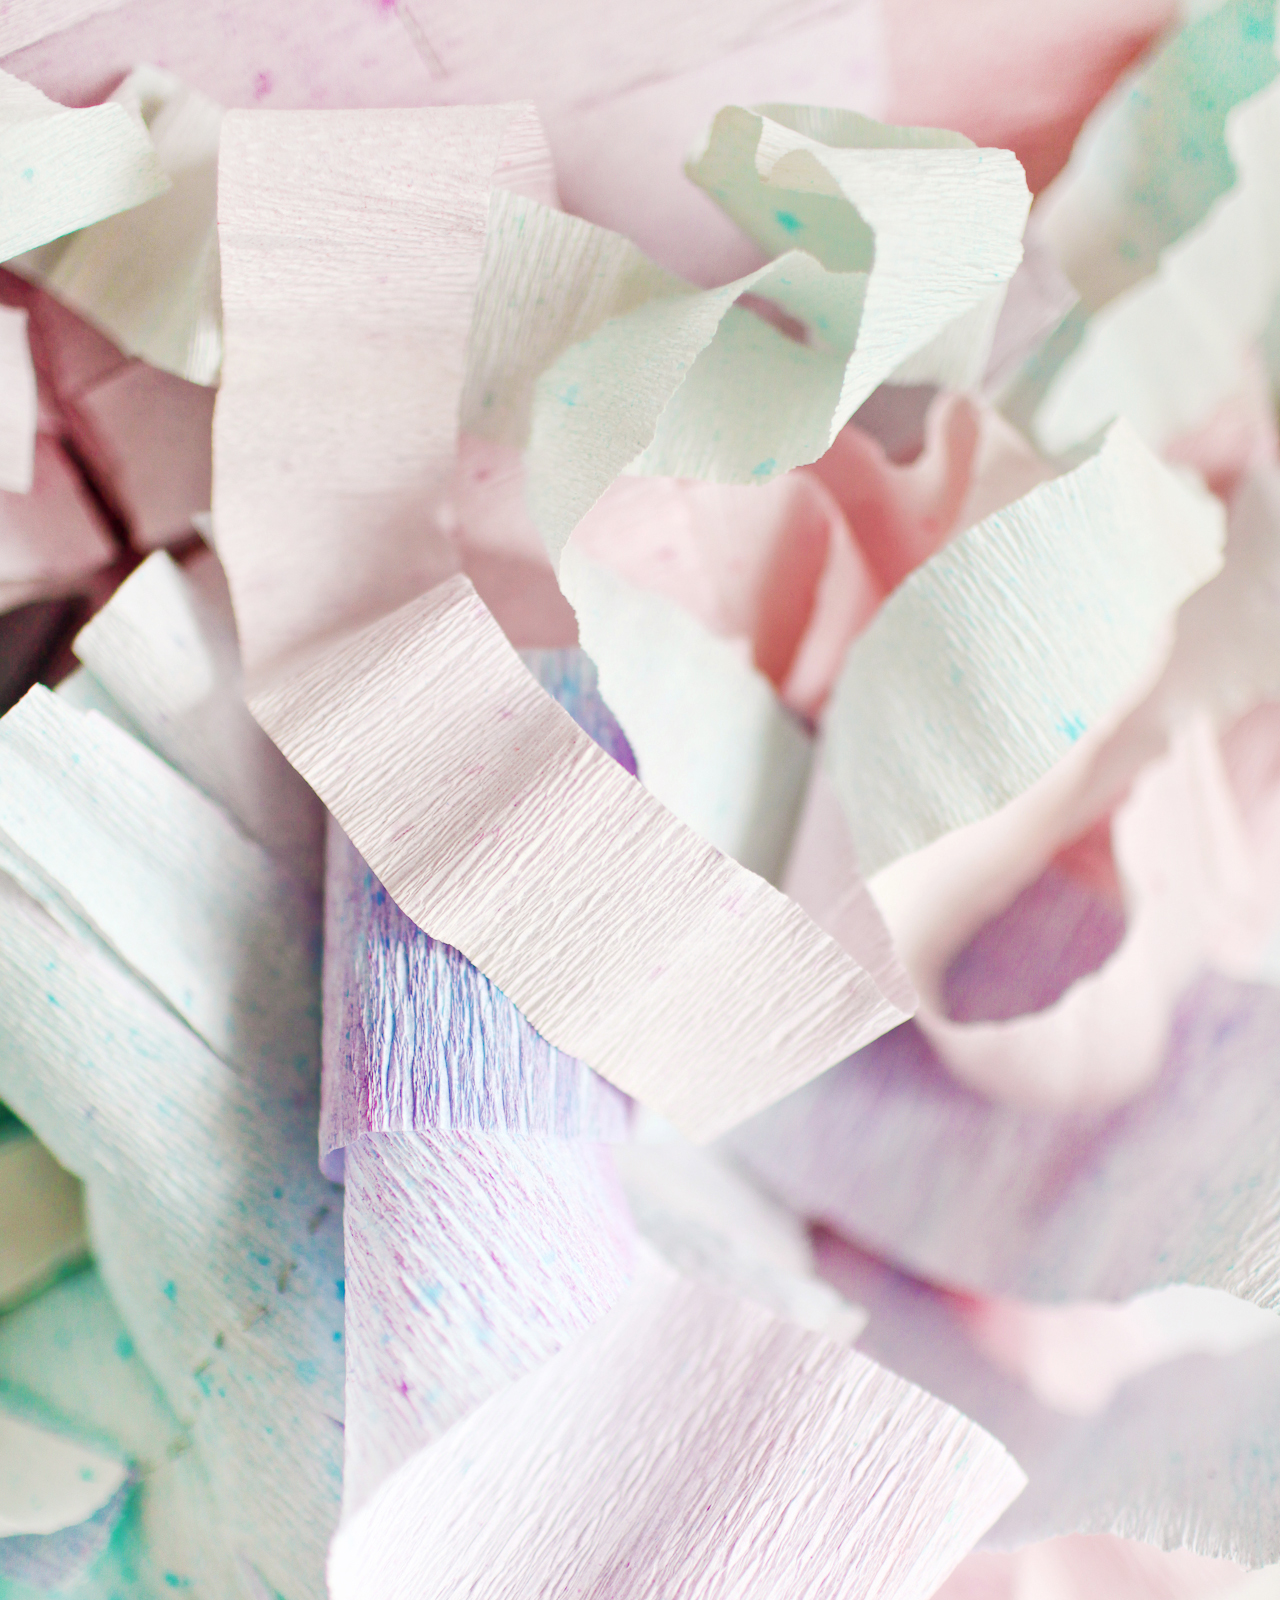
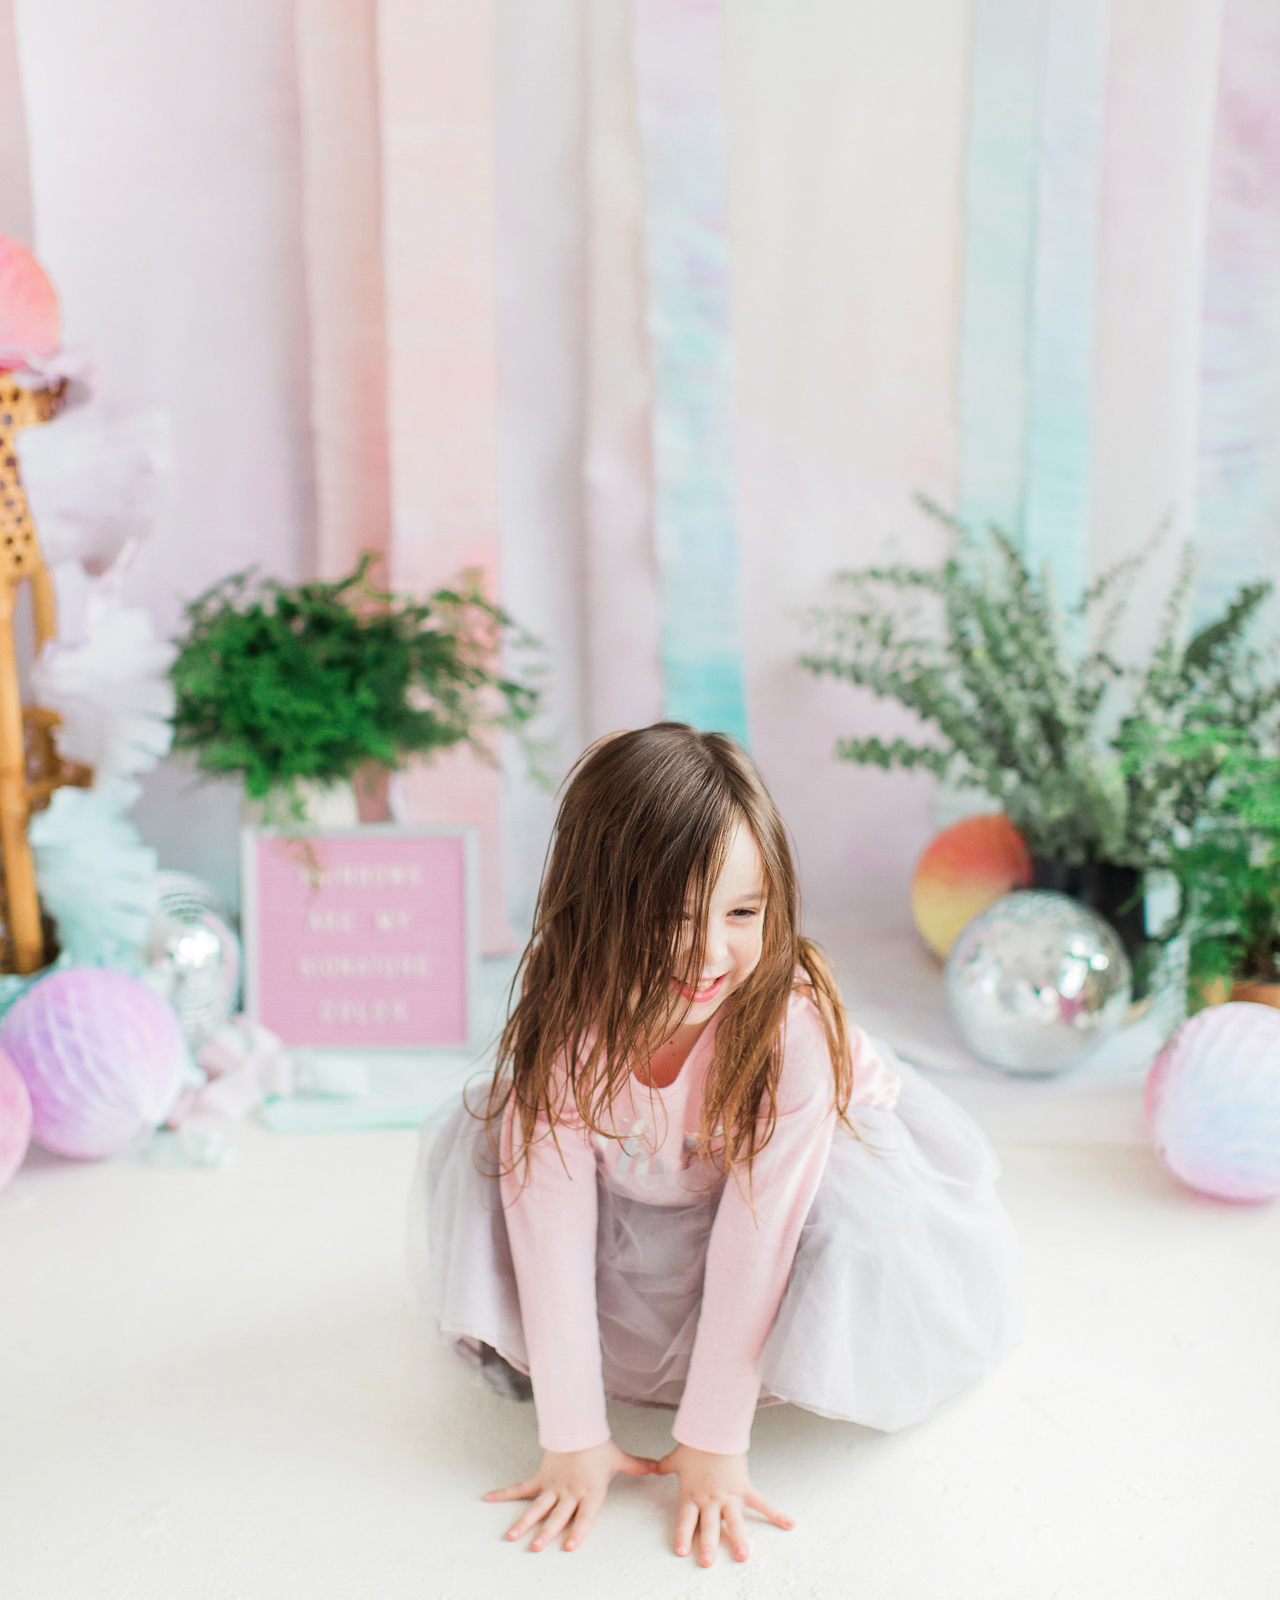
Spring is just around the corner – and I couldn’t be more excited! Every year I look forward to the explosion of spring flowers, from pale pink cherry blossoms and purple lilacs (my absolute favorite) to yellow daffodils and colorful tulips in nearly every shade of the rainbow. Oh, and fluffy peonies in every shade of pink? Yes, please! Today I’m paying homage to my favorite season with a DIY rainbow watercolor crepe paper backdrop that is perfect for spring weddings, birthday parties, and everything in between. This gorgeous pastel backdrop makes me so happy every time I look at it. Oh, and my secret ingredient for creating this gorgeous backdrop? Spray bottles filled with Rit All-Purpose Dye!

DIY Rainbow Watercolor Crepe Paper Backdrop with RIT Dye

DIY Rainbow Watercolor Crepe Paper Backdrop with RIT Dye

DIY Rainbow Watercolor Backdrop with Rit All-Purpose Dye

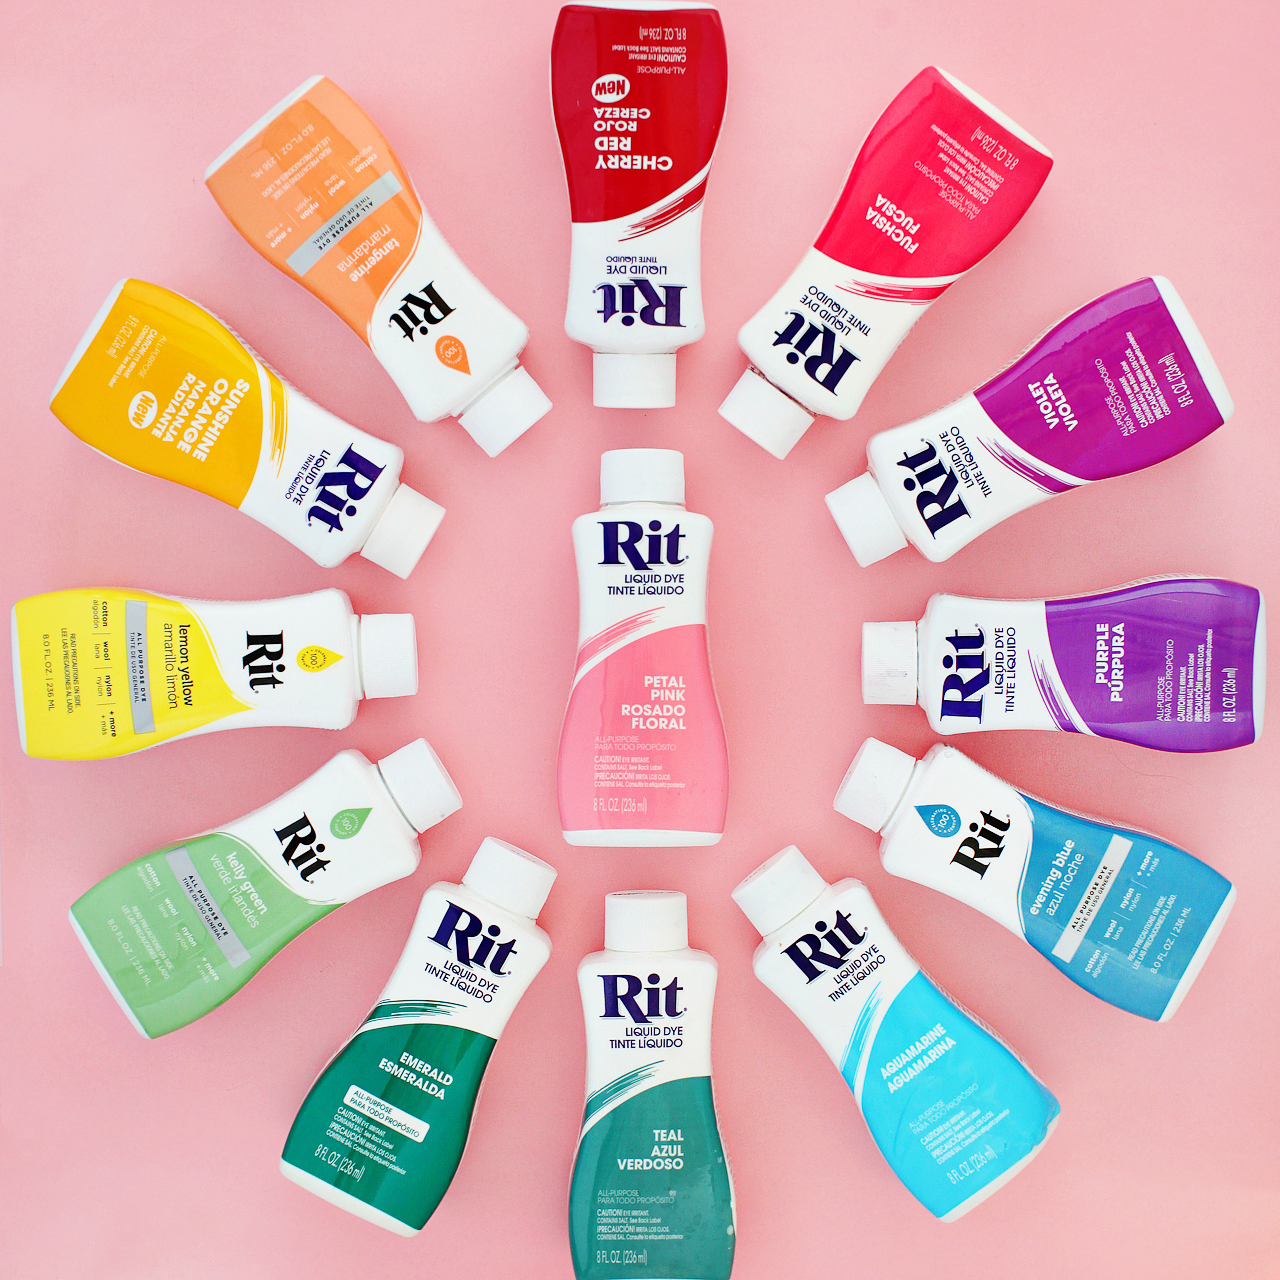
Rit Dye is one of my favorite tools for DIY projects! It’s really the perfect solution for adding pops of color throughout your wedding ceremony and reception, from ribbons for floral arrangements to napkins and table linens to dresses! Rit All-Purpose Dye is perfect for washable fabrics with natural fibers, like cotton, linen, wool, silk, and ramie – or even for materials like nylon, rayon, paper, and wood. I’ve used Rit All-Purpose Dye to dip dye envelopes, create dip-dyed muslin favor bags, and even to dye my own Shibori-style pink dinner napkins! And did you know that there’s also Rit DyeMore for synthetic fibers?? You can use Rit DyeMore for polyester, polyester cotton blends, nylon, acrylic, or acetate – or even faux fur! I’ll need to try that one next!

DIY Rainbow Watercolor Crepe Paper Backdrop with RIT Dye

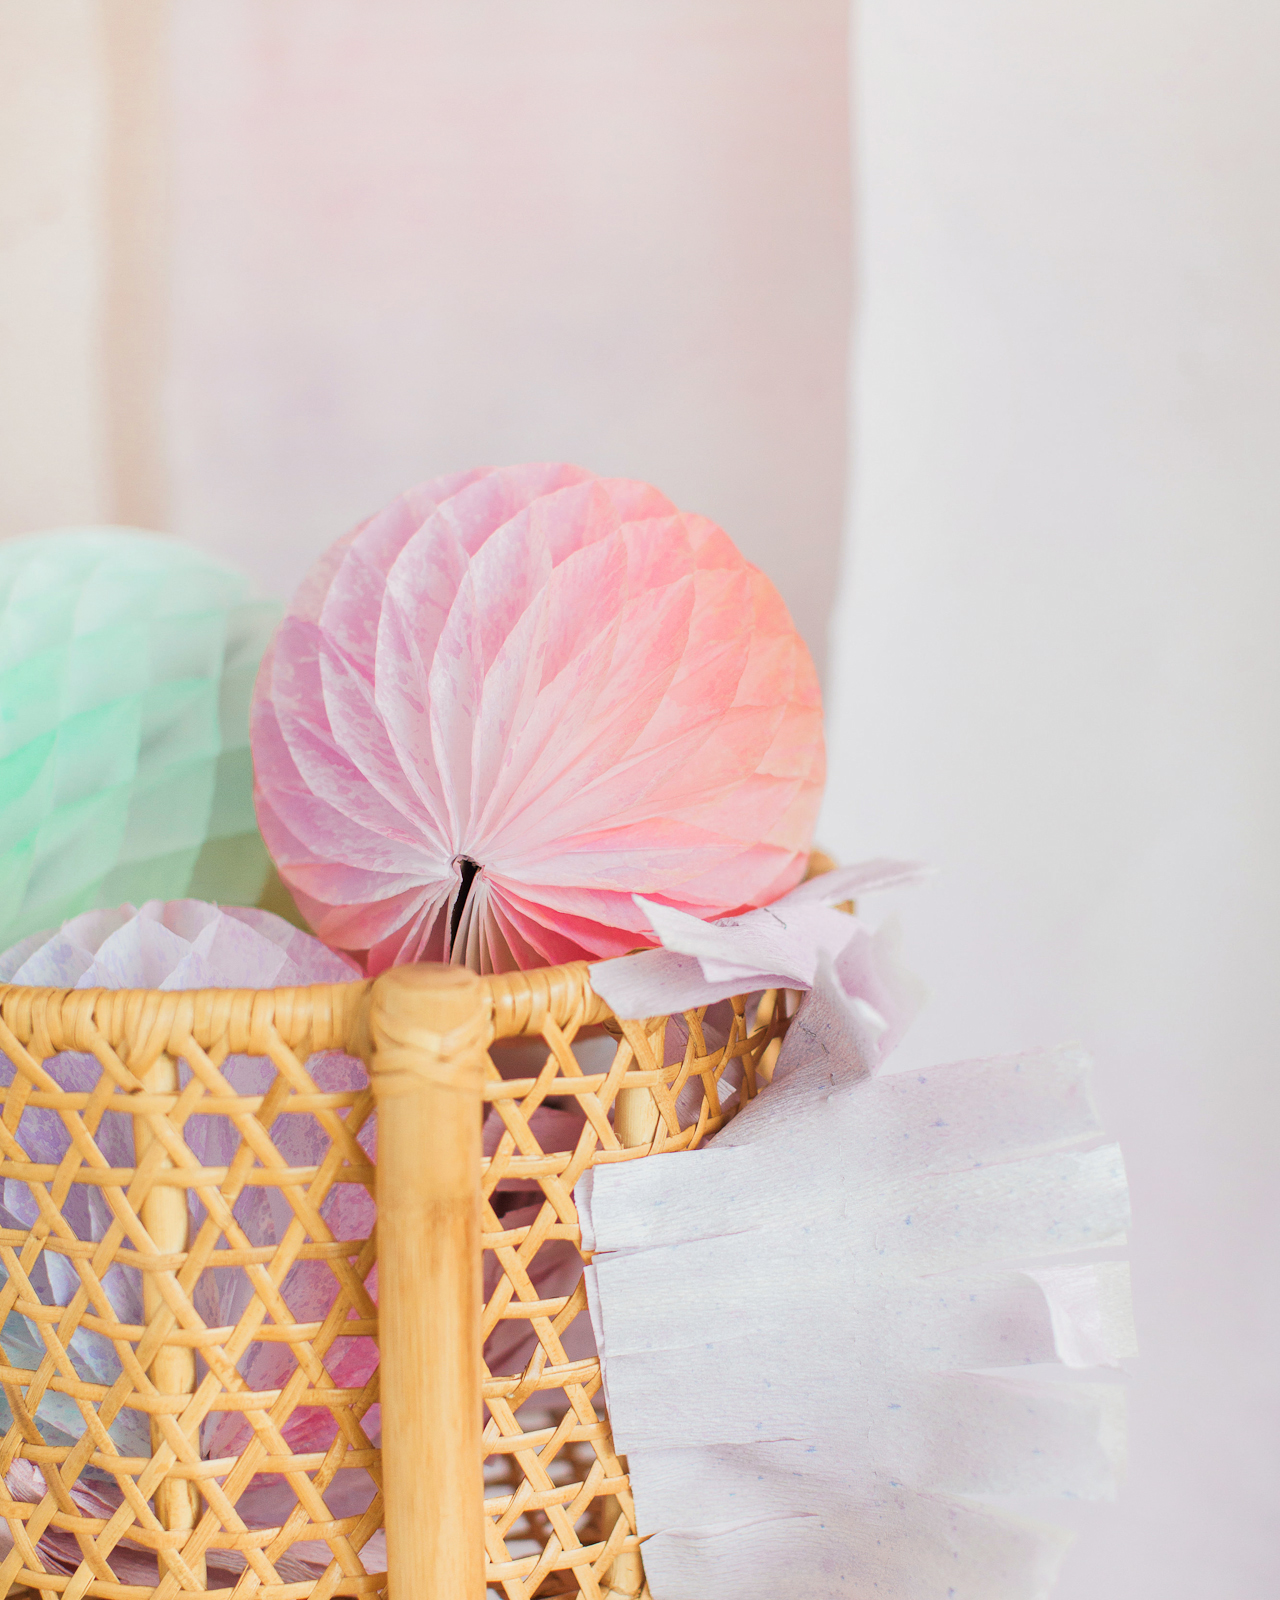
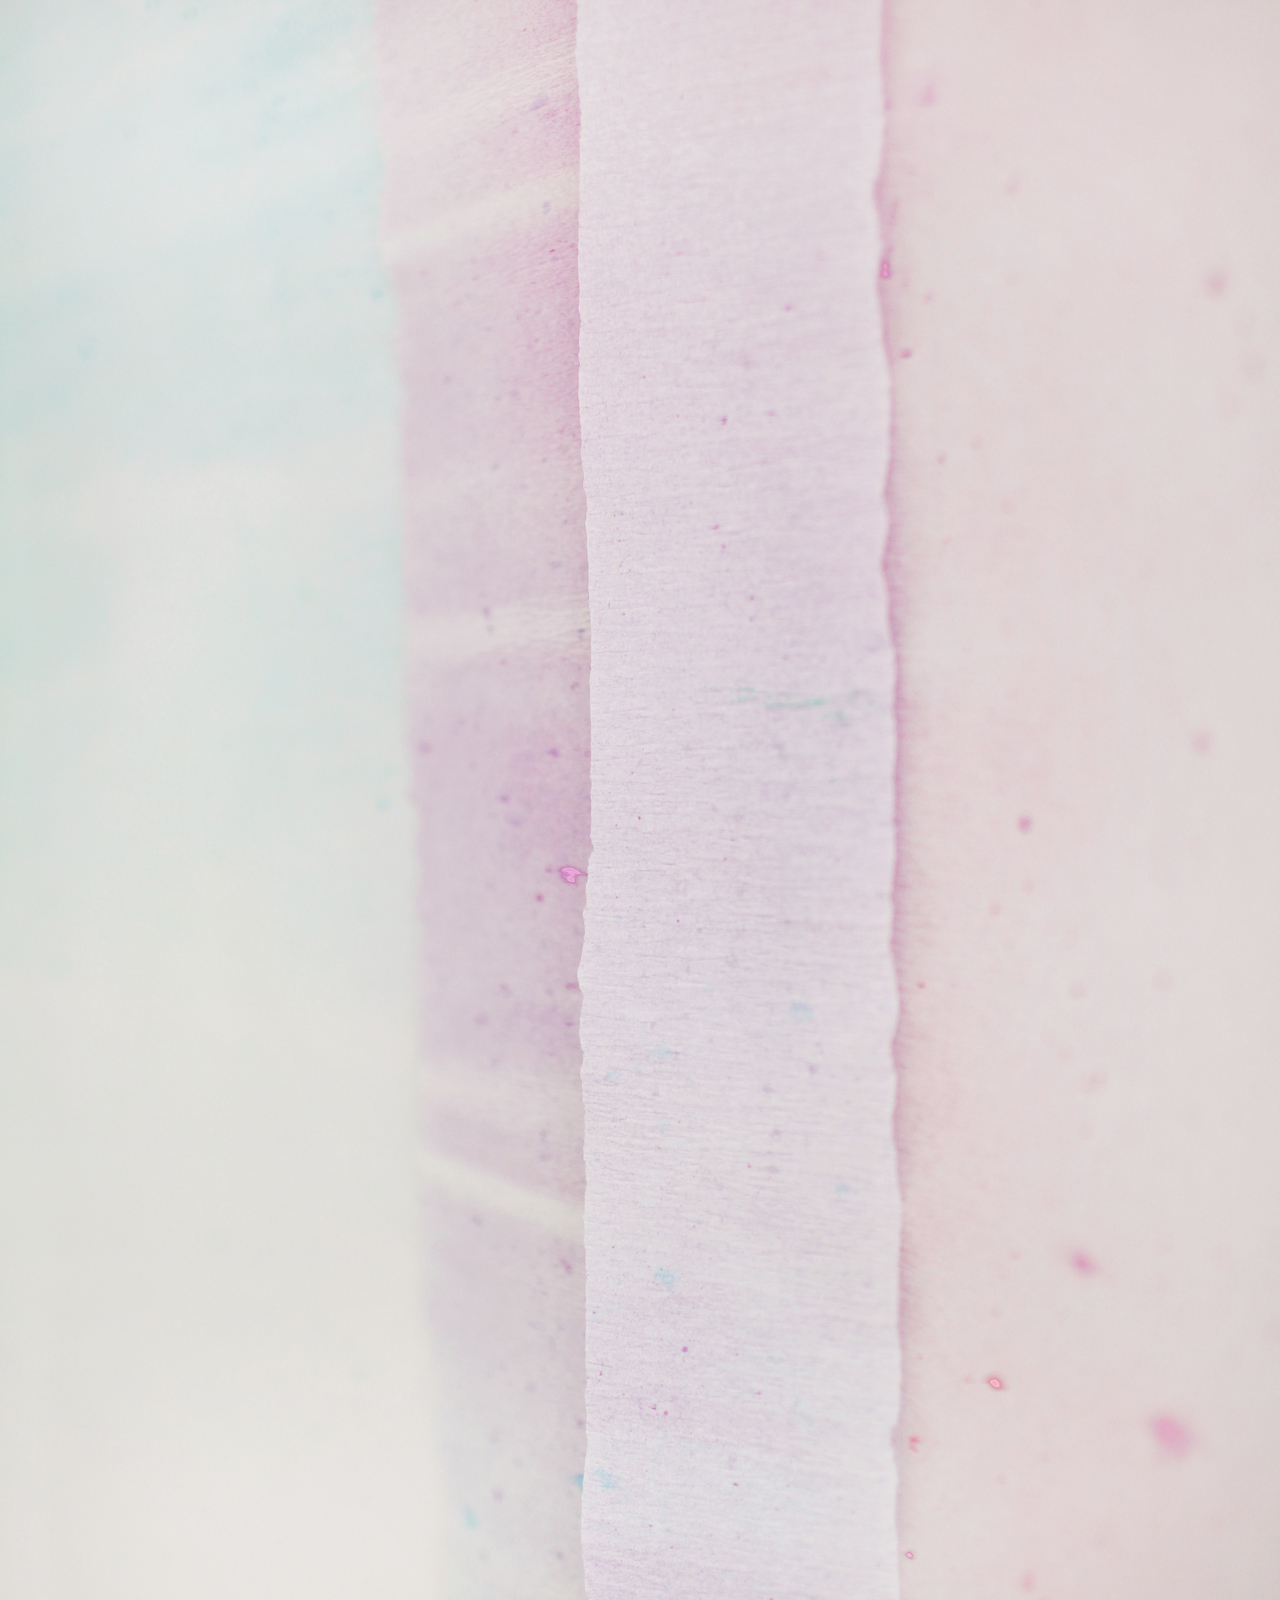
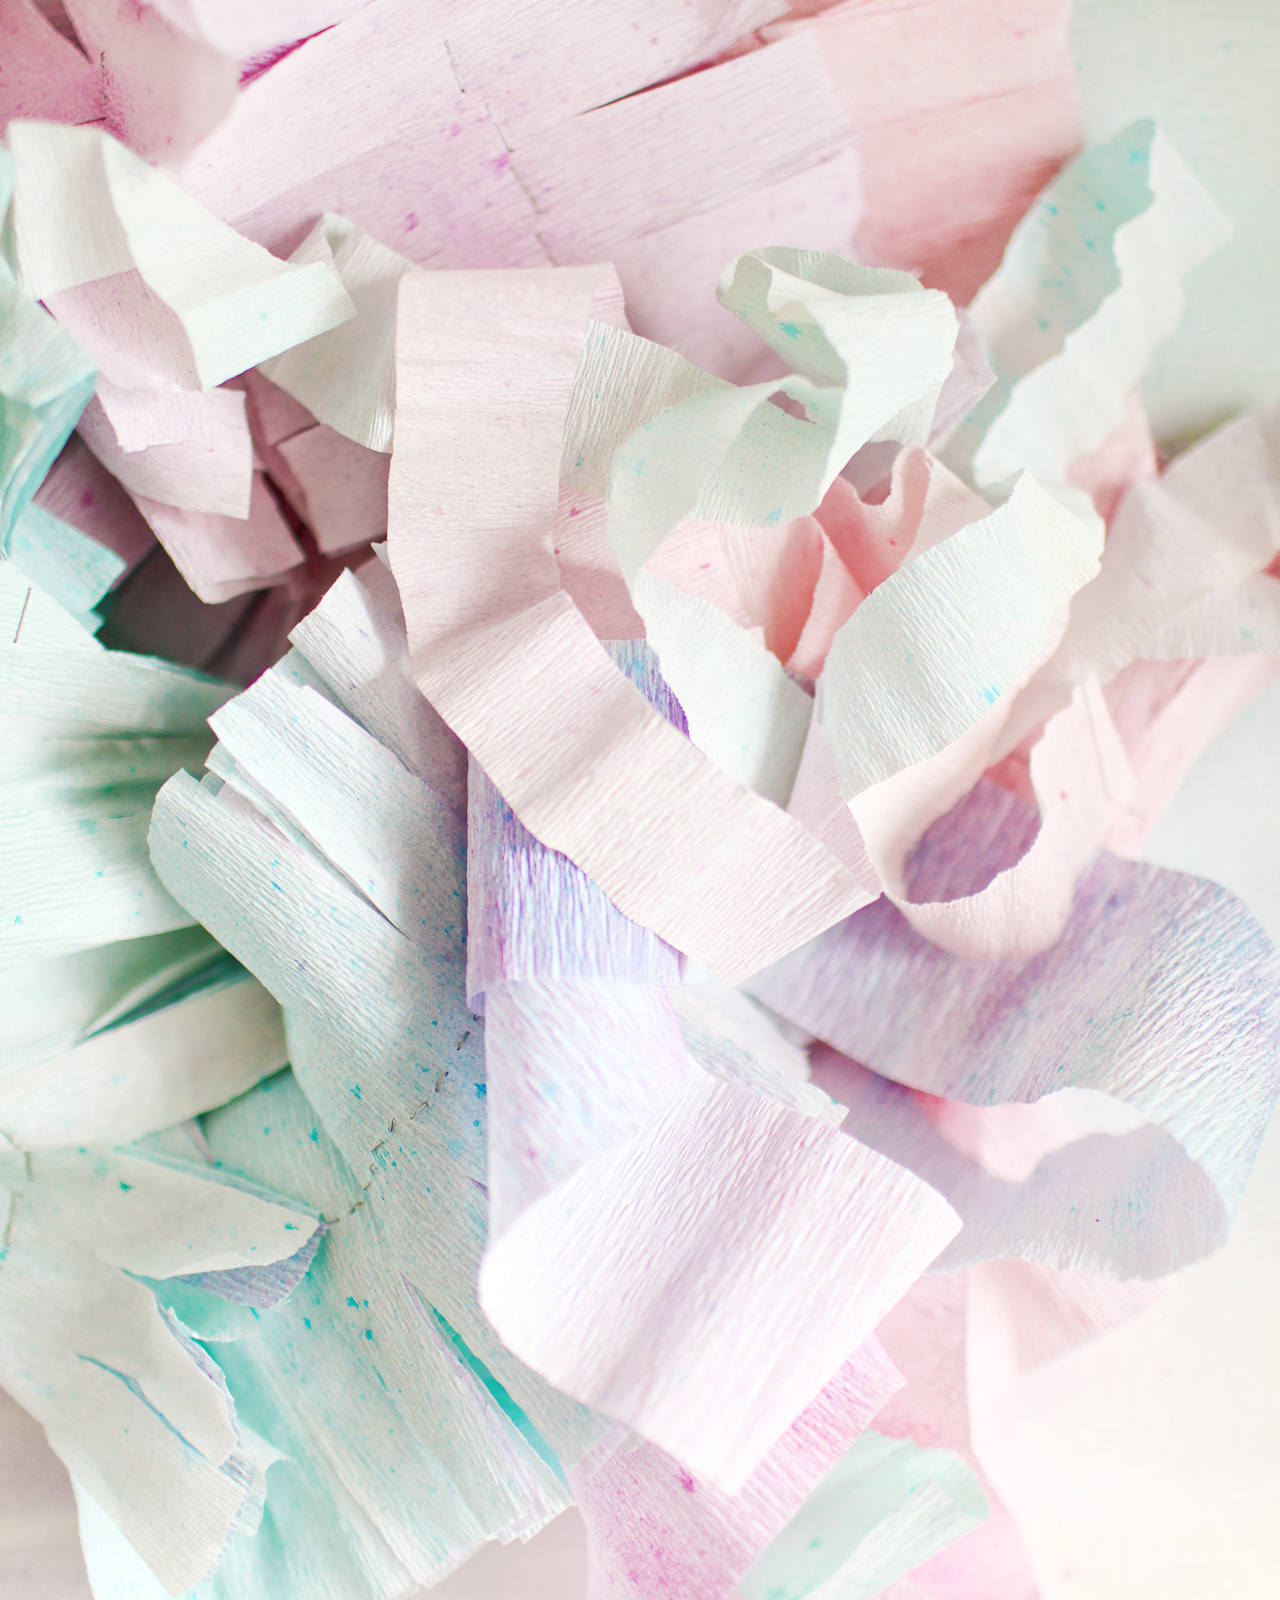
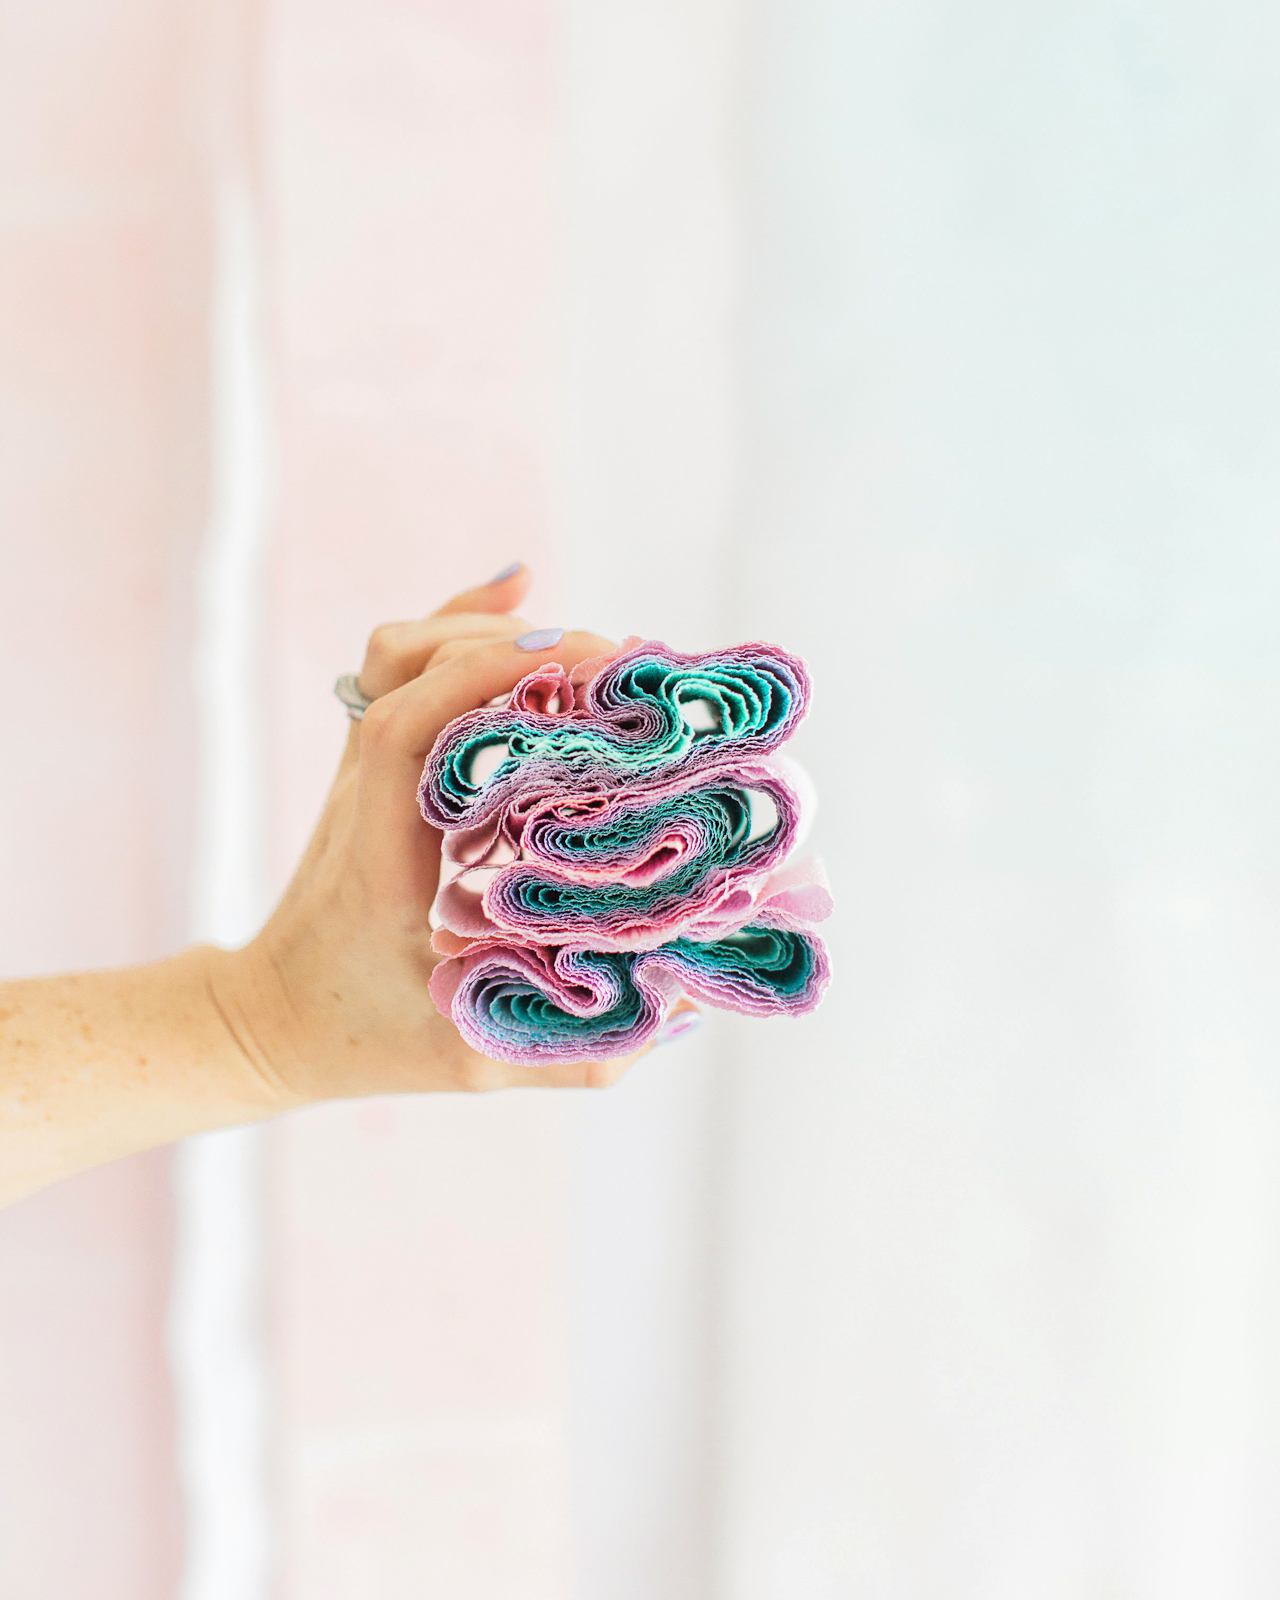
I was super excited to experiment with multiple Rit All-Purpose Dye colors to create this gorgeous watercolor-inspired backdrop. I mean, it’s a proven fact that rainbows make everything prettier. And a pastel rainbow? Even better! This pastel backdrop is made from a few rolls of white crepe paper spray dyed with fine mist spray bottles filled with Rit All-Purpose Dye. You can also use the same method to dye tissue paper decorations like honeycomb balls and tissue paper fans! Using spray bottles to create a super fine dye mist leaves the most gorgeous watercolor effect on crepe paper and tissue paper, and the result is completely unique wedding and party décor that you won’t find anywhere else!

DIY Rainbow Watercolor Crepe Paper Backdrop with RIT Dye

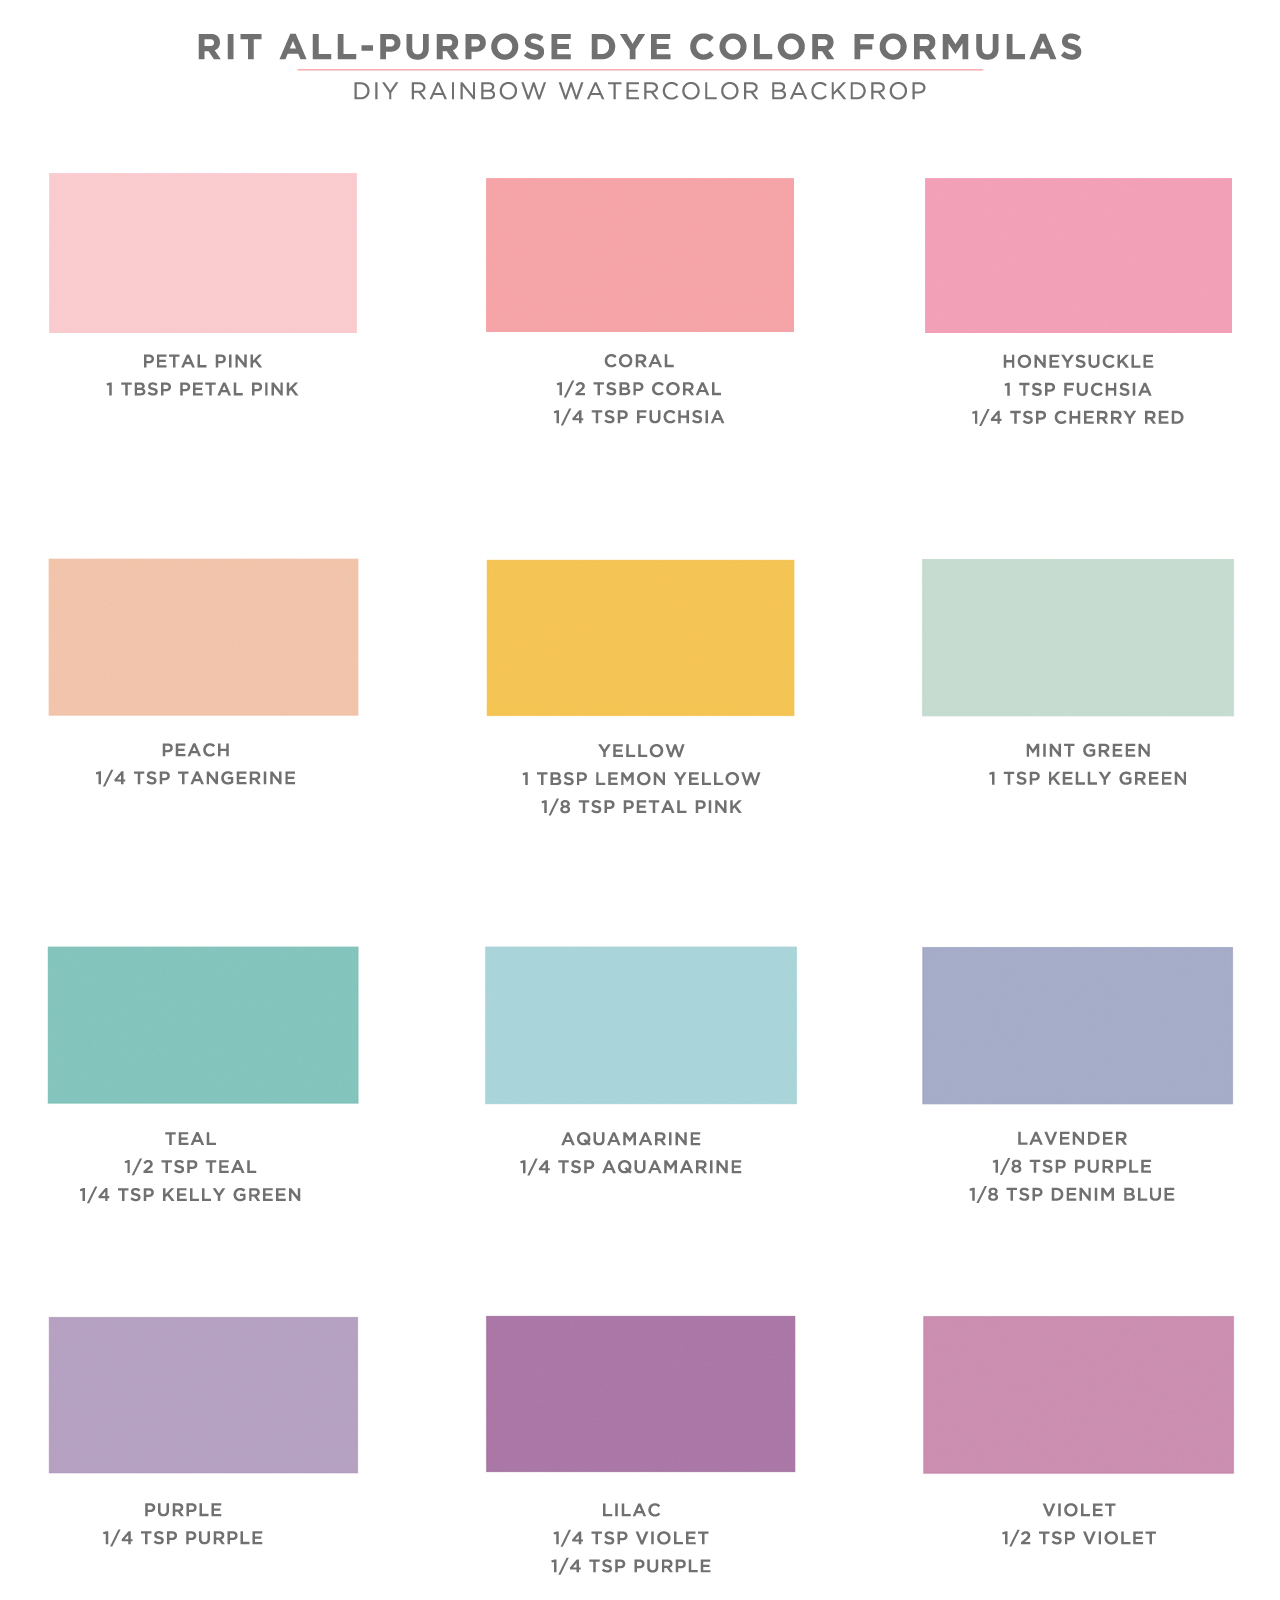
The best part about this DIY rainbow watercolor crepe paper backdrop is that you can completely customize the colors to suit your wedding color palette! Rit All-Purpose Dye is available in 50 shades, like Petal Pink, Coral, Violet, Aquamarine, and Kelly Green. Or you can create your own colors using the Rit Color Library, which includes color formulas to create over 500 additional colors – including Pantone on-trend colors by season! There’s seriously SO much color inspiration in the Rit Color Library! I love, love, love our pastel rainbow backdrop (you can find the specific color formulas I used a bit further below!), but I could also totally see a gorgeous ombré backdrop in several shades of a single color. How gorgeous would that be??

DIY Rainbow Watercolor Crepe Paper Backdrop with RIT Dye

Skill Level: Beginner

Approximate Crafting Time: 1 –2 Hours

Supplies

Rit All-Purpose Dye

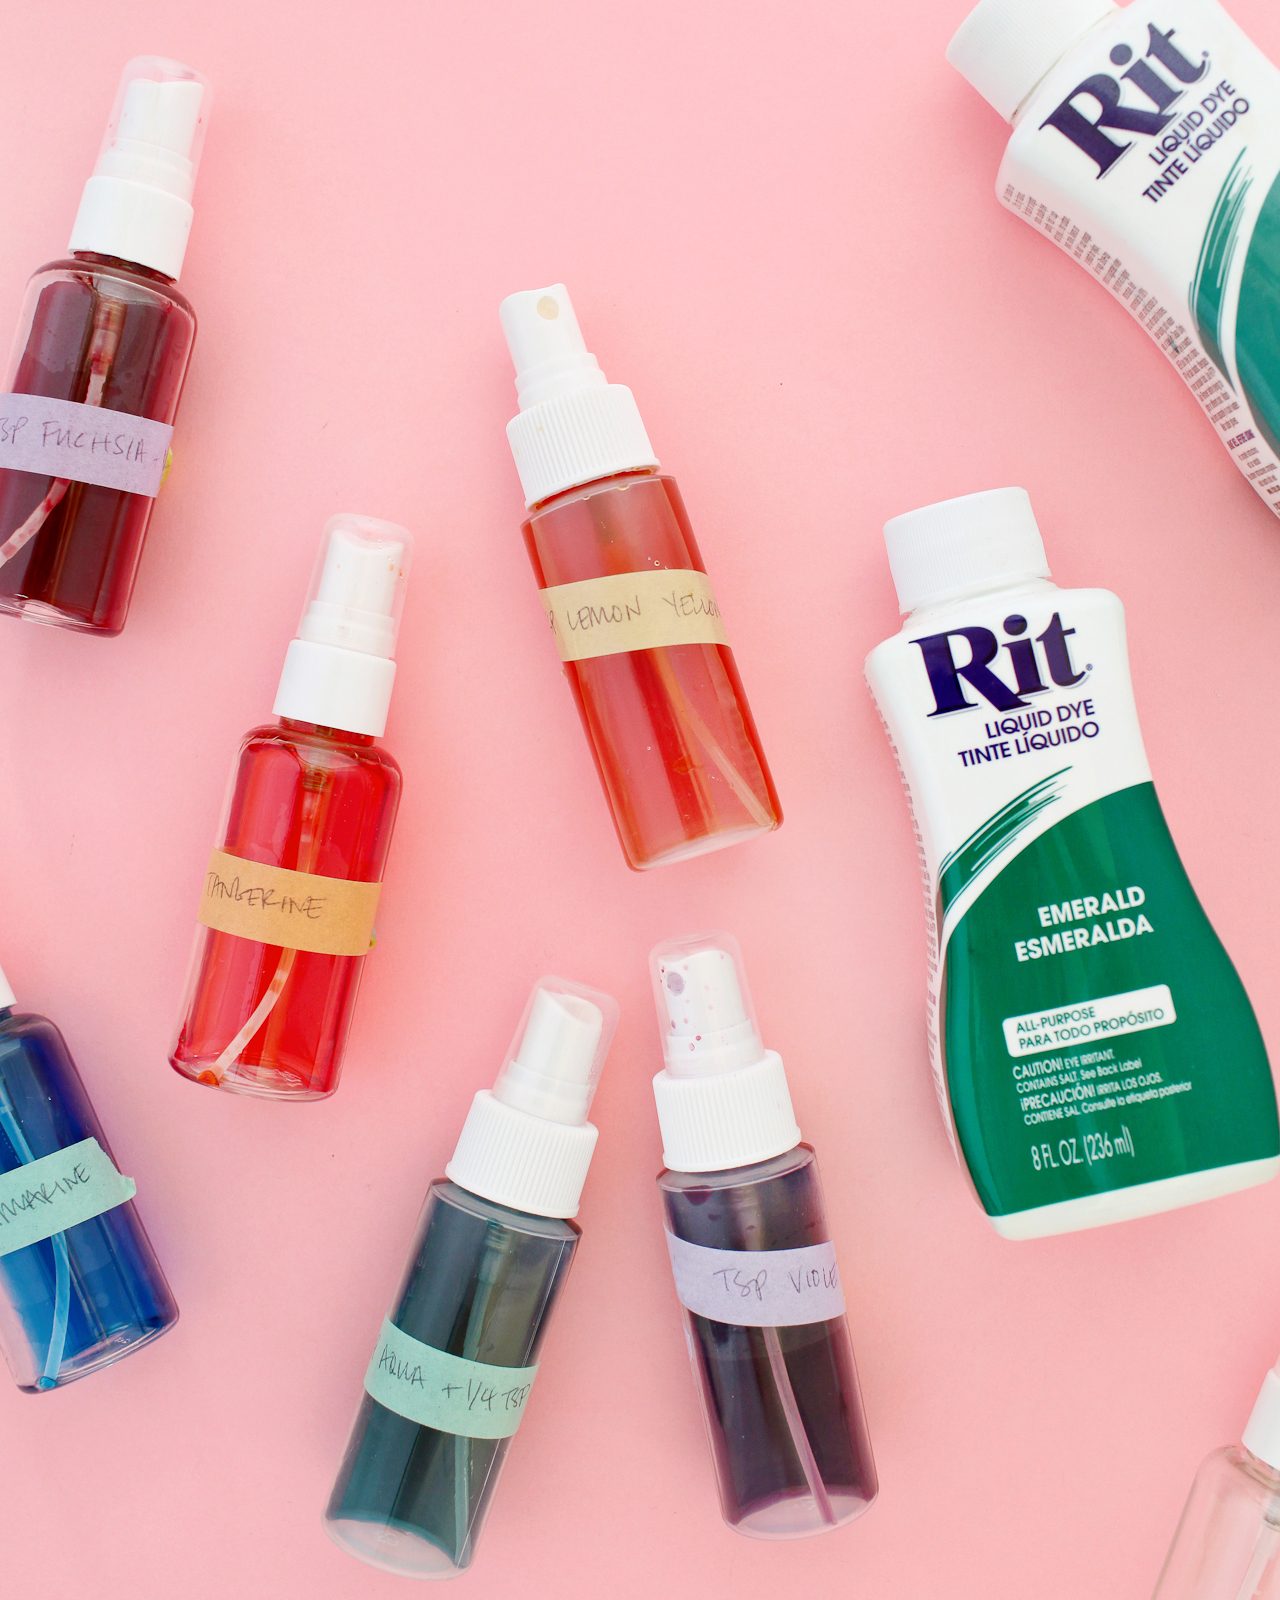
2.5 oz Fine Mist Spray Bottles one bottle per dye color – I used a total of twelve spray bottles)

8-10 White Crepe Paper Rolls

Scissors

Protective rubber gloves

Rags or paper towels

Protective drop cloth

Measuring spoons

Gaffer’s Tape

Wood Dowels

Removable wall hooks

DIY Rainbow Watercolor Backdrop with Rit All-Purpose Dye

To make the DIY rainbow watercolor crepe paper backdrop:

Step 1. First, you’ll need to pick your colors! The Rit Color Library breaks all of the color formulas down by parent color: red, orange, yellow, green, blue, purple, pink, brown, and gray. I knew I wanted spring-inspired colors, so I went with shades of pink, peach, light purple, blue, teal, mint green, and sunny yellow. But I can’t wait to try this again with different color combinations. Burgundy and blush? Lavender and deep dusty blue? Sage green and rose? Yes, yes, and yes!

DIY Rainbow Watercolor Crepe Paper Backdrop with RIT Dye

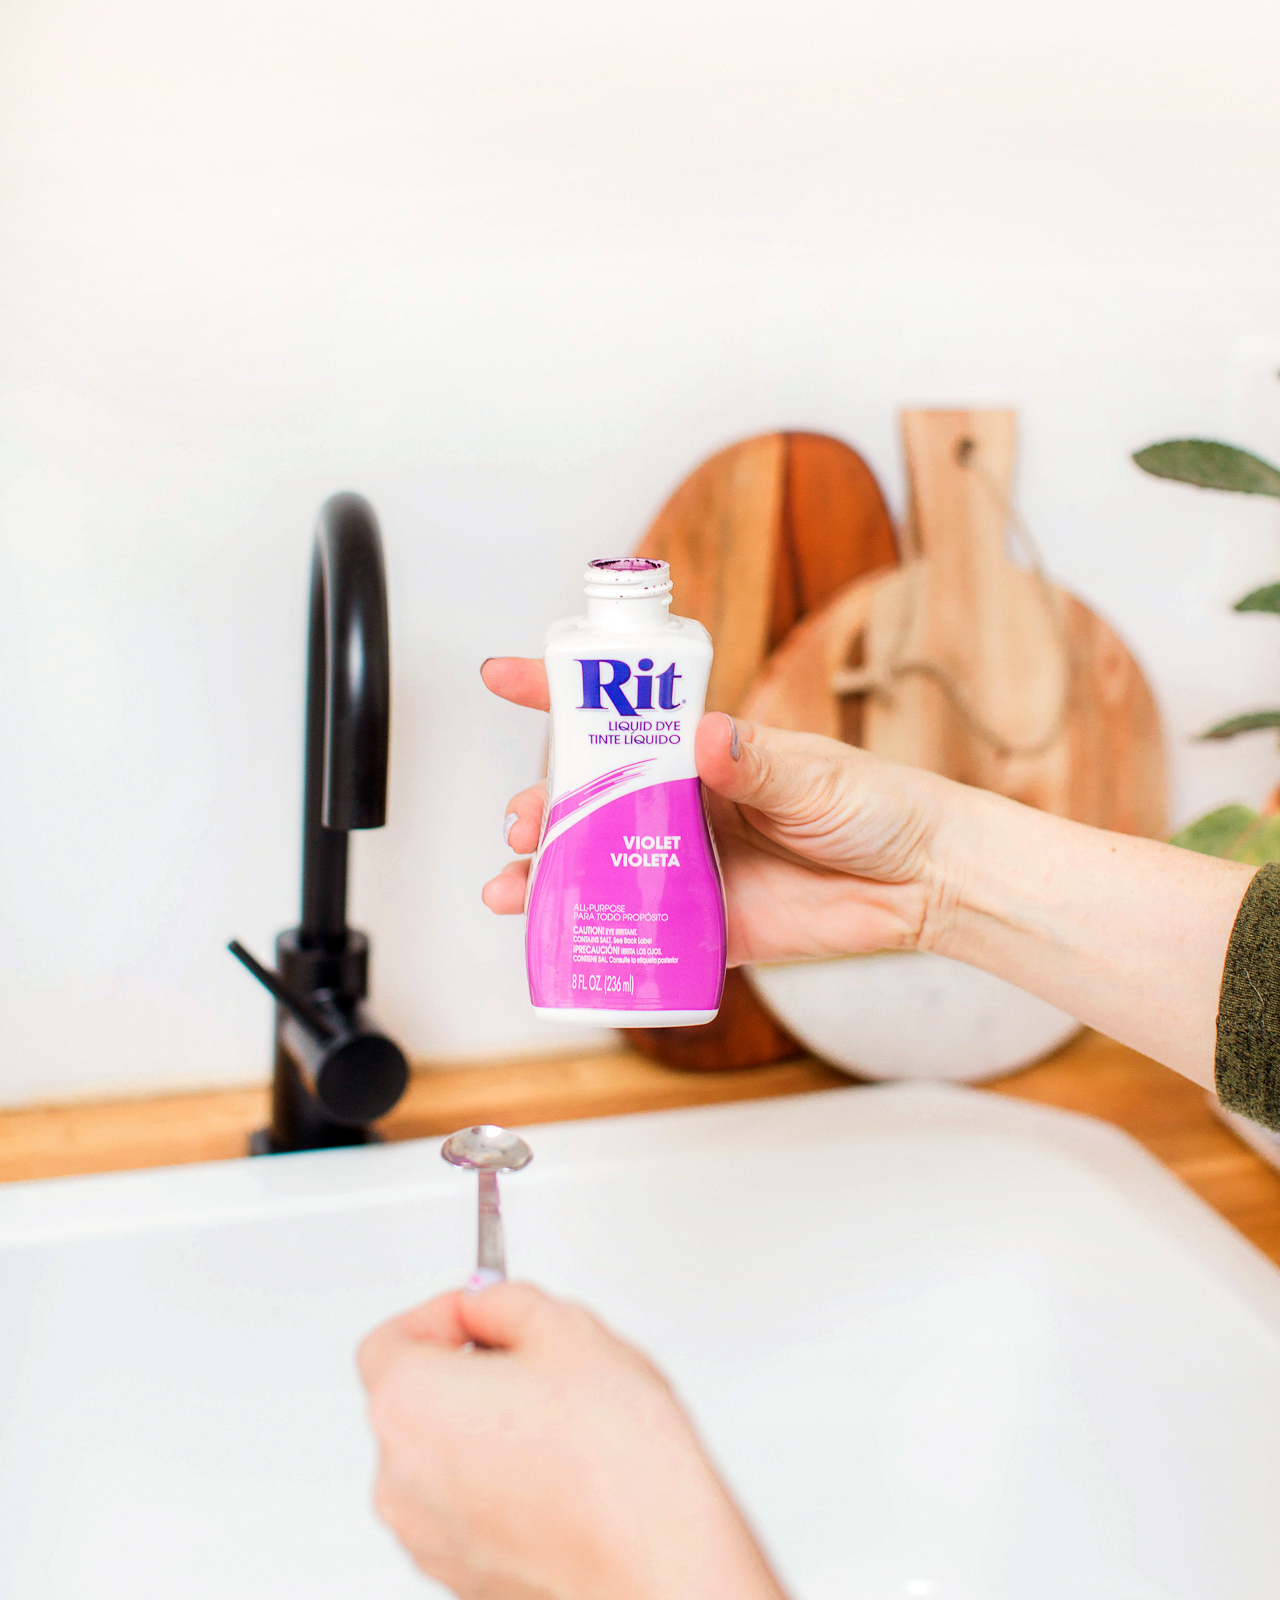
Step 2. Now that you’ve chosen your colors, mix your colors according to the recommended formula in the Rit Color Library, dividing the recommended dye amounts by 1/4. Don’t forget to wear your protective gloves! We’re using smaller amounts of dye than we’d need if we were planning to dye textiles, but because we’re turning the dye into a super fine mist, we still need the dye to be a bit more concentrated and intense. Dividing the color formula recipe by four seemed to do the trick for me! Shake dye bottles before pouring. Using a measuring spoon, measure the amount of Rit All-Purpose Dye and carefully pour the dye into the small spray bottles, then fill the spray bottle with hot water. Shake carefully to mix.

DIY Rainbow Watercolor Crepe Paper Backdrop with RIT Dye / Process

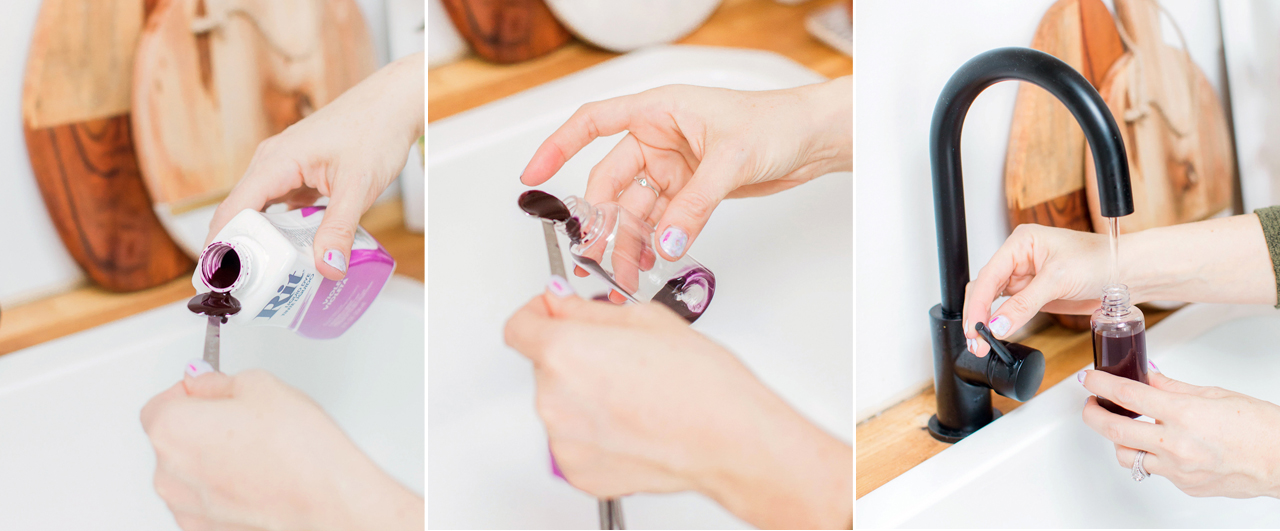
Pro tip: be sure to label your bottles as you go, otherwise you’re bound to lose track of what’s what (trust me on this). I used a bit of washi tape and wrote the color formula on a small piece of tape, then taped the written formula to each bottle.

Here are the exact color formulas that I used to create the backdrop:

DIY Rainbow Watercolor Backdrop / Rit All-Purpose Dye Color Formulas

Step 3. Unravel each roll of white crepe paper until it’s one big long sheet, then place each sheet on top of a protective drop cloth on the floor of your workspace. Before you start spray dyeing, be sure to test your colors on a test sheet of crepe paper – or even just on a paper towel – and let it dry completely. The colors will become more intense as they dry! If a color is too dark, pour out a portion of the bottle and add more water to dilute the color. If you need a color to be darker, I found it easiest to pour out the entire 2.5 oz bottle and start over – usually doubling the original quantity of each color (i.e., going from 1/2 teaspoon of kelly green to 1 teaspoon of kelly green to get the perfect shade of mint green).

DIY Rainbow Watercolor Crepe Paper Backdrop with RIT Dye

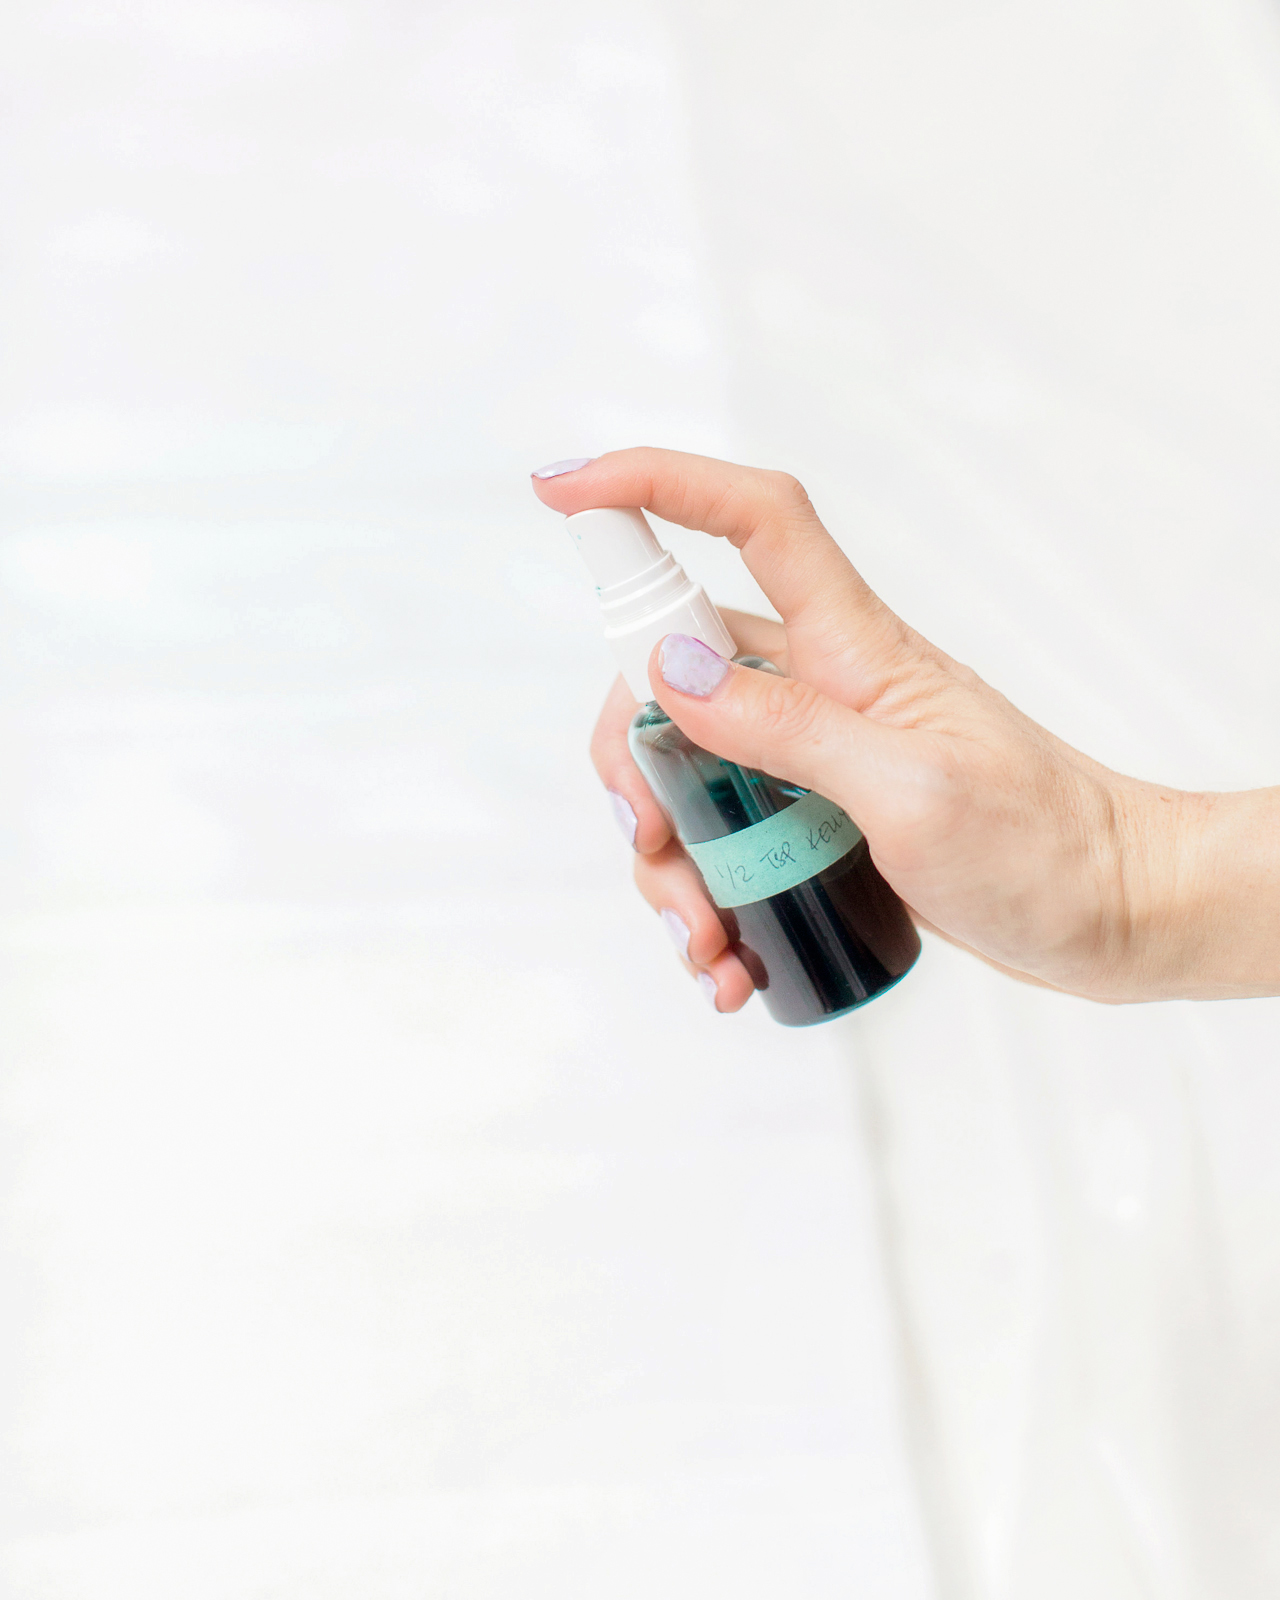
Step 4. Using one spray bottle at a time, spray a very light coat of Rit All-Purpose Dye all over each sheet of white crepe paper, using each dye color in rainbow order. I switched things up a bit with the color order; sometimes I would start with pink or peach at the top and work my way down to lavender, other times I started with lavender and end with blue. Whatever order you choose, place analogous colors next to each other (oranges into pinks into purples) so the colors flow smoothly into each other and don’t end up looking muddy. For the best and most consistent results, make sure the crepe paper doesn’t get too wet and blot the nozzle with a paper towel or a rag after 5-8 pumps to maintain a fine spray mist.

DIY Rainbow Watercolor Crepe Paper Backdrop with RIT Dye

DIY Rainbow Watercolor Crepe Paper Backdrop with RIT Dye

Step 5. Once you’ve dyed all of your crepe paper, apply a couple pieces of gaffer’s tape to one end of each sheet and tape the paper to the floor. Then, pull on the other side of the paper to remove the stretch in the crepe paper and tape the other end to the floor. Allow the crepe paper to dry completely, around 30 minutes, then remove the gaffer’s tape. It’s gentle enough that it shouldn’t tear the paper as long as you’re very careful while removing it!

Step 6. To hang the backdrop, use a few pieces of gaffer’s tape to adhere the crepe paper to long wooden dowels and use non-damaging, removable wall hooks to hang the backdrop. For added depth and visual interest, layer the crepe paper sheets over each other – or even cut some of the sheets into a variety of widths and mix them all together!

DIY Rainbow Watercolor Crepe Paper Backdrop with RIT Dye

DIY Rainbow Watercolor Crepe Paper Backdrop with RIT Dye

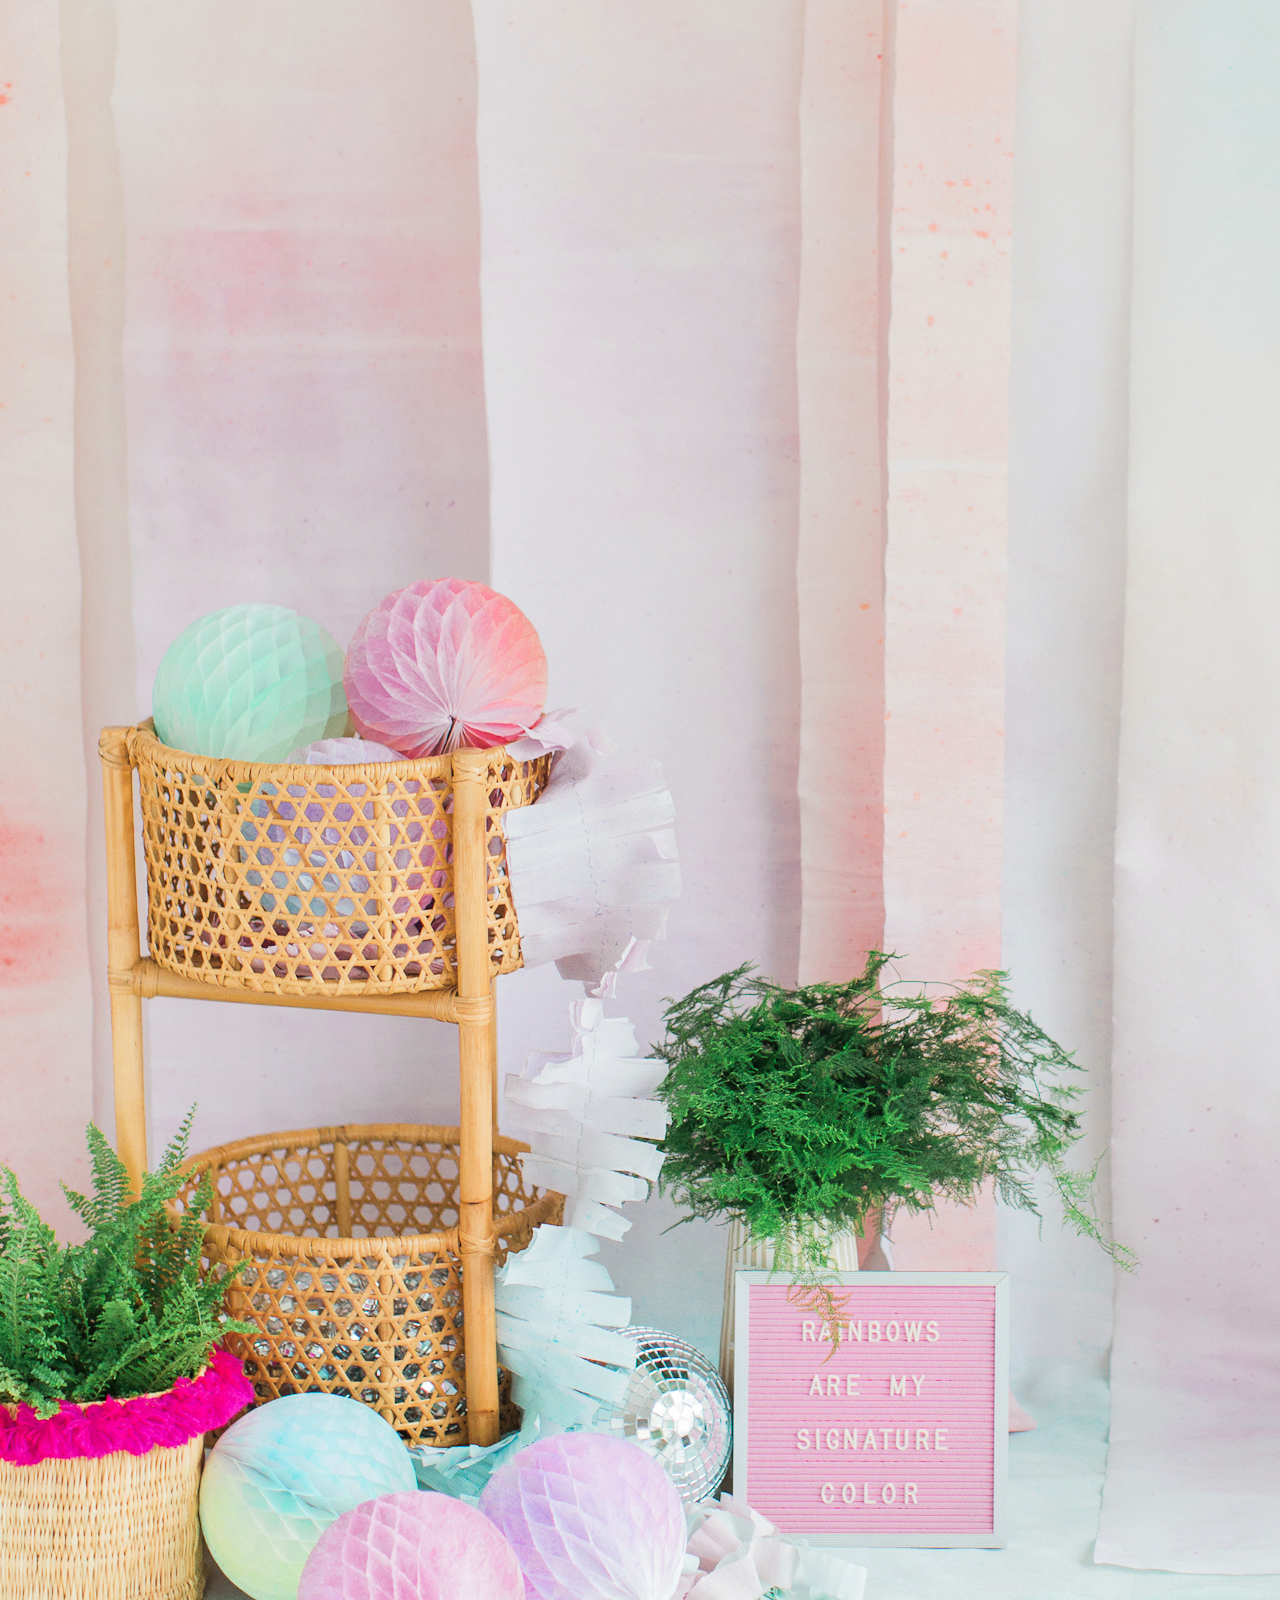
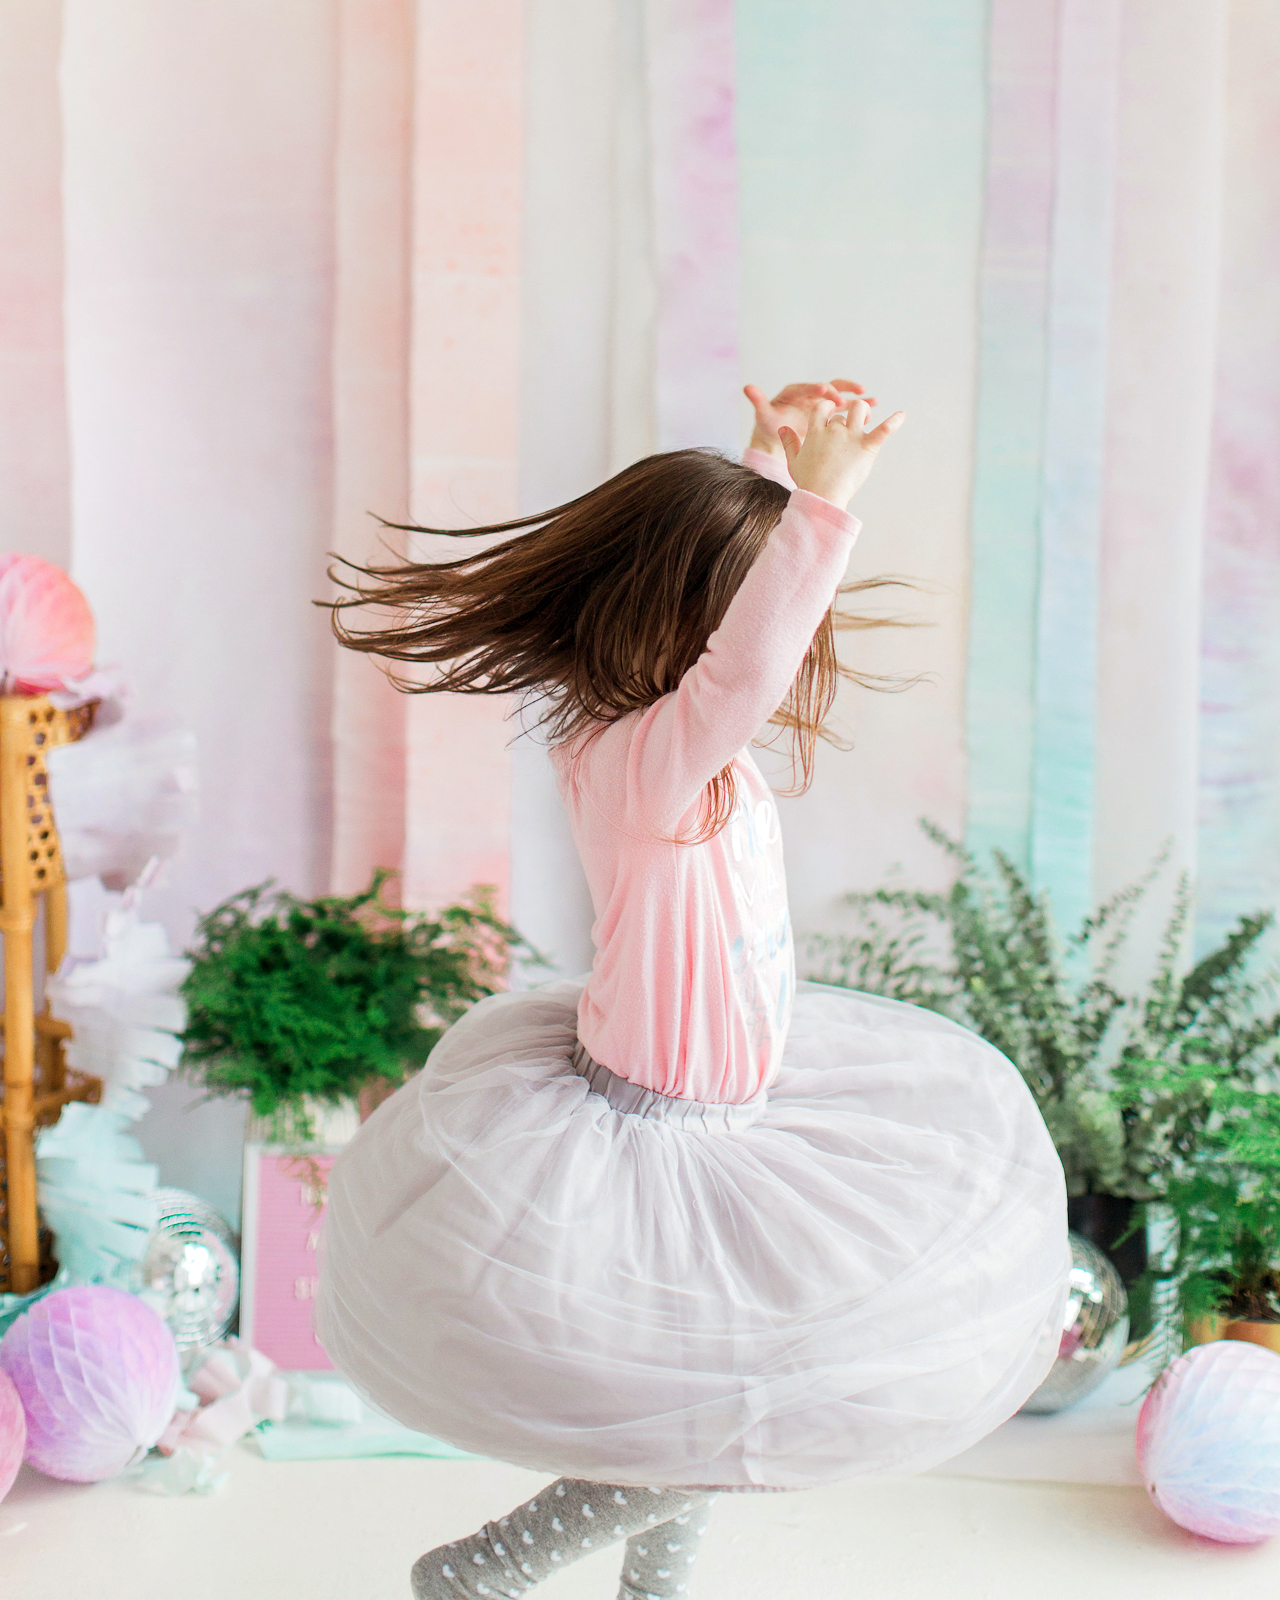
Ta da! It’s such a quick and easy way to add a dose of color to a wedding or party – and you can use the same technique to turn any white paper decorations into a rainbow, from round honeycombs to tissue paper fans and fringe crepe paper garlands! I absolutely LOVE this idea for a wedding ceremony backdrop – which you can reuse as a photo booth backdrop for the reception! Just be prepared for this backdrop to inspire a bit of twirling from your younger guests.

DIY Rainbow Watercolor Crepe Paper Backdrop with RIT Dye

DIY Rainbow Watercolor Crepe Paper Backdrop with RIT Dye

DIY Rainbow Watercolor Crepe Paper Backdrop with RIT Dye

DIY Rainbow Watercolor Crepe Paper Backdrop with RIT Dye

Pastels! Rainbows! Gah, I just love this DIY rainbow watercolor crepe paper backdrop SO much! But what do YOU think?? If you make this crepe paper backdrop for your wedding or party, be sure to share a photo on Instagram with the hashtag #madewithosbp so I can see it!

This is a sponsored conversation written by me on behalf of Rit Dye. The opinions and text are all mine. Check out the 50 shades of Rit All-Purpose Dye right here and browse over 500 color formulas in the Rit Dye Color Library here!


Photo Credits: Meghan Marie Photography and Nole Garey for Oh So Beautiful Paper

Holiday Gift Wrap Pairings

Okay, show of hands: who gets just as excited about finding the perfect wrapping paper during the holiday season? Or really, any time of year! My color palette changes from year to year, but I always enjoy mixing traditional holiday patterns with non-traditional (aka year-round) gift wrap patterns. So today I thought I’d show you how I’m wrapping my holiday gifts this season and how I’m mixing and matching my holiday gift wrap pairings to create an eclectic holiday vibe. Oh, and the ribbons! That might actually be my favorite part. Plus, I’ve got a fun DIY gift tag coming up tomorrow that adds just the perfect amount of sparkle to your holiday gifts. Let’s jump right in!

Beautiful Holiday Gift Wrap Pairings

Each year, I start with a color palette. In past years I’ve done kraft paper gift wrap with red and white accents, I’ve done all metallics, and last year I went with pink and green in honor of my daughter’s favorite colors. I’m normally not a traditional red-and-green-Christmas kind of girl, but this year I was definitely feeling it – so I decided to just roll with it! My color palette for this year ended up being red, white, and black mixed with pops of green, gold, and silver. I’m loving it!

Beautiful Holiday Gift Wrap Pairings

Once I have my color palette established, I pick out 1-2 patterns in the following categories: traditional, modern, and non-traditional. This year, my traditional patterns were plaid and tiny polka dots, my modern pattern was large painterly dots, and my non-traditional patterns were iridescent white and green marbled gift wrap. I find it’s easiest to mix linear patterns (like stripes and plaids), polka dot patterns (large and small), solids, and one organic or abstract pattern like marbling or hand painted patterns. You can definitely mix illustrated gift wrap patterns, but make sure you pick different pattern sizes (not all large scale illustrations or all small scale illustrations) and keep them in the same color palette to avoid clashing.

Beautiful Holiday Gift Wrap Pairings

Let’s start with the traditional patterns! I can’t resist a good buffalo check, and I went all in with a plaid ribbon, too! It looks so pretty with a bit of greenery tucked into the ribbon! I also love the plaid ribbon layered over white iridescent gift wrap from the Target birthday party supply aisle.

Beautiful Holiday Gift Wrap Pairings

Beautiful Holiday Gift Wrap Pairings

Buffalo Check Gift Wrap | White Iridescent Gift Wrap | Plaid Grosgrain Ribbon | Glitter Wire Ribbon | Gold Metallic Line Ribbon

Beautiful Holiday Gift Wrap Pairings

You can’t go wrong with polka dots! I love the contrast between the tiny red and gold polka dots (from this year’s Sugar Paper for Target collection) and the larger multicolor hand painted dots from Our Heiday. And those new Drittofilo cotton ribbons from Angela Liguori? An instant favorite!

Beautiful Holiday Gift Wrap Pairings

Beautiful Holiday Gift Wrap Pairings

Red and Gold Dot Gift Wrap | Hand Painted Dot Gift Wrap | Drittofilo Cotton Ribbons (in Natural with Black, Red, and Gold edges)

Beautiful Holiday Gift Wrap Pairings

Don’t they look so pretty all mixed together? When wrapping a set of gifts (these are Star Wars books for our nephew) with multiple patterns, I like to keep the ribbon fairly simple. This gold tinsel ribbon is simple but very festive!

Beautiful Holiday Gift Wrap Pairings

Hand Painted Dot Gift Wrap | Red and Gold Dot Gift Wrap | Buffalo Check Gift Wrap | Gold Tinsel Ribbon

This iridescent white gift wrap is pretty much my favorite thing ever. That shimmer! And I love the way it can look surprisingly traditional or completely modern depending on the trim!

Beautiful Holiday Gift Wrap Pairings

Beautiful Holiday Gift Wrap Pairings

White Iridescent Gift Wrap | Plaid Grosgrain Ribbon | Wood Spool Stripe Ribbon (in Natural/Black) | Silver Tinsel Ribbon | Mint Color Twist Wool Ribbon

I’m completely obsessed with this green marbled gift wrap. The color is just perfect for the holiday season! This particular design is from Katie Leamon in the UK, but this fair trade handmade paper is also really pretty and can be found at Paper Source if you want it in time for Christmas.

Beautiful Holiday Gift Wrap Pairings

Beautiful Holiday Gift Wrap Pairings

Green Marbled Gift Wrap | Hand Painted Dot Gift Wrap | Green Grosgrain Ribbon | Black and Gold Bow

Beautiful Holiday Gift Wrap Pairings

Beautiful Holiday Gift Wrap Pairings

Beautiful Holiday Gift Wrap Pairings

Beautiful Holiday Gift Wrap Pairings

So that’s what I picked this year! What’s your holiday gift wrap style? Do you go more traditional or modern? Tell me tell me!

Gift Tag Calligraphy: Meant to Be Calligraphy

p.s. DIY gold and copper leaf hexagon gift tags!

Photo Credits: Meghan Marie Photography and Nole Garey for Oh So Beautiful Paper

Favorite DIY Halloween Ideas!

I have a couple of fun DIY pumpkin projects that I can’t wait to share with you – but first, I thought I’d revisit some of my favorite DIY Halloween ideas from years past! First up, these DIY hologram galaxy pumpkins are SO much fun to make – and the results are SO cool! This method will work on pretty much any dark pumpkin, from matte black to a deep navy blue!

DIY Hologram Galaxy Pumpkins

DIY Hologram Galaxy Pumpkins

DIY Hologram Galaxy Pumpkins

Everything’s coming up rainbows! These colorful Halloween treat bags would be perfect for a non-traditional Halloween party:

Colorful DIY Halloween treat bags

Colorful DIY Halloween treat bags

For those of you with school-aged kids, I created these fun printable Halloween classroom treat bags with some of my favorite Halloween puns. Print them on any paper color (I used kraft paper and vellum), and fill them with sweet (or healthy) treats! You can also use white Pen-touch paint markers to add a few fun patterns on black treat bags!

Printable Halloween Classroom Treat Bags

Printable Halloween Classroom Treat Bags

And for those of you planning an adult Halloween party – printable calligraphy treat bags


Printable Calligraphy Halloween Favor Bags / A Fabulous Fete for Oh So Beautiful Paper

Printable Calligraphy Halloween Favor Bag / A Fabulous Fete for Oh So Beautiful Paper

Printable Calligraphy Halloween Treat Bags

My kids aren’t quite ready for the super scary side of Halloween, so I created this quirky DIY eyeball Halloween door cover using circle craft punches in a variety of sizes! Wouldn’t this be completely adorable on a classroom door??

DIY Eyeball Halloween Door Cover

DIY Eyeball Halloween Door Cover

Any requests for specific Halloween DIY projects? I’m all ears!

Printable Illustrated Ice Cream Cone Wrappers

I have a really fun (and easy!) DIY project for you today: printable illustrated ice cream cone wrappers! My girls have been obsessed with ice cream cones lately and also happen to have birthdays coming up real soon, so I’m fairly confident that we’ll be making ice cream cones at their birthday party. I teamed up with Kim from Bright Room Studio to make these colorful illustrated ice cream cone wrappers to bring an extra dose of color to our favorite summer treat!

Printable Illustrated Ice Cream Cone Wrappers

Printable Illustrated Ice Cream Cone Wrappers

I absolutely adore the illustrations that Kim whipped up for these wrappers – so colorful and summery! And the sweet treat theme of the illustrations is so versatile, you can use these for any type of event. Wouldn’t they be so cute at an end-of-summer Labor Day BBQ? Or use them at a birthday party any time of year!

Printable Illustrated Ice Cream Cone Wrappers

Supplies

White text weight or cover weight paper

Printable template (choose sugar/waffle cones or cake cones)

Scissors

Washi tape in your favorite color

Printable Illustrated Ice Cream Cone Wrappers

To make the printable illustrated ice cream cone wrappers:

Step 1. Print out the free template on white text or cover weight paper. You can use this template for sugar and waffle cones, or this template for cake cones.

Step 2. Cut out each individual ice cream cone wrapper with scissors, being careful to cut just inside the template outline. Wrap around an ice cream cone and secure with a piece of colorful washi tape, and voila!

Printable Illustrated Ice Cream Cone Wrappers

Printable Illustrated Ice Cream Cone Wrappers

Printable Illustrated Ice Cream Cone Wrappers

Gah! I’m obsessed with these adorable illustrations of delicious summer treats!

Printable Illustrated Ice Cream Cone Wrappers

Printable Illustrated Ice Cream Cone Wrappers

Sweet, simple, and so fun! Download the printable ice cream cone wrapper templates below!

SUGAR + WAFFLE CONE TEMPLATE

CAKE CONE TEMPLATE

p.s. Printable hologram foil ice cream cone wrappers and printable hand lettered gift tags and favor labels!

Bright Room Studio is a member of the Designer Rolodex  â€“ you can see more of Kim’s beautiful work right here!

All artwork © 2017 Bright Room Studio created exclusively for Oh So Beautiful Paper. All artwork is made available for personal use only. By downloading the patterns you agree to the terms of use.

Photos by Nole Garey for Oh So Beautiful Paper