Happy Weekend!

Happy Friday everyone! Time seems to be moving faster and faster these days – I can’t believe Christmas is only three weeks away! This weekend we’re looking forward to catching up on some sleep (thanks again toddler and newborn). Next week I’m excited to share a few gift guide posts – although last year’s gift guides are still full of some great ideas and worth checking out – not to mention more holiday cards! But in the meantime…

Giant-Origami-Instagram

Photo by Giant Origami

…a few links for your weekend!

This week on Oh So Beautiful Paper:

Check back soon for this week’s cocktail! I hope you all have a wonderful weekend, and I’ll see you back here next week! xoxo

DIY Tutorial: Handmade Stationery Holiday Gift Box Set

Every year, we try to make at least some of the gifts that we give to friends and family for the holidays. This year, we decided that giving them an all-in-one stationery kit would be perfect! Not only will they love having everything they might need at hand, it also encourages them to send more snail mail throughout the year! For this gift, we converted a little portable sketch box into a fabulous carry all for paper loveliness. We hope our friends and family like them (shh-don’t tell)-and we hope you do too! –Bailey and Emma of Antiquaria

DIY Tutorial: Stationery Holiday Gift Box Set by Antiquaria for Oh So Beautiful Paper

Materials

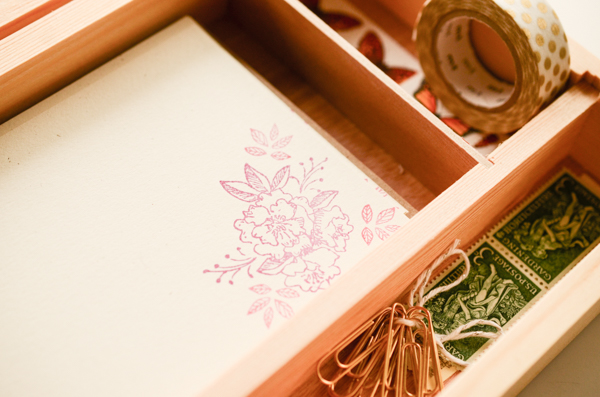
Small Sketch Box, similar to this. We bought ours locally at Aaron Brothers. They told us that it is a regular in-store item.

Patterned Text Weight Paper in Lucy Floral

Cardstock, in Milkweed and Fuchsia

Monarch Envelopes, in kraft

Camellia Monogram Stamp Kit

Stamp Pads, Magenta and Peony

Divine Twine, in Silver

Self Healing Mat, Metal ruler and Craft Knife

Spray Adhesive

1/8 inch hole punch

Rubber Bands

Optional: Foil notebook, New and Vintage postage, Pens, Washi Tape, Gold Paper Clips

DIY Tutorial: Stationery Holiday Gift Box Set by Antiquaria for Oh So Beautiful Paper

DIY Tutorial: Stationery Holiday Gift Box Set by Antiquaria for Oh So Beautiful Paper

Step One: Cut your papers. For this set, you will need 2 pieces of Lucy floral text paper (cut to 6.5″x10″), 6 pieces of Milkweed card stock (cut to 3.75″ x 7.25″ – should yield 12 cards) and 1 piece of fuchsia card stock (cut to 1.5″ x 3.5″). The smaller tags are the remnants from the Milkweed cards.

DIY Tutorial: Stationery Holiday Gift Box Set by Antiquaria for Oh So Beautiful Paper

Step Two: Next, you’ll want to stamp your monarch cards for the set. We included 12 cards and envelopes in our kit. Stamp the Camellia pattern stamp first in Peony ink, as shown, and then add the small leaves around it in Magenta ink. We love that every card is a little different! Set cards aside to dry.

DIY Tutorial: Stationery Holiday Gift Box Set by Antiquaria for Oh So Beautiful Paper

Step Four: Punch holes in your gift tags (fuchsia and milkweed) centering the hole on the small side of the card.

DIY Tutorial: Stationery Holiday Gift Box Set by Antiquaria for Oh So Beautiful Paper

Step Five: To add interest to the kit and to cover up the thumbhole in the “portable palette” part of the kit, you want to cover it with patterned paper. We purposefully cut our paper wider than the palette (6.5″ x 10″), applied spray adhesive to the back of the entire piece, laid the palette down to adhere, and then trimmed off the excess so that it’s fit was exact. Repeat this process for the second side.

DIY Tutorial: Stationery Holiday Gift Box Set by Antiquaria for Oh So Beautiful Paper

Step Six: We wanted to add some additional items to our kit that didn’t fit in the pre-sized containers below the palette. In order to fit them in, we decided to add rubber bands around the board. Not only are they handy, but we love that we were able to recycle the ones that we’ve been collecting from our grocery store takeout containers. We thought 3 was perfect for what we needed but feel free to use as few or many as you’d like!

DIY Tutorial: Stationery Holiday Gift Box Set by Antiquaria for Oh So Beautiful Paper

Step Seven: Now all that’s left is to fill the box! We had a ton of fun gathering coordinating items to include. We decided a notebook was good for jotting down thank you notes that need to be written, addresses, or simply quick thoughts.

We also included enough postage for 12 letters. We mixed vintage postage with new postage in a pretty garden theme.

What good is a gift tag without a way to tie it on? That’s why we included a length of silver metallic twine so that the recipient always had some good string at hand when wrapping gifts. Also included are some of our favorite felt tip pens as well as paper clips and of course, washi tape!

For an extra luxe gift, you could also consider including a return address stamp and stamp pad in the kit as well.

These boxes are easy to make and putting them together couldn’t be more fun! We love that every little bit can be customized to each person’s color preferences and stationery needs. We wish you happy DIY-ing this holiday season and hopefully we’ve inspired you to make some gifts this year too!

DIY Tutorial: Stationery Holiday Gift Box Set by Antiquaria for Oh So Beautiful Paper

DSC_5686

DIY Tutorial: Stationery Holiday Gift Box Set by Antiquaria for Oh So Beautiful Paper

Photos by Antiquaria for Oh So Beautiful Paper

Seasonal Stationery: 2014 Holiday Cards Part 2

I shared the first installment of my annual holiday card round up on Monday – and today I’m back with more favorite holiday cards! I’ve also been busy adding more cards from the designers below (and lots of others) to the full holiday card round up page right here!

2014 Holiday Card Round Up by Oh So Beautiful Paper

1. Ink Meets Paper

2. Antiquaria

3. Our Heiday

4. Belle & Union

5. Rifle Paper Co.

6. lala grace

2014 Holiday Card Round Up by Oh So Beautiful Paper

7. Fig.2 Design

8. My Dear Fellow

9. Quill and Fox

10. Pei Design

11. One Canoe Two

12. Shannon Kirsten

13. Cardtorial

Check out the full holiday card round up – with 400+ holiday cards – right here!

DIY Tutorial: Holiday Envelope Addressing Ideas

As you might be able to guess, we send quite a lot of snail mail in our line of work. Whether it’s thank you notes, catalogs, color samples, or a letter to our loved ones, we try to make all of our outgoing mail a treat for the recipient to receive. Since we have holiday cards on the brain, we decided to come up with some fun and easy addressing options suited to the season. They incorporate fun lettering styles as well as stamping and we just love them all! Want more DIY addressing styles? Check out our first envelope addressing post here. Have fun with the designs and happy addressing! –Bailey and Emma of Antiquaria

DIY Tutorial: Holiday Envelope Addressing Ideas by Antiquaria for Oh So Beautiful Paper

Option One: Do Not Bend Pennant Stamp + White DIY Pointed Pen Calligraphy Addressing. White stamping and white calligraphy ink really pop off of this gorgeous fig colored envelope. While it takes time to perfect using a pointed calligraphy pen, feel free to experiment also with white or silver gel pens for a similar (and easier) effect.

DIY Tutorial: Holiday Envelope Addressing Styles by Antiquaria for Oh So Beautiful Paper

Stamp your Please Do Not Bend Pennant Stamp on the lefthand side of your envelope, just a hair above the center. With your pen, draw a line to the bottom with white ink.
DIY Tutorial: Holiday Envelope Addressing Styles by Antiquaria for Oh So Beautiful Paper

Next, address the envelope to your loved one using a pointed calligraphy pen and white ink. Start your addressing right below the pennant stamp, as shown above.

DIY Tutorial: Holiday Envelope Addressing Styles by Antiquaria for Oh So Beautiful Paper

Let the addressing dry completely (with white calligraphy ink this can take a few hours). Once it’s dry, add your postage and then stamp our Long Live Snail Mail Stamp to the left. Feel free to play with the lettering style of addressing on this design! A simple hand-written block print with white or silver gel ink also looks lovely (see below)!
DIY Tutorial: Holiday Envelope Addressing Styles by Antiquaria for Oh So Beautiful Paper

Option Two: Zig-Zag Stamp + Bold Brush Block Lettering. Adding a line of pattern along the bottom of the envelope instantly adds an air of “fun” to the design. When paired with an easy brushed address, the effect is bold and will stand out instantly among the bills and junk mail!

Mint-AddressingDIY Tutorial: Holiday Envelope Addressing Styles by Antiquaria for Oh So Beautiful Paper

Print your zig-zag stamp in black ink along the bottom edge of the mint colored envelope. You’ll want to make sure that each printing is close together but not overlapping.
DIY Tutorial: Holiday Envelope Addressing Styles by Antiquaria for Oh So Beautiful Paper

With a black brush pen, write out your loved one’s name. We decided to make big block letters for their name (with the mint color showing in the center) and a simple italic print for the address. Once the address is done, add your postage and our Long Live Snail Mail Stamp to complete the look!
DIY Tutorial: Holiday Envelope Addressing Styles by Antiquaria for Oh So Beautiful Paper

Option Three: Deliver To Banner Stamp + Hand-lettered Script. Bailey actually designed this adorable “Please Deliver To” stamp to use on her save the date a while back and we think that it makes the perfect snail mail statement on this coral envelope when combined with red addressing. The fun part of this design is that you get the look of calligraphy but with simpler tools! A common felt tipped pen made this gorgeous script. Incredible, right?

DIY Tutorial: Holiday Envelope Addressing Styles by Antiquaria for Oh So Beautiful Paper

Start by stamping your Deliver To Banner Stamp on the left hand side of the envelope, a little above center. Angle it so that you can nestle the lettering in underneath it. To make the hand lettered script, use your prettiest cursive and write the name across your envelope. Then, draw a second line along each letter, creating the thick and thin look (as shown above). Refer to a favorite script font for letter shape and style, if needed.

DIY Tutorial: Holiday Envelope Addressing Styles by Antiquaria for Oh So Beautiful Paper

Once you’ve done that for the entire name, color in the letters so that they are solid red. Finish out the addressing with a simple italic print for the address. We also added a fun flourish underneath the last address line to gussy the envelope up even more! Draw it in pencil first or practice on a scrap piece of paper if you need to before executing it on your envelope.

DIY Tutorial: Holiday Envelope Addressing Styles by Antiquaria for Oh So Beautiful Paper

While we think all of these styles would be perfectly suited to holiday greetings, we also think that they could be adapted and used on save the dates and Invitations as well! Play around with the techniques and find out what you like best with the cards that you’re sending. We hope that you have just as much fun addressing your cards as you do selecting them!

Materials and Resources

Special Delivery Stamp Kit: Deliver To Banner, Long Live Snail Mail and Do Not Bend Pennant

Feathers & Arrows Stamp Kit: contains the zig-zag stamp

Calligraphy Starter Kit

White Calligraphy Ink

Calligraphy Resources: Setting up your Tools,  Lower Case Alphabet by Bailey Rivera, Calligraphy Supplies

Brush and Felt Tipped Pens

For envelopes, we discuss many different envelope resources and options in a previous post, found here.

Current USPS Postage

Vintage Postage

Photography by Antiquaria for Oh So Beautiful Paper

DIY Tutorial: Printable Thanksgiving Table Décor

With shorter days and a chill in the air, we know that Thanksgiving is right around the corner. This holiday is a favorite of ours; a day filled with great food, friends and family. A day where we slow down to give thanks and reflect upon all of the great things that fill our lives. As lovers of décor, we always like to dress up the table with beautiful dishes, linens, and paper accents. This year, we decided to design a coordinating set of paper items that you can use on your table! The downloadable set includes place cards, a menu, and A2 Thankfulness cards. We are excited to share our designs with you, and hope that they make your festivities extra special! –Bailey and Emma of Antiquaria

Printable Thanksgiving Table Décor by Antiquaria for Oh So Beautiful Paper


Printable Thanksgiving Table Décor by Antiquaria for Oh So Beautiful Paper


You can download the set of designs by following this link.  Once downloaded, print them out on your home printer, making sure that the settings are for the best color quality and on 100% scale. We printed them out on a lovely cream uncoated card stock.

Printable Thanksgiving Table Décor by Antiquaria for Oh So Beautiful Paper

The place cards can be used either as a tented card by cutting out the card along the lines and folding the design in half (it helps to score the middle first) or as a flat card, as we’ve shown, by cutting the design in half.

Printable Thanksgiving Table Décor by Antiquaria for Oh So Beautiful Paper


Printable Thanksgiving Table Décor by Antiquaria for Oh So Beautiful Paper

Fill out the menu with all of the dishes in your Thanksgiving feast in your prettiest handwriting. It helps to pencil the words in lightly first, before writing them in ink. That way, you will be sure that the lines are generally centered!

Printable Thanksgiving Table Décor by Antiquaria for Oh So Beautiful Paper

Printable Thanksgiving Table Décor by Antiquaria for Oh So Beautiful Paper


These Thankfulness cards are the perfect way that you and your guests can take a moment to reflect on all of the things that bring joy into their lives. To make them, just cut the printed letter size page into four equal cards (4.25″ x 5.5″). We added a further finishing touch by notching in the corners with a specialty punch. These will also fit inside an A2 envelope so feel free to print some out to mail to friends and family that can’t celebrate with you in person!

Printable Thanksgiving Table Décor by Antiquaria for Oh So Beautiful Paper


Printable Thanksgiving Table Décor by Antiquaria for Oh So Beautiful Paper


We hope that you have a beautiful holiday and above all are able to share a warm meal with those you hold dear. Enjoy!

Please note that the designs in this tutorial are © Antiquaria and intended for personal, non-commercial use only.

Photography by Antiquaria for Oh So Beautiful Paper