Mary + Nathan’s Beautiful Papercut Ketubah

I featured this beautiful Jewish wedding on my DC-area wedding blog, United With Love, last week.  The couple, Mary and Nathan, had a stunning papercut ketubah (Jewish marriage contract) and I couldn’t resist sharing this particular detail here on OSBP.  The design is relatively simple – just white paper and digital calligraphy with the laser cut details, but I actually prefer a simple white ketubah to some of the more colorful options.

Traditional-Jewish-Wedding-Papercut-Ketubah

Traditional-Jewish-Wedding-Ketubah

I asked Mary and Nathan where they found the ketubah and was expecting to hear that they had worked with a local artist, but it turns out they found it online.  This particular ketubah is called Winter by Ruth Stern Warzecha, but you can check out some of the other designs right here.

Photo Credits: Inbal More Photography

DIY Geek Chic Graph Paper Save the Dates

It’s the ladies of Antiquaria, back with another fabulous and creative DIY project for you all!  This project is for wedding save the dates, but you can easily apply this tutorial to any party invitations or announcements!

Inspired by some awesome vintage graph paper we found while rummaging through an estate sale, we crafted up this super easy (only 3 steps!) and affordable DIY save the date perfect for a casual and cheeky affair!!  This project requires just a few materials and most that are extremely easy to find – you might even have them hanging around your office at this very moment.

DIY Geek Chic Rubber Stamp Wedding Save the Date Tutorial

Step One: Choose the paper you wish to stamp on (a list of options follows below) and lay it on a flat surface.  Ink the stamp; we used the “Sketchbook” save the date stamp for this design.

Hand Stamped Save the Dates: Step 1

Step Two:  Once you have all of your images stamped, use a paper cutter or a cutting mat, x-acto knife and ruler to cut them to the correct size.  Our suggestion is to give 1/8″ to 1/4″ of border on each side of your image.

Hand Stamped Save the Dates: Step 2

Step Three: Tear pieces of decorative washi tape to secure the stamped image in place on the backer (size A6).  If you want the stamped image to be more securely affixed to the backing, use spray adhesive to adhere them together.

Hand Stamped Save the Dates: Step 3

Materials List:

Custom rubber stamp: “Sketchbook” Save the Date

Washi tape

Spray adhesive

Decorative Paper: (this can be found at your local office supply store, thrift stores, estate or garage sales or in your own office!)  Or, if you want, go here to print your own customizable graph paper for free!!

Paper cutter or self healing matt, X-acto and ruler

Color Box Stamp Pad: We chose a rust/brown color for this tutorial

Backing Paper: We used pre-cut Kraft card stock, size A6

Photo Credits: Antiquaria

Rachel + Stefan’s Modern Pink Wedding Invitations

One of my favorite jewelry designers, Rachel from Elephantine, is getting married in a few weeks – and she’s here to share her wedding invitations!  I first fell in love with her sweet and simple illustrated save the dates back in December, and I love the way she incorporated her signature modern style into a sophisticated and meaningful invitation suite.  Rachel and Stefan are planning a small wedding and were able to invest some time into creating a personalized invitation for each recipient.  So pretty!

Modern-Pink-Wedding-Invitations

From Rachel:  I’ve always had my heart set on a wedding invitation with multiple parts to it. (I’ve also always had this fascination with things that contain several smaller things, like matryoshka dolls.)  Our invitation is made up of three flat cards, printed on both sides: one is the actual invitation, another has important details and a detachable RSVP, and a third has a map & directions.  Then there’s the RSVP envelope and the mini calendar reminder for guests to put in their day planner or on their fridge.

Modern-Pink-Wedding-Invitations-Suite

Modern-Pink-Wedding-Invitations-Detail

I wanted the invitations to feel personal to the recipients. The whole “suite” is held together by a band that I reverse-printed each invitee’s name on.  When the band comes off, it reveals the “Love, R & S” on the first card.  On the back of the first card is the actual invitation.  The fonts are Whitney and Cyclone.

Modern-Pink-Wedding-Invitations-Font

The last card has the nitty-gritty details and the RSVP, which can be detached.  I lightly perforated the “detach here” line above the RSVP with a tracing wheel.  On the back, there’s a quote from A.A. Milne, aka Winnie-the-Pooh’s author (“Some people care too much. I think it’s called love.”) and then there are a few lines for guests to write a note to us, if they’d like to.

Modern-Pink-Wedding-Invitations-RSVP

Modern-Pink-Wedding-Invitations-RSVP

Modern-Pink-Wedding-Invitations-Calendar

I printed the mailing & return addresses directly onto the envelopes, added a little bit of gold washi tape, and used my favorite stamps.  Et voilà!

Modern-Pink-Wedding-Invitations-Envelope

Absolutely fabulous!  Thanks Rachel!

Photo Credits: Elephantine

DIY Vintage Handkerchief Save the Dates

Hi Everyone!  Today I’m super excited to introduce a new DIY series from the ladies of Antiquaria, an online shop curated by designer Emma James (you might remember her awesome wedding invitations) and calligrapher Bailey Amon.  In addition to their shop, Emma and Bailey offer custom rubber stamps featuring Bailey’s calligraphy and they’ll be joining us here every couple of weeks with a fun DIY project to inspire all of you at home.  Let’s get started!

Hello!  We’re Bailey and Emma from Antiquaria, and we love vintage handkerchiefs!!  This tutorial uses custom rubber stamps to create elegant and original save the dates.  These offer your guests a true keepsake and help set the tone for your vintage wedding!

Vintage Handkerchief Save the Dates

DIY Hand Stamped Handkerchief Save the Dates : Step 1

Step One:

After washing and ironing the handkerchiefs to the desired size, choose stamp pad and ink up the custom  Save the Date stamp.  We used our  “Art Nouveau” Save the Date Stamp.  On a hard and sturdy work surface, place the inked stamp on the handkerchief and apply even pressure.  Then gently lift the stamp off the handkerchief.

Step 1: DIY Handkerchief Save the Dates

Step Two:

Most couples will find it necessary to include accommodation options with their Save the Date – including them in the invitation is often too late to capture discounted rates, etc.  For this Save the Date, we printed out an accommodations card with a compatible font, we then used Antiquaria’s  Wreath Monogram stamp to accent the enclosure.

Antiquaria DIY Hand Stamped Handkerchief Save the Dates: Step 2

Step Three:

Slide the accommodations card into the handkerchief and using your desired ribbon, tie them together, like a present.

DIY Hand Stamped Handkerchief Save the Dates : Step 3

Step Four:

Using a coordinating return address stamp {we used our Wildflowers Return Address Stamp}, ink the stamp and place it in the center of your square envelope.

**Remember to do this before you or a calligrapher addresses the envelopes so that you don’t have to redo any if you get a bad inking.**

DIY Hand Stamped Handkerchief Save the Dates: Step 4

Materials List

Custom Rubber Stamps like these:  “Art Nouveau” Custom Save the Date Stamp, “Wreath Monogram” Stamp, “Wildflowers” Return Address Stamp

Vintage Handkerchieves – Iron to 5.5 x 5.5 squares with starch and a hot iron.  Check Ebay for lots of handkerchieves.  It is more affordable to buy them in bulk than one at a time.  Expect to pay $1-3 per handkerchief for vintage handkerchieves for this project.  Etsy and local thrifts are other good places to look for them.

Colorbox Stamp Pad – we used a variety of pinks and neutrals for this project.

5.5″ x 5.5″ Flat Card – for the accommodations card

5.75 x 5.75 Square Envelope

Hand Painted Silk Ribbon

Photo Credits: Antiquaria

National Stationery Show 2011 – Part 10

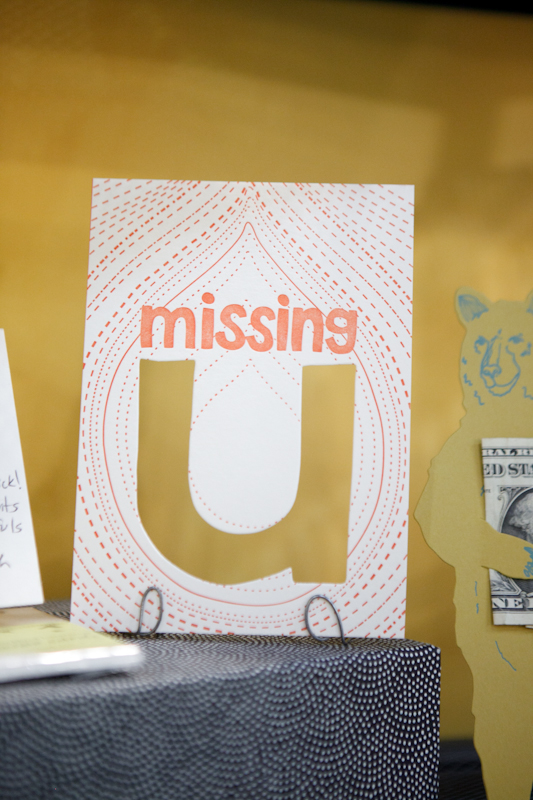
It’s time for another installment of our National Stationery Show coverage!  First up for today, Kathryn from Blackbird Letterpress, with more of her beautiful die cut greeting cards – including a new bee design for this year and a “missing u” note card that would be perfect for anyone with a far-away loved one.

Blackbird Letterpress

Allison from Igloo Letterpress is always coming up with new and creative applications for her designs – from pull out letterpress greeting cards to fun die cut cards.   This year Allison debuted a set of notebooks inspired by brownstone architecture – line up each design for your own little neighborhood!

Igloo Letterpress

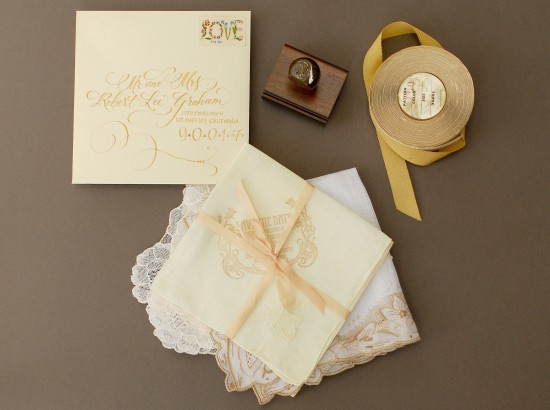
So many pretty things over at the Wiley Valentine booth!  From new greeting card designs to wedding invitation albums and baby stationery, these ladies have been keeping busy!

Wiley Valentine

Tina from Joie Studio made her Stationery Show debut this year, with a booth full of letterpress greeting cards, wedding invitations, and pinwheel party accessories.  I’m loving the fruit note cards below – so cute!

Joie Studio

Brad from Maginating always has the best collection of greeting cards – the bacon and egg card below is still one of my all-time favorites, but I’m loving the new perfect match and cheer up cards, too.

Maginating

The ladies from Sugarcube Press had an adorable and ruffle-filled booth with tons of pretty stationery – calendars, greeting cards, coasters, bookplates, oh my!

Sugarcube Press

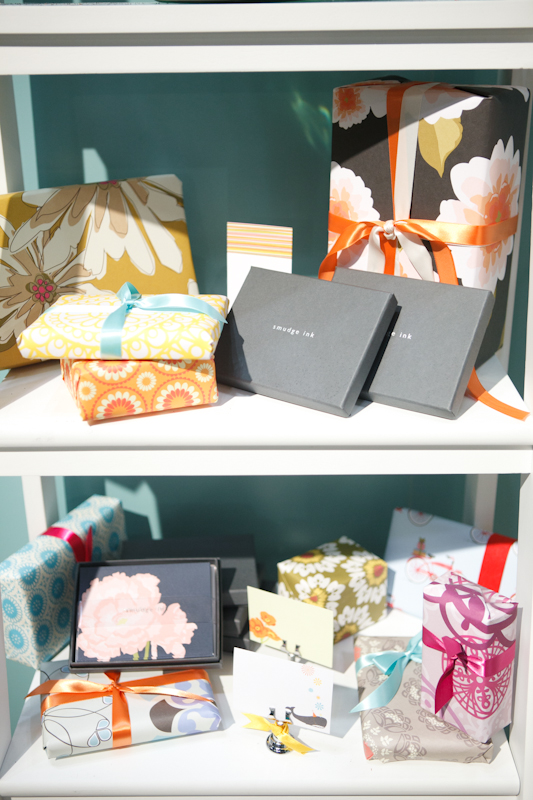
Color made a return to the Stationery Show in a big way this year and was very much in effect at the Smudge Ink booth, with bold patterned gift wrap and calendars, brightly colored note cards, and imprintable party invitations.

Smudge Ink

Speaking of color – the ladies of Two Trick Pony are known for their colorful screen printed note cards, wedding invitations, and calendars.  I love the deep, saturated color of screen printing!

Two Trick Pony

Of course, no trip to the Stationery Show would be complete without a trip to the Old Tom Foolery booth.  Lauren and Joel are guaranteed to put a smile on your face with these hilarious cards.

Old Tom Foolery

Only a couple more posts from the National Stationery Show to go!  I’ll be back tomorrow with more coverage from the show.

Photo Credits: Brian Tropiano Photography for Oh So Beautiful Paper; please ask permission before reposting.

*Wiley Valentine is a spon­sor of Oh So Beau­ti­ful Paper.  For more on my edi­to­r­ial poli­cies, please click here.