DIY Hand Painted Envelopes

We all love to dress up our envelopes with beautiful postage stamps, gorgeous calligraphy, and pretty address labels. But what about cards (and envelopes) delivered in person? I always try to personalize the front of my hand delivered envelopes, whether it’s a simple hand drawn border or a pretty flourish around the recipients’ names. This week I thought I’d share a few of the ways I’m personalizing my hand delivered holiday cards, although you can totally use these ideas year round. These aren’t really tutorials – just a few ideas that I wanted to share. Today we’re starting with my favorite idea: hand painted envelopes!

OSBP-DIY-Tutorial-Painted-Envelopes-6

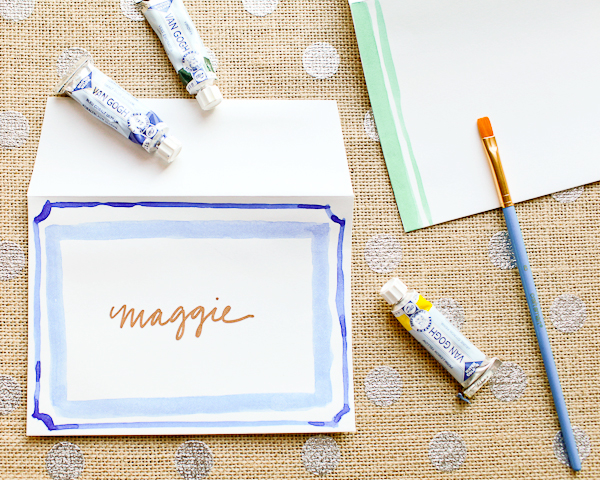
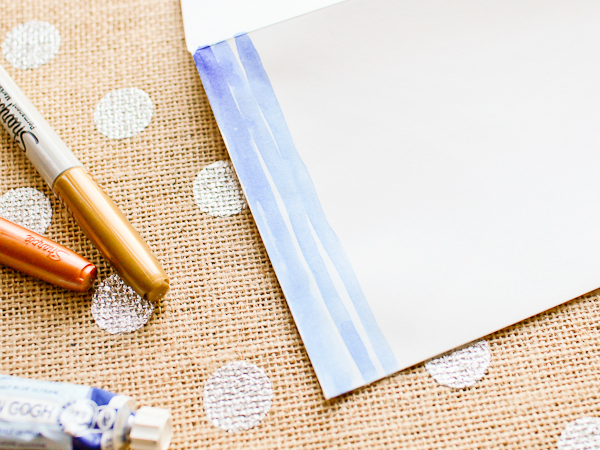
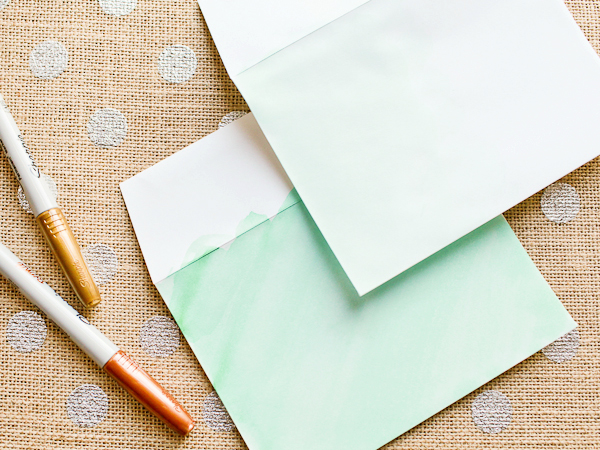
Watercolor paints are one of my favorite ways to dress up light color envelopes – the pattern options are endless! I’m partial to stripes and line borders, but you can also create a watercolor wash by using more water to dilute your chosen color. For this example, I used a deep cobalt blue and emerald green on Mohawk Superfine White envelopes.

OSBP-DIY-Tutorial-Painted-Envelopes-55OSBP-DIY-Tutorial-Painted-Envelopes-45

OSBP-DIY-Tutorial-Painted-Envelopes-54

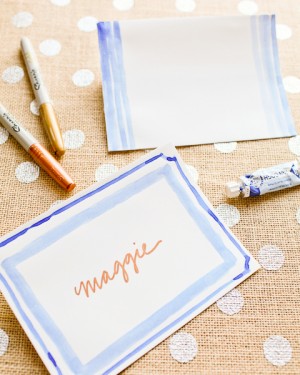
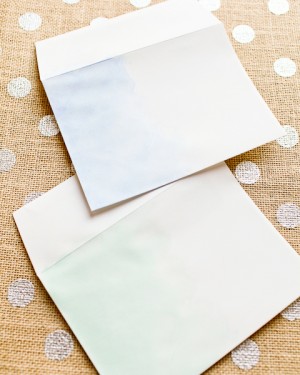
You’ll probably want to play around with colors and patterns on some scrap paper before moving on to your envelopes. Normally, watercolors would be used on super thick paper, so depending on your particular envelopes there will most likely be some warping/wrinkling in the paper. I’m not bothered by this, but just make sure that the envelopes are completely dry before you insert your card or address the finished envelope.

OSBP-DIY-Tutorial-Painted-Envelopes-46

OSBP-DIY-Tutorial-Painted-Envelopes-16

OSBP-DIY-Tutorial-Painted-Envelopes-26

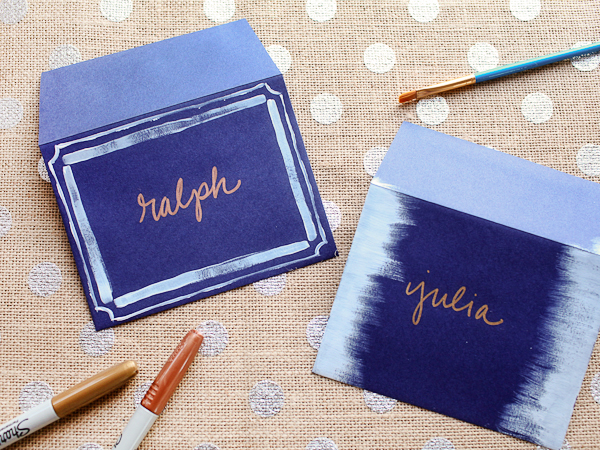
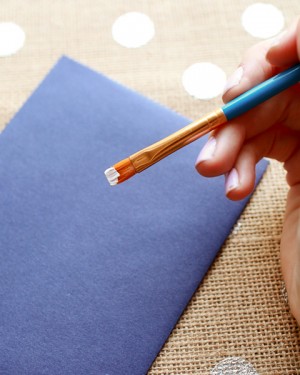
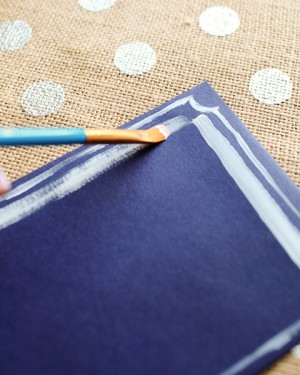
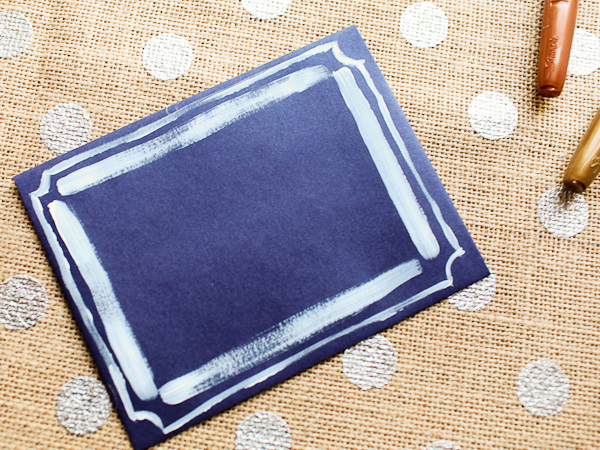
For darker envelopes, I like to use opaque acrylic paint for a fun light-on-dark effect. Here I used white acrylic paint on Mohawk antique vellum envelopes (in Iris) paired with my favorite gold and copper metallic Sharpie markers.

OSBP-DIY-Tutorial-Painted-Envelopes-29OSBP-DIY-Tutorial-Painted-Envelopes-40

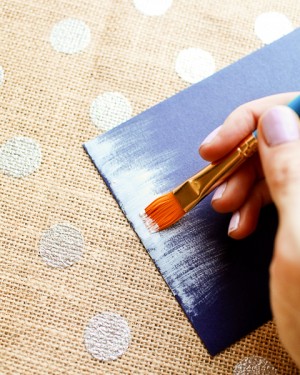
To create a dry brush effect along the edge, simply start out with a small amount of paint on the edge of your brush. Too much paint, and you’ll loose the feathery texture. Starting at the top left corner of your envelope, paint a horizontal stroke – moving in a single motion until your brush runs out of paint. Repeat down each side of the envelope. Let dry, then write the name of your recipient on the envelope!

OSBP-DIY-Tutorial-Painted-Envelopes-31

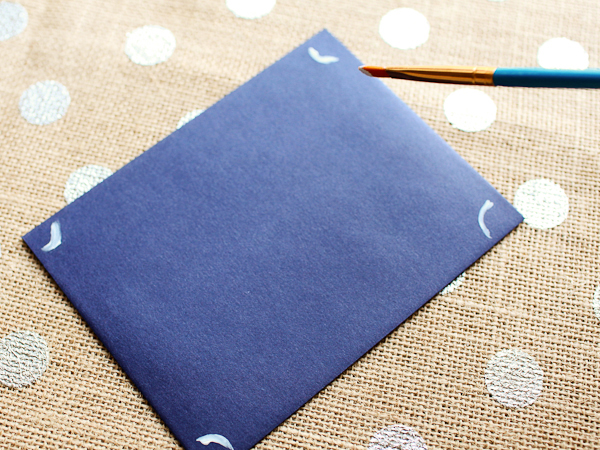
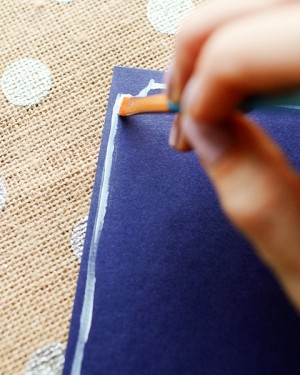
For the border effect, I like to start with the small curves in each corner to serve as guides. Then draw lines to connect the ends of each curve. I used the flat edge of my brush for the outer frame to achieve a thinner line, then switched to the broad edge of the brush for a thicker inner frame. Don’t worry about painting perfectly straight lines – any wobbly lines or changes in texture will only add to the hand painted charm. Let dry, then write in the name of your recipient – and done!

OSBP-DIY-Tutorial-Painted-Envelopes-32OSBP-DIY-Tutorial-Painted-Envelopes-34

OSBP-DIY-Tutorial-Painted-Envelopes-38

I’ll be back with a couple more ideas later in the week!

Photo Credits: Nole Garey for Oh So Beautiful Paper

Phoebe’s Floral and Gold Foil Birth Announcements

Erin of BerinMade and her husband recently welcomed their first child – a darling baby girl named Phoebe Rose! Erin designed a floral birth announcement inspired by Phoebe’s middle name, and featuring Phoebe’s darling silhouette! Ah, baby silhouettes. There is nothing sweeter! Erin also hand lettered Phoebe’s name, which was stamped in gold foil over the digitally printed floral background. Such a beautiful combination!

Floral Birth Announcement by BerinMade via Oh So Beautiful Paper

From Erin: My husband and I were started thinking about these birth announcements before Phoebe was born because we were so excited! The suite is inspired by her name, Phoebe Rose. Phoebe’s name means a “bright, shining light” and we really wanted concept to stand out on the announcement. We knew we wanted gold foil for her name. I incorporated my hand-painted roses as the floral background of the card and hand-lettered her name. The card was then digitally printed on watercolour textured stock, then gold foil was pressed on top.

Floral Birth Announcement by BerinMade via Oh So Beautiful Paper

Floral Birth Announcement by BerinMade via Oh So Beautiful Paper

A silhouette of her face was traced from the very last scan we did prior to giving birth! And because we had received so many presents and well-wishes by that point, we also had matching notecards printed with the rose motif. On the back, we printed a verse which reads “Strength and dignity are her clothing, and she laughs at the time to come.”

Floral Birth Announcement by BerinMade via Oh So Beautiful Paper

Congrats Erin!

Photo Credits: Kirsten Mavric Photography

Friday Happy Hour: Le Japonais

Cocktails are a malleable bunch. There’s no recipe out there that can’t be tweaked or deconstructed to suit your tastes or your mood, no matter how classic or venerable. Here’s a good example: a classic, the Japanese Cocktail (which, despite its name, has nothing to do with Japan) and a modern update, incorporating the enormously versatile St-Germain, Le Japonais.– Andrew

OSBP-Signature-Cocktail-Ideas-Le-Japonais-St-Germain-18

OSBP-Signature-Cocktail-Recipe-Le-Japonais-St-Germain-Shauna-Lynn-Illustration

Illustration by Shauna Lynn for Oh So Beautiful Paper

Le Japonais

2 oz Brandy
1/2 oz St-Germain
1/4 oz Orgeat Syrup
2 Dashes Angostura Bitters
2 Dashes Orange Bitters

Combine everything in a mixing glass filled with ice and stir well until chilled. Strain into a chilled cocktail glass and garnish with the biggest piece of lemon peel you can carve. Enjoy!

OSBP-Signature-Cocktail-Ideas-Le-Japonais-St-Germain-6OSBP-Signature-Cocktail-Ideas-Le-Japonais-St-Germain-12

The original Japanese Cocktail paired a full half ounce of the sweet, almond-flavored Orgeat syrup with a half teaspoonful of bitters, probably to balance the richness of the Orgeat. Le Japonais adds in the sweet floral notes of St-Germain, along with some additional bitters to balance out the extra sweetness. It’s a pretty mellow drink, thanks to the smoothness of the Brandy and the balance between the sweet and bitter elements.

OSBP-Signature-Cocktail-Ideas-Le-Japonais-St-Germain-20

Ok, so: the Japanese Cocktail? It’s not from Japan, it wasn’t invented by anyone from Japan (or even in Japan!), and it doesn’t contain any Japanese ingredients. Brandy and Orgeat are decidedly not Japanese in origin. So what gives? Well, David Wondrich – who should know, because he does this for a living – identifies it as the creation of famed bartender Jerry Thomas, who may have invented it in 1860 to commemorate the first Japanese legation to the United States. Maybe. Apparently, they finished up their trip in New York, where Thomas worked, and were pretty fond of cocktails, which Thomas made lots of. In other words, the first clever, commemorative cocktail name. 153 years ago. Go figure.

Photo Credits: Nole Garey for Oh So Beautiful Paper

This post is brought to you in collaboration with St-Germain. All content, photos, recipes, and words are our own. Thank you for supporting the sponsors that help make Oh So Beautiful Paper possible!

Happy Weekend!

Happy Friday everyone! It has been a cold and wintery week here in DC – with more snow on the way this weekend, eeek! Last winter was incredibly mild and I kind of forgot what a real winter is like. The one bonus? Sophie looks adorable in the puffy winter coat we bought for her once we realized her little fleece sweatshirt wasn’t going to cut it this winter. Right now I’m looking forward to a mostly unscheduled weekend, except for checking out Holiday Heap in Baltimore tomorrow. But in the meantime…

Little-Owl-Design-Typographic-Map-Print

Typographic Map Print by Little Owl Designs

…a few links for your weekend!

This week on Oh So Beautiful Paper:

Check back soon for this week’s cocktail! I hope you all have a wonderful weekend, and I’ll see you back here next week! xoxo

Book Preview: Yellow Owl’s Little Prints

I grew up in a creative household. We made t-shirts at birthday parties, decorated the light switch plates in our bedrooms, among other crafty projects. I’m looking forward to creative projects with Sophie as she gets older, and I was so excited when Christine from Yellow Owl Workshop released her newest book – Yellow Owl’s Little Prints – dedicated entirely to handmade projects to make for (and eventually with) kids!

Yellow-Owl-Workshop-Little-Prints-Cover2

Yellow Owl’s Little Prints features more than 25 creative projects ranging from DIY birth announcements and birthday party invitations to keepsake boxes, book plates, growth charts, rubber stamped bed linens, and nursery decorations. I’ve been in awe of Christine’s amazing creativity for years now and the incredible products she produces for Yellow Owl Workshop. Christine employes some of her favorite materials and techniques in Little Prints, including rubber stamps, stenciling, and hand printing techniques. Most projects can be done during an afternoon nap, and Christine was careful to exclude any projects that might require special equipment. Christine even includes a wonderful introduction with tips for teaching art to children and activity recommendations based on age and skill level. And of course, no craft book would be complete without a list of resources and templates (there’s a whole section of both in the back).

Yellow-Owl-Workshop-Little-Prints

Yellow-Owl-Workshop-Little-Prints-Inside6

My two favorite projects? A folk art wall mural using contact paper decals and a custom canvas name banner. So good!

Yellow-Owl-Workshop-Little-Prints4

Yellow-Owl-Workshop-Little-Prints5

You can grab your own copy of Yellow Owl’s Little Prints right here!

Photo Credits: Laure Joilet for Potter Craft

Christine and Evan of Yellow Owl Workshop kindly sent me a copy of this book for review, but all words and opinions are my own.