DIY Tutorial: Calligraphy Gift Tags

As the season of gifting approaches, we always like to think of new and beautiful ways to present the gifts that were so thoughtfully selected. Gift tags, which are usually an afterthought, can be made really beautiful and special with just a little white ink and a pen. Using blank business sized cards in various colors, we hand made gift tags for our loved ones. They would even make a lovely gift in themselves. – Bailey and Emma of Antiquaria

DIY Tutorial: Calligraphy Gift Tags by Antiquaria for Oh So Beautiful Paper


Materials

White ink

Calligraphy Starter Kit, or dip pen and nib

Blank business cards – we used Pool, Lake and Slate

Hole punch

Ribbon


DIY Tutorial: Calligraphy Gift Tags by Antiquaria for Oh So Beautiful Paper

Step One: Gather your supplies. We used various 2″ x 3.5″ colored cards, our very favorite white ink and a pointed calligraphy pen. It’s also handy to grab a cheap paint brush to mix the ink.

DIY Tutorial: Calligraphy Gift Tags by Antiquaria for Oh So Beautiful Paper

Step Two: Bleed Proof White ink is fabulous because it can be used on dark colors and remains very opaque if mixed correctly.  When the ink is new, it is a thick, paste like consistency. You can make it into workable ink by adding distilled water into the jar and gently stirring it in (this is where your cheap paintbrush comes in handy) until it looks like heavy cream. Start slow, it’s easier to add more water than to remove water. You’re looking for the ink, when tested, to be very opaque but flow out of the pen smoothly.

DIY Tutorial: Calligraphy Gift Tags by Antiquaria for Oh So Beautiful Paper

Step Three: Put your creative hat on! Decorate the tags to suit the gifts or recipients that they’re for. We did a variety of tag decorations, including leaves, hearts and modern lines. It can really be as simple or as ornate as you’d like! It’s also a really fun effect to decorate around where the hole will be punched, as shown in some of the designs above. Let all of your tags dry very thoroughly. White ink can even take overnight to dry in some climates so don’t rush on to the next step!

DIY Tutorial: Calligraphy Gift Tags by Antiquaria for Oh So Beautiful Paper

Step Four: Once all of the tags are good and dry, punch holes in the top center of each one.

DIY Tutorial: Calligraphy Gift Tags by Antiquaria for Oh So Beautiful Paper

Step Five: Select a ribbon to coordinate and you’re all done!

Photography by Antiquaria for Oh So Beautiful Paper

Calligraphy Inspiration: petitserif

Looking through the work of this month’s calligraphy inspiration was a lot of fun. Her work is all about type; from calligraphy to lettering to typeforms created out of bacon, this girl loves letters and it’s plain to see. Wendy Xu of petitserif is has quite the talented hand. With a degree in graphic design from Parsons, and background in Type Design from Type@Cooper, her grasp on letterforms shows in her truly gorgeous calligraphy.  –Julie

Calligraphy Inspiration: petitserif via Oh So Beautiful Paper

Calligraphy Inspiration: petitserif via Oh So Beautiful Paper

Calligraphy Inspiration: petitserif via Oh So Beautiful Paper

Wendy has struck a wonderful balance in styles. ‘Victoria’ is my favorite: fantastic flourishes and connections that step it up from being just another whimsical style.

Calligraphy Inspiration: petitserif via Oh So Beautiful Paper

Calligraphy Inspiration: petitserif via Oh So Beautiful Paper

Calligraphy Inspiration: petitserif via Oh So Beautiful Paper

Her portfolio of lettering is filled with typographic goodies too, so you’ll definitely have to take a look for yourself! If you’d like to see more of Wendy’s work, visit her portfolio, dribbble, or Instagram.

Photo Credits: Wendy Xu


Guest Post: Erin Austen Abbott of Amelia + Cooking with Tom Otis

I’ve asked some of my favorite creative mamas to help out while I’m away with our new baby. Today, the wonderful Erin Austen Abbott from one of my most favorite shops – Amelia – is sharing a recipe from one of her favorite activities with her son Tom Otis: cooking! Thanks Erin! –Nole

When I was in the fourth grade, my mom had me start making my dinner for myself each night. I had cooked with her a little before that, but I was more or less thrown to the wolves to figure it out. She also dropped me off at the grocery store and I did my own shopping. While that was REALLY young, it taught me some valuable lessons. How to shop on a budget yet still get the most for your money, the beauty of fresh veggies, and it allowed me to not be scared to create my own recipes. –Erin

Erin-Austen-Abbott-Amelia-Cooking-with-Tom-Otis-8

Erin-Austen-Abbott-Amelia-Cooking-with-Tom-Otis-10

I’ve grown to love cooking… I cook breakfast each weekend for my family. I make dinner six nights a week and I’ve started cooking with my two year old. He gets out his stool and climbs up to sit where he can see. I talk to him about each step that goes into the dish. If I mince the onion, we talk about it. When I select a spice, we talk about it. I tell him about flavor of the spice and how they go with the other ingredients. We might talk about the country that the dish is from. I let him stir, pour and his favorite part, taste test. I hope that he will always want to cook with me, because everything is more fun with him around to help.

Below is a recipe, that is one of his favorites, that I created for him.

Erin-Austen-Abbott-Amelia-Cooking-with-Tom-Otis-1

Veggie Pizza

Prep time, 10 mins

Cook time, 12-15 mins

Total 22-25 mins

Ingredients

One flour tortilla

Olive Oil

Basil

Garlic powder

Salt

Pepper

Several Broccoli florets

One stem of Kale

Mushrooms

Onion

Green Peppers

Spinach

Spaghetti sauce

Cheese

Directions

Preheat the oven to 400 degrees F.

Lay the tortilla on a cooking sheet.

Erin-Austen-Abbott-Amelia-Cooking-with-Tom-Otis-2

Spread a light layer of olive oil on the tortilla.

Erin-Austen-Abbott-Amelia-Cooking-with-Tom-Otis-3

Sprinkle garlic powder, salt, pepper, and basil over the tortilla.

Add a spoonful of sauce onto of the spices.

In a blender or food processor, blend the raw broccoli and raw kale until finely minced.

Erin-Austen-Abbott-Amelia-Cooking-with-Tom-Otis-4

Add a layer of the mixture over the sauce.

Erin-Austen-Abbott-Amelia-Cooking-with-Tom-Otis-6

Sprinkle cheese to cover.

Erin-Austen-Abbott-Amelia-Cooking-with-Tom-Otis-5

Add mushrooms, onion, green onion, chopped spinach.

Erin-Austen-Abbott-Amelia-Cooking-with-Tom-Otis-7

Bake for 12-15 minutes or until cheese begins to brown.

Erin-Austen-Abbott-Amelia-Cooking-with-Tom-Otis-11

*If your child is really picky about the veggies, you can blend them with the broccoli and kale and hide them under the sauce and cheese. None the wiser.
Enjoy!

Hand Embroidered Fabric Invitation Pocket with Craftsy!

Hand Embroidered Fabric Invitation Pocket by Oh So Beautiful Paper

Today we’re continuing our series with Craftsy, an online craft class platform. They gave me the opportunity to take a few of their online classes and learn some new skills – and this time we wanted to expand our horizons a bit by combining embroidery with paper by taking Design It, Stitch It Hand Embroidery class with Jessica Marquez. For this post, I roped in my talented DIY contributor Mandy Pellegrin – she used her new skills to create a beautiful embroidered fabric invitation pocket! And of course we’re offering a serious discount for you to take the class too!

Hand Embroidered Fabric Invitation Pocket by Oh So Beautiful Paper

Here’s Mandy:

One of the first craft skills that I ever learned was embroidery from my grandmother. For this and many other reasons, it’s always been one of my favorite mediums for getting creative. I was excited to dust off my embroidery skills and pick up some great new tips with the help of Craftsy’s Design It, Stitch It Hand Embroidery class with Jessica Marquez. I’m even more excited to share with you what I created with my newly refreshed skills – a completely custom, hand-embroidered invitation pocket:

Hand Embroidered Fabric Invitation Pocket by Oh So Beautiful Paper

My favorite part of Craftsy classes is how accessible they are – no matter where you are. I propped myself up in bed with my iPad and the Craftsy app to work my way through the class. If you don’t have an entire afternoon to spend boning up on embroidery, no worries! Once you’ve signed up for a class, it’s yours forever.  The Hand Embroidery class is organized into eight lessons covering everything from the very basics of quickly threading a needle to embroidering on specific types of fabrics, and each lesson is subdivided into discrete sections making later reference an absolute breeze, which is pretty clutch for revisiting some of the more complicated stitches. I also really appreciated all the inspiration that Jessica shared at the end of each lesson. It really got my gears turning for fresh and modern ways to put the stitches to use.

Hand Embroidered Fabric Invitation Pocket by Oh So Beautiful Paper

I’m pretty pleased with how I decided to put my new knowledge to use – creating custom invitation pockets. This is a paper blog, after all! I knew the star on the invitation and RSVP card were just screaming to be embroidered. I used a fairly simple set of stitches, but Jessica’s class covers over 30 different stitches and includes downloadable patterns for a handful of projects.

Click here to take the Hand Embroidery with Jessica Marquez yourself complete with a special discount just for Oh So Beautiful Paper readers! Read on for some tips on how to put the lessons learned in the class to use to create your own invitation pockets.

Hand Embroidered Fabric Invitation Pocket by Oh So Beautiful Paper

Materials
cotton fabric
marking pencil
embroidery floss
embroidery needle
embroidery hoop
thread
sewing machine

For each invitation pocket, cut the fabric so that the width is 1/2″ larger than the width of the invitation and 1″ larger than the length. Be inspired by the details of your invitation to create and transfer your own embroidery design using the helpful tips from the Craftsy class. Once you’ve completed the design using a combination of stitches learned from the class, double fold the ends that will comprise the mouth of the pocket, press, and top stitch in place. Fold in half lengthwise with right sides facing, and stitch 1/4″ from each side. Turn right-side-out, press, and stuff with your invitation.

Hand Embroidered Fabric Invitation Pocket by Oh So Beautiful Paper

Hand Embroidered Fabric Invitation Pocket by Oh So Beautiful Paper

You could also incorporate an embroidered fabric pocket into a baby announcement, moving announcement, or party invitation – the options are endless! Click here to take the Craftsy Hand Embroidery class – with a big discount for Oh So Beautiful Paper readers! This discount is only available for a week – so sign up soon!

Styling + Photos by Mandy Pellegrin for Oh So Beautiful Paper / Invitation sample from Kalo Make Art

This post is sponsored by Craftsy. All content, photos, ideas, and words are our own. Thank you for supporting the sponsors that help make Oh So Beautiful Paper possible!

Hello Brick & Mortar: Packaging for Retail

I judge books by their covers, wine by its label and brands by their logos. I know the good stuff is on the inside, but I could ogle good packaging all day and have been known to buy things for reasons far divorced from utility. (I’d guess I’m not alone in this crowd.) Packaging may not seem like the sexiest topic, but good packaging is an invitation to purchase, and that’s an invitation we want to extend. –Emily of Clementine

Hello Brick + Mortar by Emily of Clementine for Oh So Beautiful Paper

Illustration by Emily McDowell for Oh So Beautiful Paper

First, the golden rule of retail packaging: They’re going to try to open it anyway. I know, you wrote “blank inside.” Customers will still look at me and ask “is it blank inside?” while opening the cellophane. I know, it’s sealed with a sticker. They will carefully peal back the sticker and reach for the card. I know, you labeled what’s inside and drew a little picture on the back showing the 6 different cards in a card set. Maybe they’ll ask me to open it. Why? I think it’s human nature. If you close something, people want to open it. Especially if it’s pretty. But let’s see if we can make your packaging something customers want to open, but instead choose to purchase and wait until they get home to break into. How? 90% of it is simple show & tell.

1. Tell them what’s inside. Pretty basic, but I receive a lot of beautiful, poorly labeled stationery. Is it a flat card? Is it blank inside? Is it a card set? How many card are in the set? Are they all the same or different? How big is that print? Is it a sticker or a mini-note? What’s it for….? I watch customers fumble through unclear packaging every day. Often, I can interrupt a quizzical look to explain what’s inside, but if I don’t, she’s stranded and will put it back down. If you don’t know what to include, try calling a friend and describing what the product looks like. Then find a well designed way to say the same thing. (Where? My vote is usually on the back. Unless you can make it work with the image.)

Hello Brick + Mortar: Packaging for Retail by Emily of Clementine for Oh So Beautiful Paper

J. Falkner’s Perfect Little Notes use paper bands to tell what’s inside without interfering with the product. The bands are a slight deterrent for customers to open the box and allow retailers to slip the band off for a photo, and put it back on for customers. Win/win!

2. Show them what’s inside. In your online shops, you can clearly photograph and explain. In person, your packaging must speak for the contents. Unless you are packaging a single card or print that is clearly visible, you need to show what’s inside (with a photo, a great good drawing or innovative packaging). Every time customers pick up a box of cards, they’re asking “what’s inside? Answering this clearly increases the likelihood that your product will sell. (Where should you put this information? My vote is for the back if it’s a card/set/calendar or smack in the middle if it’s a tube.)

Hello Brick + Mortar: Packaging for Retail by Emily of Clementine for Oh So Beautiful Paper

The Albertine Press letterpress library is one of the few products, I (happily) display without cellophane. The spine tells what’s inside and a quick flip open reveals the cards. The packaging itself feels like a gift and looks beautiful displayed in multiples.

3. Extend your branding. The cost of packaging increases the price of your products, but don’t make it a throwaway purchase. Good packaging makes your product feel like a gift, and if done well, can make an indelible mark that the customer returns to.

SHP_Packaging3

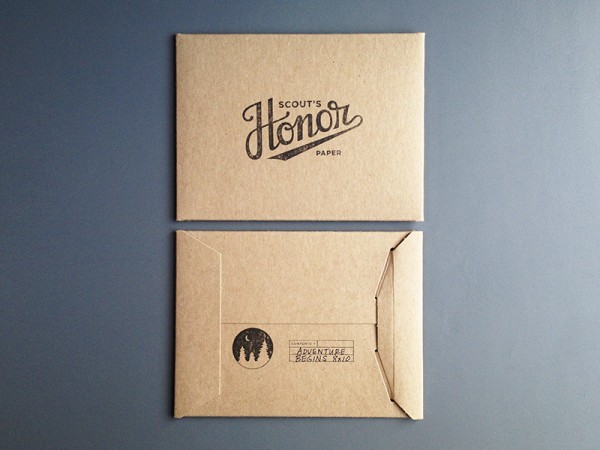
Scout’s Honor Paper packages her prints in stiff craft sleeves with a strong branded stamp on the front and back that tells the print name and size. Though she totally breaks my rule of showing what’s inside, I can easily take one print out to display and house the extras behind. 

4. Packaging should keep it together and look great. Do you want the parade of horribles? I’ve had cello sleeves crumple or split as customers shove cards back in; stiff cello boxes that pop open; sealed small notes that aren’t affixed within the package so they jumble, but I can’t adjust them without damaging the package; prints with crumpled corners after being dropped; boxes that obscure the card design; gorgeous prints, postcards and tea towels that no one buys because they have no idea what’s inside; closure stickers that pop open more than they stick; belly bands that come unstuck and end up all over the floor; twine that frays and looks frumpy; calendars and prints with no backing that slide to the floor; products that fade in the window; and (through fault of my own) a cello box or two melted each winter due to radiator proximity. Those horribles are not so horrible, but these are costs that retailers absorb, if a product remains poorly packaged we won’t take the risk. You can’t always avoid these pitfalls, but you can mitigate by simply using the packaging yourself: pack your product up, throw the box around, unpack it and leave it on a table for a few weeks. See which of your items still shine, and adjust the rest.

5. There’s no right answer. When in doubt, reach out to a retailer you trust or hop into your favorite store and see what’s working. You should decide on the packaging you want, but here are some considerations:

  • Single Cards – Cellophane sleeves are a must. I’m torn on whether a sleeve with the fold over seal is preferable. A little sticker on the back can tell the customer if the card is flat or folded, how big it is and whether the card is blank inside.
  • Card Sets – Card sets are the slowest sellers. I think they’re also the most vaguely labeled. You can only show one card on the front, but you can show and tell on the back of the box. How many cards are in there? Are they all the same (if not, please include a label with a photo or drawing), what color is the envelope? Tying it with twine can look pretty or obstruct your image. Stickers can make a pretty seal but the occasional customer that ignores the sticker’s purpose and opens it, leaves me with a damaged product.

Hello Brick + Mortar: Packaging for Retail by Emily of Clementine for Oh So Beautiful Paper

Moglea’s vibrant packaging shows both envelope and note, while the sticker draws your eye from the front to the back of the box where you learn the details of what’s inside!

OSBPblackbirdback

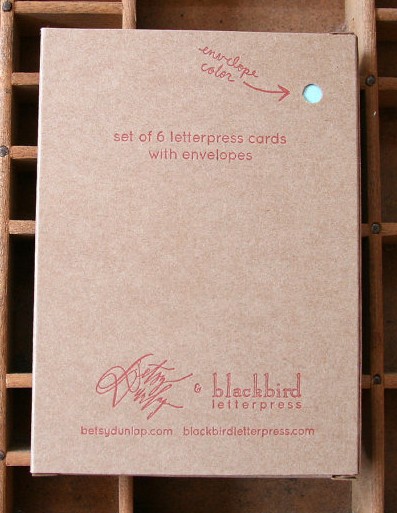
The cute peephole on the back of this card set from Blackbird Letterpress invites the customer to look closer while communicating basic info about this card set.

  • Tiny notes, gift tags, book plates, recipe cards – These things don’t often get much respect in a retail setting because they’re little and often confuse the customer. They benefit from super clear packaging, and a bit of personality to invite the customer to pick them up.

EMexistingnote


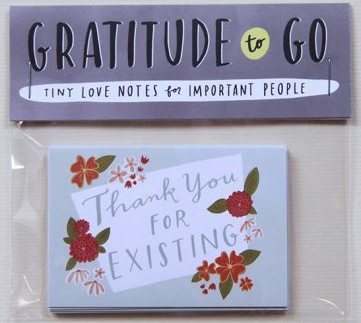
Emily McDowell draws people in with words alone. By the time customers read what her notes say, they’re already sold on the sentiment, with little need to even know the function.


  • Pads of paper, journals & notebooks – You guys, wars could be started over whether a notebook should have lined or unlined pages. Let the customer know upfront. Also, let them know how many pages are in there. Cello sleeves help keep the corners neat and the pages clean.
  • Prints – Customers often buy prints for gifts or quick decor, so including the dimensions is crucial. A sturdy piece of cardboard lets retailers display the print safely. Prints packaged in tubes are the most difficult to sell. I often have large prints professionally framed, but if the framed print sells, we’re back to the tube. A large color sticker is the best way to show what’s inside.
  • Calendars – Customers who are on a calendar hunt want the days to be in boxes, customers who fall in love with your designs don’t care! Either way, it’s nice to show the customer whether or not there are boxes and display each month on the back (customers want to see their birth month, it’s often what sells them.) Like prints, a sturdy piece of cardboard is helpful for display and protection. I see a lot of dual purpose calendars these days (eg, once used, each month can be a print!) I love this idea, but make sure it’s clear so the customer knows they’re getting two uses for the price.
  • Coasters – Coasters are one item where the packaging might be saved for storage, so this can be a great chance to extend your brand into a customer’s home.

Hello Brick + Mortar: Packaging for Retail by Emily of Clementine for Oh So Beautiful PaperRifle Paper Co’s coasters are packaged in boxes that make adorable storage for any other little thing. It’s a perfect extension of branding and makes the packing bridge into extended use.

  • Tea Towels – Tea towels are almost always displayed folded. To prevent constant unfolding, a nice wide belly band with an image of the opened towel can help. (Bonus: offer to send a sample to display if your retailer buys a certain quantity.)
  • Temporary tattoos – Temporary tattoos are often shared, or used as party favors, so people want to know how many they’re getting. I also think they look better on the body, so a photo of them in action is a super plus.

TattlyAnimalDrivers

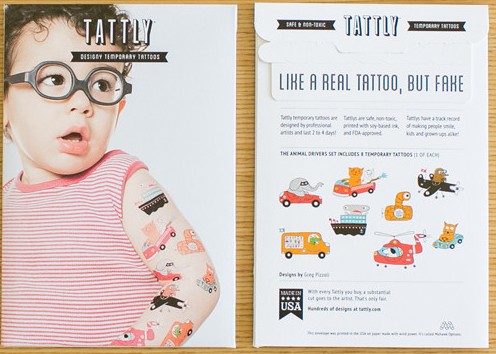
Tattly’s packing shows the products on (uh, adorable) models, then the back manages to be fun while describing exactly what’s inside.

  • All other beauties – You makers are so darn prolific, I can’t even keep up with all of the areas that you’re branching into, so I’ll leave you with something simple: let the product speak for itself. Let it guide the packaging and be ok with being simple. Sometimes, that’s the best approach.

Hello Brick + Mortar: Packaging for Retail by Emily of Clementine for Oh So Beautiful Paper

I’m utterly blown away by the beauty created by mixing the talents of Angela Liguori and Maybelle Imasa Stukuls. All I want to know is more about this ribbon, and Angela’s simple spool and clear font on a card give me just that. 

The final golden rule of packaging is this: if you have an innovative idea, go for it. All of this is open to your interpretation. I don’t like cello sleeves, but I’m pimping them out here because it’s the current best solution to selling cards. If you have a better idea, please, go on. As long as your packaging shows and tells what’s inside, you’re meeting your retailers’ needs. If you can make it inventive and even more fun, you’re taking a step further to extend your brand and build a relationship with your retailers and customers.

Search outside of the stationery world for ideas. When I need a bit of inspiration (like how to finish up this post) I pull a collection of items from Clementine to see where themes emerge. I love the packaging below for all kinds of reasons: font, color, utility. Mostly, because it draws you a step closer to the product, making the customer one step closer to falling in love and taking it home.

Hello Brick + Mortar: Packaging for Retail by Emily of Clementine for Oh So Beautiful Paper

Just another day in the shop, lost down a rabbit-hole of the beauty you all make via my Instagram.

I can’t wait to see what you pack up next! xoxoxo – Emily