Kelly + John’s Pink, Mint, and Gold Wedding Invitations

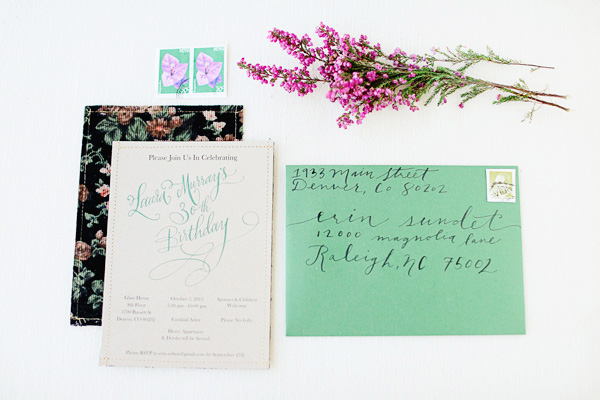
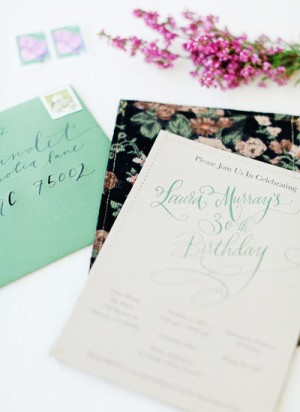
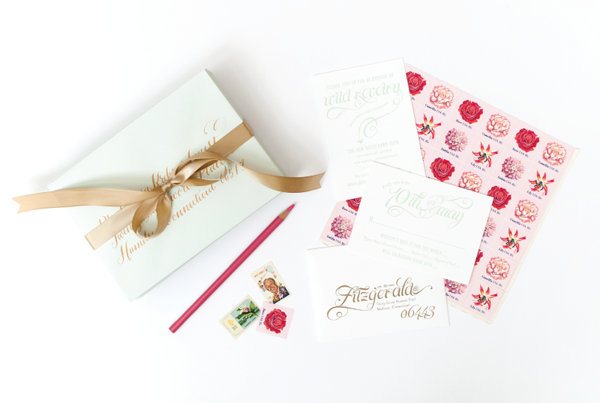
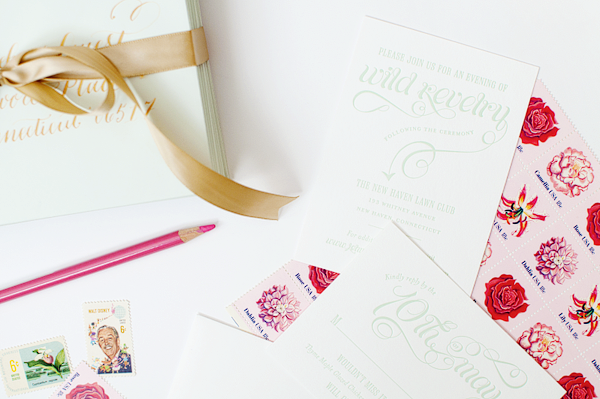
Pink, mint, and gold – can you imagine a sweeter color palette? Nichole from Coral Pheasant incorporated all three colors through both the save the dates and wedding invitations. Nichole started with a fold-out save the date (along with some confetti!), followed by beautiful letterpress printed invitations! The final finishing touches? Calligraphy by Molly Jacques and the perfect pink and mint vintage stamps!

Pink-Mint-Wedding-Invitations-Coral-Pheasant

From Nichole: Kelly and John’s vision for their wedding was for it to be fun and full of surprises with simple pops of color. I love bring­ing an ele­ment of dis­cov­ery to cus­tom sta­tionery and was excited to get started on this project!
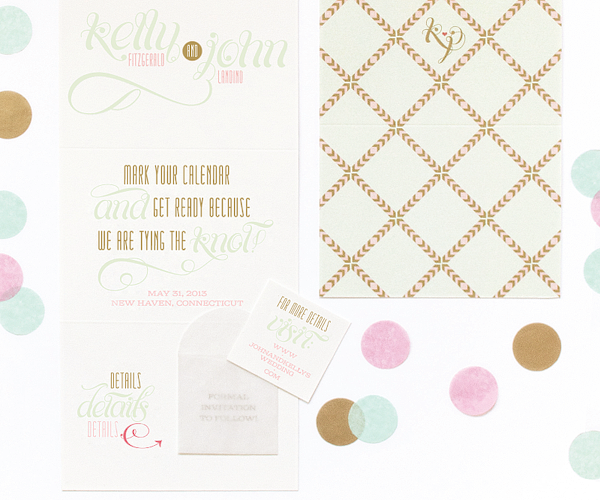
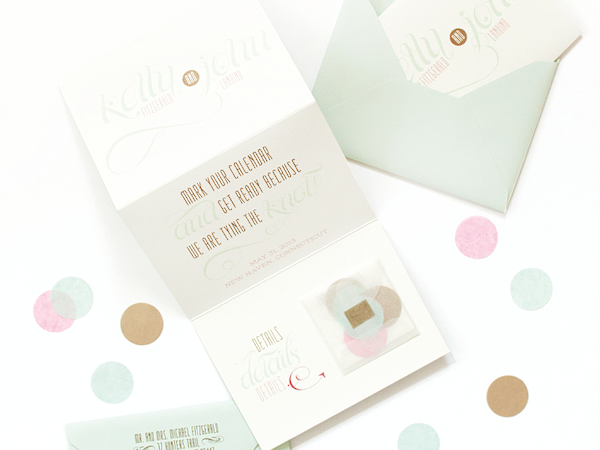
Pink-Mint-Wedding-Invitations-Coral-Pheasant7

Pink-Mint-Wedding-Invitations-Coral-Pheasant8

With their deli­cious color palette of mint, pink, and gold, we started with an accor­dion style save the date. The card featured the details on the front and a chevron-inspired pattern on the back. On the last panel, a mini glas­sine enve­lope was attached that con­tained tis­sue paper con­fetti and a small card with their wed­ding web­site. Who doesn’t get excited by confetti?!
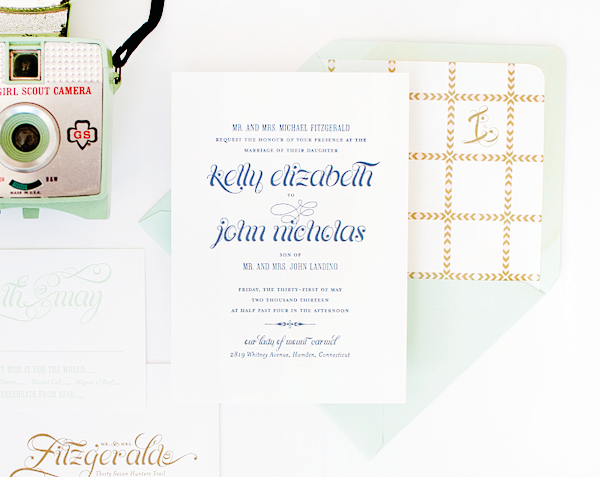
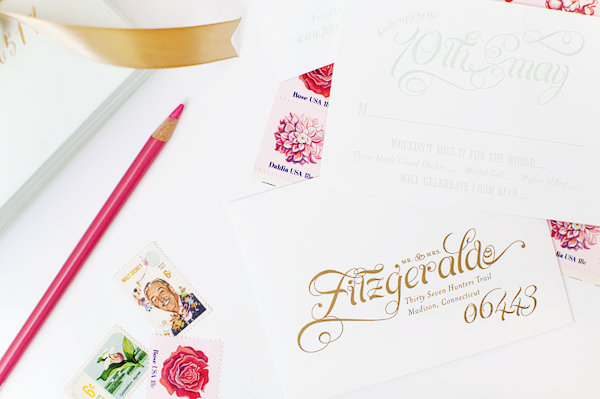
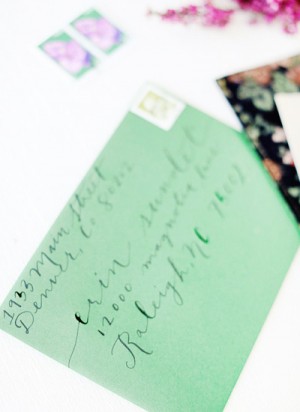
Pink-Mint-Wedding-Invitations-Coral-Pheasant5

Pink-Mint-Wedding-Invitations-Coral-Pheasant6

The design car­ried over to their letterpress printed invi­ta­tion suite where cel­e­bra­tory word­ing mar­ried playful typography, and the pattern from the save the date was used on the envelope liners. The finishing touch: lovely calligraphy by Molly Jacques.

Pink-Mint-Wedding-Invitations-Coral-Pheasant3

Pink-Mint-Wedding-Invitations-Coral-Pheasant2

Thanks Nichole!

Design: Coral Pheasant

Calligraphy: Molly Jacques

Check out the Designer Rolodex for more tal­ented wed­ding invi­ta­tion design­ers and the real invi­ta­tions gallery for more wedding invitation ideas!

Photo Credits: Coral Pheasant

Happy Weekend!

Happy Friday everyone! Do you all have fun plans for this beautiful fall weekend? We’re heading to upstate New York to visit my husband’s family for a few pre-Halloween festivities. It’s a long drive, but I know Sophie will be happy to see her grandparents and cousins! I’m heading out to make our final preparations for the trip, but in the meantime…

OSBP-Fall-Dahlias

Photo by me via Instagram

…a few links for your weekend!

This week on Oh So Beautiful Paper:

Finally, I made a little announcement on Instagram last week that I thought I’d share here as well. I’m looking to add some DIY contributors to the OSBP team! If you’re interested in contributing, click here for more details on how to apply!

Check back soon for this week’s cocktail! I hope you all have a wonderful weekend, and I’ll see you back here next week! xoxo

Calligraphy Inspiration: Crystal Kluge

This month’s calligraphy inspiration comes from the talented Crystal Kluge. With a client list that includes Nordstrom, Target, and Google, Crystal has a wonderful portfolio of work that’s sure to please. Never stuffy or dull, her fanciful and dynamic style is perfect for those who have a little skip in their step. – Julie

Calligraphy Inspiration: Crystal Kluge via Oh So Beautiful Paper

Calligraphy Inspiration: Crystal Kluge via Oh So Beautiful Paper

I really enjoy the added flourishes in Crystal’s calligraphy; a great use of space and it transforms letters into art.

Calligraphy Inspiration: Crystal Kluge via Oh So Beautiful Paper

Calligraphy Inspiration: Crystal Kluge via Oh So Beautiful Paper

As whimsical and playful as it may seem, there’s also a sense of ease in the flow of her styles. They’re fun but not frilly.

Calligraphy Inspiration: Crystal Kluge via Oh So Beautiful Paper

Calligraphy Inspiration: Crystal Kluge via Oh So Beautiful Paper

For more peeks at Crystal’s projects, be sure to stop by her blog. You can also find her writing in jewelry form at Brevity. as well as in font form over at tart workshop!

Photo Credits: 3 l+r via Hello!Lucky, 6 left Larry Callahan, all others via Crystal Kluge

DIY Tutorial: Rubber Stamp Mountain-Inspired Save the Dates

Fall is officially here and we couldn’t be more thrilled! Today’s gorgeous save the date tutorial is perfect for the season with its shades of brown and mountain scenery. We can’t seem to get enough of folded cards lately (see our previous designs here and here). They’re perfect for destination weddings since they allow you to incorporate more information without having to have additional cards. – Bailey and Emma of Antiquaria

DIY Tutorial: Rubber Stamp Mountain-Inspired Save the Dates

Step One: Download the mountain folded card design (see bottom of post for download link) and print it out on a 11″ x 17″ piece of card stock. Next, trim the card down at the crop marks to reach the final size (16″ x 5 1/4″). We used a self healing mat, metal ruler and craft knife for this step, but if  you plan on cutting many cards, we recommend taking them to a local printer to have them cut them all at once with an industrial cutter.

DIY Tutorial: Rubber Stamp Mountain-Inspired Save the Dates

Step Two: Score your 16″ x 5 1/4″ every four inches (three scores total, at the 4″, 8″ and 12″ mark). Don’t fold it yet!

DIY Tutorial: Rubber Stamp Mountain-Inspired Save the Dates

Step Three: Gather all of your stamps and make certain that you have a stamping plan before you dive in. The stamps we used for this design, from left to right are our “Banner” Names Monogram, Vintage Label Save the Date, Calligraphy Accent Accommodations Card and our Calligraphy Accent Website Card. Once you have your plan, you will ink each stamp and align it into its appropriate space. For a step-by-step video tutorial about the stamp printing process go here. Once they’re dry, fold your cards at each score mark. Using a bone folder can help you get lovely, crisp, folds!

DIY Tutorial: Rubber Stamp Mountain-Inspired Save the Dates

Step Four: Next, you will stamp your return address on the back flap of your A2 kraft envelope. We used our Calligraphy Ampersand Return Address Stamp with chestnut  ink for this design. Once you have the return address stamped on your envelopes, all that’s left is addressing and adding postage!

Materials

Mountain Scene Illustration: Download available here **Note: digital download is for personal use only**

11″ x 17″ Card Stock

Self Healing Mat, Craft Knife and Metal Ruler (or you can take your prints to a professional printer to have cut)

Scoreboard

“Banners” Name Monogram Stamp

Vintage Label Save the Date Stamp

Calligraphy Accent Accommodations Card Stamp

Calligraphy Accent Website Card Stamp

Calligraphy Ampersand Return Address Stamp

Stamp Pad in Chestnut

Bone Folder

A2 Envelopes in Paper Bag

Anti­quaria is a mem­ber of the Designer Rolodex – you can see more of their beau­ti­ful work right here or visit the real save the dates gallery for more save the date ideas!

Photo Credits: Antiquaria for Oh So Beautiful Paper

Laura’s Floral Fabric 30th Birthday Party Invitations

Erin’s watercolor wedding invitations were among my favorites from 2012, so I was thrilled to hear from her again – this time with some invitations that she created for her sister Laura’s 30th birthday! These invitations reflect Erin’s love of sewing, with a beautiful fall-inspired corduroy fabric backing sewn to the kraft paper invitations using gold thread. Gorgeous!

Floral-Fabric-30th-Birthday-Party-Invitations-Sewbon6

From Erin: My sister, Laura, is a wedding photographer and loves gorgeous, printed invitations. For her 30th birthday, I wanted to merge her love of printed work and calligraphy with my love of sewing to add a special, personal touch. My jumping off point in the design was some gorgeous fall-esque corduroy fabric that I found at Colorado Fabrics, which I sewed onto the back of each invitation using gold thread. The green envelopes (addressed in my sister’s hand lettering) completed the invitation.

Floral-Fabric-30th-Birthday-Party-Invitations-Sewbon3 Floral-Fabric-30th-Birthday-Party-Invitations-Sewbon2

Thanks Erin!

Invitation Design: Erin | Sewbon

Invitation Calligraphy: Designsgirl

Envelope Calligraphy: Laura Murray

Printing: The Print Connection

Paper: Speckletone Kraft by French Paper

Fabric: Colorado Fabrics

Photo Credits: Laura Murray Photography