DIY Eyeball Halloween Door Cover

Earlier this week I shared some DIY colorful Halloween treat bags, and today I have a fun DIY eyeball Halloween door cover idea to share with you! Earlier this year, Fiskars asked me to come up with a Halloween door cover idea using their awesome craft punches. As the parent of a preschool age kid and a toddler, I wanted to make something that would be an appropriate decoration for my own home and something that preschool and elementary school teachers could use to decorate their classroom doors – meaning it couldn’t be too scary. Enter this eyeball door cover inspired by classic Halloween googly eyes: a little bit creepy, a little bit silly, and a whole lot of fun to make!

DIY Eyeball Halloween Door Cover with Fiskars Circle Punches

This door cover uses Fiskars circle punches in a variety of sizes, along with black and white card stock. It’s super easy to make, and tiny assistants will love helping you punch out the various eyeball circles. We also cut out a few favorite Halloween phrases from regular white printer paper to add to the door cover. The full how-to is available on the Fiskars website right here!

DIY Eyeball Halloween Door Cover with Fiskars Circle Punches

I had such a blast putting this door cover together! The paper eyeballs seriously crack me up. I just love the idea of 20+ pairs of eyeballs staring down at little trick-or-treaters! I wrapped my front door with a roll of black kraft paper and used a glue stick to adhere the eyeballs to the door, but you could skip the black paper and use non-damaging removable poster squares to put the eyeballs directly on your door. Add in some fake spiderwebs and a few Jack-o-lanterns and you have the perfect Halloween front stoop!

DIY Eyeball Halloween Door Cover with Fiskars Circle Punches

DIY Eyeball Halloween Door Cover with Fiskars Circle Punches and Scissors

DIY Eyeball Halloween Door Cover with Fiskars Circle Punches

Black and white eyeballs – perfect for Halloween! Check out the full post on the Fiskars website right here!

This post was created in partnership with Fiskars. All content and opinions are my own. Thank you for supporting the sponsors that make Oh So Beautiful Paper possible!

Wedding Stationery Inspiration: Cocktail Hour Ideas

We’re big fans of cocktail hour here on Oh So Beautiful Paper. At a wedding celebration, the cocktail hour kicks off the post-ceremony reception, but that doesn’t mean you need to spend a lot of money to make a big statement. Just a few details, like personalized napkins or coasters, are a fun way to incorporate your personal style, stories, and tastes. Here are a few fun cocktail hour ideas for your wedding! – Annie

Wedding Stationery Inspiration: Cocktail Hour Ideas / Oh So Beautiful Paper

How gorgeous is this garland around the bar? | Photography: Tec Petaja, Design, Coordination, Paper, and Florals: Bash, Please via Style Me Pretty

Wedding Stationery Inspiration: Cocktail Hour Ideas / Oh So Beautiful Paper

Love this wooden drinks menu with hand drawn illustrations and lettering. | Photography: Flora + Fauna, Signage: Paper Tangent, Event Coordinator: Flutter Fete via 100 Layer Cake

Wedding Stationery Inspiration: Cocktail Hour Ideas / Oh So Beautiful Paper

Custom coasters add a personal touch. | Photography: Max Wanger, Hand lettering for Coasters: Bernadette Pascua, Event Planning: Bash, Please via 100 Layer Cake

Wedding Stationery Inspiration: Cocktail Hour Ideas / Oh So Beautiful Paper

These napkins are a modern take on monograms. | Photography: Our Labor of Love, Event Planning: Bash, Please via Style Me Pretty

Wedding Stationery Inspiration: Cocktail Hour Ideas / Oh So Beautiful Paper

Mirrors with calligraphy bring glamour to the bar. | Photography: Tory Williams Photography via The Knot

Wedding Stationery Inspiration: Cocktail Hour Ideas / Oh So Beautiful Paper

Calligraphy bar accessories – like these napkins, drink stirrers, and bar sign – create a cohesive and elegant look. | Photography: Rebecca Yale Photography, Cocktail Napkins and Drink Stirrers: Laura Hooper Calligraphy, via Style Me Pretty

Wedding Stationery Inspiration: Cocktail Hour Ideas / Oh So Beautiful Paper

These paper maché letters are easy to personalize. | Photography: Kelly Stonelake Photography, Paper Goods: Hen & Co., Planning, Coordination, and Design: Going Lovely via Style Me Pretty

Wedding Stationery Inspiration: Cocktail Hour Ideas / Oh So Beautiful Paper

Use a framed chalkboard to display your signature drinks options. | Photography: Our Love Is Loud, Bar Sign Calligraphy: Whimsy Design Studio, Event Design and Planning: Cammye with We Tie The Knots via Green Wedding Shoes

Wedding Stationery Inspiration: Cocktail Hour Ideas / Oh So Beautiful Paper

For the tropical or botanical-inspired wedding, these calligraphy leaf drink markers are a must. | Photography: Something Minted, Calligraphy: Pink by Peach, Wedding Planner and Creative Director: The Wedding Project Photography via 100 Layer Cake

Wedding Stationery Inspiration: Cocktail Hour Ideas / Oh So Beautiful Paper

Custom drink stirrers carry on the theme of your wedding in a subtle way. | Photography: Milou + Olin Photography, Event Planning, Flowers, and Stationery: Bash, Please via Style Me Pretty

Wedding Stationery Inspiration: Cocktail Hour Ideas / Oh So Beautiful Paper

Ice breaker! Guests will love reading these fun facts as they mingle. | Photography: Flora + Fauna, Signage: Paper Tangent, Event Coordinator: Flutter Fete via 100 Layer Cake

Wedding Stationery Inspiration: Cocktail Hour Ideas / Oh So Beautiful Paper

You can’t miss this graphic, graffiti-inspired drink menu. | Photography: Jes Workman, Paper Goods: Boldhouse, Event Design: Art & Soul Events via Green Wedding Shoes

p.s. More cocktail hour and reception signage inspiration right here!

The World of Illustration: Mari Andrew Illustration

Hello everyone! I think it’s safe to say everyone is feeling the need to find reasons to laugh and some lighthearted escapes. And that’s where illustration can really hit home. I’m beyond thrilled to share a peek into the work of a super talented illustrator, and a true artist crush of mine — Mari Andrew. It’s not everyday you look into someone’s Instagram feed and wish you could paper your walls with their work. But that’s the feeling I got when I first discovered Mari Andrew, an illustrator and writer living in Washington, D.C. Her illustrations are so personal, so real, and some are the literal laugh-out-loud variety. So I asked Mari to share some insight into her world as an illustrator, and as someone I wish I could meet for coffee and just chat (so this is the next best thing!). Here’s our Q&A and some of my all-time favorite illustrations of hers, but do check out her website and Instagram for even more! Jen

Mari Andrew Illustration

Mari Andrew Illustration

Mari Andrew Illustration

Mari Andrew Illustration

Q: Where do you like to work when you’re creating an illustration?

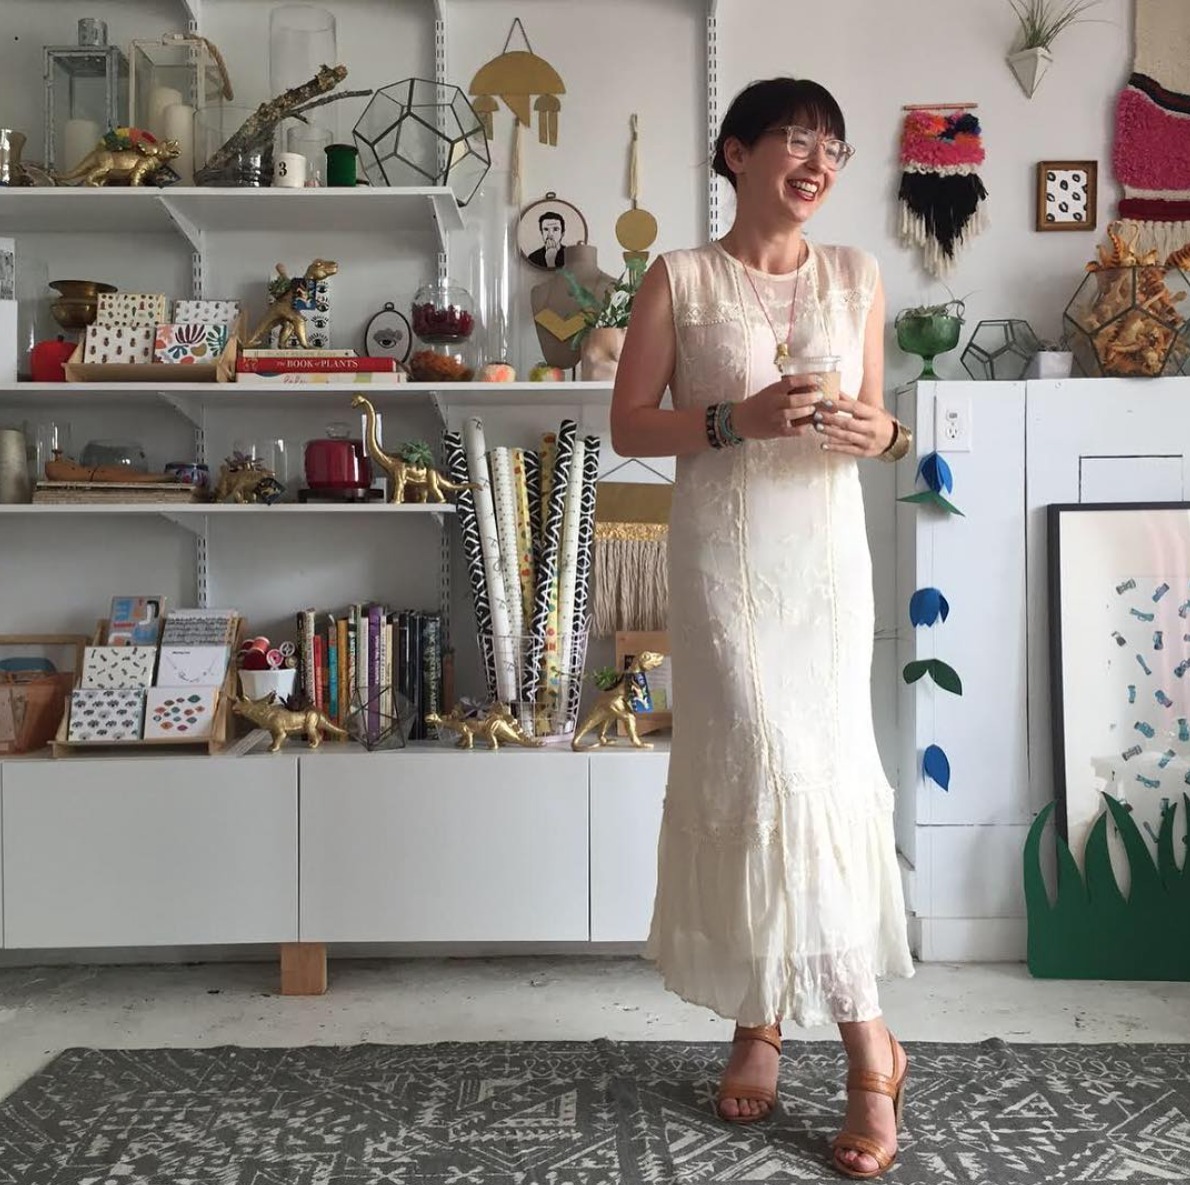
A: I work from the cutest little studio with the cutest little name — The Lemon Bowl. I used to work on a coffee table in my apartment, but that table is also where I eat, watch Netflix, email, and scroll through Instagram, so it didn’t feel like a very creative space. It changed my life to have a studio space where I could go and work, sort of like going to the gym. At the studio, I’m accountable to create and I feel much more disciplined and focused when I’m there. I sit at a long table and listen to podcasts and occasionally get up to stretch or dance a little.

Mari Andrew Illustration

Q: Where do you like to go to be inspired?

A: Brazil! But also, I walk two hours a day (to work and back home) and that’s a very creative time for me when I’m processing life events. It’s also a great time to look around to get inspired by other people and the interesting things I see along my commute through several neighborhoods.

Mari Andrew Illustration

Mari Andrew Illustration

Q: Do you have a favorite color or color palette?

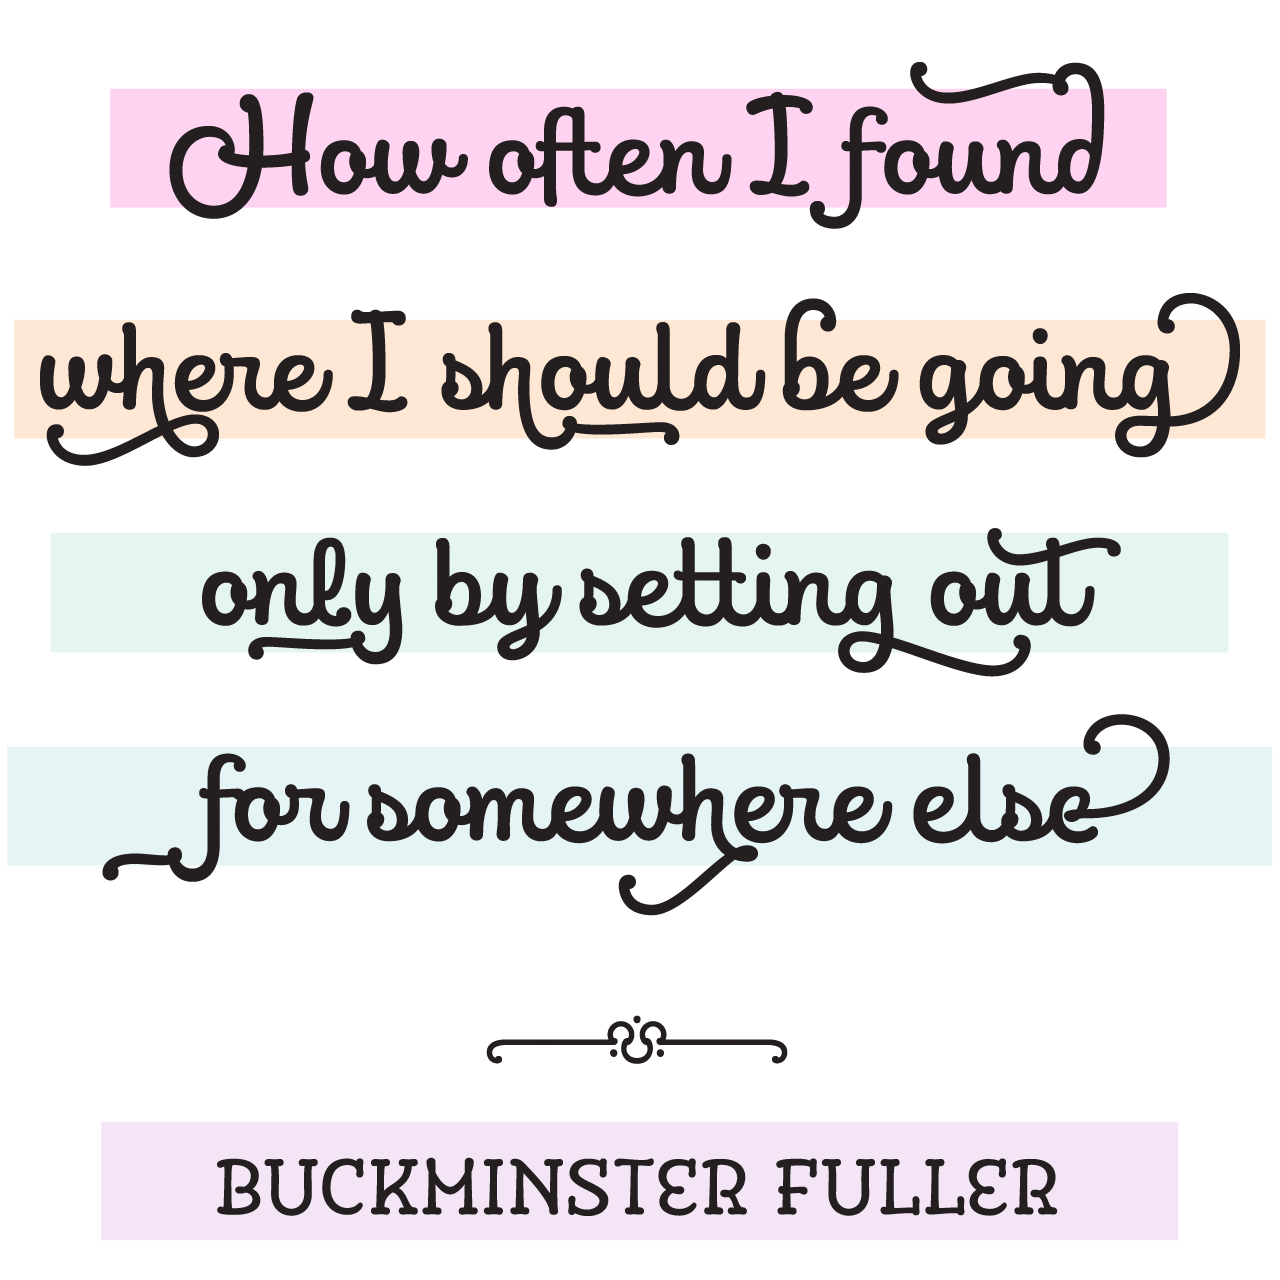
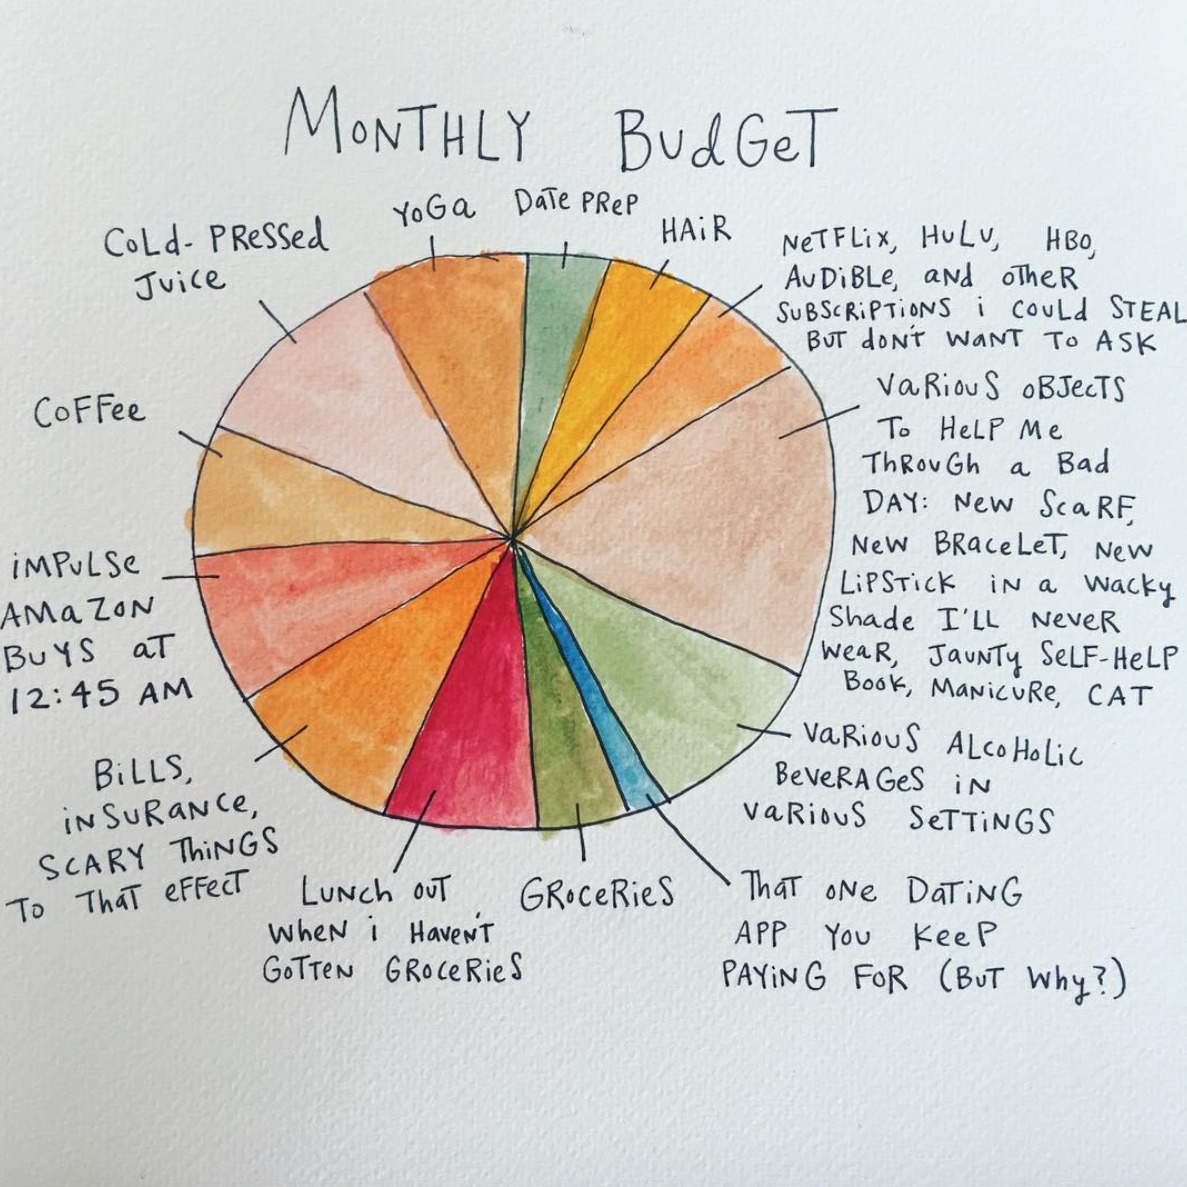
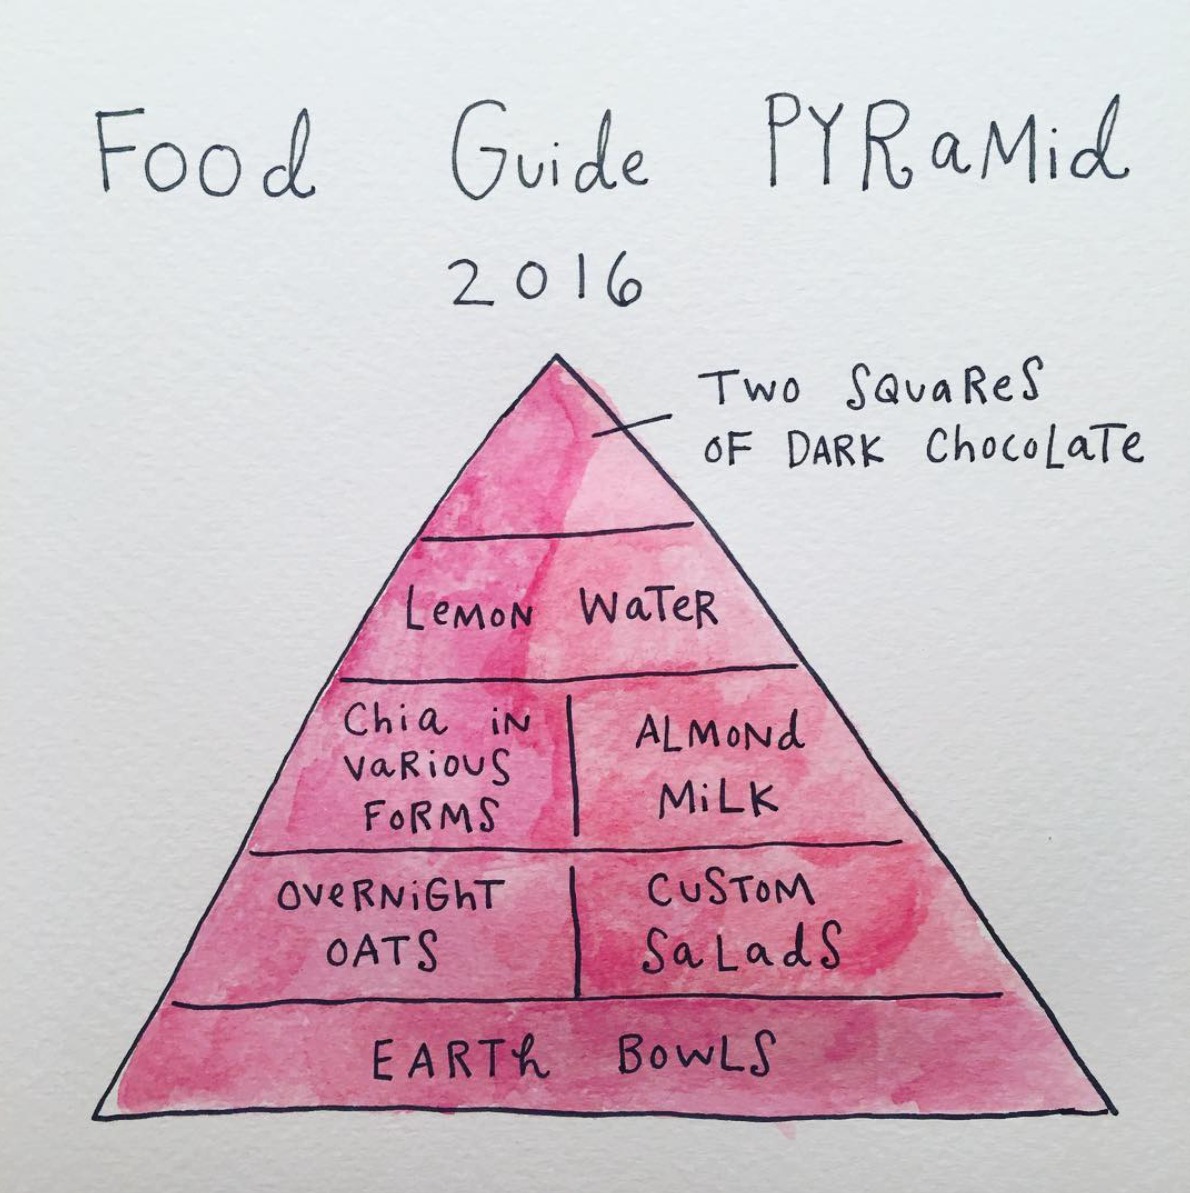
A: I love fuchsia! I try to make as many Venn diagrams as I can to work in big splashes of pink. I really love the way black/white illustration looks, but I have too much fun with watercolor to stick to such a palette myself.

Mari Andrew Illustration

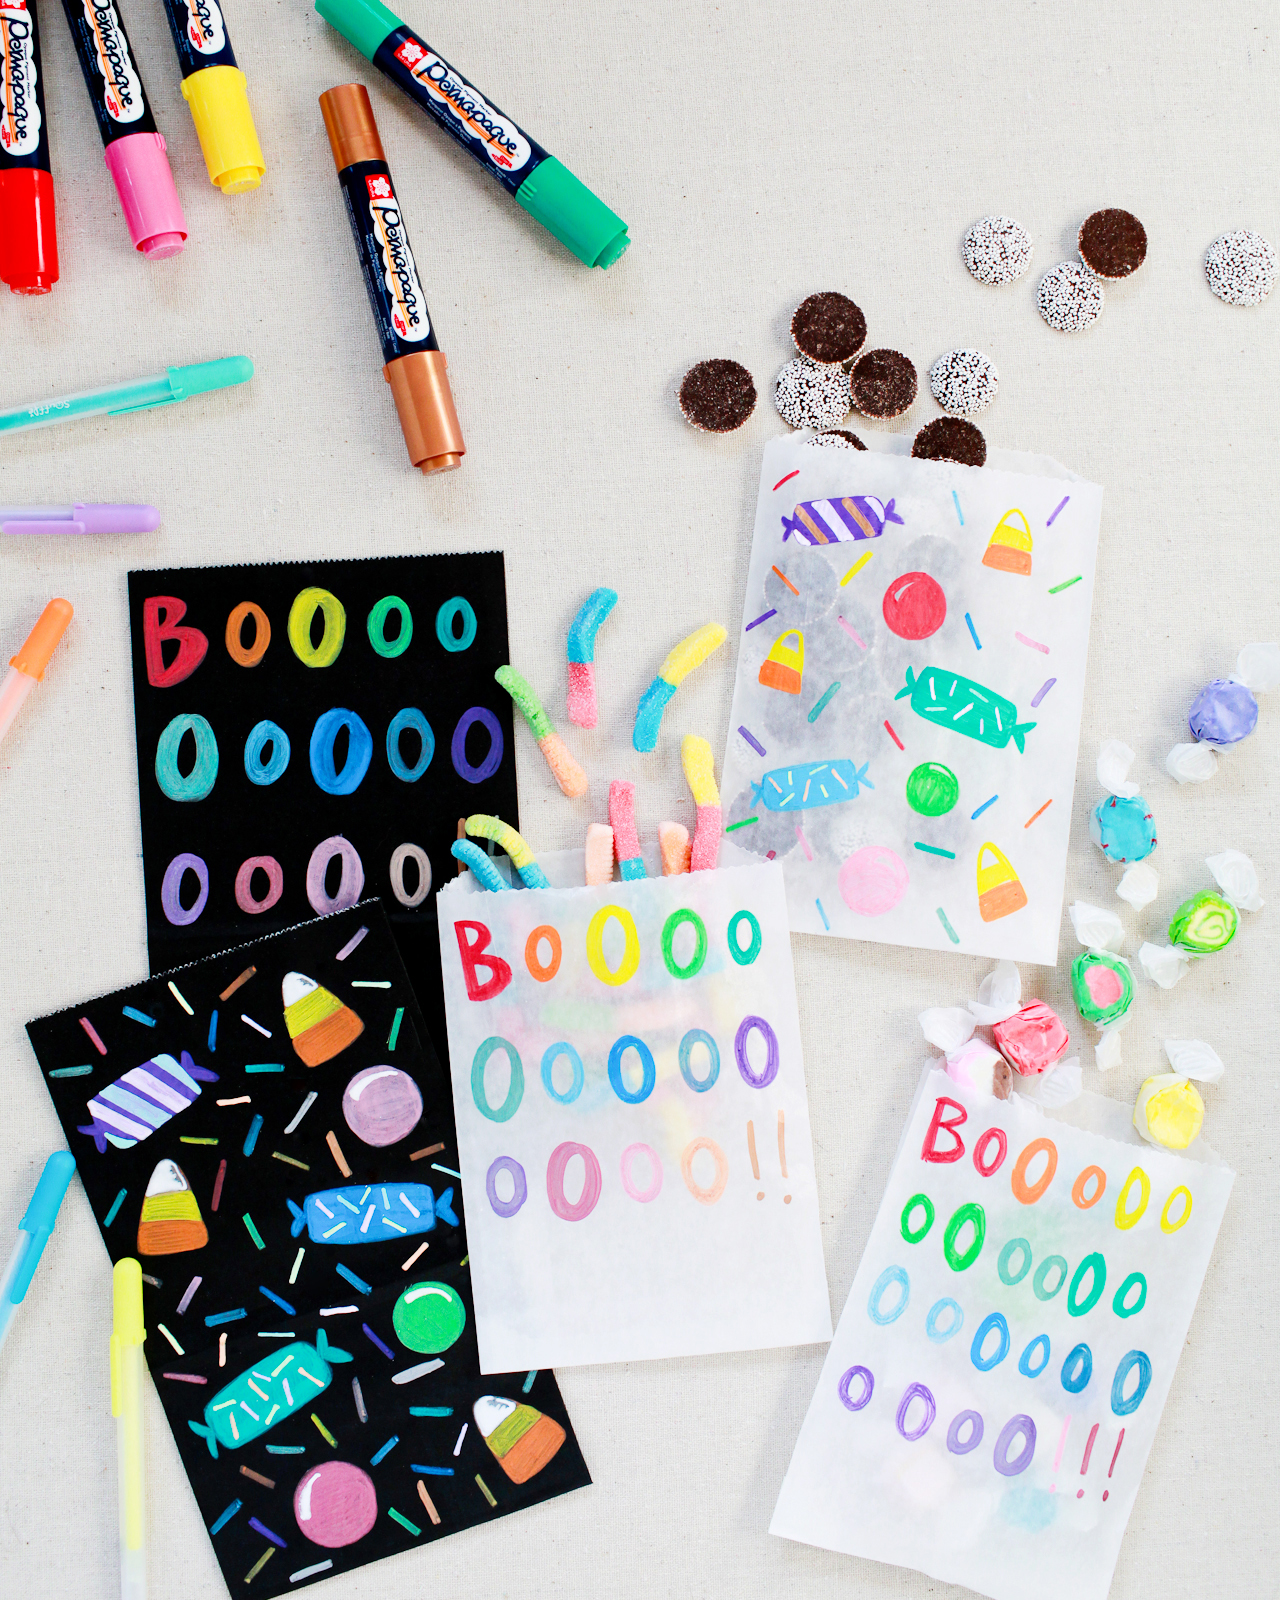
Q: What artist tools do you use for creating your illustrations-a-day?
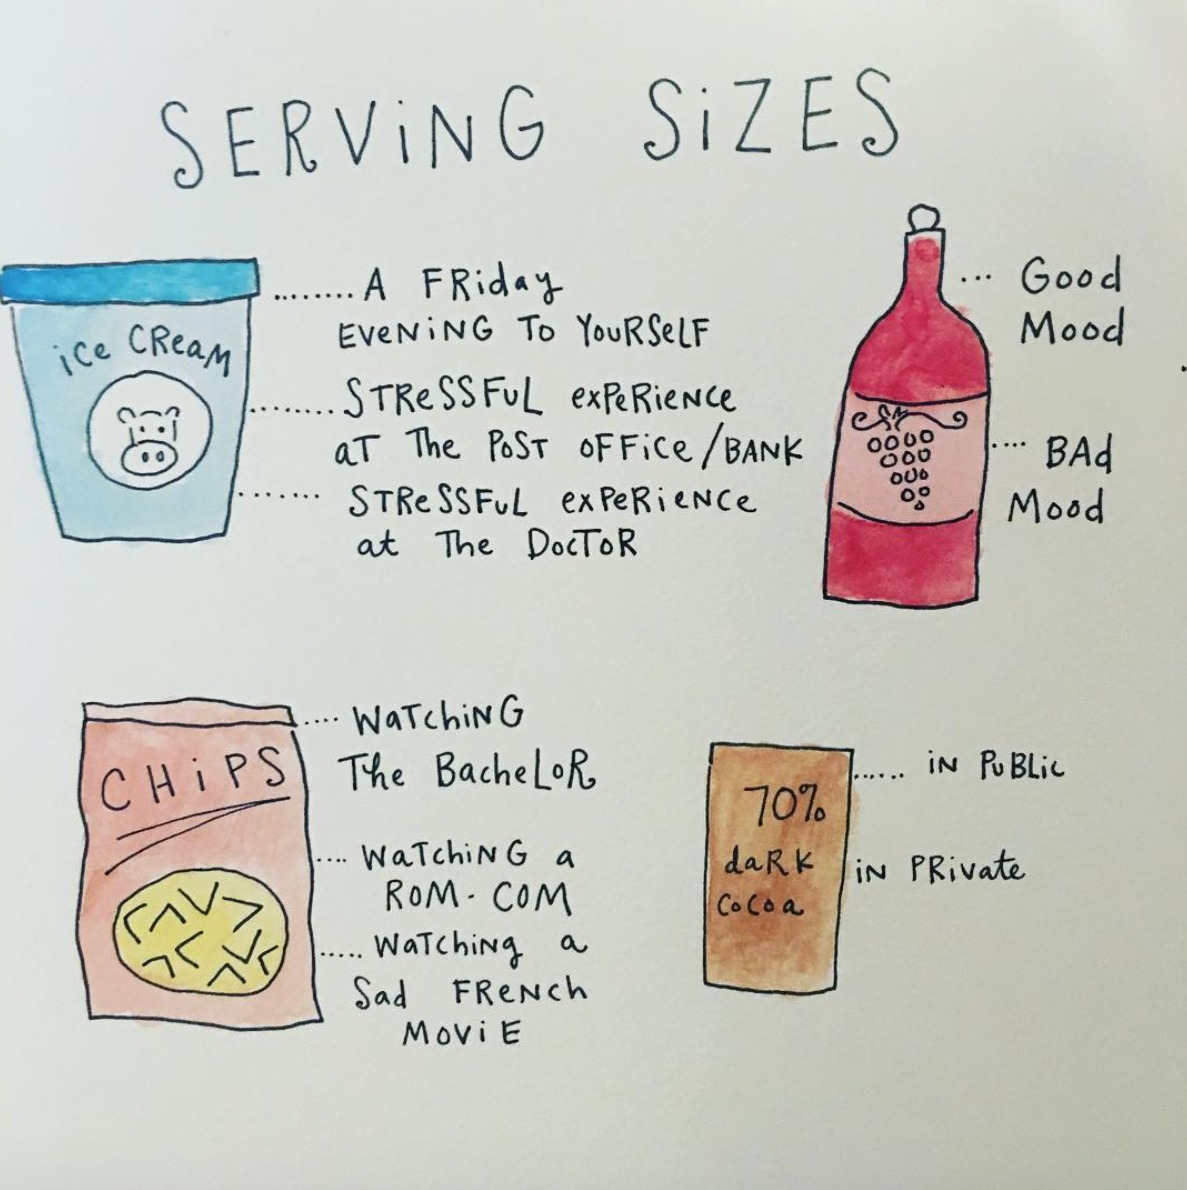
A: I use the cheapest tools: A Sharpie pen and a travel watercolor set I got on Amazon for $19.99. I draw on nice watercolor paper though!

Mari Andrew Illustration

Mari Andrew Illustration

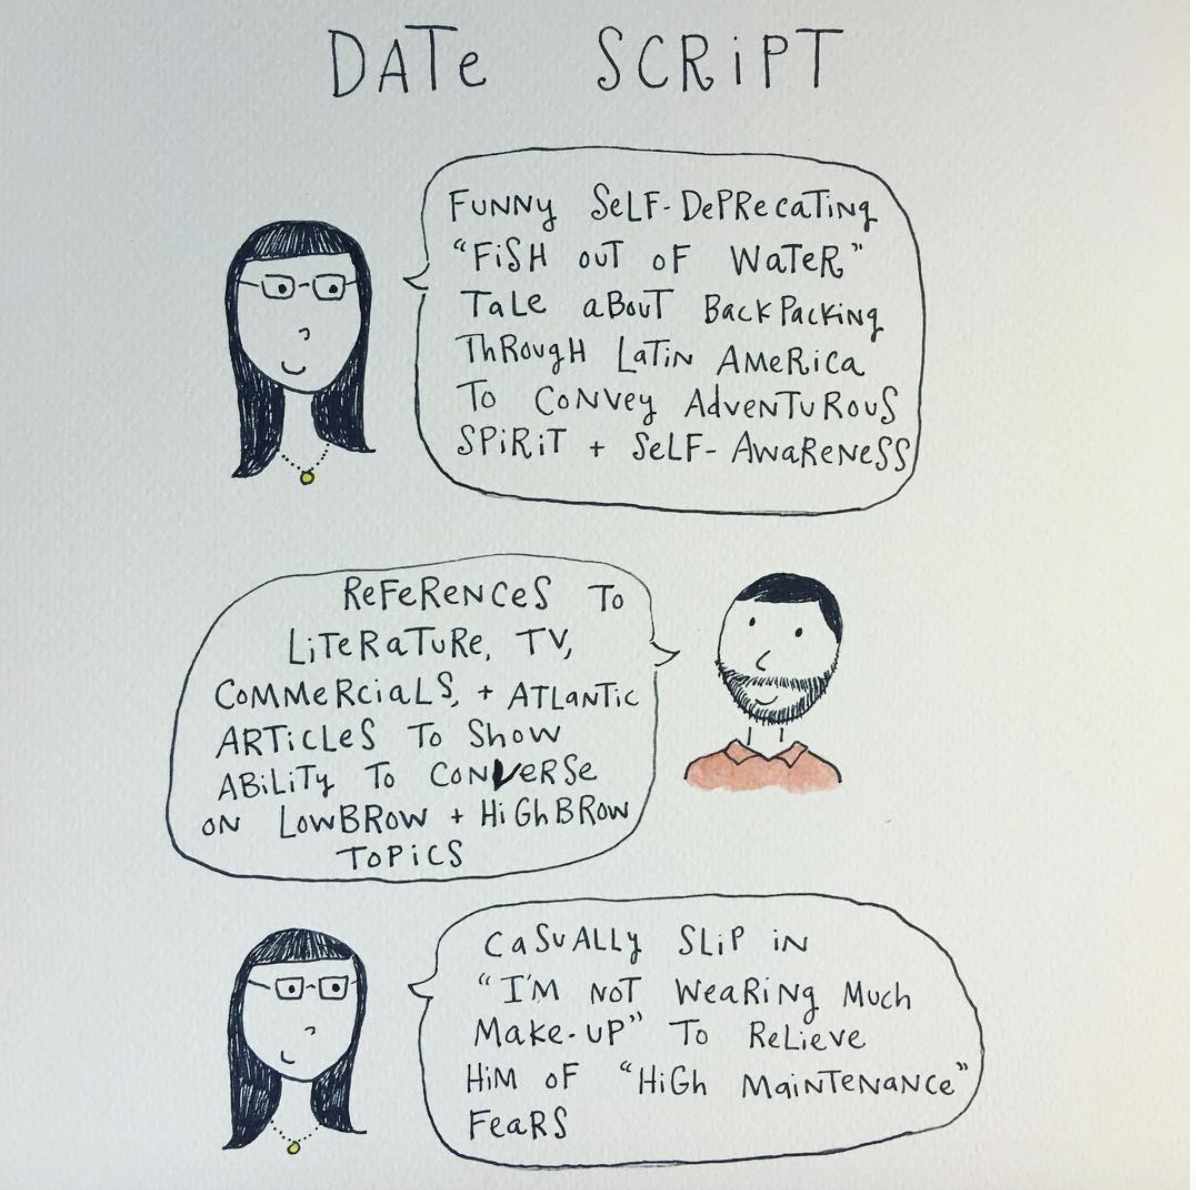
Q: I love how some of your illustrations so perfectly depict dating life, and the myriad of experiences you can have as a single person dating. Have those illustrations been some of the pieces that have resonated most with people? Do you have a favorite ice cream for breakup blues?

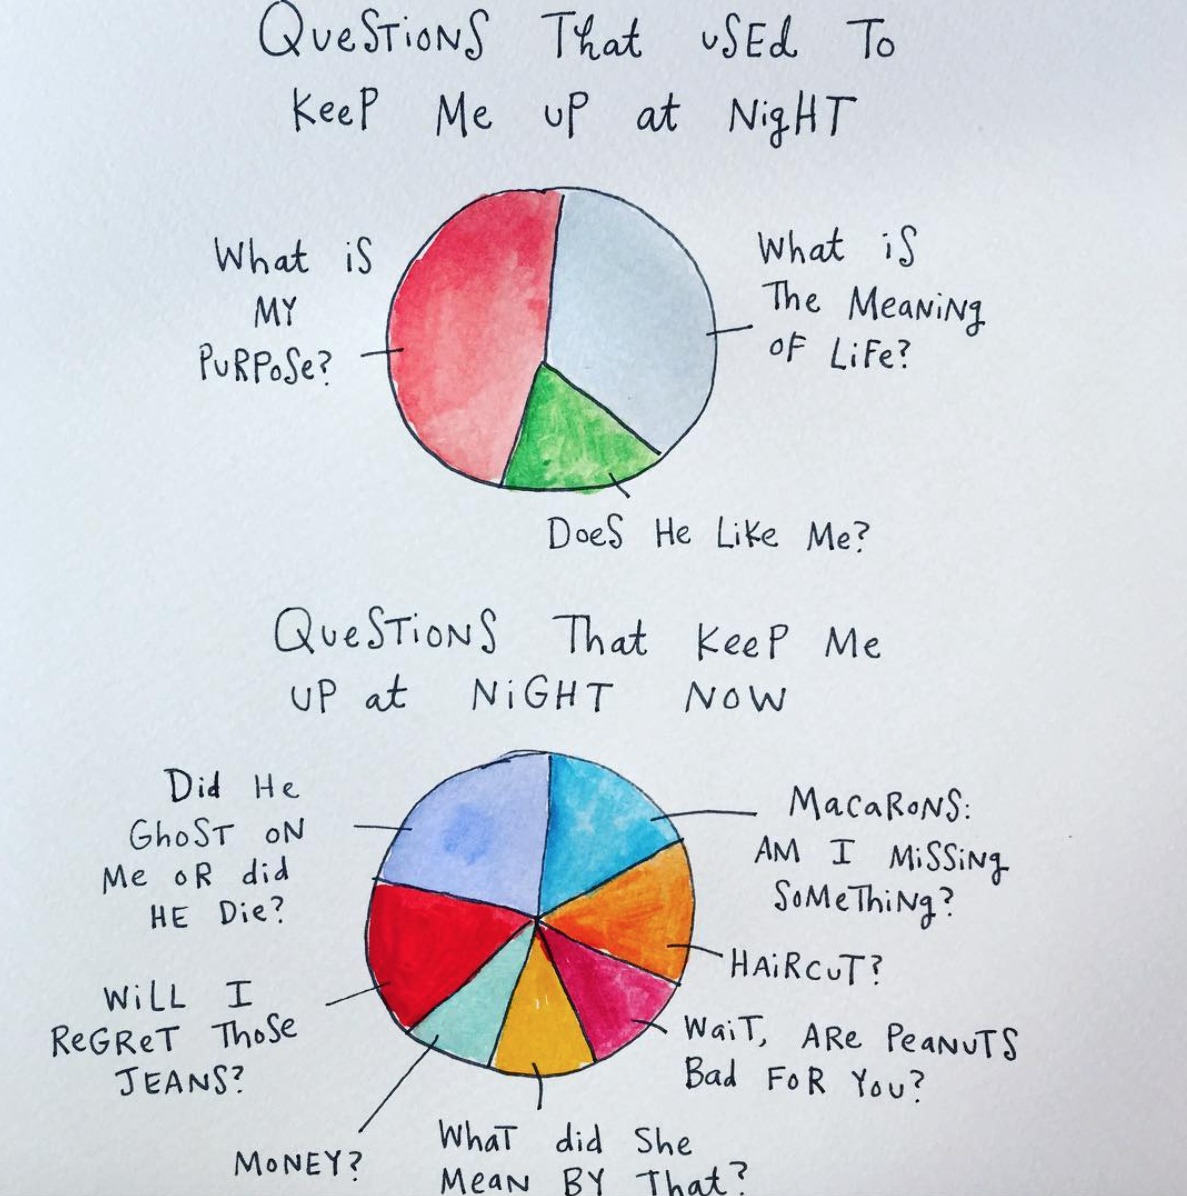
A: YES, I always think I am totally alone in my dating fiascos and breakups, but as soon as I publish something very personal, a lot of people always resonate. They say it makes them feel less alone, which is lovely, but I do it selfishly because it makes ME feel less alone! The dating illustrations are definitely the most popular; I think it’s because we all assume we’re somewhat isolated in our experiences and it’s nice to know that it’s just hard for everyone, no matter who you are.

A breakup ice cream has to be SUPER indulgent or it doesn’t work. I’d go for Ben and Jerry’s Half Baked. The more chunks of baked goods mixed in, the better.

Mari Andrew Illustration

Q: Are you a morning person or a night person? When do you create your best work?

A:  I have all my energy and create my best work in the morning. It’s a little stressful having that time of day be so productive in contrast to the rest: do I spend that energy on my art, on cleaning my apartment, exercise, or my 9-5 job? Art usually wins!

Mari Andrew Illustration

A big thank you to Mari Andrew for sharing her thoughts and work. Isn’t it amazing how art (that makes you think!) can be created simply with a sharpie and a cheap set of watercolors? I love that. See you back here soon!

Photos: Mari Andrew

DIY Colorful Halloween Treat Bags

Back in April, I got to play around with some envelope inspiration featuring light ink over dark watercolor washes using Sakura of America‘s opaque Soufflé pens. I loved the light-against-dark look so much, it got me thinking about other ways that I could use opaque ink colors over dark paper or surfaces. With Halloween just around the corner, I thought it would be fun to put a colorful DIY spin on Halloween treat bags using matte black paper treat bags. So today I’m thrilled to partner up with Sakura of America once again to share a couple of really fun ideas for DIY colorful Halloween treat bags using their opaque Soufflé pens and Permapaque dual point paint markers!

DIY Colorful Halloween Treat Bags

Halloween treat bags are a must for parents of school-aged children, but they’re also a fantastic option for anyone considering non-food trick-or-treating options for kids with food allergies. Halloween feels like the perfect time to break out a black treat bag, but I could also totally see a version of this DIY working for kids birthday parties any time of year. Maybe tiny bugs and creepy-crawlies for an insect-inspired party, or a colorful treasure map for a pirate party??

DIY Colorful Halloween Treat Bags

The Permapaque markers come in really bright and vibrant colors, along with gold, silver, and copper, while the Soufflé pens read much more pastel against the black paper. I just love the pops of color against the matte black paper, and the pastel tones of the Soufflé pens give off a vaguely ’70s black light poster vibe, which is pretty cool.

Let’s get to the how-to so you guys can give this a try at home!

DIY Colorful Halloween Treat Bags

Supplies

DIY Colorful Halloween Treat Bags

To make the hand lettered treat bags, use a white pencil to lightly write out the word or phrase you want on your treat bags. I had my daughter’s preschool class in mind when creating my treat bags, so I wanted to keep things really simple. A drawn out BOOOOOOOOOOOO!! is perfect for a bunch of 4 year-olds still learning how to read, but for older kids or a grown up Halloween party you could do a series of words or a favorite Halloween phrase. Write the letters in all caps and in varying sizes for a playful, whimsical feel. Then trace over the light pencil letters with Permapaque dual point markers or Soufflé pens. Allow the ink to dry completely, then add a second coat of ink if needed. So easy!

DIY Colorful Halloween Treat Bags

DIY Colorful Halloween Treat Bags

To make the illustrated candy Halloween treat bags, start by drawing solid color candy shapes using Permapaque paint markers and allow the ink to dry completely, usually just 2-3 minutes. I did a mix of triangular candy corn, round gum balls, and little twisty rolls, along with a random sprinkle pattern. Add a second coat of the Permapaque paint for more vibrant and smooth color coverage, then allow the ink to dry a second time. Finally, use the Soufflé pens to add detail over the Permapaque layer and to add more sprinkles.

DIY Colorful Halloween Treat Bags

DIY Colorful Halloween Treat Bags

DIY Colorful Halloween Treat Bags

DIY Colorful Halloween Treat Bags

I absolutely LOVE the way the Permapaque markers and Soufflé pens look on the matte black paper treat bags! I was really surprised by how well even the darker color Permapaque markers did against the black paper, and the pastel tones of the Soufflé pens are even more lovely in person. I also did a few versions on regular glassine treat bags so you could see what they would look like. The Soufflé pens had a tough time with the waxy coating on the glassine bags, but worked perfectly when layered over the Permapaque paint!

DIY Colorful Halloween Treat Bags

DIY Colorful Halloween Treat Bags

DIY Colorful Halloween Treat Bags

And don’t feel intimidated if illustration isn’t your thing. I went with a candy theme for my illustrations, but even a simple polka dot pattern would look amazing in the colorful ink against dark paper and would take approximately 30 seconds per bag. Or stars in varying sizes! Rainbow stars, or even an all-metallic design with stars in silver, copper, and gold. YES. If you’re feeling adventurous, try a Jack O’ Lantern face. So many great possibilities! I found the Permapaque markers better for a more bold and graphic lettering or illustration style, while the Soufflé pens are great for line illustrations and details, so just keep that in mind when creating your illustrations.

DIY Colorful Halloween Treat Bags

DIY Colorful Halloween Treat Bags

DIY Colorful Halloween Treat Bags

So bright and happy! You can pick up your own set of Soufflé pens here and Permapaque markers here – you’ll have so much fun creating colorful treat bags with them!

Photos by Nole Garey for Oh So Beautiful Paper

This post is sponsored by Sakura of America. All content and opinions are my own. Thank you for supporting the sponsors that make Oh So Beautiful Paper possible!