How to Add Your Personal Touch to DIY Wedding Invitations

Over the years, we’ve put countless wedding invitation suites together. Whether they were for this DIY column, for a client or even for our own weddings, we’re always blown away by how different a design can look once a couple puts their own personal spin on the details. Today we’ll show you just how different one of our standard letterpress designs (our Old West Invitation) can look once we add in all of the special details that bring the suite together. Hopefully this column inspires you to think outside the box about your own invitations! Be sure to check out the bottom of the post where we share our favorite DIY resources! – Bailey and Emma of Antiquaria

How to Add Your Personal Touch to DIY Wedding Invitations by Antiquaria via Oh So Beautiful Paper

Bespoke design services are certainly available and a very popular option right now. It stands to reason that couples want a suite that reflects their personal style and the special day that they are planning. While they’re a great option for some, many budgets just can’t accommodate the high prices that come along with the custom design process. It’s not the only option to get something that suits you and also your budget. DIY-ing components of your suite and putting everything together with friends and family can really help the bottom line.

Maybe you want a letterpress invitation but also a vintage postcard reply. That’s when using a rubber stamp on a portion of your wedding invitation suite can come in really handy. Want envelope liners but the high price tag of having them installed blows the budget? Find fun patterned wrapping paper or scrapbooking paper and do it yourself. It will definitely take some extra time and effort but in the end offers the same custom look. The options for customizing your suite are endless (really, they are) so we’ll show you three designs and outline what it took to achieve each look. We’ll also give you some of our go-to resources for the fun stuff so that you can find exactly what you might need!

How to Add Your Personal Touch to DIY Wedding Invitations by Antiquaria via Oh So Beautiful Paper

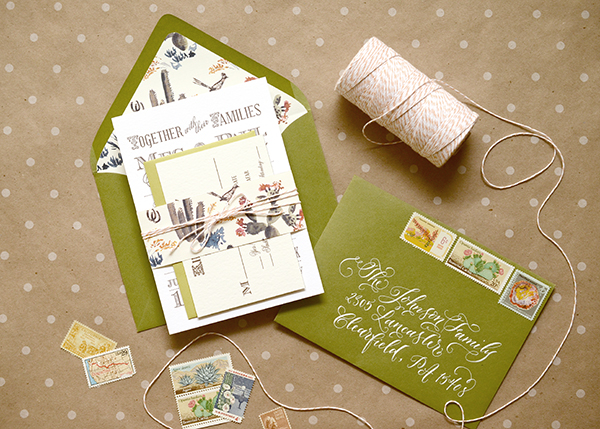
Our first suite is a fun play on traditional western imagery. We brought in tonal shades of green with the envelopes and a cactus patterned paper. We used the letterpress wedding invitation as well as the coordinating reply card (our Old West Invitation and Old West Reply Card) to keep it simple. For this suite we splurged and used calligraphy addressing because it’s really the best way to get opaque white ink and to add more of a unique touch. Twine always looks great with western design, so we used a peach bakers twine over a belly band to tie the pieces together.

How to Add Your Personal Touch to DIY Wedding Invitations by Antiquaria via Oh So Beautiful Paper

For the second design, we wanted to illustrate just how pretty and feminine western design can be. We took the same Old West Invitation but paired it with pretty vintage postcard that featured a peach colored cactus flower and rubber stamped our reply info on the back. Adding in this imagery really helped us tie in the blush envelope and the coordinating chocolate and pink western liner. Of course, tying it together with a pretty Grecian Pink ribbon doesn’t hurt either. This suite was addressed using a digital addressing service. Just because you might not be able to afford a calligrapher doesn’t mean that you must resort to those tacky clear labels. There are many options for guest addressing with style selections to choose from.  There’s a good chance that you’ll be able to find something to coordinate with your suite.

How to Add Your Personal Touch to DIY Wedding Invitations by Antiquaria via Oh So Beautiful Paper

By far the most pricey and customized design of the group, this suite includes custom art and a box mailer. We still used the same Old West invitation design but brought in luxe details like the navajo patterned response card and vintage arrowheads – all enclosed in a little gift box. Thinking “out of the box” can be really fun if you have the time and budget to bring in special details like these (even if they’re actually in a box). Custom guest address labels were used on this design in lieu of calligraphy. We knew the box would need a lot of postage, especially if using vintage postage stamps, but hand lettering and calligraphy needs quite a bit of room to execute. The label is printed out with both your guest address as well as your return address and wraps onto the back of the envelope (or box). It’s especially appropriate for the box mailers since it seals one side of the box shut.

We hope that your mind is a-buzz with ideas of how to make your own wedding invitations custom and unique to you! There are many options out there and it pays off to spend a little time adding some DIY touches your your own invitations.

Resources

Designs used in the tutorial: Old West Letterpress Invitation, Old West Letterpress Reply Card, Old West Coral Patterned Paper

About Envelopes: Adding colored envelopes is always a great option. Often invitation companies will give you a credit if you elect not to use the envelope that they provide with the invitations. Our favorite envelope sources are Paper Source, Paper Presentation and Envelopes.com. Between the three, they offer a wide selection of colors and styles for your to choose from. There are many others out there too if you spend the time to search around.

About Addressing Options

Calligraphy: It’s not for every budget, but calligraphy is a great options for many couples. If you have time, you can even try to learn for yourself with our tutorials and supply kit. Otherwise, calligraphers are plentiful both online and locally. If you’d prefer to work with a local calligrapher, the best way to find a talented and reputable person is currently to go through your local calligraphy guild. Using a local calligrapher can make your life easier and can be less expensive since you can avoid shipping things back and forth. They also tend to accommodate rush jobs more easily. Some calligraphers may not have websites…don’t let this deter you, they can easily email samples to show you their skills!

Digital Addressing Services: Envelopes.com offers addressing on their huge selection of envelopes. It’s a great option for a professional look without hiring a professional calligraphy to hand letter each envelope. Etsy also has many, many sellers that offer this service as well. These vendors do not necessarily stock the envelopes so you’ll need to use the ones provided or find your own.

Guest Address Labels: Etsy is another great source for this service as well. You can also ask your designer or stationer if they offer addressing options to coordinate with the design that you choose. They might offer one or all of the options through their shop.

Our Favorite DIY Supply Resources

Pattterned papers for DIY envelope liners and bellybands: Antiquaria, Paper Source, Paper Mojo

Vintage Postage:  Our favorites source is Verde Studio Vintage Stamps, don’t hesitate to contact Virginia at Verde Studio: she is brilliant at currating a custom mix of vintage postage to suite your needs. Other resources for vintage postage include: Champion Stamp Co., Ebay – USA unused stamps 1901-now, The Paper Nickel

Ribbon: We love the soft look of rayon taylor’s ribbon available at Antiquaria, for a more organic look check out the gorgeous italian cotton ribbons at Angela Liguori, M&J Trimming has a full assortment of ribbons and trimming to choose from.

Bakers Twine: Baker’s twine now comes in a variety of colors. Here are two great sources: Antiquaria &  The Twinery

Anti­quaria is a mem­ber of the Designer Rolodex – you can see more of their beau­ti­ful work right here or visit the real wedding invitations gallery for more wedding invitation ideas!

Photo Credits: Antiquaria for Oh So Beautiful Paper

Envelope Address Hand Lettering Tutorial from Ladyfingers Letterpress

Hi Everyone! The ladies of Ladyfingers Letterpress were kind enough to fill in during my summer vacation last year, and this post on Arley-Rose’s signature hand lettering was one of my favorite posts that week! So I jumped at the chance when Arley-Rose volunteered to stop by with some tips and tricks for adorning your envelopes with beautiful and whimsical hand lettered addresses. Take it away ladies! –Nole

With the majority of correspondence these days taking place in the digital realm, it’s always such a treat to get something real and tangible in the mail. Heck, even before e-mail dominated our lines of communication, you knew something was really special when it arrived through your mail slot all decked out with big, beautiful lettering that you knew someone took time to carefully create. Hopefully by the end of this post you will want to sit yourself down and experiment with some of the styles shown below to make your own beautifully styled envelope addresses. –Arley-Rose of Ladyfingers Letterpress

Envelope Address Hand Lettering Tutorial by Ladyfingers Letterpress / Oh So Beautiful Paper

I like to think of hand-lettering as more of an “illustration using letters” more than a “trained handwriting” kinda thing, so I choose pens that give me the most control as possible. People are doing beautiful things with pointed pens and modern calligraphy these days, and I encourage you to experiment with pointed pens if you like, but for now I am going to stick the tools that I know and love.

We’ll begin our journey into the world of lettering with familiarizing ourselves with a few different lettering styles that will act as our foundation and give us some variation in style that we can draw upon throughout our lettering endeavors! Personally, I like to combine different lettering styles, fluctuating between scripts, roman, and sans-serif characters to give the piece a lot of motion and personality. Not sure what a roman character is? Read on! Have questions about the etiquette and formality of addressing your envelopes? Martha Stewart has a terrific go-to tutorial about that!

Hand Lettering Envelope Address Tutorial by Ladyfingers Letterpress / Oh So Beautiful Paper

Roman lettering, which can also be called a “Serif,” has some of the earliest origins dating back to, well, the Romans! The word “Serif” is latin for “foot”, which makes sense when you look at the letters. See? They all have feet (except o’s)! Serifed typefaces such as Garamond or Baskerville look great as all caps and spaced out (which us type nerds refer to as “tracking”), or spelled out in both caps and lowercase with normal tracking. I sometimes like to make tall condensed roman letters if the address is really long and I need to make the most of my space. On capital As, Rs, Ns, Ys, Ks, Hs, and sometimes Gs, I like to add a little flourish, as you’ll notice on some of the envelope samples below.

Hand Lettering Envelope Address Tutorial by Ladyfingers Letterpress / Oh So Beautiful Paper

Now that you know that the word “Serif” means “foot”, naturally “Sans Serif” means “Without Feet!” Sans Serif letters were popularized in the mid twentieth century with the arrival of Helvetica, Gill Sans and Futura. I think they look great as all caps, tall and condensed! I also find that they’re easy to draw because they most closely resemble a clean, handwritten print style.

Hand Lettering Envelope Address Tutorial by Ladyfingers Letterpress / Oh So Beautiful Paper

Now the fun part begins! Getting the hang of lettering a script might take some time to get the hang of, but here’s a secret! Write in cursive as you normally would, and then darken the strokes that should have accents. Feel free to refer to other scripts with a quick google image search to see where those accents should be. Have some fun with your script: it’s not necessary to keep a straight baseline, in fact I tend to like scripts that dance around a little bit on the page. They have more character! Ha! Get it! Character? Typography? Joke? Uhhh….. Nevermind.

Hand Lettering Envelope Address Tutorial by Ladyfingers Letterpress / Oh So Beautiful Paper

Hand Lettering Envelope Address Tutorial by Ladyfingers Letterpress / Oh So Beautiful Paper

My favorite go-to pen is the Pigma Micron from Sakura of America. I’ve been drawing with Micron pens since I was a wee young artist, and they continue to be my favorite pen for all types of uses, especially drawing on light-colored envelopes. My size of choice is an 08 but there was a time when all I used was the smaller 03s to get a really nice fine line.

Hand Lettering Envelope Address Tutorial by Ladyfingers Letterpress / Oh So Beautiful Paper

Hand Lettering Envelope Address Tutorial by Ladyfingers Letterpress / Oh So Beautiful Paper

Keep it classy! Sometimes a white pen is all you need to do the trick, especially on dark or brightly colored envelopes. My go-to is the White Gelly Roll 08, which gives me a nice smooth line without any breaks or clogs. I’ve found that the Metallic Silver Gelly Roll pen is also super awesome! It’s not really too sparkly, but is super opaque which is exactly what I want. I also like the Moonlight pens for an extra burst of color.

Envelope Address Hand Lettering Tutorial by Ladyfingers Letterpress / Oh So Beautiful Paper

Sometimes I like the swift expression that can only be found with a brush pen. When I don’t have time to whip out the gouache and brushes, the Pigma Brush pens really do the trick. They also come in  a variety of colors, so if you’re not feeling like black ink is your thing that day, you can also choose from a variety of other colors that look great on white or light colored envelopes.

Envelope Address Hand Lettering Tutorial by Ladyfingers Letterpress / Oh So Beautiful Paper

The Do Not Open Lettering Project  by Erik Marinovich was recently brought to my attention by my amazing typographer friend Jeremy Mickel, and it blew my mind. It still does blow my mind. Every time I look at it. I thought I would refer to it here because it shows how creative you can be with large oversize envelopes. Besides, envelopes: they’re really just a canvas for beautiful lettering, right? Anyway, the Permapaque markers are incredible for this task. They’re nice and opaque like a paint marker without the nasty smell, and you get a huge variety of colors!

Now that you’ve seen some samples, I’d love to see what you come up with! Don’t forget to tag your work on Instagram with @beautifulpaper, @ladyfingersletterpress and @sakuraofamerica. Thanks and happy lettering!

Pens provided by Sakura of America, with awesome stamps provided by Pack & Post!

Photo Credits: Ladyfingers Letterpress

DIY Tutorial: Spring Watercolor Wedding Invitation Suite

Spring is finally here and we couldn’t be more excited! When we stumbled across this gorgeous double sided watercolor paper by Rifle Paper Co., we just knew that it would be making a starring appearance in a future DIY tutorial. To kick off the season, we’ve designed a gorgeous, pastel invitation suite that would be perfect for any spring or summer event. The decorative watercolor paper trifold is just icing on the cake! We absolutely love it  this season as an alternative to the envelope liner! – Bailey and Emma of Antiquaria

DIY Tutorial: Watercolor Trifold Wedding Invitation by Antiquaria for Oh So Beautiful Paper

DIY Tutorial: Watercolor Trifold Wedding Invitation by Antiquaria for Oh So Beautiful Paper

Step One: Gather and cut the decorative paper that is destined to be your trifold wrap around your invitation. To fit an A7 (5″ x 7″) card cut the paper into rectangles measuring 7″ tall by 11″ long. This will allow for an inch of overlap around your invitation card. The decorative paper that you choose doesn’t have to be double sided like ours is but we would recommend selecting a paper with a pretty back, either clean white or a color or pattern. Remember that the back will be seen when your guests view the invitation!

DIY Tutorial: Watercolor Trifold Wedding Invitation by Antiquaria for Oh So Beautiful Paper

Step Two: For ease of folding and to make sure the line was straight, we scored one side of our decorative paper at the 2.5″ mark. Fold along the line and set the paper aside.

DIY Tutorial: Watercolor Trifold Wedding Invitation by Antiquaria for Oh So Beautiful Paper

Step Three: Next we stamped our invitation piece on an A7 card. For this design we used our Mod Invitation Stamp and an antique pewter stamp pad. For a step-by-step video tutorial about this printing process go here.

DIY Tutorial: Watercolor Trifold Wedding Invitation by Antiquaria for Oh So Beautiful Paper

Step Four: Next, we folded the other side of our decorative paper trifold around the A7 card, making sure it was a snug fit. We used a bone folder to make a crisp, folded edge.

DIY Tutorial: Watercolor Trifold Wedding Invitation by Antiquaria for Oh So Beautiful Paper

Step Five: Insert the A7 invitation card into the trifold decorative paper with double sided tape or stick glue. Put the tape on all four corners of the back of your card. Carefully place it over the center of the trifold and press it down to adhere it to the decorative paper.

DIY Tutorial: Watercolor Trifold Wedding Invitation by Antiquaria for Oh So Beautiful Paper

Step Six: For the reply card, we wanted to add some pattern and color to tie together the coral and turquoise sides of our decorative paper. For the reply card itself, we cut 4bar cards (3 1/2″ x 4 7/8″) out of our Paloma Patterned Coral Cover Paper and stamped our Mod  Reply Card Stamp on the blank, non-patterned side. We used a turquoise colored 4bar envelope stamped with our Mod Banner Return Address Stamp to coordinate. You will get four 4bar cards out of one sheet of card stock.

DIY Tutorial: Watercolor Trifold Wedding Invitation by Antiquaria for Oh So Beautiful Paper

Step Seven: The last step puts all of the gorgeous finishing touches on the suite. We used the Paloma Coral Paper again, except in text weight, to make the belly bands wrapped around the suite. We cut them into strips of 2″ x 11″ – meaning you will get four belly bands per sheet of paper. After taping the belly band, we tied a piece of ribbon around the band to soften the look and add a bit of texture to the design.

We stamped the same return address (Mod Banner Return Address Stamp) on the back flap of a blush envelope before addressing them and sending them on their merry way! We promise that each guest will be truly delighted to receive such a present in their mailbox!

Materials

Mod  Invitation Stamp

Mod  Reply Card Stamp

Mod Banner Return Address Stamp

Stamp Pad in Antique Pewter

Decorative Paper (we used these ombré gift wrap sheets from Rifle Paper Co.) cut to 7″ x 11″

A7 Cards in Superfine White

A7 Envelopes in Luxe Blush

Paloma Coral Patterned Paper in Cover and Text weight

4bar Envelopes in Pool

Double sided tape or stick glue

Scoring Board

Ribbon

Anti­quaria is a mem­ber of the Designer Rolodex – you can see more of their beau­ti­ful work right here or visit the real wedding invitations gallery for more wedding invitation ideas!

Photo Credits: Antiquaria for Oh So Beautiful Paper

DIY Tutorial: Rubber Stamp Clay Save the Dates

Texture is subtle but boy does it make a huge impact! When we found some paper clay at the art store a while back, we knew it would make a great DIY but we weren’t quite sure what to do with it. After obsessing over textured clay pottery now for ages, we decided that a “pottery” save the date was in order. The natural off-white color of the paper clay comes alive when paired with a mix of floral patterns and a unique lilac, eggplant, and ochre color palette! – Bailey and Emma of Antiquaria

DIY Tutorial: Rubber Stamp Paper Clay Save the Dates by Antiquaria for Oh So Beautiful Paper

DIY Tutorial: Rubber Stamp Paper Clay Save the Dates by Antiquaria for Oh So Beautiful Paper

DIY Tutorial: Rubber Stamp Paper Clay Save the Dates by Antiquaria for Oh So Beautiful Paper

Step One: Gather your paper clay supplies: bag of clay, wooden cutting board (you don’t want any texture in your rolling surface – unless it’s the look you’re going for), clear plastic wrap, and a rolling pen. Break your paper clay into approximately 2 oz pieces. There will be scraps that you can re-roll together.

DIY Tutorial: Rubber Stamp Paper Clay Save the Dates by Antiquaria for Oh So Beautiful Paper

Step Two: Squish the paper clay into a small rectangle with your fingers (this doesn’t need to be precise). Place it in the middle of your plastic wrap and fold the other end of the wrap over the top. Now, you’ll start rolling! It’s basically like rolling out a pie crust or cookies – just keep the thickness even and it will be good. We suggest a thickness of around â…›” or maybe a little less. Remember: it does need to fit in an envelope!

DIY Tutorial: Rubber Stamp Paper Clay Save the Dates by Antiquaria for Oh So Beautiful Paper

Step Three: Once it’s rolled out thin and even (and approximately the size of your stamp mount, you’re ready to print the design. With an un-inked stamp (we used our Vintage Label Save the Date stamp) center it over the clay and carefully set it down. With your fingertips, press each section of the design evenly to make the print. This printing method feels different than printing paper so it may take some extra time to get the hang of it! Not to worry though, you can just re-roll the clay so there is no waste in the practice process!

Once you get a good print, trim the clay around the design with a kitchen knife (we used the mount size as a guide). Carefully flip the clay over in your palm and transfer it to a plastic lined tray or baking sheet. Let dry 1 – 3 days or until firm.

DIY Tutorial: Rubber Stamp Paper Clay Save the Dates by Antiquaria for Oh So Beautiful Paper

DIY Tutorial: Rubber Stamp Paper Clay Save the Dates by Antiquaria for Oh So Beautiful Paper

Step Four: Now that your clay save the dates are complete, you can move on the the rest of the pieces that you’ll need for the design. Cut patterned card stock (we used our Annabelle Violet Paper) into A2 sized cards (4.25″ x 5.5″) with a craft knife and ruler on a self healing mat. You will get four cards out of one 8.5″ x 11″ sheet.

DIY Tutorial: Rubber Stamp Paper Clay Save the Dates by Antiquaria for Oh So Beautiful Paper

Step Five: Stamp your accommodations and website information on the back of your patterned card. We used our Calligraphy Accent Accommodations and Calligraphy Accent Website stamps for this design. You can watch our step-by-step video tutorial about the stamp printing process here.

DIY Tutorial: Rubber Stamp Paper Clay Save the Dates by Antiquaria for Oh So Beautiful Paper

Step Six: A coordinating liner really dresses up an envelope, don’t you think? For this design, we used our daisy paper. The process is simple! Trace the template with a pencil and cut out the pattern. Use double sided tape or stick glue to adhere the liner into the envelope just below the gumming.

DIY Tutorial: Rubber Stamp Paper Clay Save the Dates by Antiquaria for Oh So Beautiful Paper

Step Seven: Now we’ll switch our focus to the outside of the envelope! We stamped our Scripted Return Address  stamp in eggplant on the back flap. To coordinate, we addressed the front in an eggplant colored ink as well and used (our favorite) seed packet postage to finish it all off!

Materials

Vintage Label Save the Date Stamp

Calligraphy Accent Accommodations Stamp

Calligraphy Accent Website Card Stamp

Scripted Return Address Stamp

Annabelle Violet Patterned Paper

Daisy Patterned Paper

Paper Clay

Cutting board, plastic wrap, rolling pen and knife

Trays or baking sheets for air drying

Self healing mat, kraft knife and metal ruler

Envelope liner templates

Pencil and Scissors

Stamp Pads in Ochre and Eggplant

A2 Envelopes in Luxe Blush

Calligraphy Ink for addressing in Red Violet

Grecian Pink Tailors Ribbon to tie the suite together

USPS Postage

Anti­quaria is a mem­ber of the Designer Rolodex – you can see more of their beau­ti­ful work right here or visit the real save the dates gallery for more save the date ideas!

Photo Credits: Antiquaria for Oh So Beautiful Paper

DIY Tutorial: Rubber Stamp Mountain-Inspired Save the Dates

Fall is officially here and we couldn’t be more thrilled! Today’s gorgeous save the date tutorial is perfect for the season with its shades of brown and mountain scenery. We can’t seem to get enough of folded cards lately (see our previous designs here and here). They’re perfect for destination weddings since they allow you to incorporate more information without having to have additional cards. – Bailey and Emma of Antiquaria

DIY Tutorial: Rubber Stamp Mountain-Inspired Save the Dates

Step One: Download the mountain folded card design (see bottom of post for download link) and print it out on a 11″ x 17″ piece of card stock. Next, trim the card down at the crop marks to reach the final size (16″ x 5 1/4″). We used a self healing mat, metal ruler and craft knife for this step, but if  you plan on cutting many cards, we recommend taking them to a local printer to have them cut them all at once with an industrial cutter.

DIY Tutorial: Rubber Stamp Mountain-Inspired Save the Dates

Step Two: Score your 16″ x 5 1/4″ every four inches (three scores total, at the 4″, 8″ and 12″ mark). Don’t fold it yet!

DIY Tutorial: Rubber Stamp Mountain-Inspired Save the Dates

Step Three: Gather all of your stamps and make certain that you have a stamping plan before you dive in. The stamps we used for this design, from left to right are our “Banner” Names Monogram, Vintage Label Save the Date, Calligraphy Accent Accommodations Card and our Calligraphy Accent Website Card. Once you have your plan, you will ink each stamp and align it into its appropriate space. For a step-by-step video tutorial about the stamp printing process go here. Once they’re dry, fold your cards at each score mark. Using a bone folder can help you get lovely, crisp, folds!

DIY Tutorial: Rubber Stamp Mountain-Inspired Save the Dates

Step Four: Next, you will stamp your return address on the back flap of your A2 kraft envelope. We used our Calligraphy Ampersand Return Address Stamp with chestnut  ink for this design. Once you have the return address stamped on your envelopes, all that’s left is addressing and adding postage!

Materials

Mountain Scene Illustration: Download available here **Note: digital download is for personal use only**

11″ x 17″ Card Stock

Self Healing Mat, Craft Knife and Metal Ruler (or you can take your prints to a professional printer to have cut)

Scoreboard

“Banners” Name Monogram Stamp

Vintage Label Save the Date Stamp

Calligraphy Accent Accommodations Card Stamp

Calligraphy Accent Website Card Stamp

Calligraphy Ampersand Return Address Stamp

Stamp Pad in Chestnut

Bone Folder

A2 Envelopes in Paper Bag

Anti­quaria is a mem­ber of the Designer Rolodex – you can see more of their beau­ti­ful work right here or visit the real save the dates gallery for more save the date ideas!

Photo Credits: Antiquaria for Oh So Beautiful Paper