Jennifer + Iskander’s Bilingual Airmail Wedding Invitations

With the National Stationery Show behind us, I’m excited to feature wedding invitations again! Today’s airmail wedding invitations come to us from Becca of Suite Paperie. In addition to beautiful travel-inspired details, these wedding invitations honor the groom’s French heritage with bilingual printing – English and French – and royal blue envelope liners. Pretty!

Airmail-Wedding-Invitations-Suite-Paperie-OSBP

From Becca: Inspired by the groom’s French heritage, this vintage airmail suite is printed in English on one side and French on the other. Natural double-ply cover stock is digitally printed with traditional airmail stripes and images of vintage stamps for both the invitation and response card. To add in a bit of a natural element, we printed custom tags with the bride and groom’s initials on kraft paper and tied the suite together with a cream cotton twine. The entire package was tucked into a natural envelope lined in a bright royal blue.

Airmail-Wedding-Invitations-Suite-Paperie-OSBP2

Airmail-Wedding-Invitations-Suite-Paperie-OSBP3

Airmail-Wedding-Invitations-Suite-Paperie-OSBP4

Airmail-Wedding-Invitations-Suite-Paperie-OSBP6

Airmail-Wedding-Invitations-Suite-Paperie-OSBP7

Thanks Becca!

Check out the Designer Rolodex for more tal­ented wed­ding invi­ta­tion design­ers and the real invi­ta­tions gallery for more wedding invitation ideas!

Photo Credits: Lindsay Nathanson

Friday Happy Hour: The Strawberry Mint Smash

Sometimes, making a drink is an exercise in raiding the fridge. What do I have on hand? More importantly, what do I have on hand that will pair well with booze? Turns out we had about a metric ton of strawberries after our strawberry picking adventure last weekend (which you might have seen on Nole’s instagram). We also had some mint simple syrup left over from the time we made Basil-Mint Juleps. It didn’t take long before both of these became acquainted with some rye whiskey and, spoiler alert, the resulting drink was pretty good. So, without further jib-jab, here’s this week’s cocktail, the Strawberry Smash. – Andrew

Strawberry-Mint-Smash-Cocktail-Recipe-OSBP-25

Strawberry Mint Smash Cocktail Recipe Card by Shauna Lynn Illustration for Oh So Beautiful Paper

Illustration by Shauna Lynn for Oh So Beautiful Paper

The Strawberry Smash

2 oz Whiskey
1/2 oz Mint Simple Syrup
2 Dashes Aromatic Bitters
Fresh Strawberries and Mint

Muddle a few fresh strawberries with the simple syrup in the bottom of a glass. Add the bitters and fill the glass with ice. Add the whiskey and give everything a stir. (Try not to stir up the strawberries too much.) Garnish with fresh mint and enjoy!

Strawberry-Mint-Smash-Cocktail-Recipe-OSBP-5

There’s an entirely false urban legend out there that drinks with lots of fruit are the product of Prohibition, when speakeasy bartenders masked the terrible flavors of bathtub booze with lots of mixers. There’s a kernel of truth to that – many Prohibition-era drinks are drenched with syrups and mixers – but adding fruit to drinks predates Prohibition by decades if not longer. (Just take a look at drinks like the Cobbler, an old-time drink that’s both amazing and drenched with fruit.) So don’t fear fruit in your drinks. Embrace it.

Strawberry-Mint-Smash-Cocktail-Recipe-OSBP-15Strawberry-Mint-Smash-Cocktail-Recipe-OSBP-18

What makes a Smash? Spirits, mint, sugar, ice… and whatever else you feel like. So, strawberries, with their earthy sweetness, and mint syrup. I like to pair these with rye whiskey, which has a spicy bite that balances the fruit and syrup. And lots of ice. It’s the only way.

Strawberry-Mint-Smash-Cocktail-Recipe-OSBP-9

Long story short: never feel bad about raiding your fridge to spice up a drink.

If you do make one at home, you can use #osbphappyhour to share photos of these (or your own creations) on Instagram.

Photo Credits: Nole Garey for Oh So Beautiful Paper


Happy Weekend!

Happy National Doughnut Day Everyone! After 14 recaps from this year’s National Stationery Show, I’m ready for a doughnut and a nice long nap – or at least to go vacuum my house or attend to one of the many other chores I’ve been neglecting the last couple of weeks! I hope you enjoyed the coverage from this year’s show! Next week I’ll be back to my normal editorial schedule with some fun new posts, but in the meantime…

OSBP Paper Party 2014 Charlie Juliet Photography 1301 Paper Party 2014!

One of the many gorgeous floral arrangements from Soirée Floral for Paper Party 2014 // Photo by Charlie Juliet Photography

…a few links for your weekend!

This week on Oh So Beautiful Paper:

Check back soon for this week’s cocktail! I hope you all have a wonderful weekend, and I’ll see you back here next week! xoxo

National Stationery Show 2014, Part 14

Well, with a total of 118 booths featured from this year’s National Stationery Show – today we’re wrapping up our show coverage with a final group of booths! Let’s jump right in!

OSBP-NSS-2014-Farewell-Paperie-9

OSBP-NSS-2014-Farewell-Paperie-14

OSBP-NSS-2014-Farewell-Paperie-6

OSBP-NSS-2014-Farewell-Paperie-19

OSBP-NSS-2014-Farewell-Paperie-20

OSBP-NSS-2014-Farewell-Paperie-22

OSBP-NSS-2014-Farewell-Paperie-27

OSBP-NSS-2014-Farewell-Paperie-31

OSBP-NSS-2014-Farewell-Paperie-2

OSBP-NSS-2014-Farewell-Paperie-3

OSBP-NSS-2014-Farewell-Paperie-24

Farewell Paperie

OSBP-NSS-2014-Papillon-Press-3

OSBP-NSS-2014-Papillon-Press-7

OSBP-NSS-2014-Papillon-Press-11

OSBP-NSS-2014-Papillon-Press-13OSBP-NSS-2014-Papillon-Press-14

OSBP-NSS-2014-Papillon-Press-15

OSBP-NSS-2014-Papillon-Press-22

OSBP-NSS-2014-Papillon-Press-16OSBP-NSS-2014-Papillon-Press-18

OSBP-NSS-2014-Papillon-Press-21

Papillon Press

OSBP-NSS-2014-Hester-and-Cook-57

Hester & Cook recently created a brand new line – The Pencil Factory – for all of its stationery goods!

OSBP-NSS-2014-Hester-and-Cook-2

OSBP-NSS-2014-Hester-and-Cook-4OSBP-NSS-2014-Hester-and-Cook-21

How gorgeous is this chandelier made from paper ribbon?!?

OSBP-NSS-2014-Hester-and-Cook-27

OSBP-NSS-2014-Hester-and-Cook-29OSBP-NSS-2014-Hester-and-Cook-7

OSBP-NSS-2014-Hester-and-Cook-12

OSBP-NSS-2014-Hester-and-Cook-14OSBP-NSS-2014-Hester-and-Cook-19

OSBP-NSS-2014-Hester-and-Cook-30OSBP-NSS-2014-Hester-and-Cook-34

Love these pencil sets and artist erasers!

OSBP-NSS-2014-Hester-and-Cook-36OSBP-NSS-2014-Hester-and-Cook-55

OSBP-NSS-2014-Hester-and-Cook-41

OSBP-NSS-2014-Hester-and-Cook-43

OSBP-NSS-2014-Hester-and-Cook-49

Hester & Cook

OSBP-NSS-2014-Cynla-9

OSBP-NSS-2014-Cynla-7

OSBP-NSS-2014-Cynla-5

OSBP-NSS-2014-Cynla-14OSBP-NSS-2014-Cynla-15

OSBP-NSS-2014-Cynla-20OSBP-NSS-2014-Cynla-24

OSBP-NSS-2014-Cynla-28

OSBP-NSS-2014-Cynla-36

Cynla

OSBP-NSS-2014-Sea-Urchin-Studio-13

OSBP-NSS-2014-Sea-Urchin-Studio-38OSBP-NSS-2014-Sea-Urchin-Studio-32

OSBP-NSS-2014-Sea-Urchin-Studio-20

OSBP-NSS-2014-Sea-Urchin-Studio-40OSBP-NSS-2014-Sea-Urchin-Studio-3

OSBP-NSS-2014-Sea-Urchin-Studio-17OSBP-NSS-2014-Sea-Urchin-Studio-15

OSBP-NSS-2014-Sea-Urchin-Studio-27OSBP-NSS-2014-Sea-Urchin-Studio-28

OSBP-NSS-2014-Sea-Urchin-Studio-46OSBP-NSS-2014-Sea-Urchin-Studio-53

OSBP-NSS-2014-Sea-Urchin-Studio-57OSBP-NSS-2014-Sea-Urchin-Studio-60

Sea Urchin Studio

OSBP-NSS-2014-Gingiber-14

OSBP-NSS-2014-Gingiber-1

OSBP-NSS-2014-Gingiber-7

OSBP-NSS-2014-Gingiber-5OSBP-NSS-2014-Gingiber-19

OSBP-NSS-2014-Gingiber-9OSBP-NSS-2014-Gingiber-17

OSBP-NSS-2014-Gingiber-21OSBP-NSS-2014-Gingiber-25

Gingiber

OSBP-NSS-2014-LetterC-Design-34

OSBP-NSS-2014-LetterC-Design-3

OSBP-NSS-2014-LetterC-Design-4

OSBP-NSS-2014-LetterC-Design-10

OSBP-NSS-2014-LetterC-Design-12

OSBP-NSS-2014-LetterC-Design-14OSBP-NSS-2014-LetterC-Design-30

OSBP-NSS-2014-LetterC-Design-25

OSBP-NSS-2014-LetterC-Design-41

Letter C Design

OSBP-NSS-2014-Lydia-and-Pugs-15

OSBP-NSS-2014-Lydia-and-Pugs-26OSBP-NSS-2014-Lydia-and-Pugs-20

OSBP-NSS-2014-Lydia-and-Pugs-5

OSBP-NSS-2014-Lydia-and-Pugs-8OSBP-NSS-2014-Lydia-and-Pugs-11

OSBP-NSS-2014-Lydia-and-Pugs-36

OSBP-NSS-2014-Lydia-and-Pugs-29OSBP-NSS-2014-Lydia-and-Pugs-32

OSBP-NSS-2014-Lydia-and-Pugs-34

Lydia & Pugs

OSBP-NSS-2014-Liddabits-1

OSBP-NSS-2014-Liddabits-9OSBP-NSS-2014-Liddabits-13

OSBP-NSS-2014-Liddabits-19OSBP-NSS-2014-Liddabits-20

OSBP-NSS-2014-Liddabits-22

OSBP-NSS-2014-Liddabits-32OSBP-NSS-2014-Liddabits-34

Liddabits

OSBP-NSS-2014-Screech-Owl-Design-3

OSBP-NSS-2014-Screech-Owl-Design-14OSBP-NSS-2014-Screech-Owl-Design-8

OSBP-NSS-2014-Screech-Owl-Design-29OSBP-NSS-2014-Screech-Owl-Design-16

OSBP-NSS-2014-Screech-Owl-Design-19

OSBP-NSS-2014-Screech-Owl-Design-24

OSBP-NSS-2014-Screech-Owl-Design-27

OSBP-NSS-2014-Screech-Owl-Design-39OSBP-NSS-2014-Screech-Owl-Design-45

OSBP-NSS-2014-Screech-Owl-Design-48

Screech Owl Design

And that’s a wrap for the 2014 National Stationery Show! If you missed any of the previous recaps, you can check them out (along with prior year shows) right here!

Photo Credits: Oh So Beautiful Paper

How to Create Unique Personal Stationery with Rubber Stamps

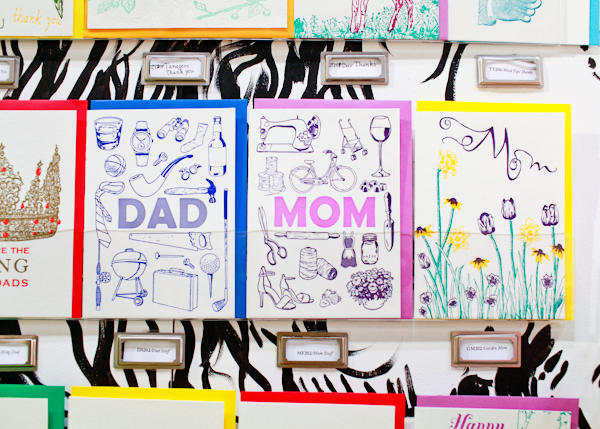
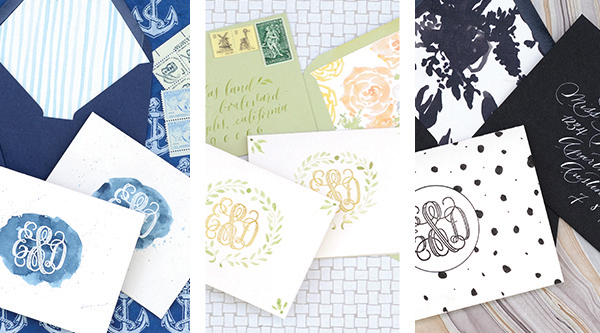
Wedding season is officially here and events of all kinds are in full swing. And with that… of course comes thank you notes! We’ve been designing lots of personal stationery as thank you notes for our clients recently so we put together some DIY versions to show how fun it can be to craft your own personal stationery. We used the same monogram rubber stamp for all three designs and the results couldn’t be more different! – Bailey and Emma of Antiquaria

DIY Tutorial: Rubber Stamp Personal Stationery by Antiquaria via Oh So Beautiful Paper

It’s always good to have some monogrammed stationery on hand for when a last minute occasion arrises. Make a bunch at one time and store them in a pretty box with pens and postage. Monogrammed stationery also makes for a really great handmade gift!

DIY Tutorial: How to Create Unique Personal Stationery with Rubber Stamps by Antiquaria for Oh So Beautiful Paper

 Option One: Blue and white is such a classic color combination. We put a painterly spin on it with this gorgeous watercolor card. Adding white embossing on top of the paint really elevates the design and makes the monogram pop off of the card, literally!

DIY Tutorial: How to Create Unique Personal Stationery with Rubber Stamps by Antiquaria for Oh So Beautiful Paper

Step One: On the front of the card, in the center, paint a loose oval with indigo colored watercolor paint. Add multiple layers so that parts of the circle are darker than others. After the circle is complete, splash a little extra paint around the circle for a splattered effect. To do this we simply flicked the tip of the brush with our fingertip over the card. Set aside to dry completely.

DIY Tutorial: How to Create Unique Personal Stationery with Rubber Stamps by Antiquaria for Oh So Beautiful Paper

Step Two: Stamp your monogram in the center of the watercolor oval using a white ink pad. Quickly sprinkle embossing powder over the stamped image. Shift it around until the monogram is completely covered with powder. Tip the excess off onto a scrap piece of paper.

DIY Tutorial: How to Create Unique Personal Stationery with Rubber Stamps by Antiquaria for Oh So Beautiful Paper

Step Three: Using a embossing heat tool, melt the powder. You can watch our video tutorial of the process here.

DIY Tutorial: How to Create Unique Personal Stationery with Rubber Stamps by Antiquaria for Oh So Beautiful Paper

DIY Tutorial: How to Create Unique Personal Stationery with Rubber Stamps by Antiquaria for Oh So Beautiful Paper

Option Two: Wreaths have been a popular design element in stationery for a while now. We just can’t get enough of them – especially when they’re hand painted in shades of green!

DIY Tutorial: How to Create Unique Personal Stationery with Rubber Stamps by Antiquaria for Oh So Beautiful Paper

Step One: After stamping your monogram in the center of the front of your card, paint a little vine circle around it, leaving the bottom open (as shown above). Don’t try to make the oval perfect, a meandering vine will be more natural once the leaves are painted around it!

DIY Tutorial: How to Create Unique Personal Stationery with Rubber Stamps by Antiquaria for Oh So Beautiful Paper

Step Two: Add your leaves to the oval. The technique is simple: just load your brush with watercolor paint, lay it down flat, and then pick it up, dragging up to the point as you lift it off. This will give you the shape of the leaf with very little effort! Practice first before starting on the final cards until you get it down. Varying the size and color of the leaves will help give a more natural look to the card. Paint the leaves starting at the bottom and finishing at the top. Where they meet, leave a little space and paint a small dot in the top center to finish it off.

DIY Tutorial: How to Create Unique Personal Stationery with Rubber Stamps by Antiquaria for Oh So Beautiful Paper

Step Three: We also added little leaf adornments to each corner, using the same technique to finish off the card design.

DIY Tutorial: How to Create Unique Personal Stationery with Rubber Stamps by Antiquaria for Oh So Beautiful Paper

Option Three: This stunning, black and white design is both modern and whimsical at the same time. Plus, you don’t even have to pull out the paint for this one!

DIY Tutorial: How to Create Unique Personal Stationery with Rubber Stamps by Antiquaria for Oh So Beautiful Paper

Step One: Stamp your monogram in the front center of the card in black ink. Set it aside to dry.

DIY Tutorial: How to Create Unique Personal Stationery with Rubber Stamps by Antiquaria for Oh So Beautiful Paper

Step Two: Find a circle on your template that is â…›” to ¼” larger than the design, and trace it using a black felt tipped pen.

DIY Tutorial: How to Create Unique Personal Stationery with Rubber Stamps by Antiquaria for Oh So Beautiful Paper

Step Three: With a brush pen, add little black polka dots around the circle – but make sure not to put any inside. We didn’t make the size or pattern of the dots even for this design, so it has a lovely organic irregularity… plus it’s easier to do!

DIY Tutorial: How to Create Unique Personal Stationery with Rubber Stamps by Antiquaria for Oh So Beautiful PaperP-Stationery-final2

Step Four: Add little bitty dots around your polka dots to fill in the white spaces of your design by touching only the very tip of the pen to the paper.

DIY Tutorial: How to Create Unique Personal Stationery with Rubber Stamps by Antiquaria for Oh So Beautiful Paper

Materials

Antique Monogram Stamp

A2 Folded Card, preferably made of Watercolor Paper (90lb hot press). We cut an art sheet down into rectangles (5.5″ x 8.5″) and scored them down the middle to make our own cards.

Envelope liner templates

Double Sided Tape or Stick Glue (to adhere liners into envelopes)

Option One:

Watercolor Paint

Paint Brushes

Frost White Stamp Pad

White Embossing Powder

Envelope Liner Watercolor Stripe Ocean Text Patterned Paper

A2 Envelope in night

Option Two:

Watercolor Paint

Paint Brushes

Stamp Pad in Olive

Envelope Liner Natalia Floral Text Patterned Paper

A2 Envelope in Sage

Option Three:

Circle Stencil Template

Black Brush Pen

Black Felt Tip Pen

Stamp Pad in Black

Envelope Liner Brushed Floral No.1  Text Patterned paper

A2 Envelope in Black

Photography by Antiquaria for Oh So Beautiful Paper