9TH LETTER PRESS: Trade Show Lessons Learned from a Rookie Exhibitor

Hello, all. Today’s guest post consists of all the “ah ha!” moments Sheli and I had while exhibiting at the 2013 National Stationery Show. If you’re planning on exhibiting or are just curious in general, this post is for you. –Isabel of 9th Letter Press

9th Letter Press at the 2013 National Stationery Show by Oh So Beautiful Paper

The 9th Letter Press booth at the 2013 National Stationery Show

I tend to think in “lists” (which is the extent of my organization talents) so I thought I’d provide one for you all with the most important lessons worth sharing:

  1. Absolutely research, prep, and plan for the show. The best resources available come from Trade Show Bootcamp, Show Time and Pushing the Envelope. Grab a highlighter and take lots of notes. I can’t tell you how useful these resources were!
  2. Excited to fill out order forms at the show? Get equally excited about printing inventory before you leave. You’ll be so happy doing the legwork beforehand and not afterward. Make your best educated guesses of what your bestsellers might be and have those printed, packaged and ready to go for when you come back. If you letterpress print your products, I would suggest having twice as much of everything printed before hand, because you may be surprised what gets ordered. We were shocked by how much more we needed to print once we got home! We will certainly be printing more inventory ahead of time in the future!
  3. Make sure you have a good selection for the most popular card-giving occasions. Ex: birthday, thank you, sympathy, etc.
  4. Make sure to bring extras! By the end of the show your cards will not be in the pristine shape that you brought them in. It will give you peace of mind knowing you can switch out a card that has suffered from being dropped, stolen or gotten dirty in some way throughout the show.
  5. Ship and pack a set: we ended up shipping a set of our products directly to our hotel and also packing two carry ons full of our products. If something happened to either set, we figured we’d be covered. (We were).
  6. Don’t forget to decorate your booth! Adding little touches of your brand throughout your display will go a long way.
  7. No matter how cute they are, leave your wedges and heels at home. Your feet will thank you.
  8. Make sure to have something to send to your retailers before and after the show. The first should arrive somewhere between two to three weeks before the show. We opted to do a more elaborate mailer to a smaller group of retailers so that we could focus on stores that we knew were a good fit for us. I also liked the idea of the mailer being personal with lots of detail and an accurate representation of our brand. Doing a mass run can limit just how creative you can be.
  9. You might consider getting an app like Handshake that will consolidate orders, information and reports to help with turnaround time after the show.

Here are a few pictures of our booth building out in New York, which was an adventure in of itself:

Sheli posing with 9th letter press wrapped pallet

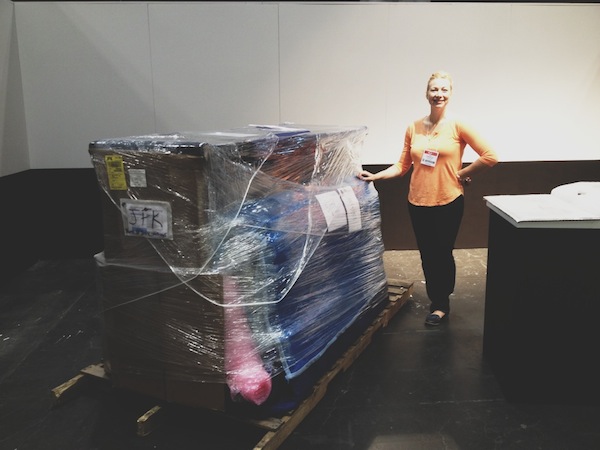
Meet Sheli, the left brain of 9th Letter Press. She’s the person who puts into motion my big ideas. Without her, I’m not sure how anything would have come together, let alone have gotten to New York. We packed up our booth on an 8 foot pallet, which we packed with lots of care in the studio parking lot. When the freight company came to pick up our wrapped up pallet, we said goodbye, and crossed our fingers it would arrive safely in New York — it did!

Isabel putting together 9th Letter Press sign

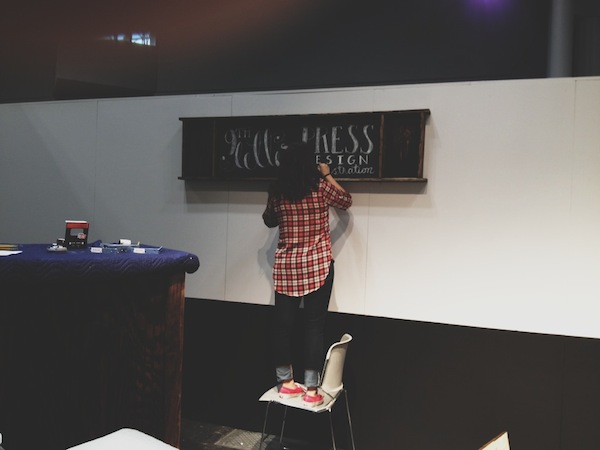
That’s me working on our signage! I wanted the booth to match the look of our studio in Winter Park, Florida, which has a very old New York meets the industrial revolution feel. In order to keep with that aesthetic, we built a super tall bar complete with purse hooks and a brass rail, added dark walnut shelves, and found foam “wood” floors.

9th letter press booth at NSS

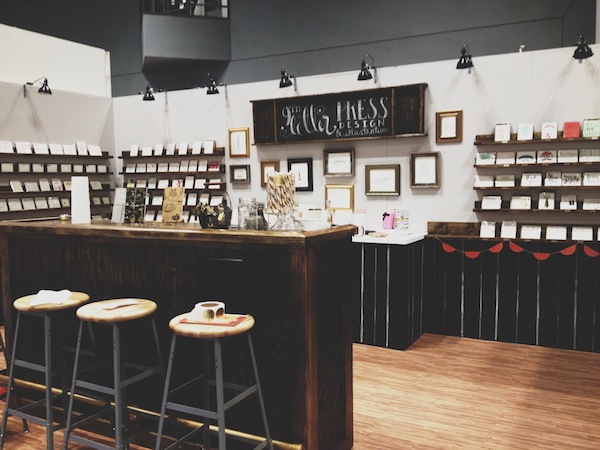
And here’s the end result! Sheli and I were thrilled with how everything turned out. We did spend a few late nights at the convention center to get it done, but it was well worth it. I really hope all or at least part of that was helpful!

Our mailers were travel themed so we included an old fashioned train ticket, a packing list, gold foil pressed luggage tags, and a gold pen to write down their information on the tag. After the show, we followed up with sending sweet little cards with an illustrated lady liberty on them.

NSS booth mailer letterpress

letter press mailer

letter press mailer from NSS

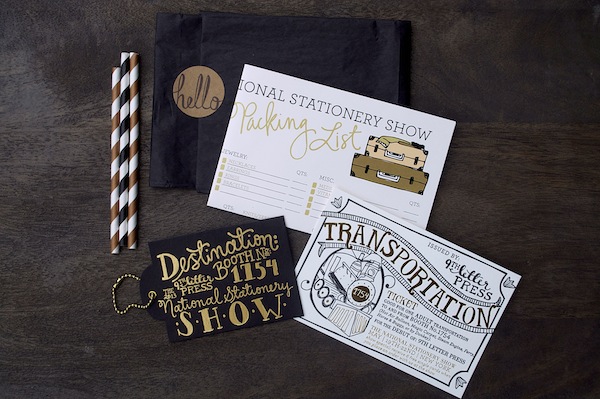
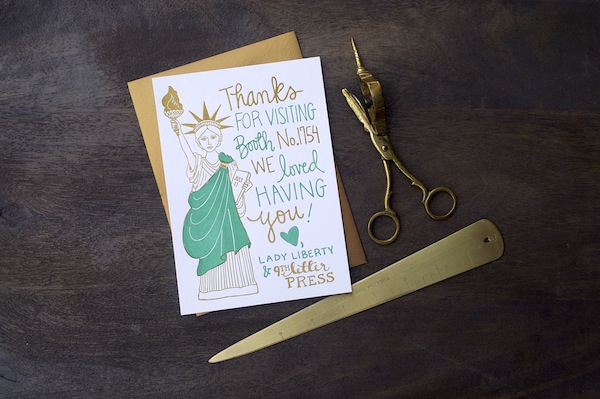
Photo Credits: 9th Letter Press Team

Stephanie + Jared’s Modern Art Deco Save the Dates

When it came time to design his own save the dates, designer Jared from TENNINETEEN combined inspiration from his 1920s wedding venue with his own modern style. The result is a combination of beautiful linear patterns with vintage-inspired text and a punch of red metallic foil. So fun!

Modern Art Deco Foil Stamped Save the Dates by TENNINETEEN via Oh So Beautiful Paper (7)

From Jared: While searching for our event space in the Kansas City area, Stephanie and I fell in love with a venue that had a 1920s feel. It has beautiful subway tile and an enormous 12-foot chandelier that centered the space. We wanted to touch on the Art Deco style in our Save the Dates, but give it a modern flair while maintaining our color palette.

Modern Art Deco Foil Stamped Save the Dates by TENNINETEEN via Oh So Beautiful Paper (2)

Traditionally, you see quite a bit of black and gold used for this era, but we wanted to mimic the style with our colors and see where it would take us. My design style is very modern and I wanted to be sure that was apparent in the design. Thus, we adopted the “Modern Art Deco” theme.

Modern Art Deco Foil Stamped Save the Dates by TENNINETEEN via Oh So Beautiful Paper (6)

Printed on Avon Brilliant White 100C, we first ran a pass of silver metallic ink, then punched it with a Pomegranate red foil. We had a custom stamp made that fell in line with the look and my fiancée, Stephanie, took care of all the hand-lettering on the envelopes.

Modern Art Deco Foil Stamped Save the Dates by TENNINETEEN via Oh So Beautiful Paper (4)

I love the linear lines and geometric shapes of the Art Deco style and used that as my inspiration. There wasn’t any single piece that I drew inspiration from, but instead I dove head first into the era and soaked in all of the patterns, shapes, and lines. Since I love clean design, I made sure not to go crazy, but include just enough so you get a taste.

Modern Art Deco Foil Stamped Save the Dates by TENNINETEEN via Oh So Beautiful Paper (1)

Thanks Jared!

Design: TENINETEEN

Printing: Boelte-Hall

Calligraphy: Stephanie Morris

Check out the Designer Rolodex for more tal­ented wed­ding invi­ta­tion design­ers and the save the date gallery for more beau­ti­ful cus­tom save the dates!

Photo Credits: TENINETEEN

DIY Tutorial: Savannah-Inspired Floral Wedding Invitations

Ever since we designed our Savannah invitation suite for this inspiration shoot in collaboration with Camille Styles, it’s been one of our most popular invitations to date. This adaptation of the Savannah design is for the DIY couple that wants a custom suite on a budget. This design is soft and elegant with gorgeous floral accents: our version of a traditional invitation! – Bailey and Emma of Antiquaria

DIY Tutorial: Savannah-Inspired Wedding Invitations by Antiquaria via Oh So Beautiful Paper

For the foundation of the suite, we used our Letterpress Printed “Savannah” Invitation design. Adding in one piece of letterpress stationery really helps elevate the entire suite. While the single piece is still a bit of a splurge, your savings comes from all of the special DIY details that help complete the look and make it special and unique.

DIY Tutorial: Savannah-Inspired Wedding Invitations by Antiquaria via Oh So Beautiful Paper

Step One: Since the invitation piece is ready to go…the first step is to cut your cards for the reply postcard and monogram tag that you will be using. With a self sealing mat, ruler and craft knife (X-acto), cut cards to 4 x 6″ (postcard) and 2 x 3.5″ (tag). You should get 2 postcards and 10 tags out of 1 sheet of patterned 8.5 x 11″ paper (we used our Magnolia Branch Patterned Card Stock).

DIY Tutorial: Savannah-Inspired Wedding Invitations by Antiquaria via Oh So Beautiful Paper

Step Two: We added a cute little corner detail to the monogram tag! To do this, simply line up the corner of the card on your mat in the 45 degree triangle and make the cut with your knife against the ruler. Flip and repeat the cut on the other side. It may take a little time to get all the corners trimmed but it’s definitely worth the effort!

DIY Tutorial: Savannah-Inspired Wedding Invitations by Antiquaria via Oh So Beautiful Paper

Step Three: Lay your  4 x 6″ patterned postcard down on a firm surface (pattern facing down). Ink your stamp (we used our Calligraphy Accent Reply Postcard stamp) thoroughly and center it over your card. Once it is positioned correctly, press down to make a print. Use both hands to ensure even pressure. Lift off and let the print dry. For a step-by-step video tutorial about this printing process go here.

DIY Tutorial: Savannah-Inspired Wedding Invitations by Antiquaria via Oh So Beautiful Paper

Step Four: How cute are these little tags! Not only are they adorable with this suite but the extras would be great to use as gift tags as well! To make them, punch a 1/8″ hole in the top center of the 2.5 x 3″ card. Then you will print your monogram stamp (we used our Antique Monogram stamp) using the same print technique as in Step 3. Lastly, add those adorable kraft hole reinforcements to your hole punch and the tags are done!

DIY Tutorial: Savannah-Inspired Wedding Invitations by Antiquaria via Oh So Beautiful Paper

Step Five: One great way to save money with your wedding stationery is to stamp your return address! For this design, we embossed our Wildflowers Return Address Stamp with white so that it would be super opaque and “pop” on the kraft envelope. Place your A7 envelope on a stable and firm surface with the flap facing you. Ink your return address and center the stamp over the flap. When ready, press the stamp down with moderate pressure to make the print. Lift the stamp off and quickly move on to adding your embossing powder.

Once you’ve made your print, immediately cover it with embossing powder by sprinkling it across the envelope. Shift the powder around until you have covered the entire image. Now, you will pour the excess powder off of the envelope onto a scrap piece of paper so that you can reuse it for future prints. Heat set the print, using an Embossing Heat Tool. You will be able to see the powder melt into an opaque and solid color when it’s done. For more information about how to emboss using stamps, please watch this instructional video.

Note: One key thing about embossing is that it is wise to try to closely match your ink color with your powder color. By doing this, you will get much more crisp and opaque results. For example, we used a white pad with white embossing powder on this envelope.

DIY Tutorial: Savannah-Inspired Wedding Invitations by Antiquaria via Oh So Beautiful Paper

Step Six: While not crucial, adding an envelope liner can really pull your invitation suite together. We kept this liner traditional by using solid tan text weight paper and simply stamping the same monogram on it that we used on our tag. Trace the envelope liner template on your paper, cut it out, stamp it (we used our Antique Monogram stamp) and use double sided tape or stick glue to affix it to your envelope. It’s that simple!

DIY Tutorial: Savannah-Inspired Wedding Invitations by Antiquaria via Oh So Beautiful Paper

Step Seven: Now all that’s left is the finishing touches! We tied the suite together with tailors ribbon, addressed the envelope with opaque white ink and affixed our postage (we love these new vintage inspired seed packet stamps). Now they’re ready to send on their way!

DIY Tutorial: Savannah-Inspired Wedding Invitations by Antiquaria via Oh So Beautiful Paper

Materials

Savannah Letterpress Invitation on Pearl White with Kraft Envelopes, colors: Warm Grey & Nude

Calligraphy Accent Reply Postcard

Antique Monogram Stamp

Wildflowers Return Address Stamp

Magnolia Branch Patterned Paper in Cover weight

Text Weight Liner Paper

Envelope Liner Templates

Stamp Pads in Antique Pewter and Frost White

Ribbon

Embossing Powder

Heat Embossing Tool

1/8″ Hole Punch

Kraft Hole Reinforcements

Self healing mat, Ruler, Craft Knife, Pencil & Scissors

Postage Stamps

Anti­quaria is a mem­ber of the Designer Rolodex – you can see more of their beau­ti­ful work right here or visit the real wedding invitations gallery for more wedding invitation ideas!

Photo Credits: Antiquaria

Paper Party 2013!

I’d normally wait until the end of my booth recaps to share these photos with you – but this time I just couldn’t wait!! For the past few years I’ve had the pleasure of hosting a party during the week of the National Stationery Show, and since I’m a tornado of activity down the aisles of the Javits Center during the show it’s really my only chance to hang out with many of my favorite stationers, calligraphers, retailers, printers, and fellow stationery enthusiasts! This year’s party was everything I could have hoped for and more!

Paper Party 2013 Hosted by Oh So Beautiful Paper, Photo Credits: Charlie Juliet Photography (18) Paper Party 2013 Hosted by Oh So Beautiful Paper, Photo Credits: Charlie Juliet Photography (47)

Since we were at full capacity last year, we found a wonderful new venue with some room to spread around: Hudson Terrace (also just a few blocks north of the Javits Center!). The additional space also gave us some new opportunities when it came to the décor, so I enlisted the help of my friends Janice from Bellwether Events and Kelly from Studio DIY – this year’s party was definitely my favorite yet! We were also lucky to collaborate with some really amazing sponsors this year to make the whole party possible: MohawkMintedSmockLegion PaperChronicle BooksHello! LuckyTradeshow Bootcamp, and the Ladies of Letterpress!

Paper Party 2013 Hosted by Oh So Beautiful Paper, Photo Credits: Charlie Juliet Photography (101) Paper Party 2013 Hosted by Oh So Beautiful Paper, Photo Credits: Charlie Juliet Photography (108)

Paper Party 2013 Hosted by Oh So Beautiful Paper, Photo Credits: Charlie Juliet Photography (107) Paper Party 2013 Hosted by Oh So Beautiful Paper, Photo Credits: Charlie Juliet Photography (102)

Paper Party 2013 Hosted by Oh So Beautiful Paper, Photo Credits: Charlie Juliet Photography (115) Paper Party 2013 Hosted by Oh So Beautiful Paper, Photo Credits: Charlie Juliet Photography (144)

The first 125 guests received an awesome tote bag screen printed by Fisk & Fern and packed with fantastic stationery from Mohawk Paper, Tattly, Maginating, Anemone Letterpress, Hello! Lucky, Fig. 2 Design Studio, Dear Hancock, Sugar Paper, Egg Press, Kate & Birdie, Katharine Watson, Kelp Designs, Thomas Printers, Old Tom Foolery, Legion Paper, Czar Press, Minted, Paper + Cup Design, Chronicle Books, Pistachio Press, Red Cap Cards, Smudge Ink, Parrott Design Studio, and Envelopments!

Paper Party 2013 Hosted by Oh So Beautiful Paper, Photo Credits: Charlie Juliet Photography (28) Paper Party 2013 Hosted by Oh So Beautiful Paper, Photo Credits: Charlie Juliet Photography (27)

Calligraphy sign by Meant to Be Calligraphy // Custom name tags designed by Hello! Lucky

Paper Party 2013 Hosted by Oh So Beautiful Paper, Photo Credits: Charlie Juliet Photography (100) Paper Party 2013 Hosted by Oh So Beautiful Paper, Photo Credits: Charlie Juliet Photography (99)

We wanted to incorporate LOTS of color and geometric-inspired patterns into this year’s party. In addition to the invitations (which I’ll share soon!), we created several folded paper displays behind the bar using Britehue paper from Mohawk – one of my favorite details from the whole party! Stay tuned for a full tutorial!

Paper Party 2013 Hosted by Oh So Beautiful Paper, Photo Credits: Charlie Juliet Photography (98)

Paper Party 2013 Hosted by Oh So Beautiful Paper, Photo Credits: Charlie Juliet Photography (95)

We also created a wall of envelopes from Mohawk in every color imaginable!

Paper Party 2013 Hosted by Oh So Beautiful Paper, Photo Credits: Charlie Juliet Photography (93) Paper Party 2013 Hosted by Oh So Beautiful Paper, Photo Credits: Charlie Juliet Photography (62)

Paper Party 2013 Hosted by Oh So Beautiful Paper, Photo Credits: Charlie Juliet Photography (1)

Paper Party 2013 Hosted by Oh So Beautiful Paper, Photo Credits: Charlie Juliet Photography (77) Paper Party 2013 Hosted by Oh So Beautiful Paper, Photo Credits: Charlie Juliet Photography (87)

Tattly was at the party with their amazing temporary tattoos!

Paper Party 2013 Hosted by Oh So Beautiful Paper, Photo Credits: Charlie Juliet Photography (78)

Paper Party 2013 Hosted by Oh So Beautiful Paper, Photo Credits: Charlie Juliet Photography (61)

Paper Party 2013 Hosted by Oh So Beautiful Paper, Photo Credits: Charlie Juliet Photography (106)

GORGEOUS floral arrangements from Soirée Floral // Table confetti from Minted!

Paper Party 2013 Hosted by Oh So Beautiful Paper, Photo Credits: Charlie Juliet Photography (127) Paper Party 2013 Hosted by Oh So Beautiful Paper, Photo Credits: Charlie Juliet Photography (123)

Paper Party 2013 Hosted by Oh So Beautiful Paper, Photo Credits: Charlie Juliet Photography (26) Paper Party 2013 Hosted by Oh So Beautiful Paper, Photo Credits: Charlie Juliet Photography (118)

Paper Party 2013 Hosted by Oh So Beautiful Paper, Photo Credits: Charlie Juliet Photography (109)

Paper Party 2013 Hosted by Oh So Beautiful Paper, Photo Credits: Charlie Juliet Photography (23) Paper Party 2013 Hosted by Oh So Beautiful Paper, Photo Credits: Charlie Juliet Photography (132)

Rose gold foil coasters and stir sticks from For Your Party // Paper Party logo design by Linda & Harriett

Paper Party 2013 Hosted by Oh So Beautiful Paper, Photo Credits: Charlie Juliet Photography (3) Paper Party 2013 Hosted by Oh So Beautiful Paper, Photo Credits: Charlie Juliet Photography (22)

Paper Party 2013 Hosted by Oh So Beautiful Paper, Photo Credits: Charlie Juliet Photography Paper Party 2013 Hosted by Oh So Beautiful Paper, Photo Credits: Charlie Juliet Photography

Cocktail recipe coasters by the Ladies of Letterpress

Paper Party 2013 Hosted by Oh So Beautiful Paper, Photo Credits: Charlie Juliet Photography (97) Paper Party 2013 Hosted by Oh So Beautiful Paper, Photo Credits: Charlie Juliet Photography (65)

Coasters from Old Tom Foolery // Signs from Minted

Paper Party 2013 Hosted by Oh So Beautiful Paper, Photo Credits: Charlie Juliet Photography (110) Paper Party 2013 Hosted by Oh So Beautiful Paper, Photo Credits: Charlie Juliet Photography (111)

Paper Party 2013 Hosted by Oh So Beautiful Paper, Photo Credits: Charlie Juliet Photography (133) Paper Party 2013 Hosted by Oh So Beautiful Paper, Photo Credits: Charlie Juliet Photography (134)

Stripey straws and drink flags from Minted // Napkins from For Your Party

Paper Party 2013 Hosted by Oh So Beautiful Paper, Photo Credits: Charlie Juliet Photography (139) Paper Party 2013 Hosted by Oh So Beautiful Paper, Photo Credits: Charlie Juliet Photography (136)

Paper Party 2013 Hosted by Oh So Beautiful Paper, Photo Credits: Charlie Juliet Photography (124) Paper Party 2013 Hosted by Oh So Beautiful Paper, Photo Credits: Charlie Juliet Photography (125)

This year’s Paper Party would not have been possible without the amazing sponsors seen above!

Paper Party 2013 Hosted by Oh So Beautiful Paper, Photo Credits: Charlie Juliet Photography (35)

Sophie even made an appearance – and somehow ended up wearing a paper crown for most of the evening!

Paper Party 2013 Hosted by Oh So Beautiful Paper, Photo Credits: Charlie Juliet Photography (2)

Paper Party 2013 Hosted by Oh So Beautiful Paper, Photo Credits: Charlie Juliet Photography (75)

Paper Party 2013 Hosted by Oh So Beautiful Paper, Photo Credits: Charlie Juliet Photography (6)

Paper Party 2013 Hosted by Oh So Beautiful Paper, Photo Credits: Charlie Juliet Photography (7)

Paper Party 2013 Hosted by Oh So Beautiful Paper, Photo Credits: Charlie Juliet Photography (36) Paper Party 2013 Hosted by Oh So Beautiful Paper, Photo Credits: Charlie Juliet Photography (76)

Paper Party 2013 Hosted by Oh So Beautiful Paper, Photo Credits: Charlie Juliet Photography (10)

Paper Party 2013 Hosted by Oh So Beautiful Paper, Photo Credits: Charlie Juliet Photography (19)

Paper Party 2013 Hosted by Oh So Beautiful Paper, Photo Credits: Charlie Juliet Photography (49)

Paper Party 2013 Hosted by Oh So Beautiful Paper, Photo Credits: Charlie Juliet Photography (54)

Paper Party 2013 Hosted by Oh So Beautiful Paper, Photo Credits: Charlie Juliet Photography (56)

We partnered with Minted to bring Smilebooth to the party – it was a huge hit! Minted even created a backdrop using custom printed fabric and their tissue paper fans!

Paper Party 2013 Hosted by Oh So Beautiful Paper, Photo Credits: Charlie Juliet Photography (90) Paper Party 2013 Hosted by Oh So Beautiful Paper, Photo Credits: Charlie Juliet Photography (5)

This year’s party was so much fun! It was so great to see all my favorite paper people all in the same place and having the most wonderful time. I’m still grinning ear to ear just thinking about it! Once again, a huge thanks and much love to our amazing sponsors for making the whole thing possible: Mohawk, Minted, Smock, Legion Paper, Chronicle Books, Hello! LuckyTradeshow Bootcamp, and Ladies of Letterpress â€“ not to mention Hudson Terrace for having us, and to Fisk & Fern, Linda & Harriett, For Your Party, Soirée Floral, Meant to Be Calligraphy, Tattly, and Smilebooth for all being a huge part of the evening!

OSBP + Smilebooth = Paper Party 2013

Finally, a million thanks to Janice and Kelly for their support and help with the party! Could not have pulled this off without these girls.

There was no way I could fit all of the photos from this year’s party into a single post, but you can find the full Paper Party 2013 gallery right here – and all the Smilebooth photos are available right here!

Photo Credits: Charlie Juliet Photography

The Manhattan

Nole reminded me recently that we have been remiss in writing about one of the most basic, and one of the best, cocktails of all time: the Manhattan. Sweet and oaky, spicy and rich, the Manhattan should be a cornerstone of every cocktail repertoire. – Andrew

Signature Cocktail Recipe: The Manhattan via Oh So Beautiful Paper (3)

Cocktail Recipe Card: The Manhattan, Illustration by Caitlin Keegan for Oh So Beautiful Paper

Illustration by Caitlin Keegan for Oh So Beautiful Paper

The Manhattan

2 oz Rye Whiskey
1 oz Sweet Vermouth
2 Dashes Bitters

Combine everything with lots of ice, stir well, and strain into a chilled tumbler. Enjoy!

Signature Cocktail Recipe: The Manhattan via Oh So Beautiful Paper (5)

The recipe above is my personal favorite and will serve up a fantastic drink, but treat it as a template rather than a rule. Consider bourbon instead of rye for a smoother, sweeter version. Or Punt-e-Mes instead of sweet vermouth for a bitter, sharper drink. Or try flipping the recipe, with two parts vermouth to one part whiskey, for a lighter and more aromatic drink. Or try adding a dash or two of absinthe or maraschino liqueur, two ingredients that pop up in many of the original versions of this recipe. Over ice or straight up, with a cherry or a lemon twist or no garnish at all, this is a pretty good drink.

Signature Cocktail Recipe: The Manhattan via Oh So Beautiful Paper (13) Signature Cocktail Recipe: The Manhattan via Oh So Beautiful Paper (8)

Just make sure that, whatever permutation you try, you don’t forget the bitters. Bitters make this drink. I’m a fan of a dash of Angostura and a dash of Fee Brothers Black Walnut bitters, but just make sure there are bitters. (I think that, for a long time, bartenders forgot that Manhattans need bitters and served many terrible Manhattans. Fortunately, most have remembered again.)

Signature Cocktail Recipe: The Manhattan via Oh So Beautiful Paper (10) Signature Cocktail Recipe: The Manhattan via Oh So Beautiful Paper (11)

The Manhattan is – for very good reason – one of David Embury’s six basic cocktails that everyone should know. It’s easy to see why: incredibly simple to make, incredibly delicious. If I was limited to just one cocktail for the rest of my life, it would be a close call between the Manhattan and Sazerac.

Signature Cocktail Recipe: The Manhattan via Oh So Beautiful Paper (6)

The Manhattan was almost certainly invented in New York (for reasons that are hopefully obvious). Beyond that, not a lot is known about its origins. The drink probably dates back to the late 1800s, but most stories of its invention don’t pass the smell test. I suspect, without any evidence but taste and a bit of logic, that the Manhattan descends (like the Martini) from the Martinez cocktail, making it the cousin of the Martini.

I like the idea of drinks having family trees.

Photo Credits: Nole Garey for Oh So Beautiful Paper