DIY Faux Grass Hanging Gems

Craftcourse basically made its handmade event decor ‘debut’ with garlands of larger-than-life hanging paper gems for a local maker market here in Nashville last winter. Even though we’ve made all kinds of things since then, they’ve kind of become our signature creation, which we’ve been known to say could be used just about anywhere for any occasion. What space or event couldn’t be made better by some hanging gems?! Although we’ve never formally given away our ginormous paper gem secrets, I’m slipping a little today by showing you how to make some medium-sized hanging diamonds covered in faux grass – a fun summer take on our plain ole gems. Enjoy! –Mandy Pellegrin of Craftcourse

DIY Faux Grass Hanging Gems Party Decorations / Craftcourse for Oh So Beautiful Paper

Materials
Template
Poster Board
Pencil
Craft Knife
Metal Ruler
Cutting Surface
Hot Glue and Glue Gun
String
Small Wooden Bead
A Cheap Artificial Grass Rug (like this or this)
Scissors

DIY Faux Grass Hanging Gems Party Decorations / Craftcourse for Oh So Beautiful Paper

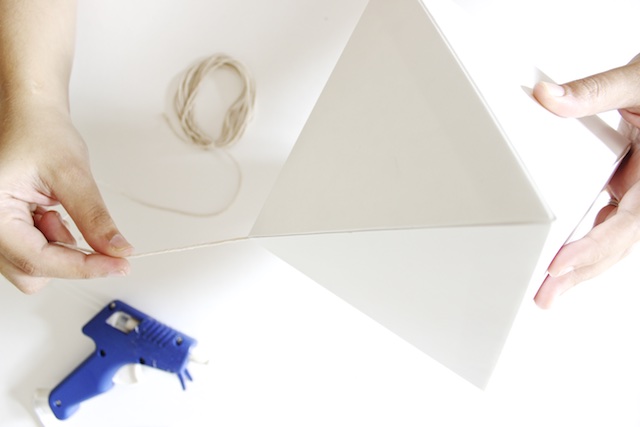
Step One: After you’ve downloaded and cut out the template, trace the template onto poster board. Trace four templates edge-to-edge as shown here and in the template file with the top points (that is, the point opposite the arrow on the template) meeting in the middle. Each diamond-shaped gem will require two of these four-triangle sets. I was able to fit six sets (or enough for three gems) onto two pieces of poster board.

DIY Faux Grass Hanging Gems Party Decorations / Craftcourse for Oh So Beautiful Paper

DIY Faux Grass Hanging Gems Party Decorations / Craftcourse for Oh So Beautiful Paper

Step Two: Cut out using a craft knife and a metal ruler. When cutting them out, you’ll need to add tabs for assembly. On one of the four-triangle sets, add only one tab along the side of one of the outer triangles as shown here (on the right) and in the template file. On the other set, you’ll need to add tabs both on an outer triangle like for the other set and along the bottom edge (i.e. the edge denoted with a triangle on the template) of each triangle. Again, this is shown here (on the left) and in the template file.

DIY Faux Grass Hanging Gems Party Decorations / Craftcourse for Oh So Beautiful Paper

Step Three: Score all the lines by gently tracing each one with the back-side of the blade of the craft knife. This will give you a nice clean score, but don’t push so hard that you cut through your poster board.

DIY Faux Grass Hanging Gems Party Decorations / Craftcourse for Oh So Beautiful Paper

Step Four: Crease each of the scores by folding inward so that your pencil marks will be on the inside of the finished gem.

DIY Faux Grass Hanging Gems Party Decorations / Craftcourse for Oh So Beautiful Paper

Step Five: Assemble the gem by first hot gluing the four bottom edge tabs of the one piece to the four bottom edges of the other piece.

DIY Faux Grass Hanging Gems Party Decorations / Craftcourse for Oh So Beautiful Paper

DIY Grassy Hanging Geometric Gems by OSBP 9

Step Six: Before glueing shut the edge tabs, slip a string with a small wooden bead tied onto the end inside the gem. Apply glue to the tabs, and gently squeeze shut and apply some pressure to the area on top of the tabs to get them to adhere. You now have a plain hanging gem!

DIY Faux Grass Hanging Gems Party Decorations / Craftcourse for Oh So Beautiful Paper

Step Seven: For each hanging gem, trace eight triangle templates onto the back of your artificial grass rug.

DIY Faux Grass Hanging Gems Party Decorations / Craftcourse for Oh So Beautiful Paper

Step Eight: Cut out each of the ‘grass’ triangles.

DIY Faux Grass Hanging Gems Party Decorations / Craftcourse for Oh So Beautiful Paper

Step Nine: Hot glue the triangles onto the plain finished gem. If you want to cover all of the poster board, make sure you cut your triangles out slightly bigger than the template. A little white peeks through on mine, but I sort of liked how it helped define the geometric shape a bit more.

For a full-on hanging gem installation, combine the ‘grass’ gems with other plain gems. Make a smaller diamond gem by shrinking the template provided, and assemble multiple on a single string. Make larger ones by blowing the template up.

DIY Faux Grass Hanging Gems Party Decorations / Craftcourse for Oh So Beautiful Paper


DIY Faux Grass Hanging Gems Party Decorations / Craftcourse for Oh So Beautiful Paper

Photo Credits: Mandy Pellegrin for Oh So Beautiful Paper

10 Amazing Art Prints from Artists on Etsy

This year marks Etsy’s 10th anniversary! Etsy was one of my first introductions to the world of handmade – and the way that I initially found many of my favorite stationers! In honor of Etsy’s anniversary, I thought I’d do a few round ups over the coming weeks highlighting some of the awesome things you can find on Etsy. Today we’re starting with 10 amazing art prints!

10 Awesome Art Prints from Artists on Etsy / Oh So Beautiful Paper

1. Love, Elodie

2. Mary Kate McDevitt

3. Seventy Tree

4. Blue Eye Brown Eye

5. Ashley Goldberg

6. Made by Girl

7. alphonnsine

8. Sycamore Street Press

9. Belinda Marshall

10. Style Me Green

p.s. A few more art prints right here!

Dip Dyed Letterpress Wedding Invitations

Aaaaaah… These beautiful ocean-inspired dip dyed letterpress wedding invitations from Swell Press Paper Co. are like a breath of fresh air! Individually dip dyed in shades of blue over blind impression text, I could stare at this gorgeous invitation suite all day!

Dip Dyed Letterpress Wedding Invitations by Swell Press / Oh So Beautiful Paper

From Brittany: These dip dyed wedding invitations was inspired by a wedding in Seaside, Florida. If you’ve heard of Seaside (or seen the Truman Show) the first thing that comes to mind is an idyllic town filled with pastel buildings, gently crashing waves of crystal water… and a really good ice cream shop. I wanted this invitation suite to evoke the charm of Seaside – which isn’t a hard thing to do with a town so dang cute. I individually dip dyed the invitation and RSVP cards with different colors of the ocean, ranging from sea foam to bright turquoise. Both the invitation and RSVP card are on 220lb Natural White Crane’s Lettra, with a sea foam RSVP envelope, Natural White outer envelope, and light blue inner envelope.

Dip Dyed Letterpress Wedding Invitations by Swell Press / Oh So Beautiful Paper

Dip Dyed Letterpress Wedding Invitations by Swell Press / Oh So Beautiful Paper

Dip Dyed Letterpress Wedding Invitations by Swell Press / Oh So Beautiful Paper

Dip Dyed Letterpress Wedding Invitations by Swell Press / Oh So Beautiful Paper

Thanks Brittany!

Check out the Designer Rolodex for more tal­ented wed­ding invi­ta­tion design­ers and the real invi­ta­tions gallery for more wedding invitation ideas!

Photo Credits: Swell Press Paper Co.

Quick Pick: Day Designer by Blue Sky

If you’ve been reading OSBP for any length of time, you probably already know about the amazing Day Designer planners. My friend Whitney created the Day Designer a few years ago to help users find balance and live an organized life – and it has been a huge hit ever since! You can find the amazing flagship edition of the Day Designer right here, but today I’m super excited to help share the news that Whitney has teamed up with Blue Sky to produce a special edition of the Day Designer available exclusively at Target stores starting this week!!

Day Designer by Blue Sky at Target / Oh So Beautiful Paper

Day Designer for Blue Sky is available in an incredible 29 format and cover options – from full-size 8″ x 10″ planners to purse-friendly weekly/monthly planners to wall and desk calendars! You can even find special free printables for travel, food, and school! There are even casebound versions for those of you who aren’t fans of the wire-o binding. The cover options include bright solid colors and floral patterns, but I think I’ll always be partial to the classic gold stripe pattern. So classic!

Day Designer by Blue Sky at Target / Oh So Beautiful Paper

Day Designer by Blue Sky at Target / Oh So Beautiful Paper

Day Designer by Blue Sky at Target / Oh So Beautiful Paper


You can browse the full collection right here – and find the collection at a Target store near you starting this week! Yay!

Friday Happy Hour: The Mai Tai

Last week, we started our month of Tiki drinks with one of our own creations, but today we’re going back to basics: the Classic Mai Tai. The Mai Tai is the consummate Tiki drink: layers of different rums and citrus and nutty sweetness. It’s simpler to make at home than its reputation suggests. And it’s so, so good. – Andrew

Classic Mai Tai Cocktail Recipe / Liquorary for Oh So Beautiful Paper

The Mai Tai Cocktail Recipe Card / Illustration by Shauna Lynn for Oh So Beautiful Paper

Illustration by Shauna Lynn for Oh So Beautiful Paper

The Mai Tai

1 oz Dark Rum
1 oz Silver Rum
1/2 oz Rhum Agricole
1 oz Lime Juice
1/2 oz Dry Curaçao
1/2 oz Orgeat
2 dashes Angostura Bitters

Combine all the ingredients in a shaker with just a bit of ice. Shake lightly and strain into a lowball glass filled with crushed ice. Garnish with a bunch of mint, a lime wheel, and any tropical fruit that tickles your fancy. Enjoy!

Classic Mai Tai Cocktail Recipe / Liquorary for Oh So Beautiful Paper

Like so many drinks, the Mai Tai’s true origins are almost certainly lost to history. Two of the great fathers of Tiki laid claim to it, both Don the Beachcomber and Trader Vic, sometime in the 1930s or 1940s. Even worse, the original recipe is lost too. I tried to dig up the closest I could find to the original, classic recipe, to cut through all of the unnecessary innovations that Tiki recipes accumulated in the dark days of the 1970s through 1990s, but I came up empty. There are versions with pineapple juice and orange juice, versions with rock candy syrup and grenadine, all kinds of a mess.

Classic Mai Tai Cocktail Recipe / Liquorary for Oh So Beautiful Paper

But the oldest recipes were consistent in a few ways: they combined light and dark rums, lime, orange liqueur, and almond-flavored orgeat. So that’s what I went with. Three kinds of rum, lime, orgeat, and dry curaçao – a recently resurrected, archaic orange liqueur that’s perfect for Tiki. I also threw in some Angostura bitters which, made in Trinidad, have a tropical spiciness that’s also perfectly suited for Tiki drinks.

Classic Mai Tai Cocktail Recipe / Liquorary for Oh So Beautiful Paper

This Mai Tai is beautifully layered and complex, sweet and tart and rich. It’s smooth, but all that rum and citrus leaves a hint of a rough edge. A Mai Tai looks pretty complicated, with all those moving parts, but it’s basically a fancy Daiquiri: rum, lime, and sugar. Easier than it looks.

(Don’t forget to follow us on Instagram, where we’ve been posting our experiments before they make their way onto this column!)

Glassware by Liquorary 

Photo Credits: Nole Garey for Oh So Beautiful Paper