Hiiiii!!!! I’m still here! Are you still here? We have so much to talk about! I’m hoping to get back into a more regular blogging schedule once my kids go back to school next week, but in the meantime I wanted to quickly pop in here and let you know that enrollment for BOTH the Modern Calligraphy Summit AND Watercolor Summit are open from now until August 30! If you’re interested in learning either calligraphy or watercolor painting techniques, you’ll definitely want to read below for more info. Yay!
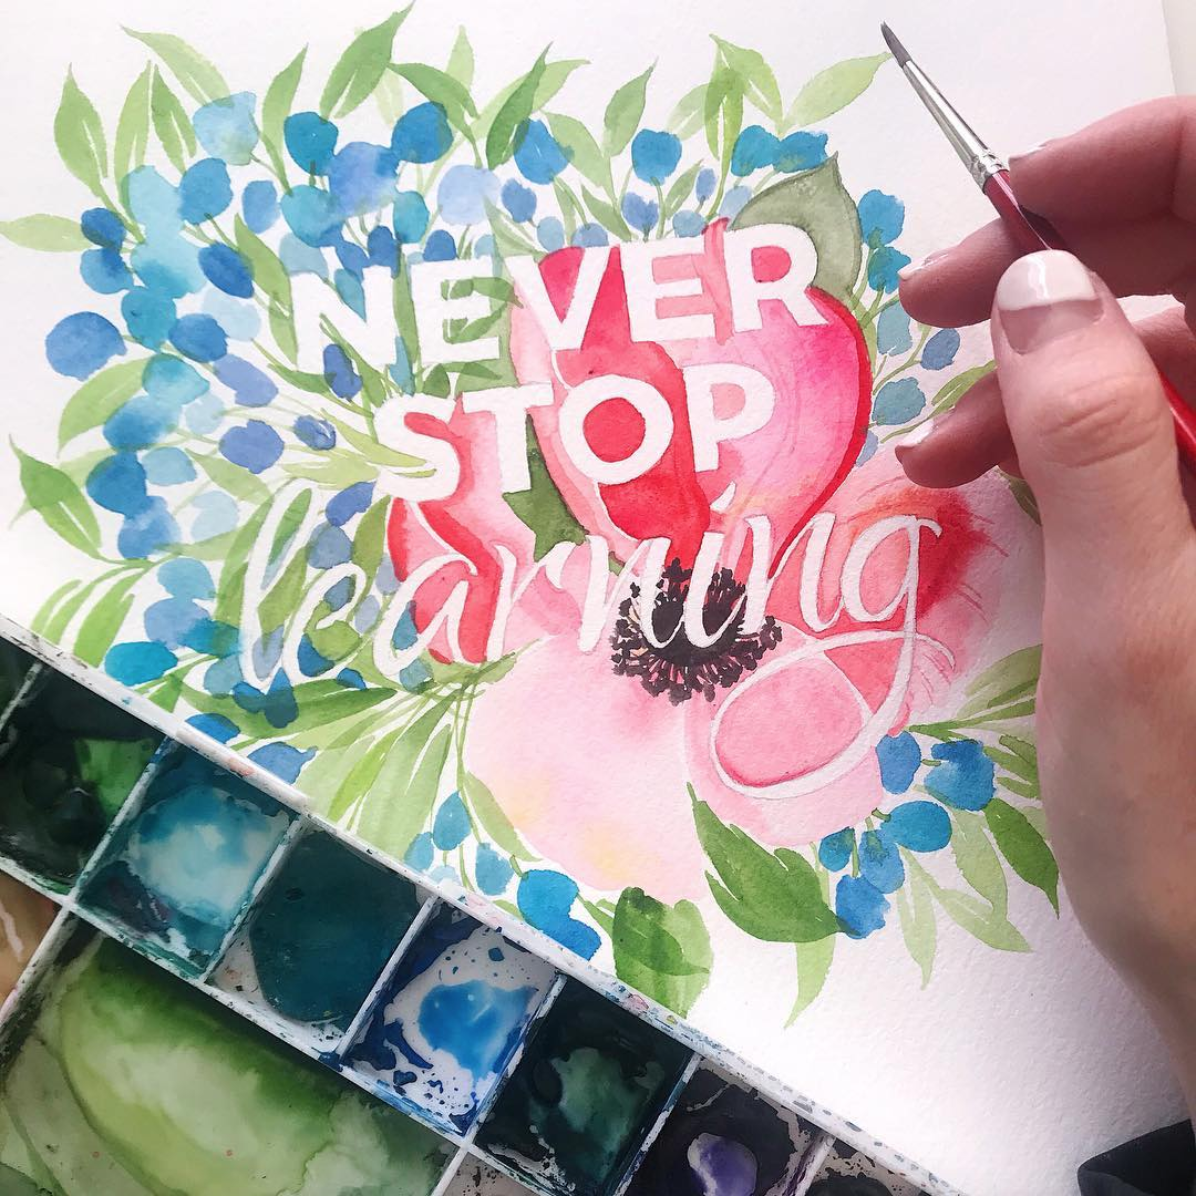
Image by Jenna Rainey – one of the talented instructors!
If you have no idea what I’m talking about, the Modern Calligraphy Summit offers the most amazing group of online calligraphy classes from every single calligrapher that I would want to learn from in person if I had the opportunity, including Anne Robin Calligraphy, Lauren Saylor of A Fabulous Fete, Karla Lim of Written Word Calligraphy, and so many more. There are two installments so far – Modern Calligraphy Summit 1.0 and Modern Calligraphy Summit 2.0 –and the classes including brush lettering, invitation design, envelope layouts, basic copperplate, writing on non-traditional surfaces, digitizing watercolor illustrations, and so much more! And as much as an in-person workshop would be totally amazing, it’s just as incredible to be able to learn from so many talented calligraphers from the comfort of your own home. The Modern Calligraphy Summit also includes handy templates and handouts, a private Facebook community to support you as you learn, and two bonus LIVE Q&A sessions with the instructors in January. And of course LIFETIME ACCESS to all the amazing content, so even if you can’t start the course material right now you can pick it up at your convenience – or go back and watch the videos as many times as you need to practice and get the hang of things!
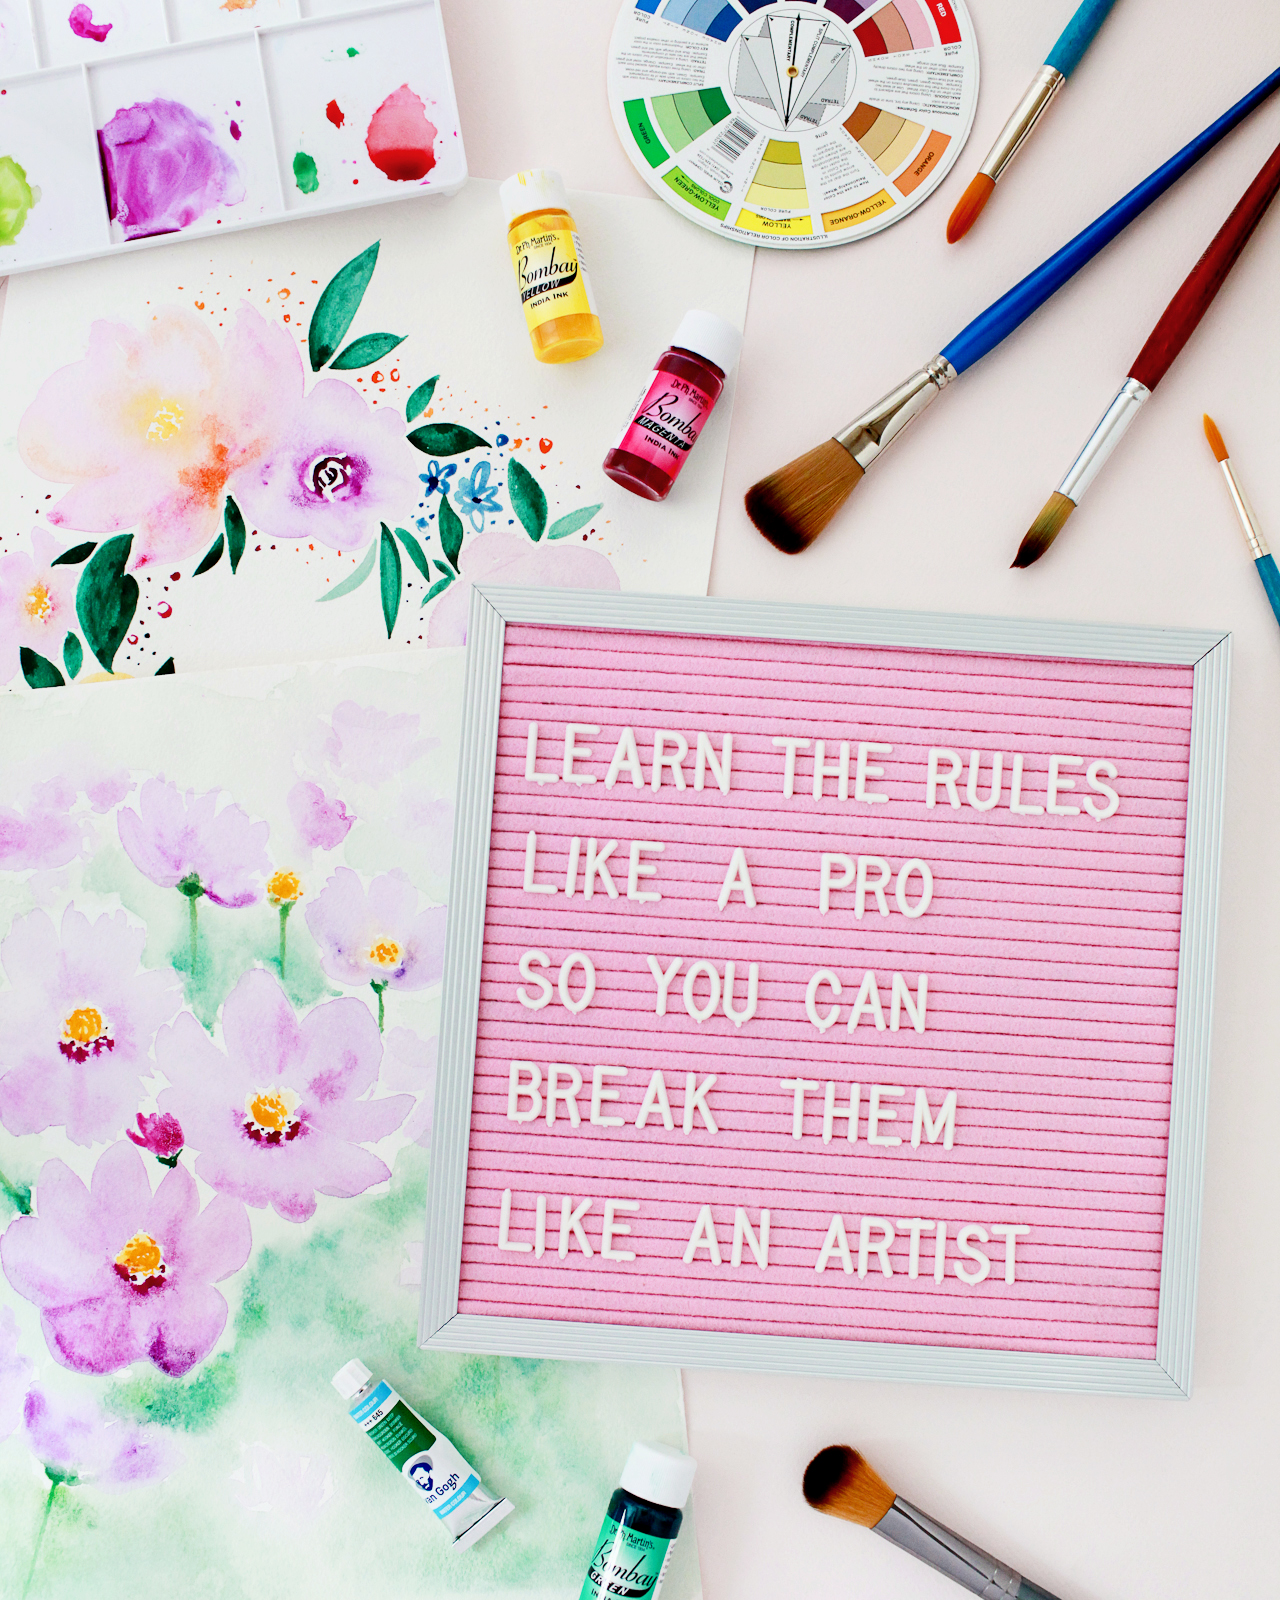
I’ve heard from so many people who have benefited from these courses since the summit first launched in 2016, and now is your chance to learn calligraphy and watercolor at home! Enrollment is only open for a few days each year. You can even sign up for BOTH calligraphy summits and get $100 off! You can enroll in the Modern Calligraphy Summit here and the Watercolor Summit right here. Go, go, go!
This post contains affiliate links. By clicking on these links, you’ll help support Oh So Beautiful Paper while also learning the beautiful arts of calligraphy and watercolor painting! I only recommend products that I truly love and trust that you’ll love, too. My full disclosure policy can be found here.
This post is sponsored by The Incredible Egg. All content and opinions are my own. Visit The Incredible Egg for Easter recipes and inspiration!
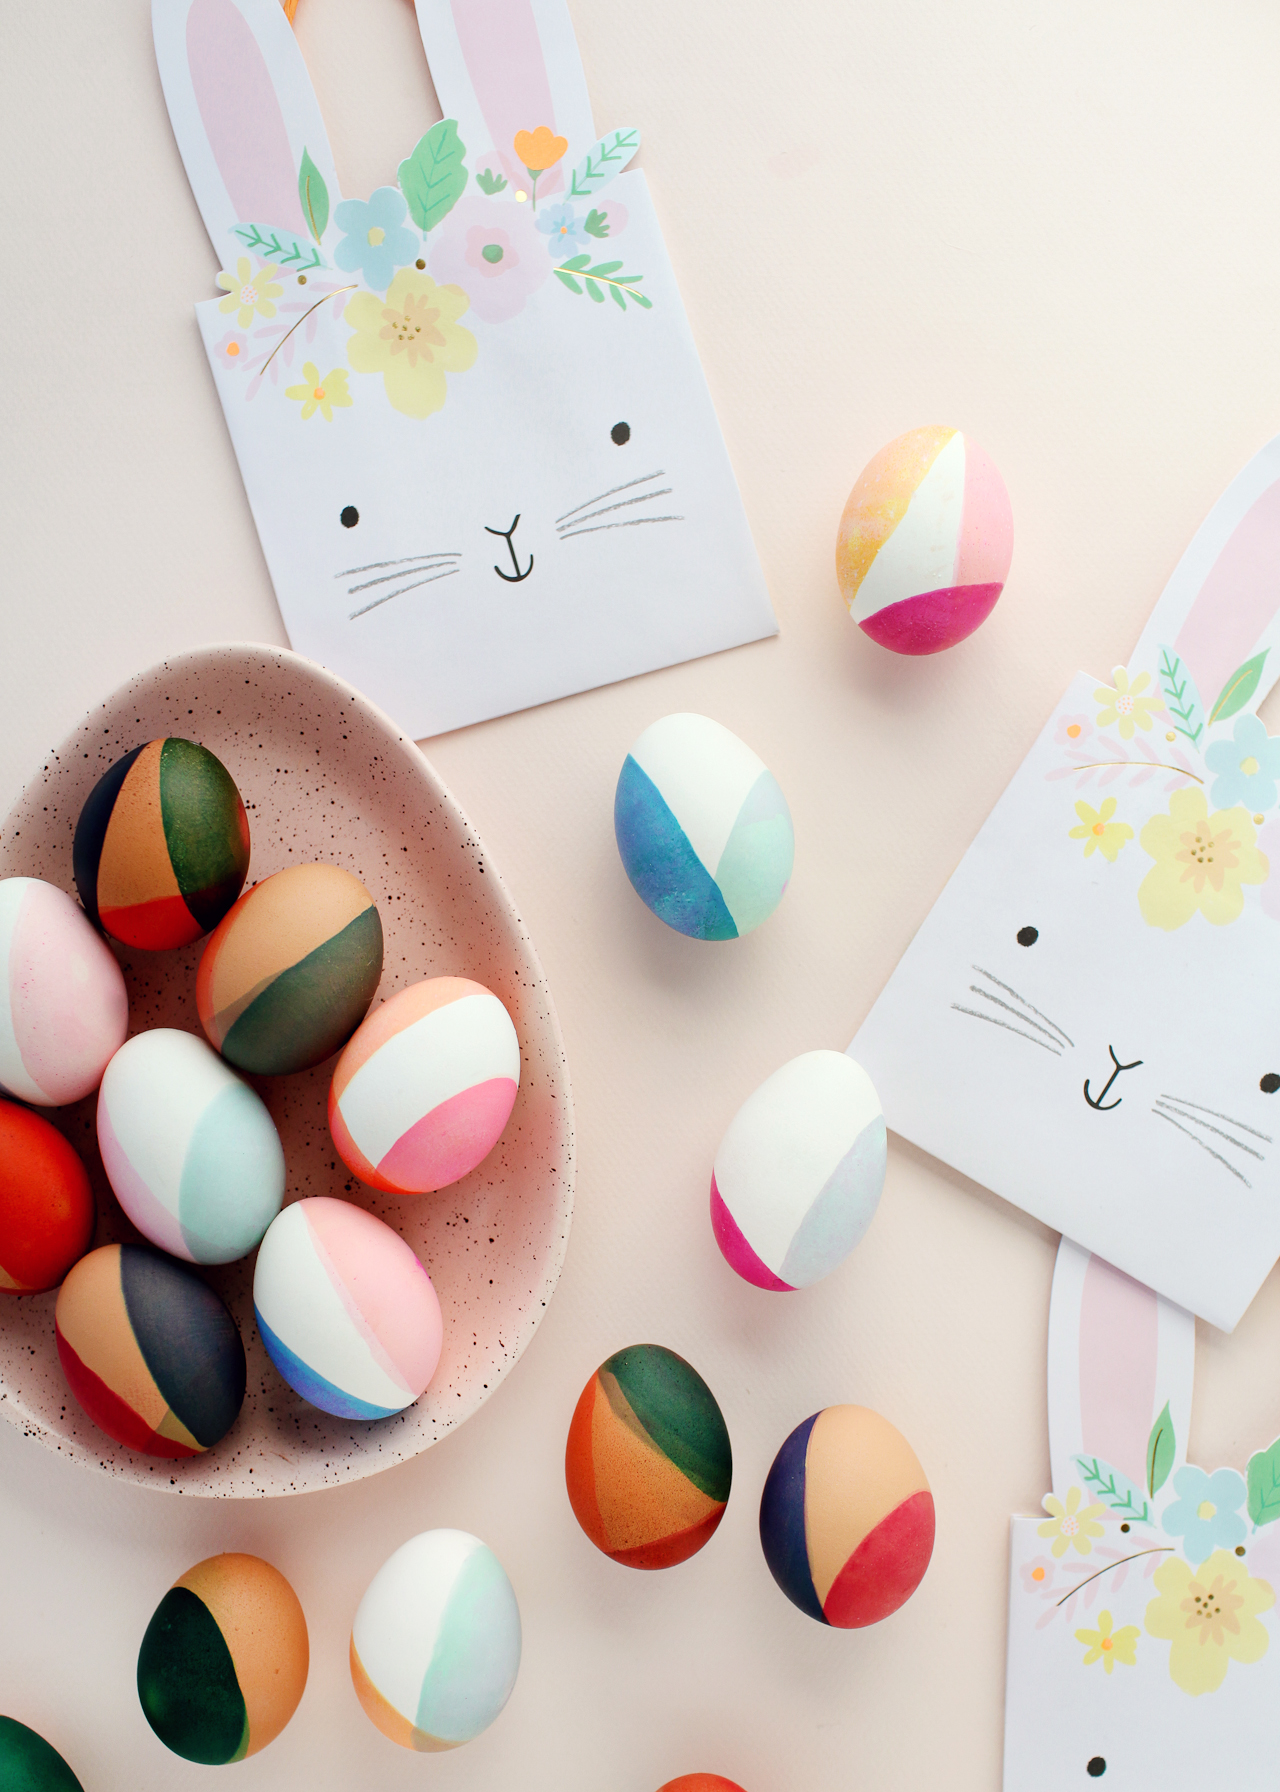
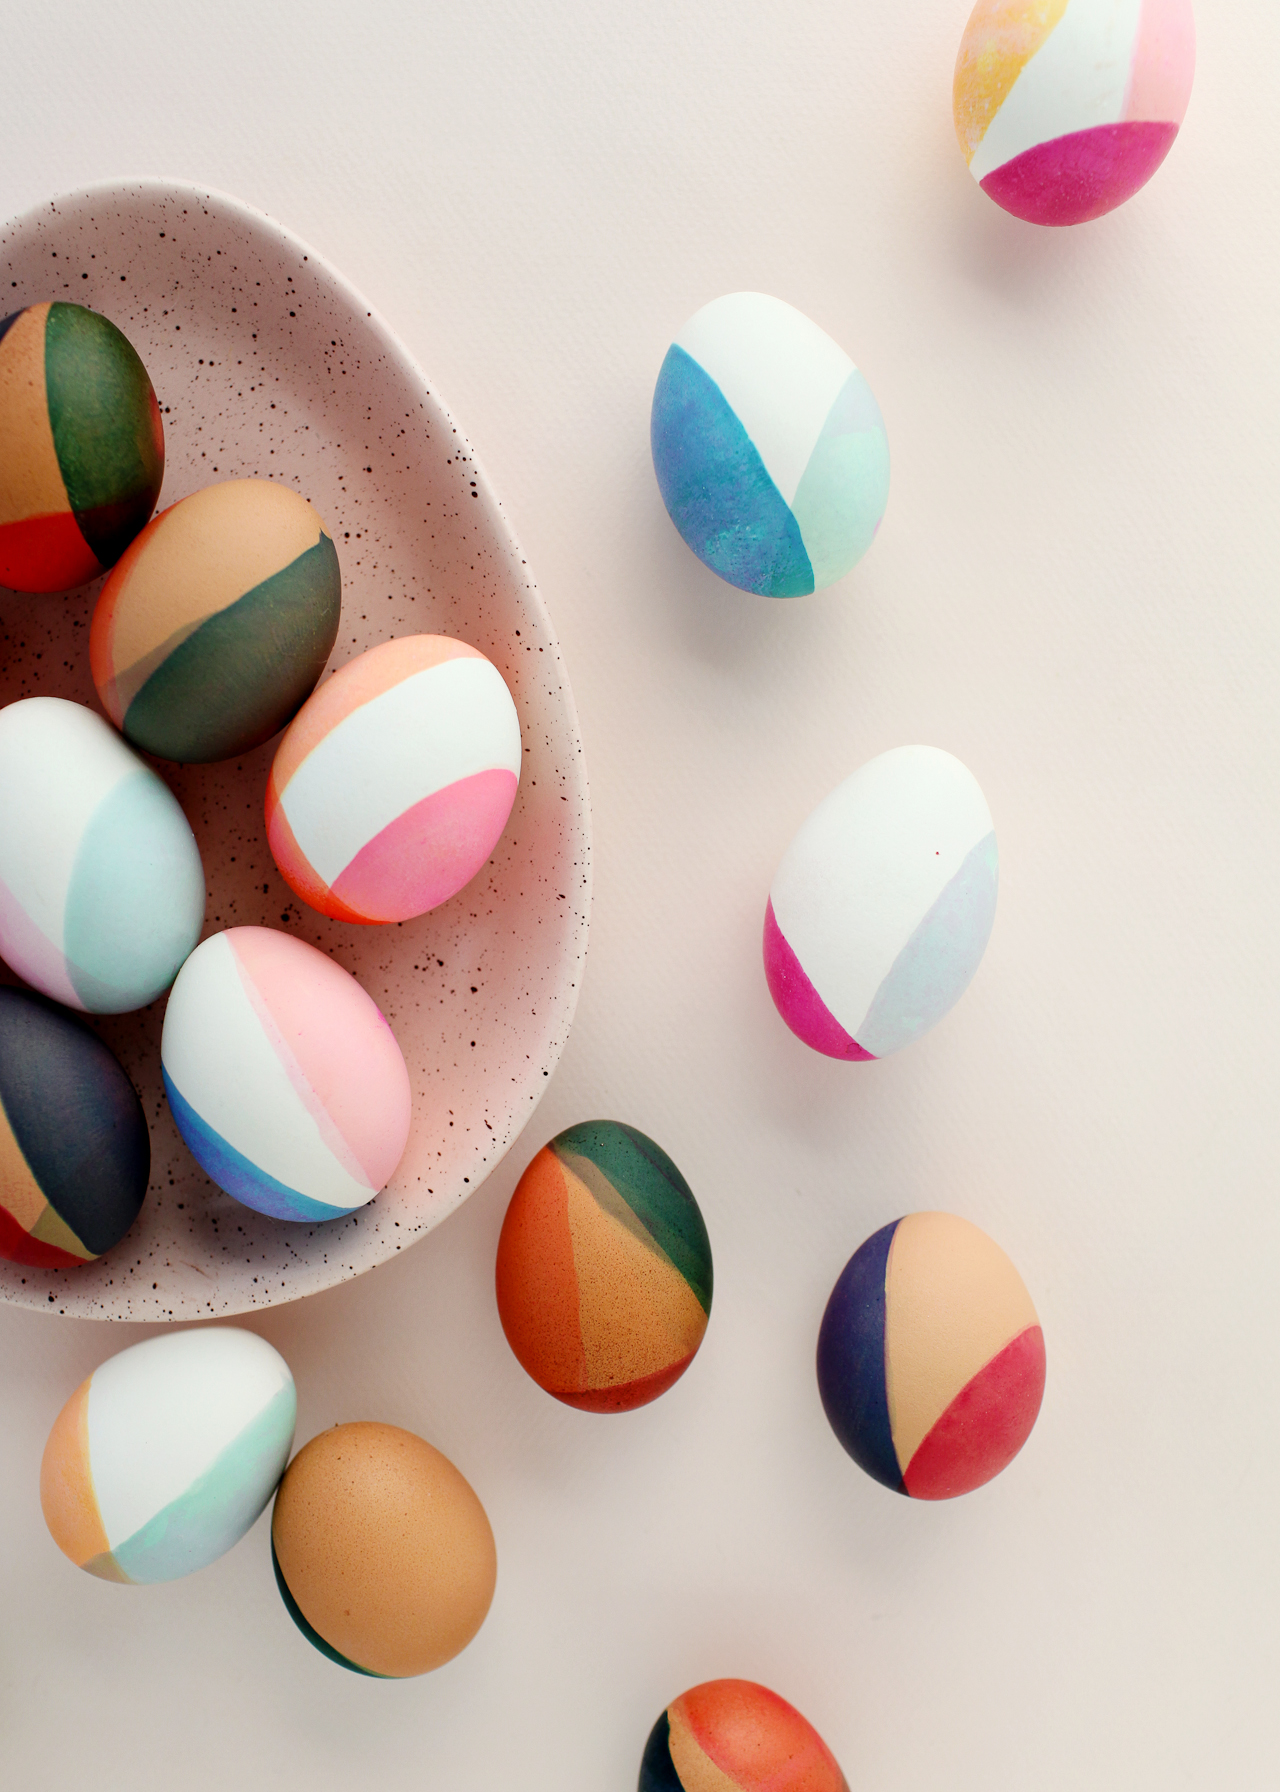
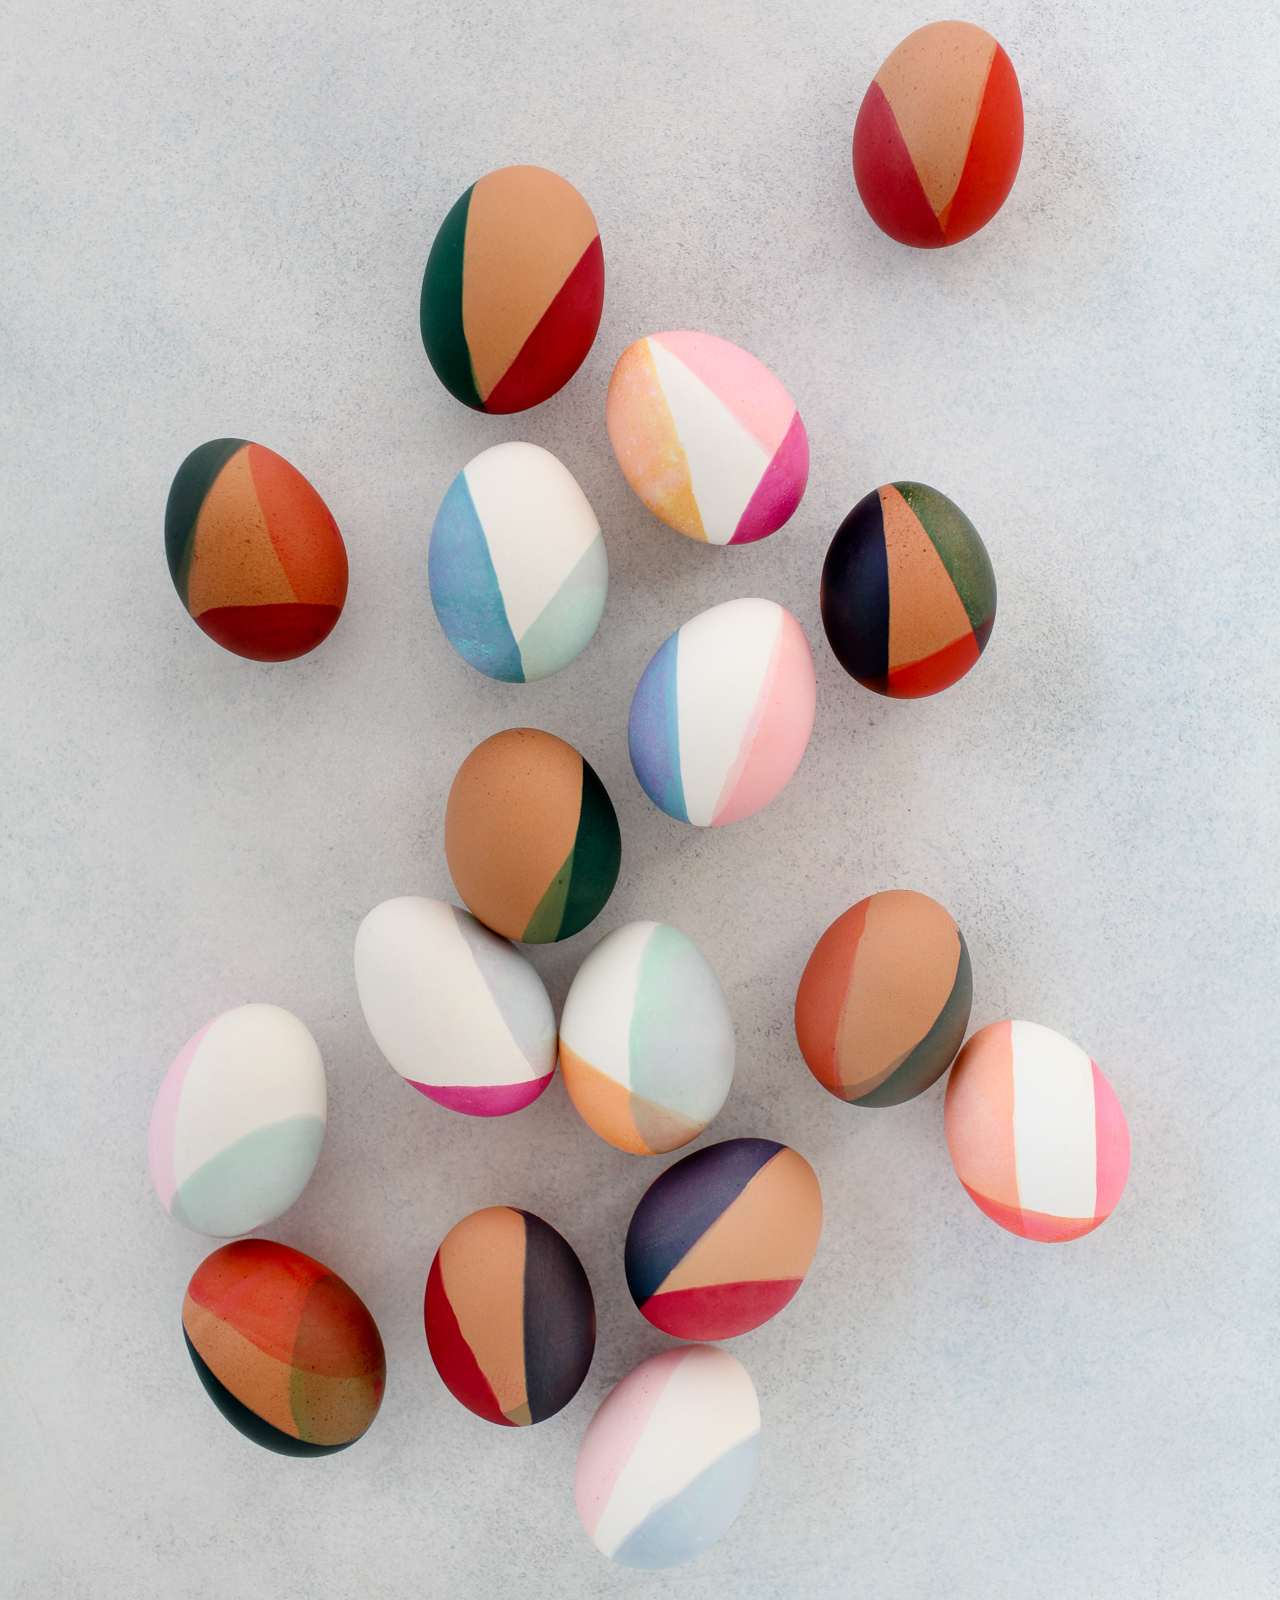
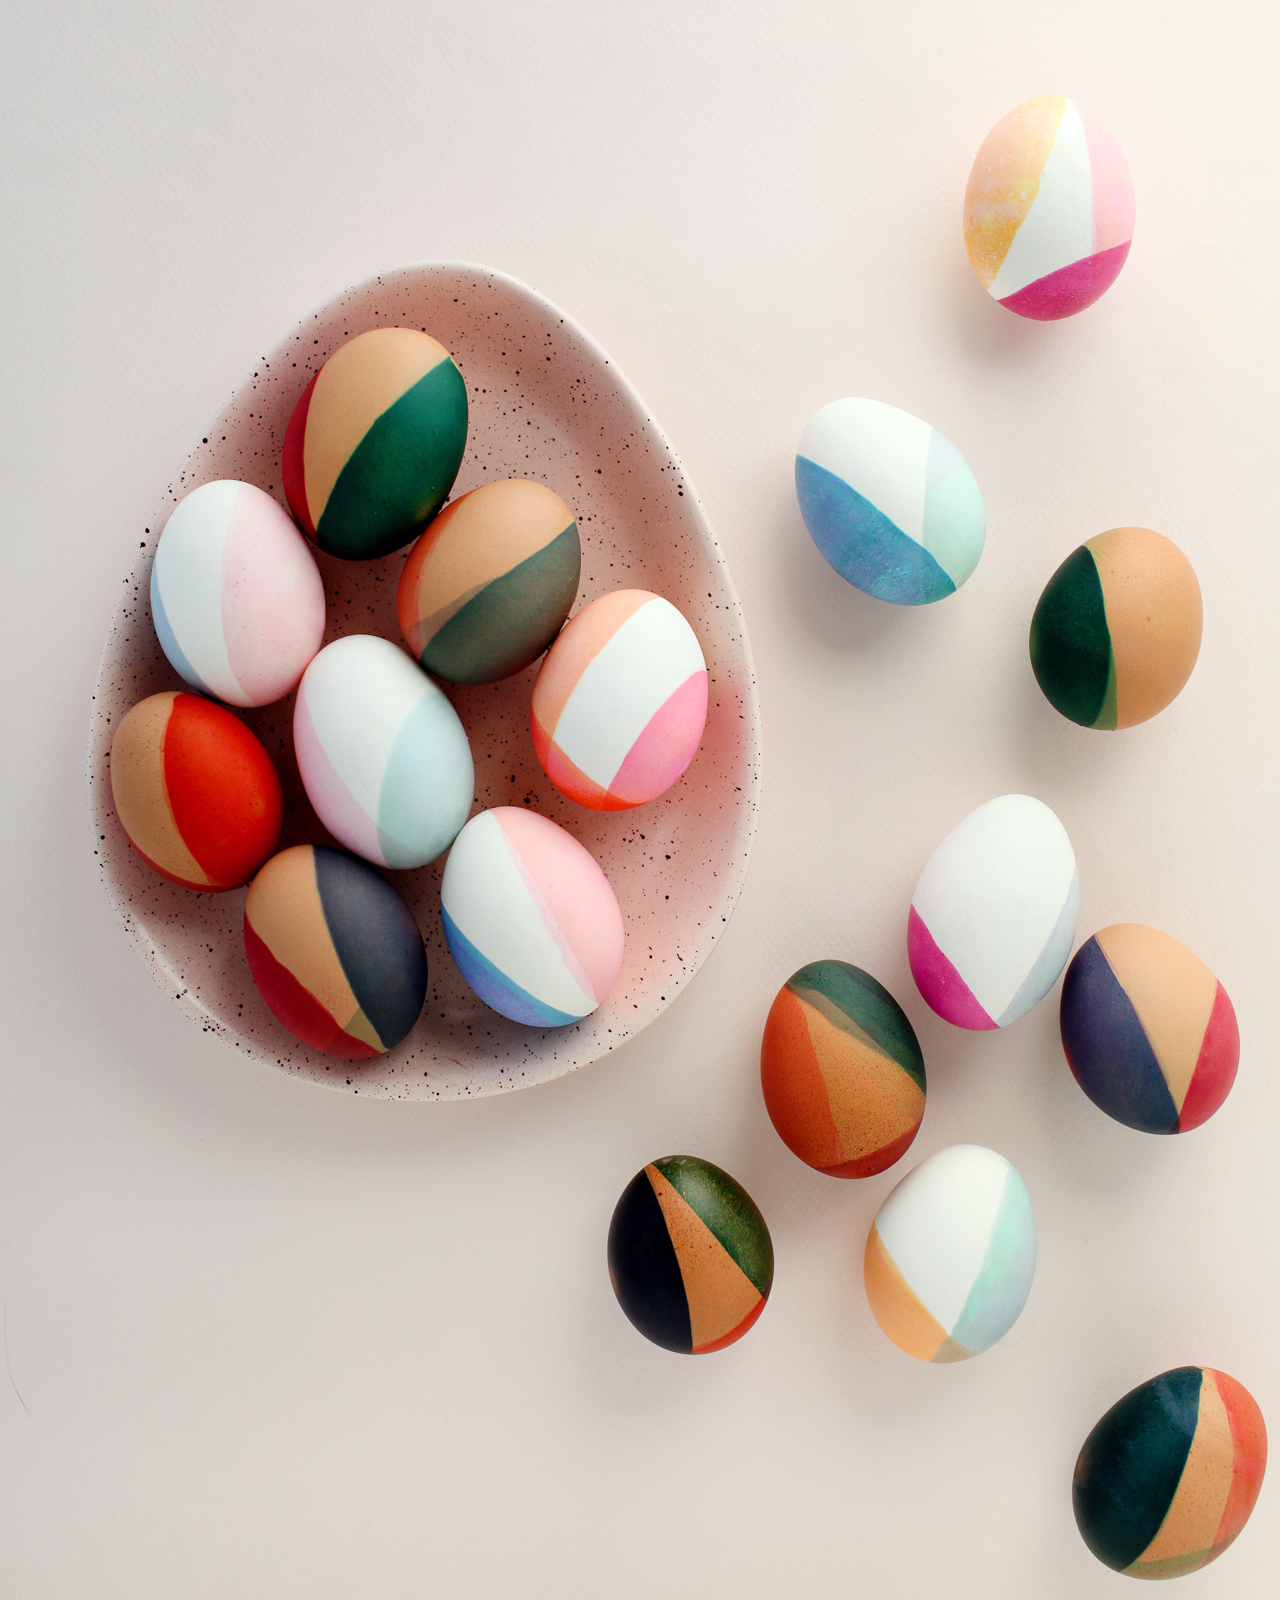
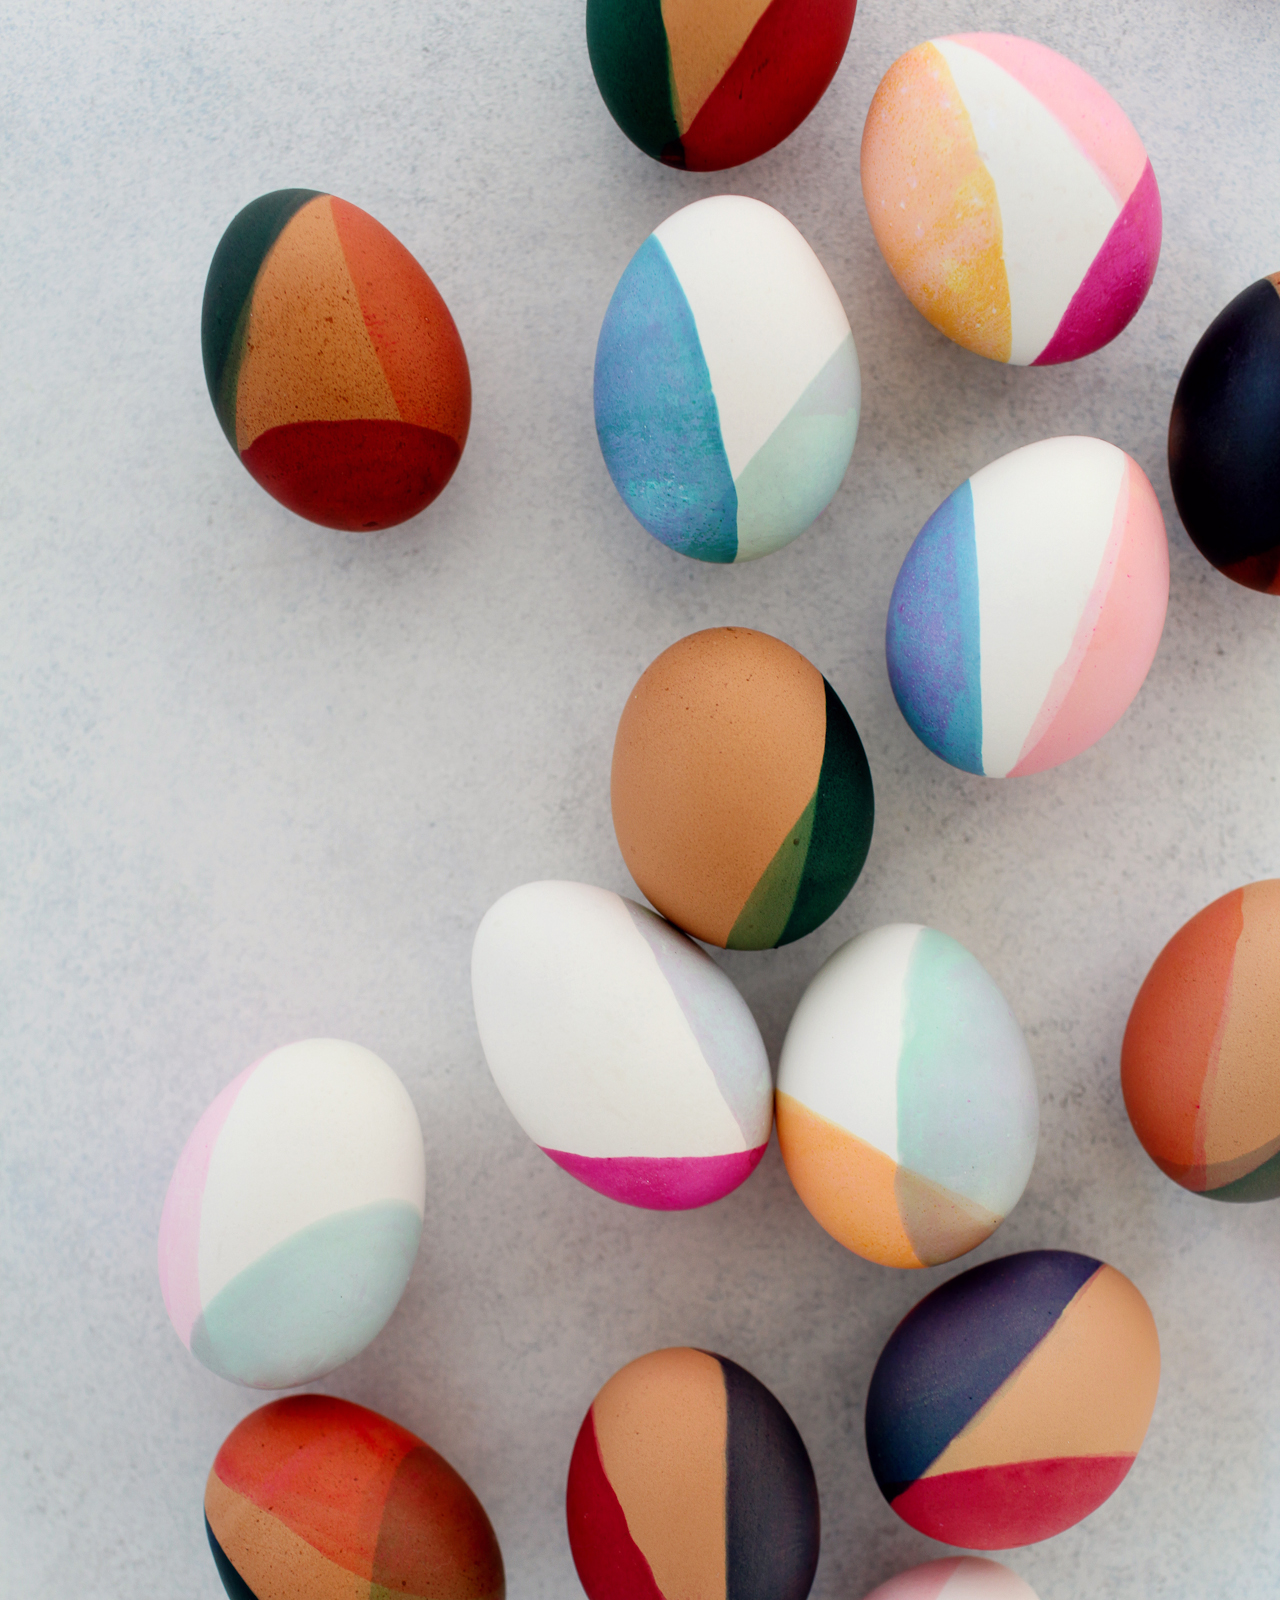
Easter is such a fun holiday, don’t you think?? I’m partial to any holiday that involves decorating – and eggs are the cutest little canvases that can be decorated in so many fun and colorful ways. And now that my kids are old enough to join in on the Easter egg decorating fun, it’s even better! I love coming up with new Easter egg decorating ideas each year, and this year I’m really feeling inspired to experiment with new color palettes and color combinations. So today I’m partnering with The Incredible Egg to share these fun DIY modern, color-blocked Easter eggs!
My family looks forward to decorating Easter eggs all year long. We typically spend the holiday with my husband’s family, so we gather everyone around the kitchen table on Easter morning to dye eggs together. I love seeing the colors (and color combinations!) everyone chooses for their eggs and all the ways they express themselves creatively. Plus my kids absolutely love both getting to decorate eggs and then hunt for them with their cousins several times in the afternoon!
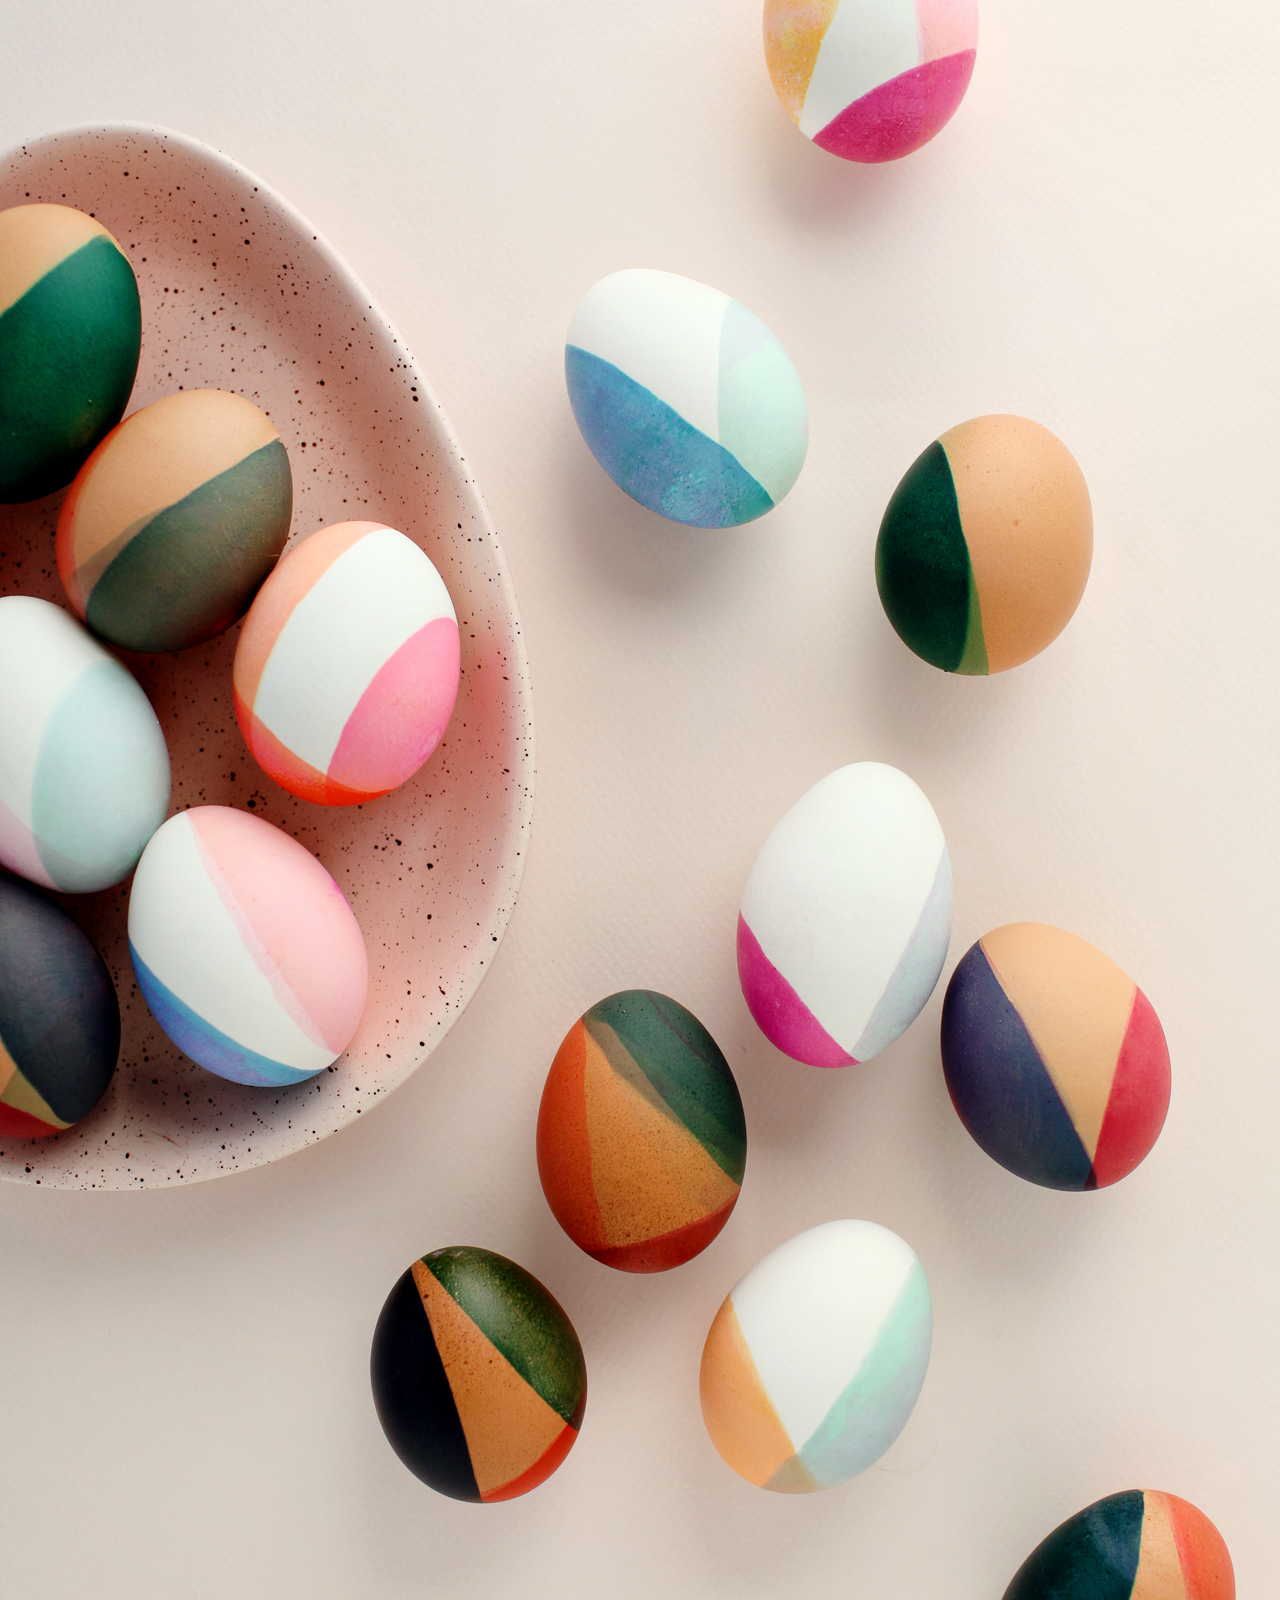
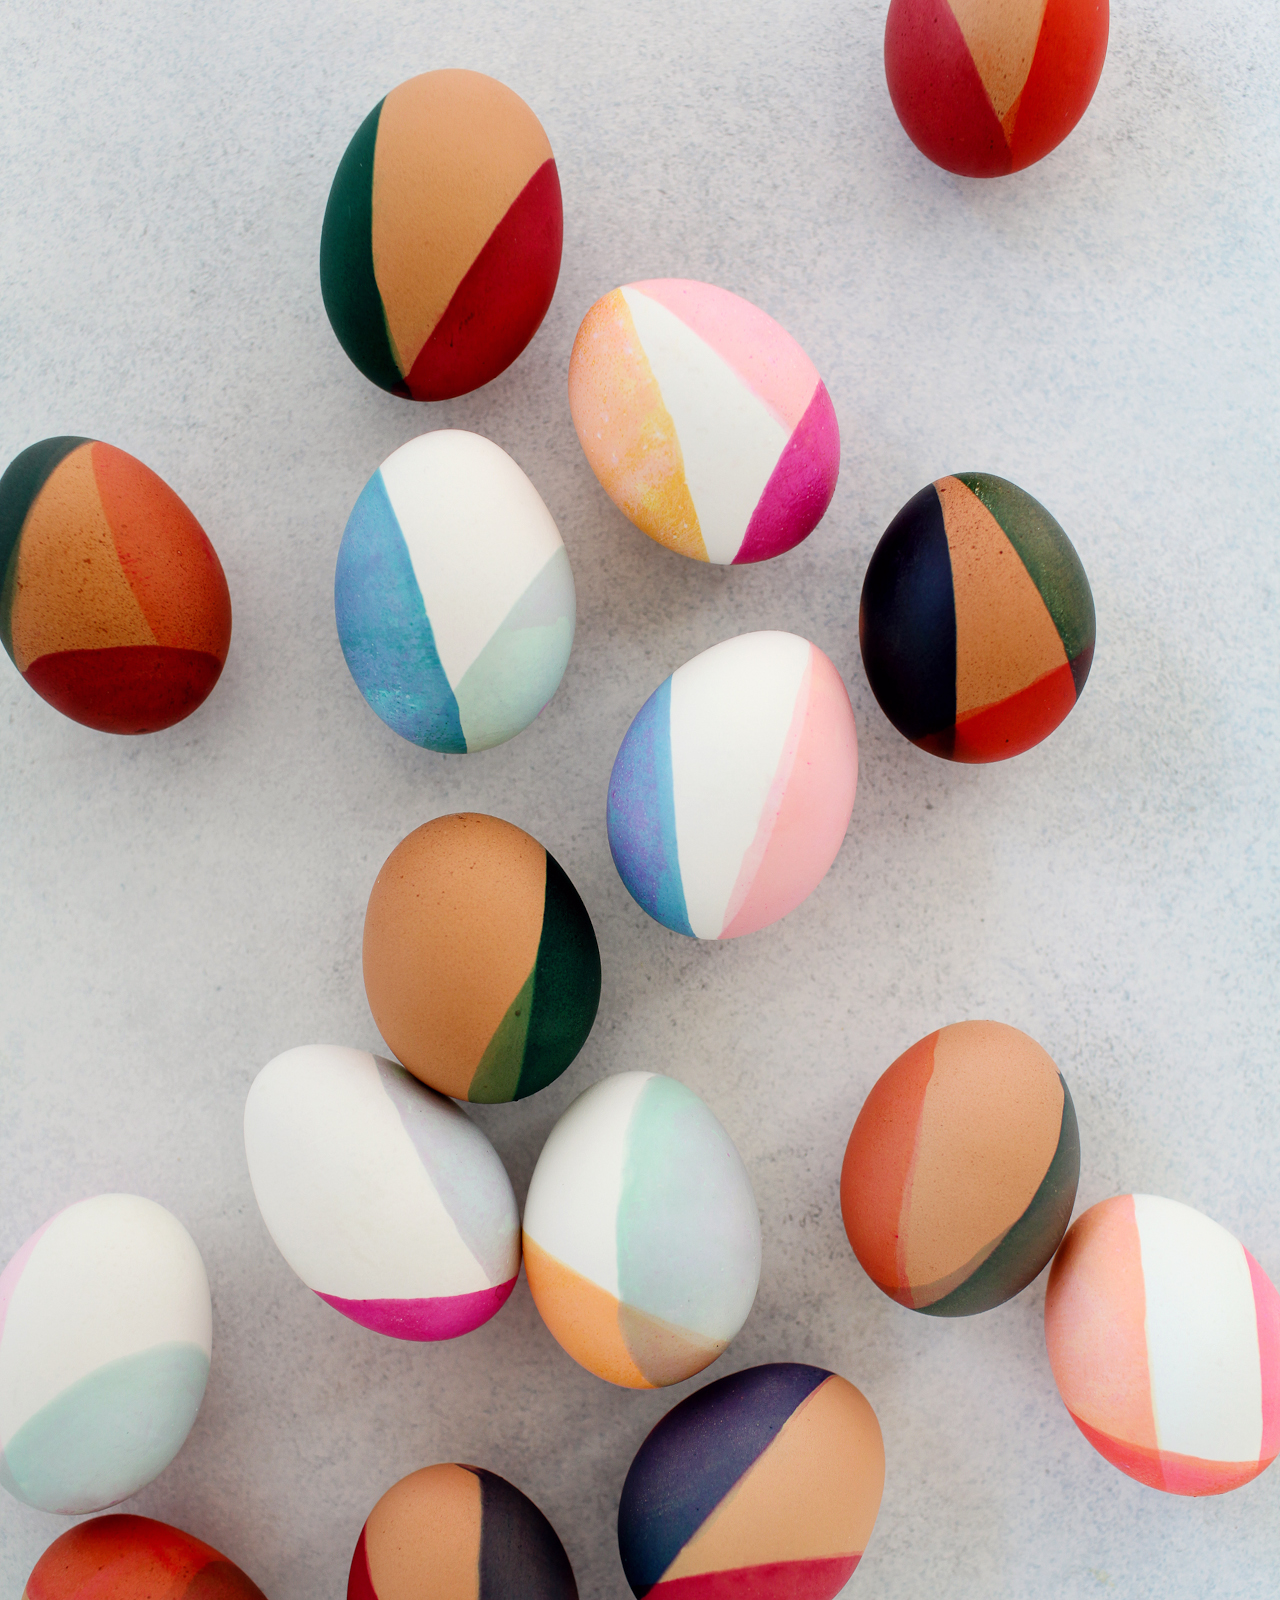
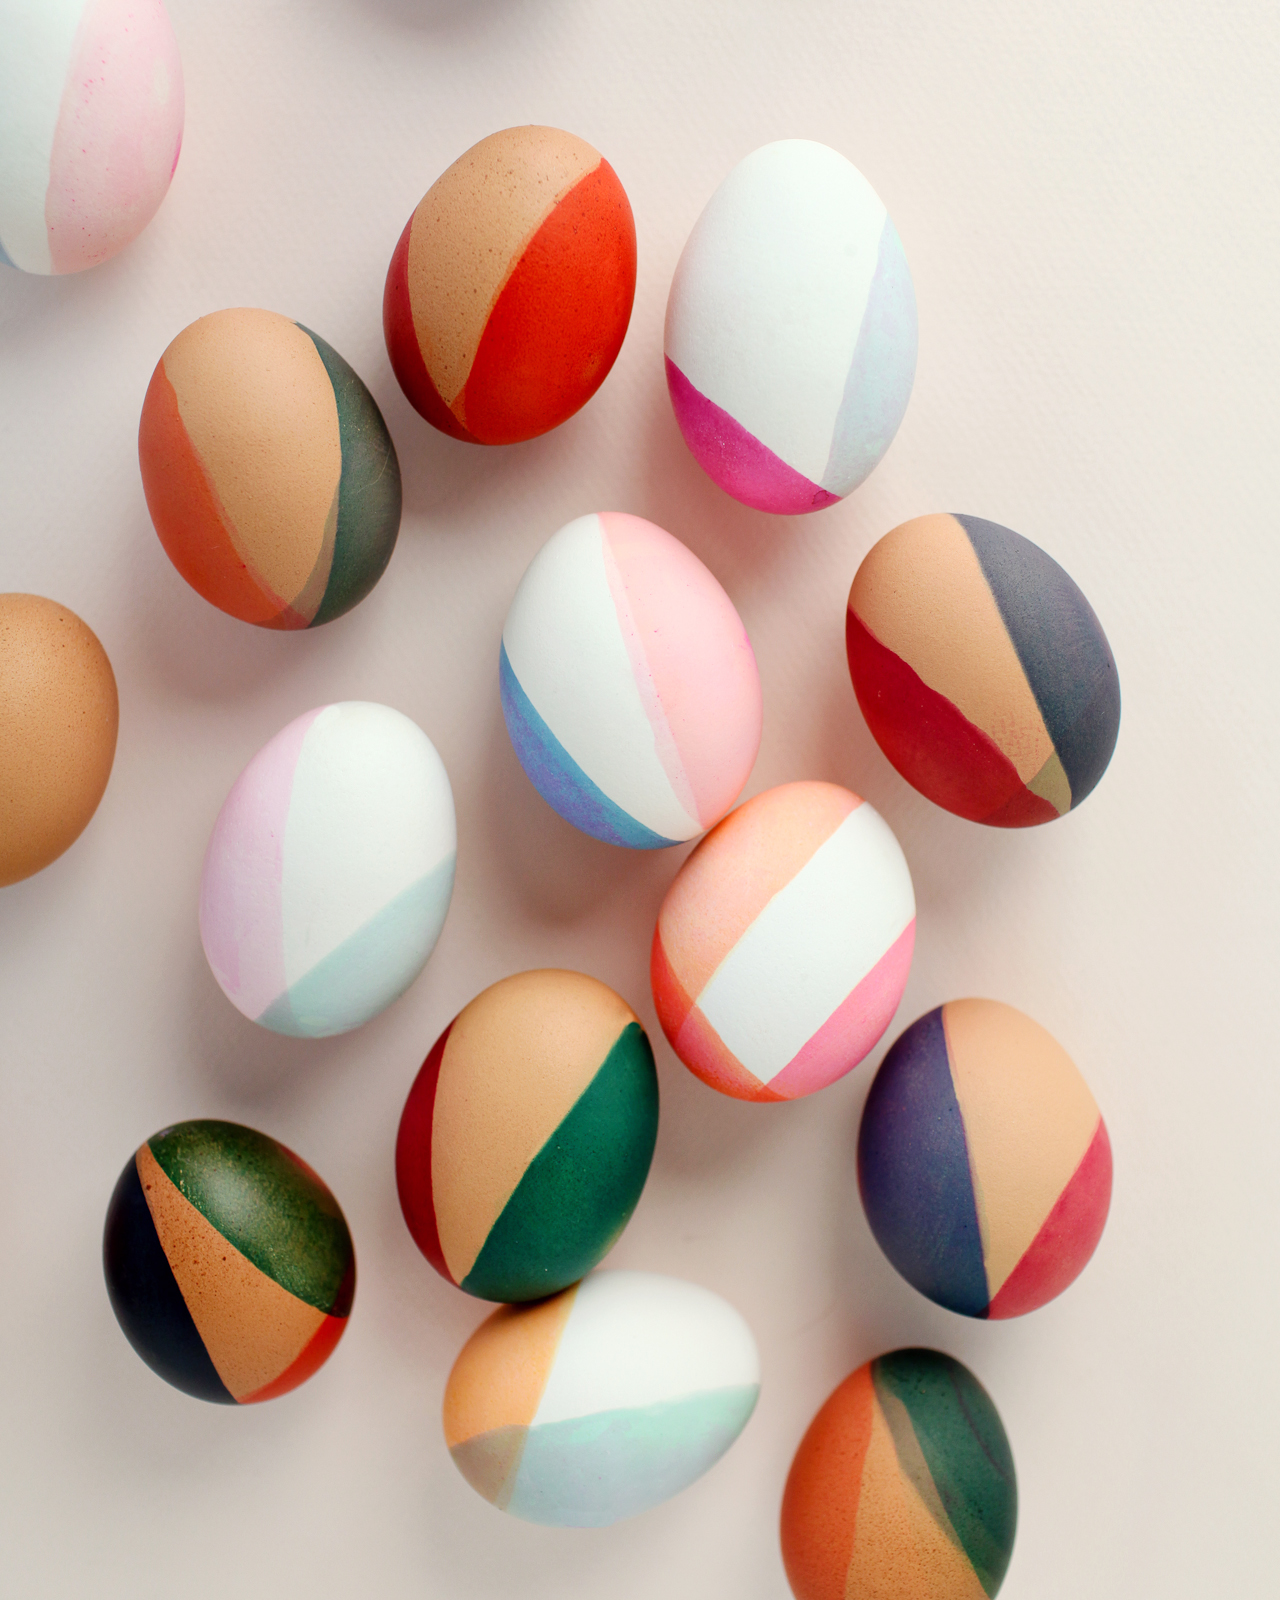
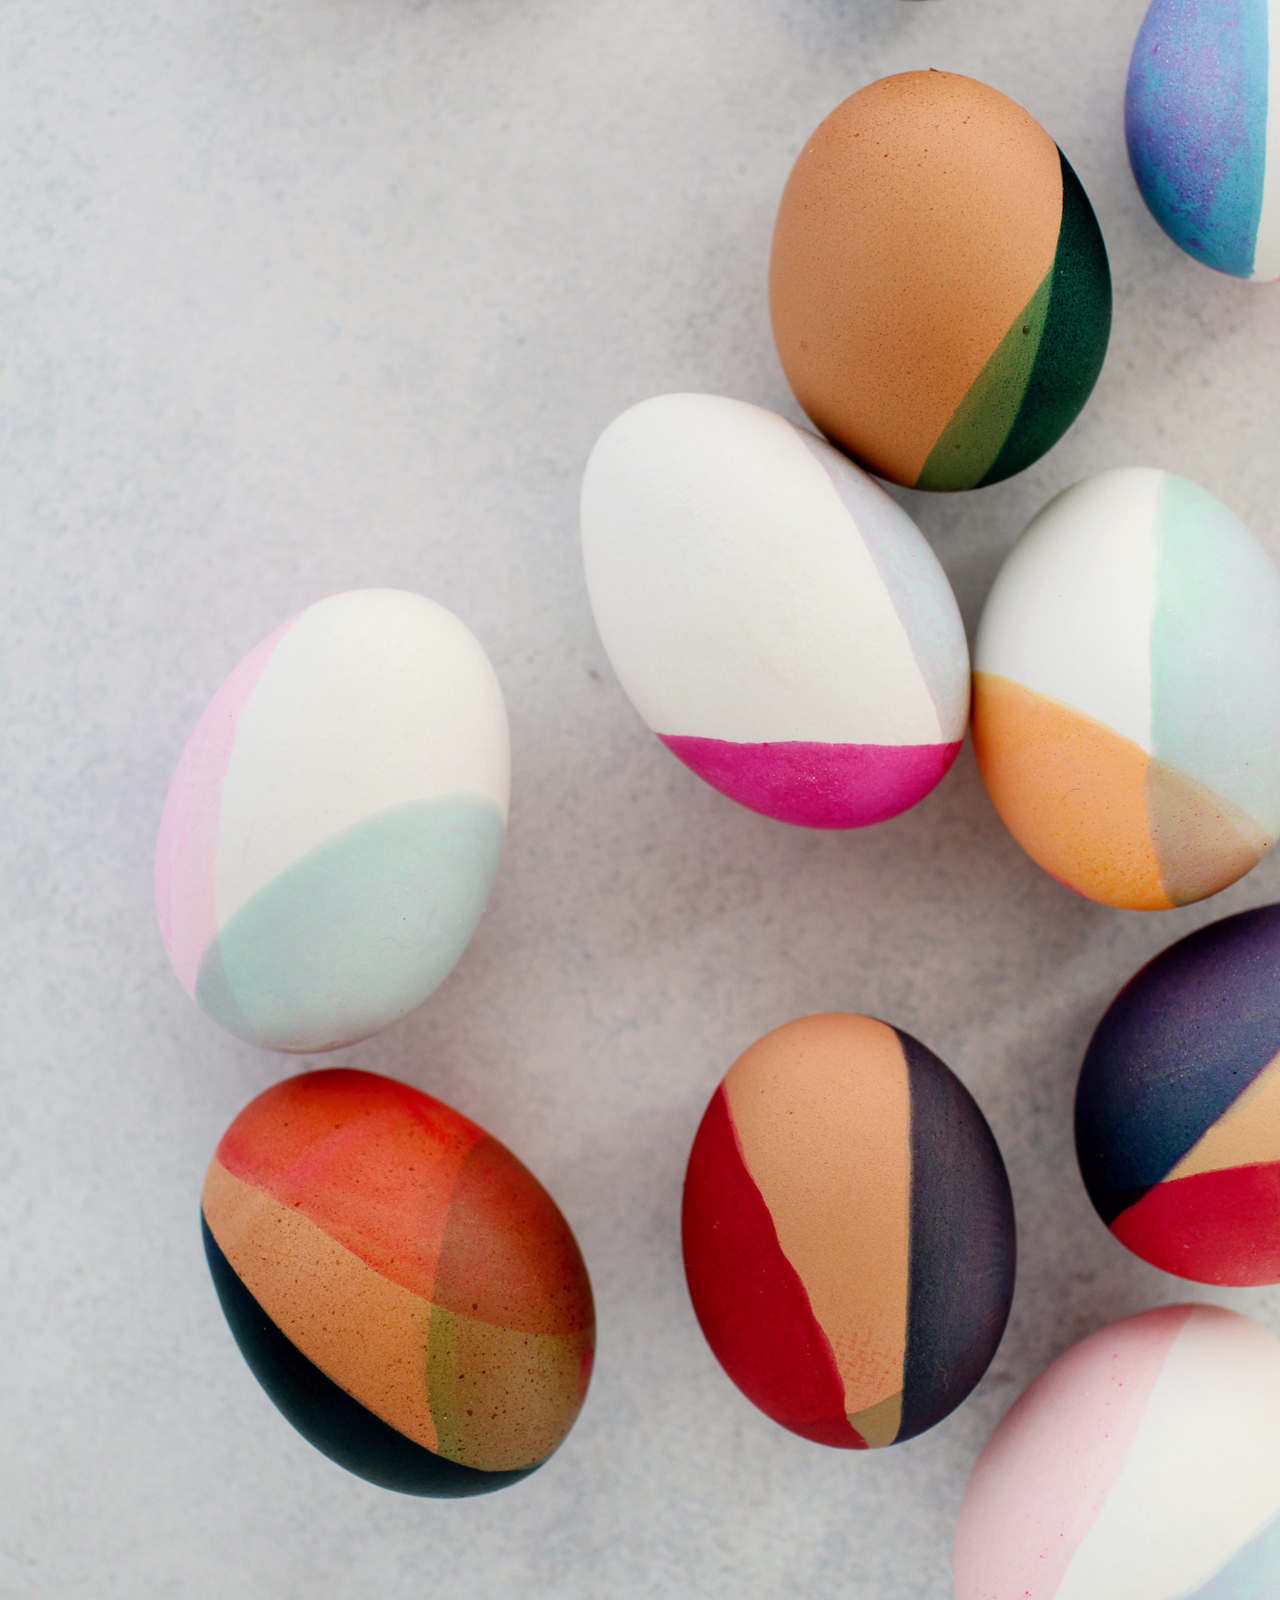
I’ve been feeling really inspired by earthy tones and neutral pastels this year – from bold burgundy and yellow tones to soft pinks and sage green hues. I am especially loving terra cotta paired with navy blue and soft pink paired with mustard yellow. I knew these color pairings would be a beautiful and unexpected application on Easter eggs, especially with a modern, color-blocked dip-dye treatment.
Another exciting development? As you may have noticed, I’m using both white and brown eggs this year! I’ve always dyed white eggs in the past, but brown eggs work so beautifully with the deeper earth tones that I just couldn’t resist. Aren’t they just absolutely DREAMY with the color blocked dip dye?? I also loved the idea of creating different colors and tones using the same color dyes on both brown and white eggs. The lighter pastel tones produced a beautiful color wash effect on the brown eggs, while the deeper hues produced rich jewel tones by leaving the eggs in the dye bath for a longer period of time.
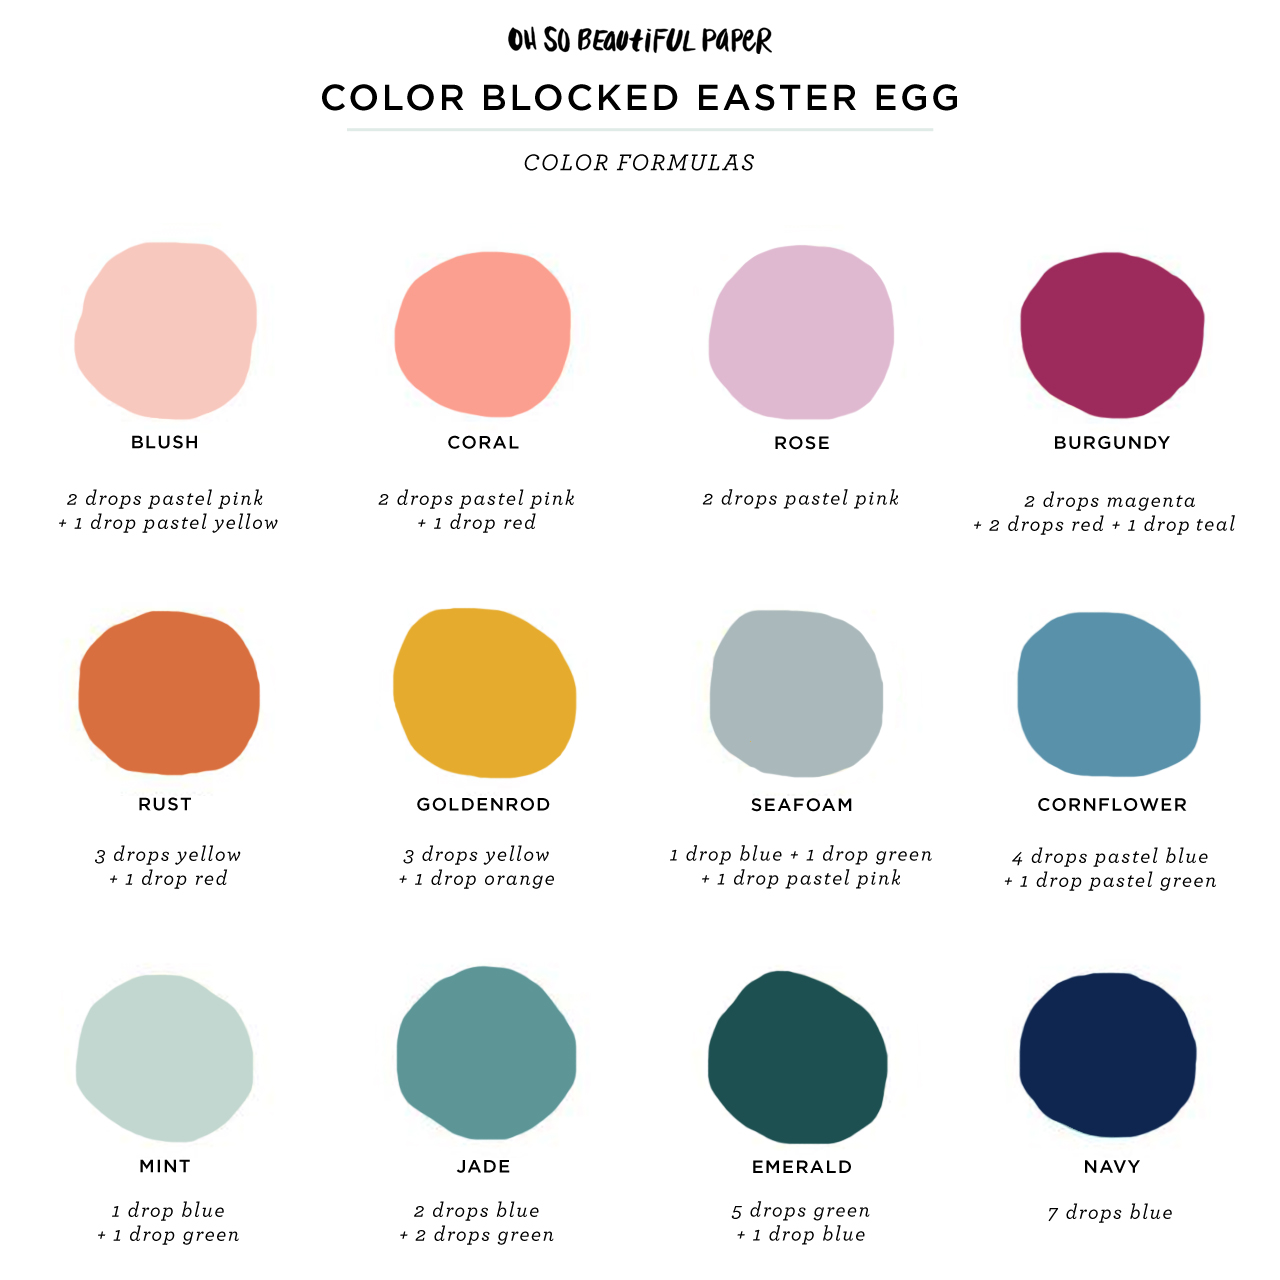
Here’s the color palette that I used as my starting point, along with the food coloring dye formulas that I used to dye the eggs:
A quick note: The color formulas above achieved *slightly* different results in person – but it’s pretty close to my original color palette objectives! When you make these color formulas at home, always test the colors with a napkin or paper towel before dyeing your eggs!
There are a million ways to decorate Easter eggs – from soft painterly pink and gold eggs totissue paper eggs – and I love putting a modern twist on traditional decorating techniques. All you need is traditional food coloring dye to achieve the gorgeous colors in these DIY modern, color-blocked Easter eggs! Are you ready? Let’s get started!
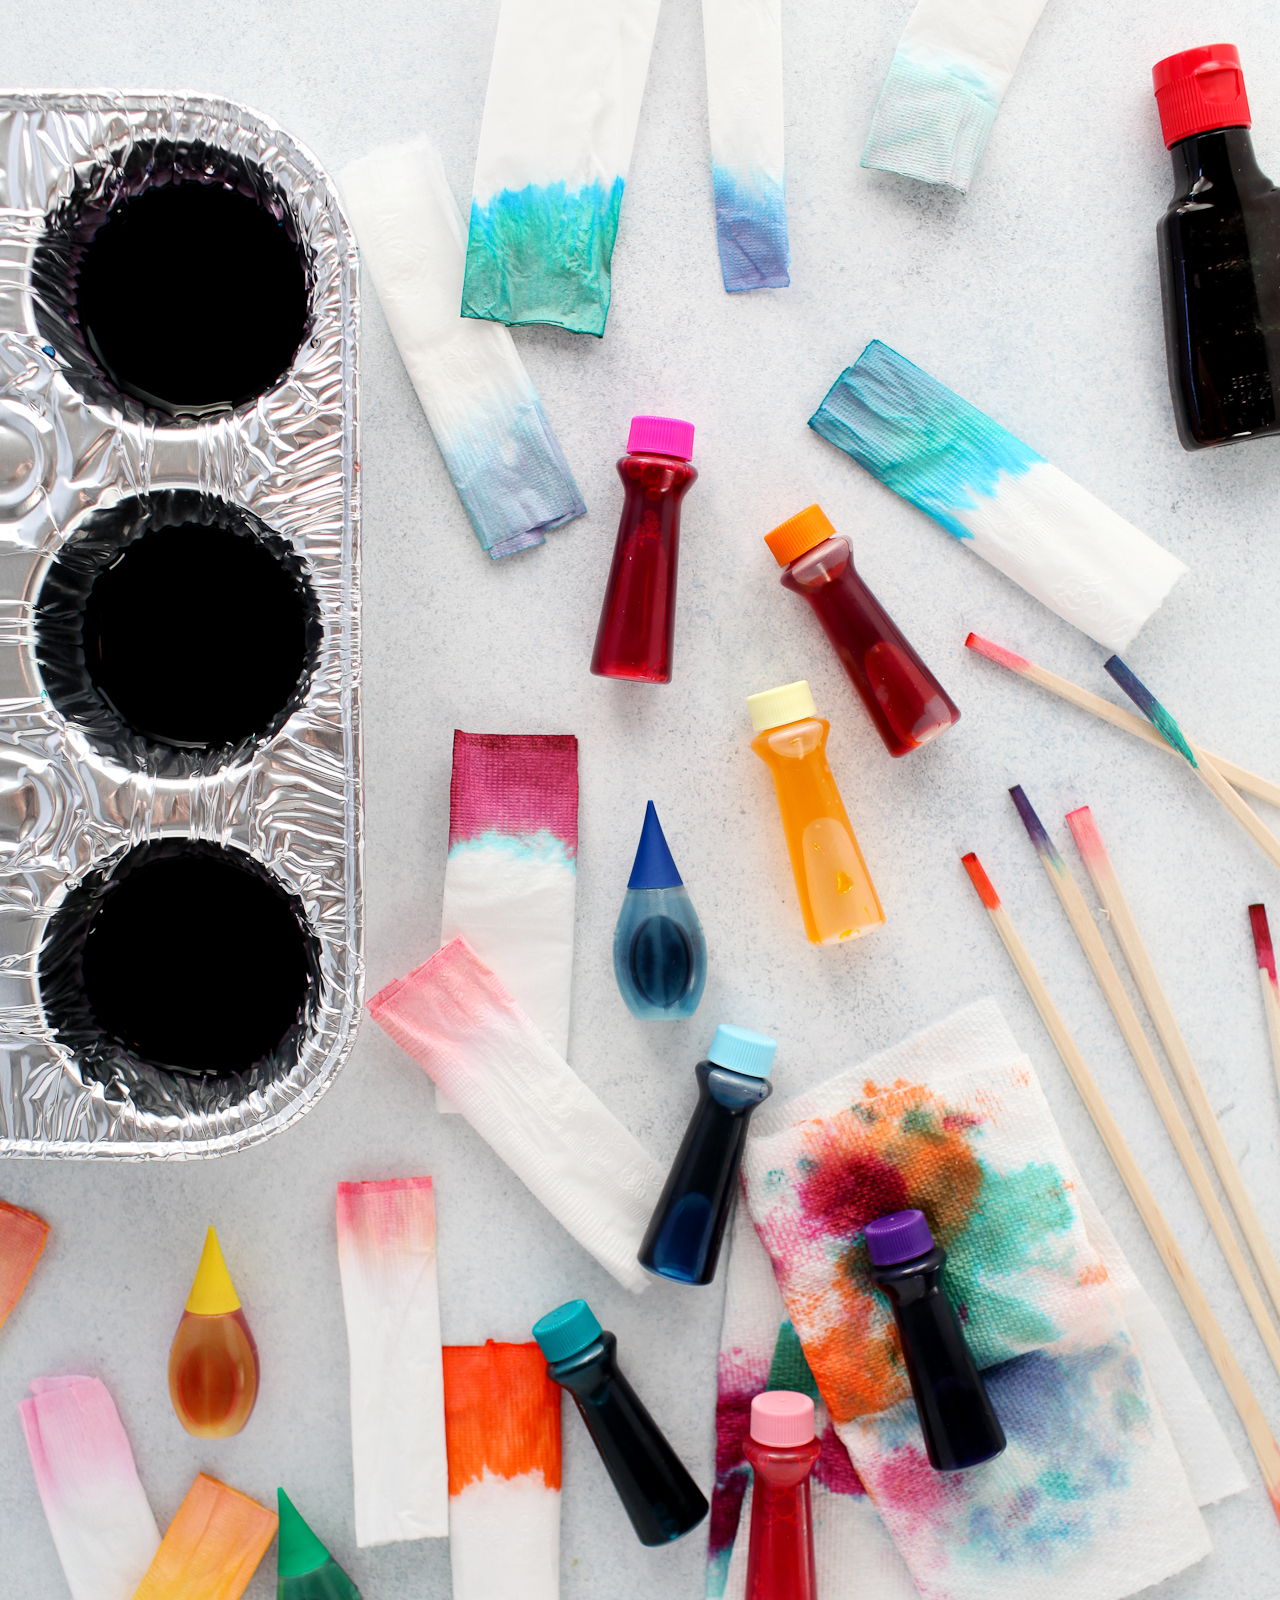
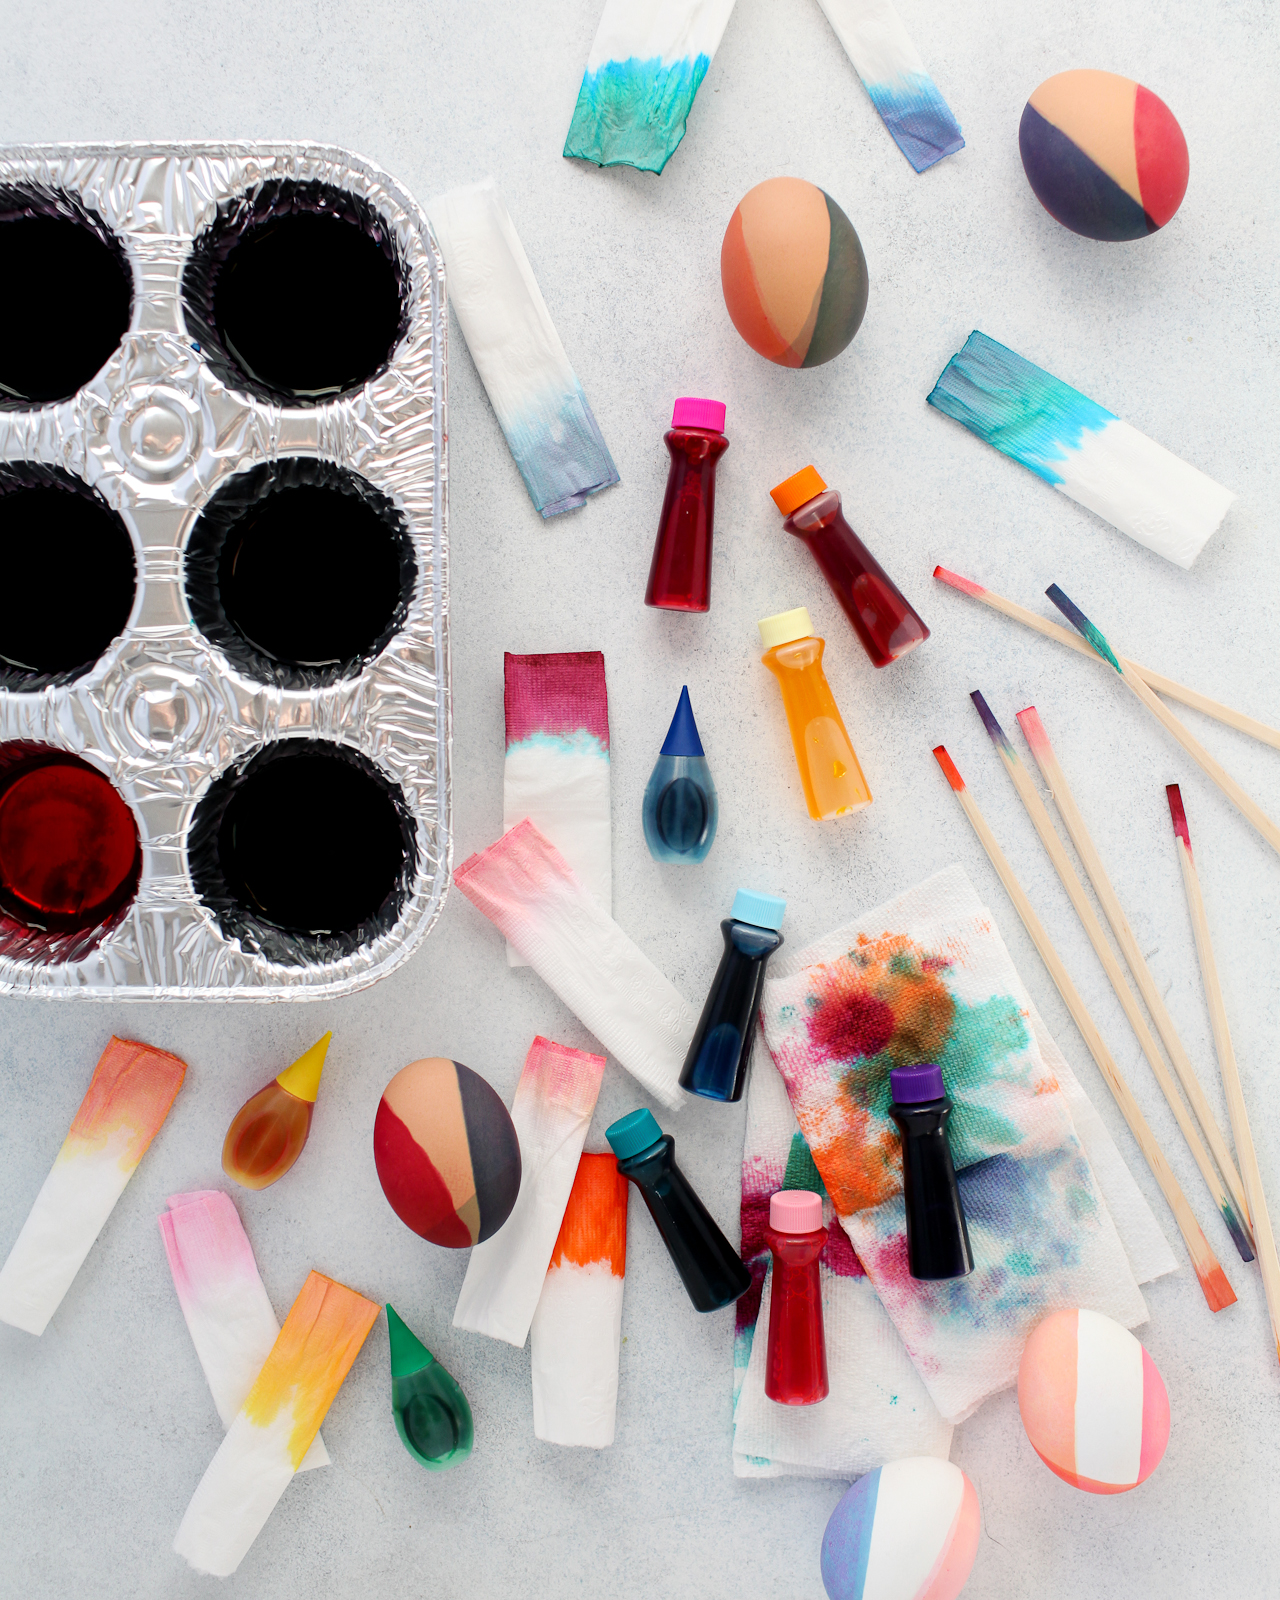
Supplies
White and Brown Hardboiled Eggs
Liquid Food Coloring
Muffin pan or small bowls for dyeing the eggs (note: the food coloring can leave permanent stains, so don’t use anything too precious!)
Vinegar
Tooth picks or wood chopsticks for stirring
Paper Towels
Disposable Gloves (optional)
To make the DIY modern color-blocked Easter eggs:
Step 1. Boil two cups of water, then add two tablespoons of vinegar to the hot water. Fill the cups of a muffin pan or a small bowl with about half an inch of the hot water. Add liquid food coloring based on the color formulas above or to achieve your own desired color palette. I used a variety of store-bought food coloring to create my dye colors, including standard red, yellow, green, and blue liquid food coloring, pastel gel food coloring, and bright magenta, teal, and orange gel food coloring. Use a toothpick or spoon to stir the food coloring together until completely blended, then give it another quick stir before dipping your egg into the dye bath.
Tip: Test the dye color with a paper towel before submerging your eggs, but keep in mind that a paper towel will absorb the dye much faster than an egg, so you’ll need to leave the egg in the dye bath for a minute or two if you’re hoping to achieve brighter/more saturated colors.
Step 2. Wearing disposable gloves, pick up your egg and gently dip one side of the egg into the dye bath. The dye should not cover the entire egg and you should continue to hold the egg in place while it’s in the dye bath so it doesn’t roll over. Hold the egg in place for several seconds for lighter colors or around a minute for deeper/more saturated colors.
Step 3. Remove from the dye bath and pat dry with a paper towel.
Step 4. Repeat steps 2 and 3 with a second and third dye color (if desired), covering a different portion of the egg with each new dye color.
I just can’t stop staring at these colors! I love all the subtle color variations between the white and brown eggs and the different overlapping tones. The non-traditional color combinations are so special and unique!
Neutral pastels! Earth tones! Jewel tones! Gah, I just love these eggs SO much! Do you love this color palette as much as I do? Will you be making color-blocked eggs this year?? Let us know if you do! And don’t forget to head over to The Incredible Egg for more Easter inspiration and recipe ideas!
This post was created in partnership with The Incredible Egg. All content and opinions are my own. Thank you for supporting the sponsors that make Oh So Beautiful Paper possible!
Happy Friday everyone! I’m heading up to New York for the National Stationery Show tomorrow, and I’ll be sharing snaps from the show on Instagram starting on Sunday – then here as soon as I can get the photos processed. Covering the show has gotten harder (at least for me) with social media since I tend to take photos with both my phone and my DSLR, giving me twice as many photos to sort through. This year I’m hoping to consolidate with just one camera and hope for the best. You’d think social media would make it easier to cover the show, but it’s actually the opposite for me! Anyway, here are some links for your weekend!
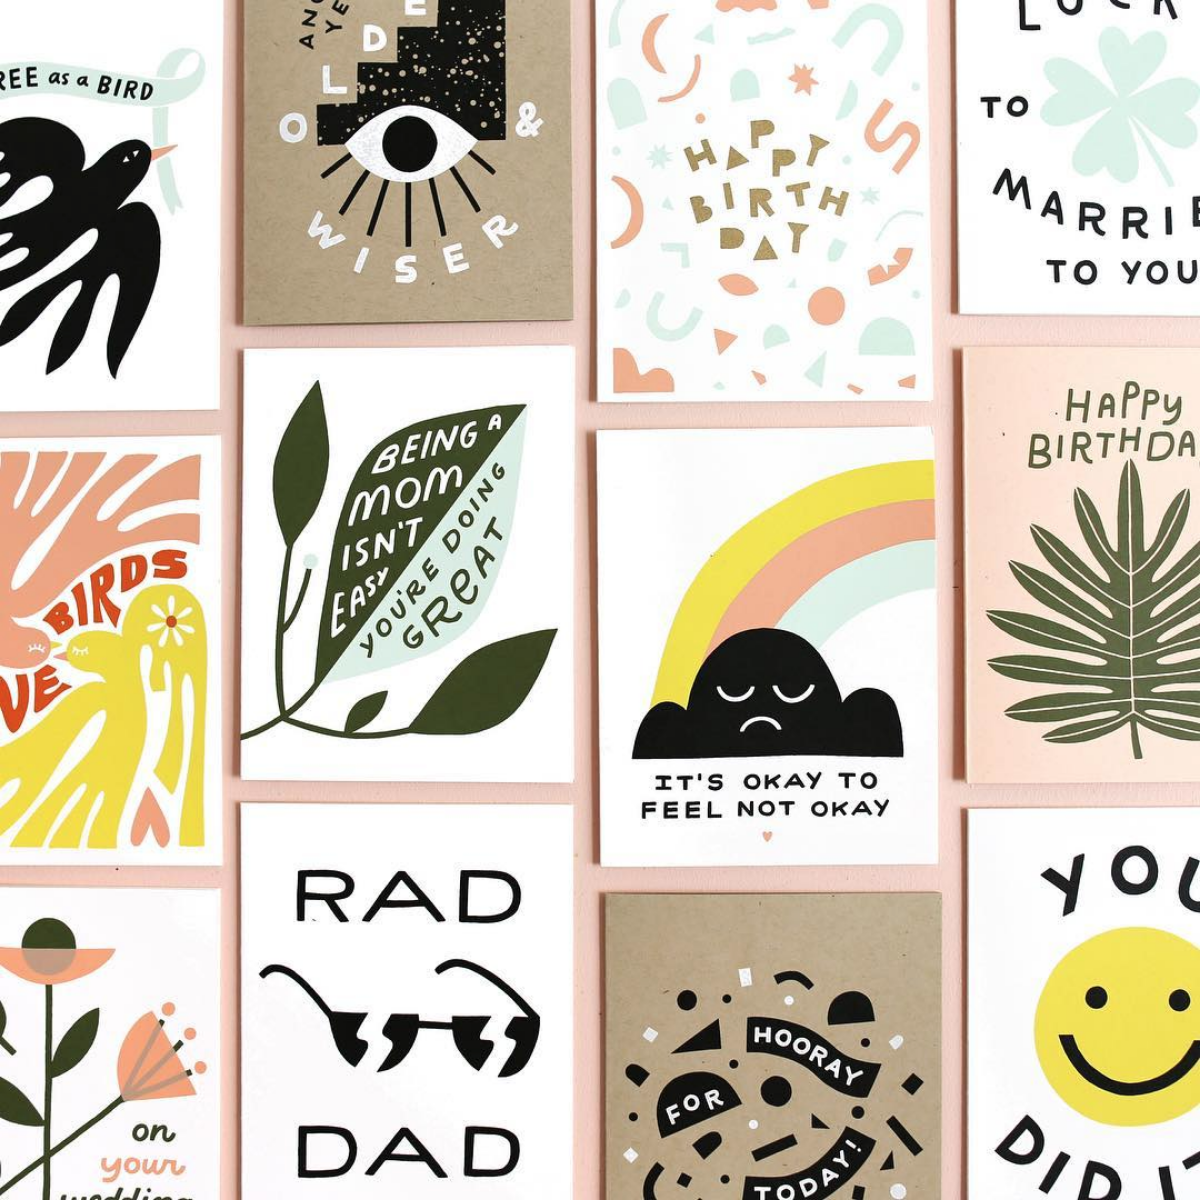
Greeting cards by Worthwhile Paper – they’ll be at the Crow & Canary booth at NYNOW (7614)!
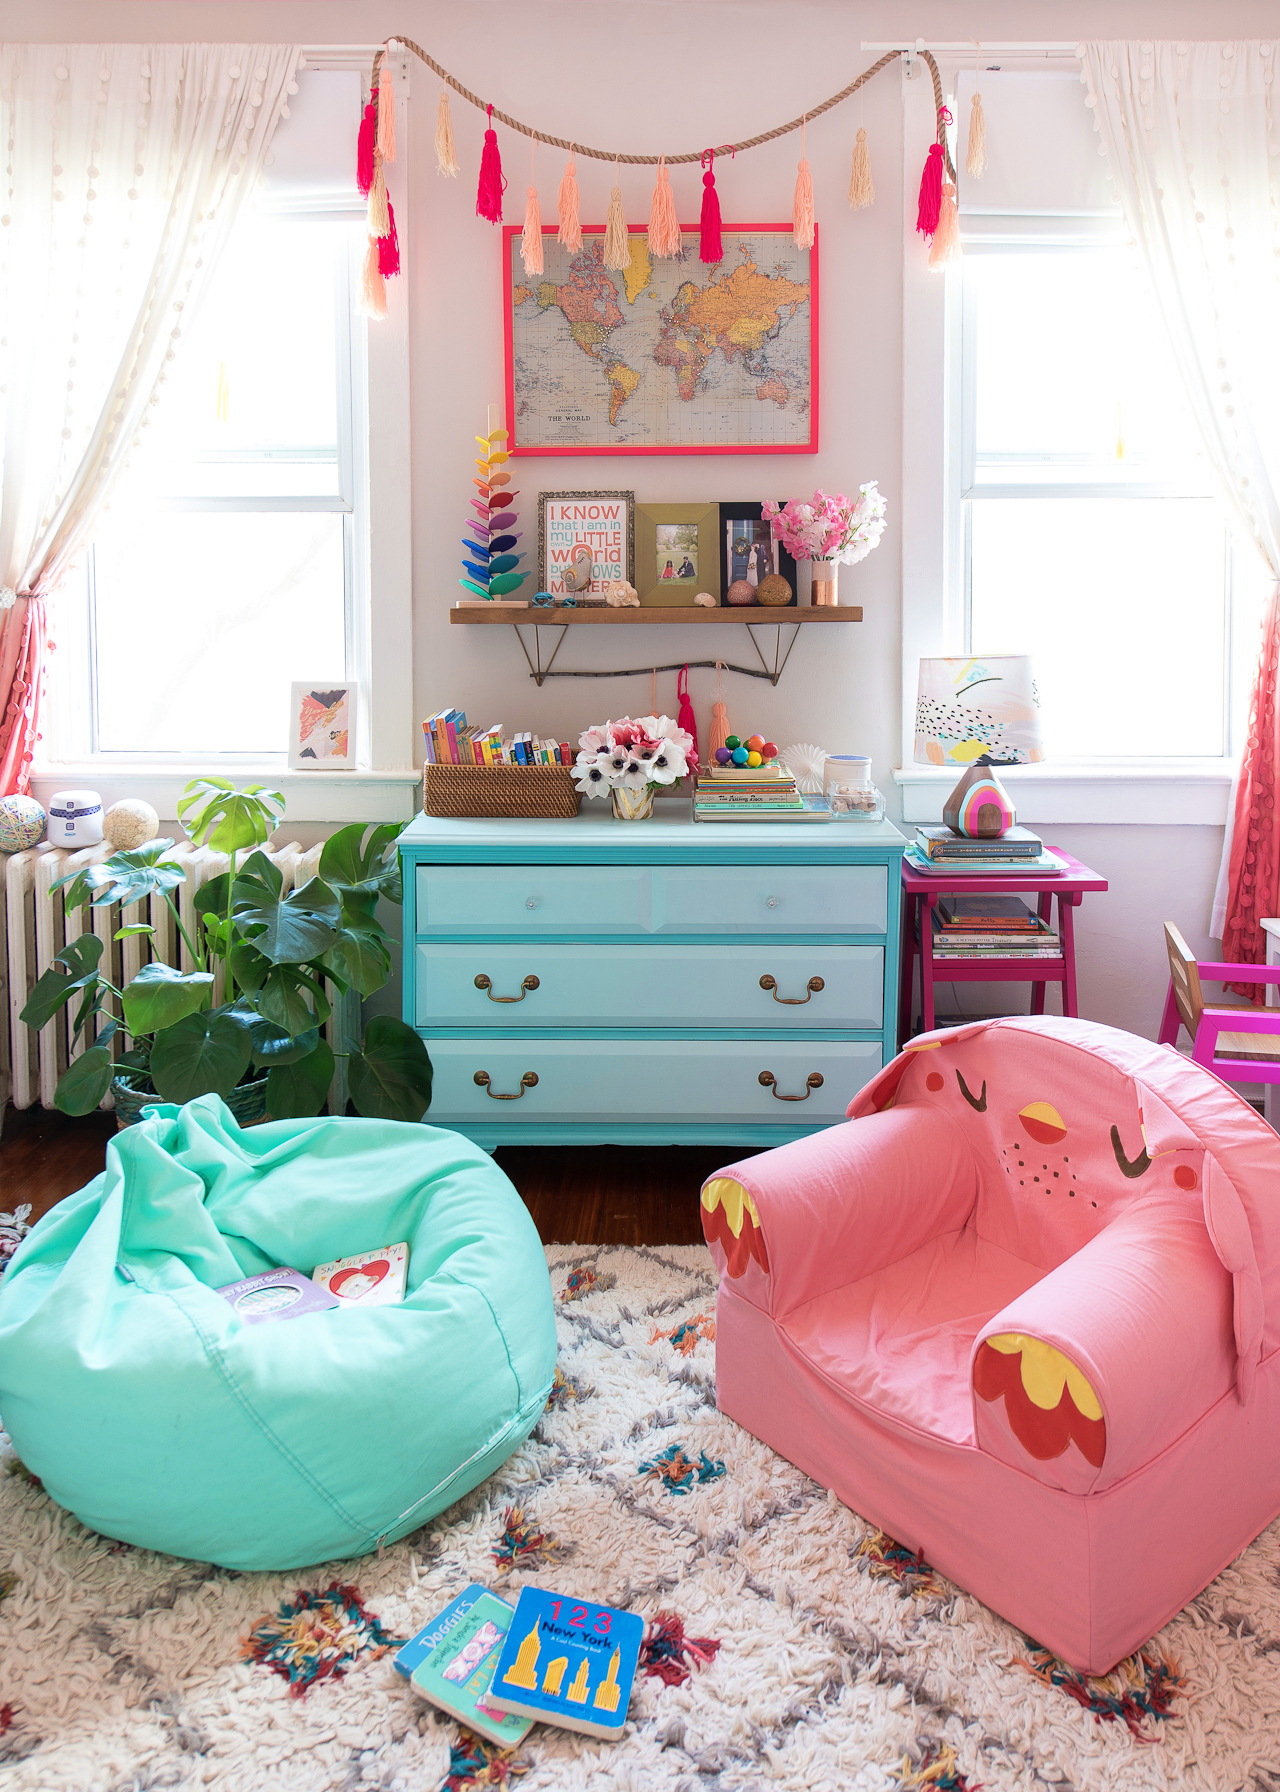
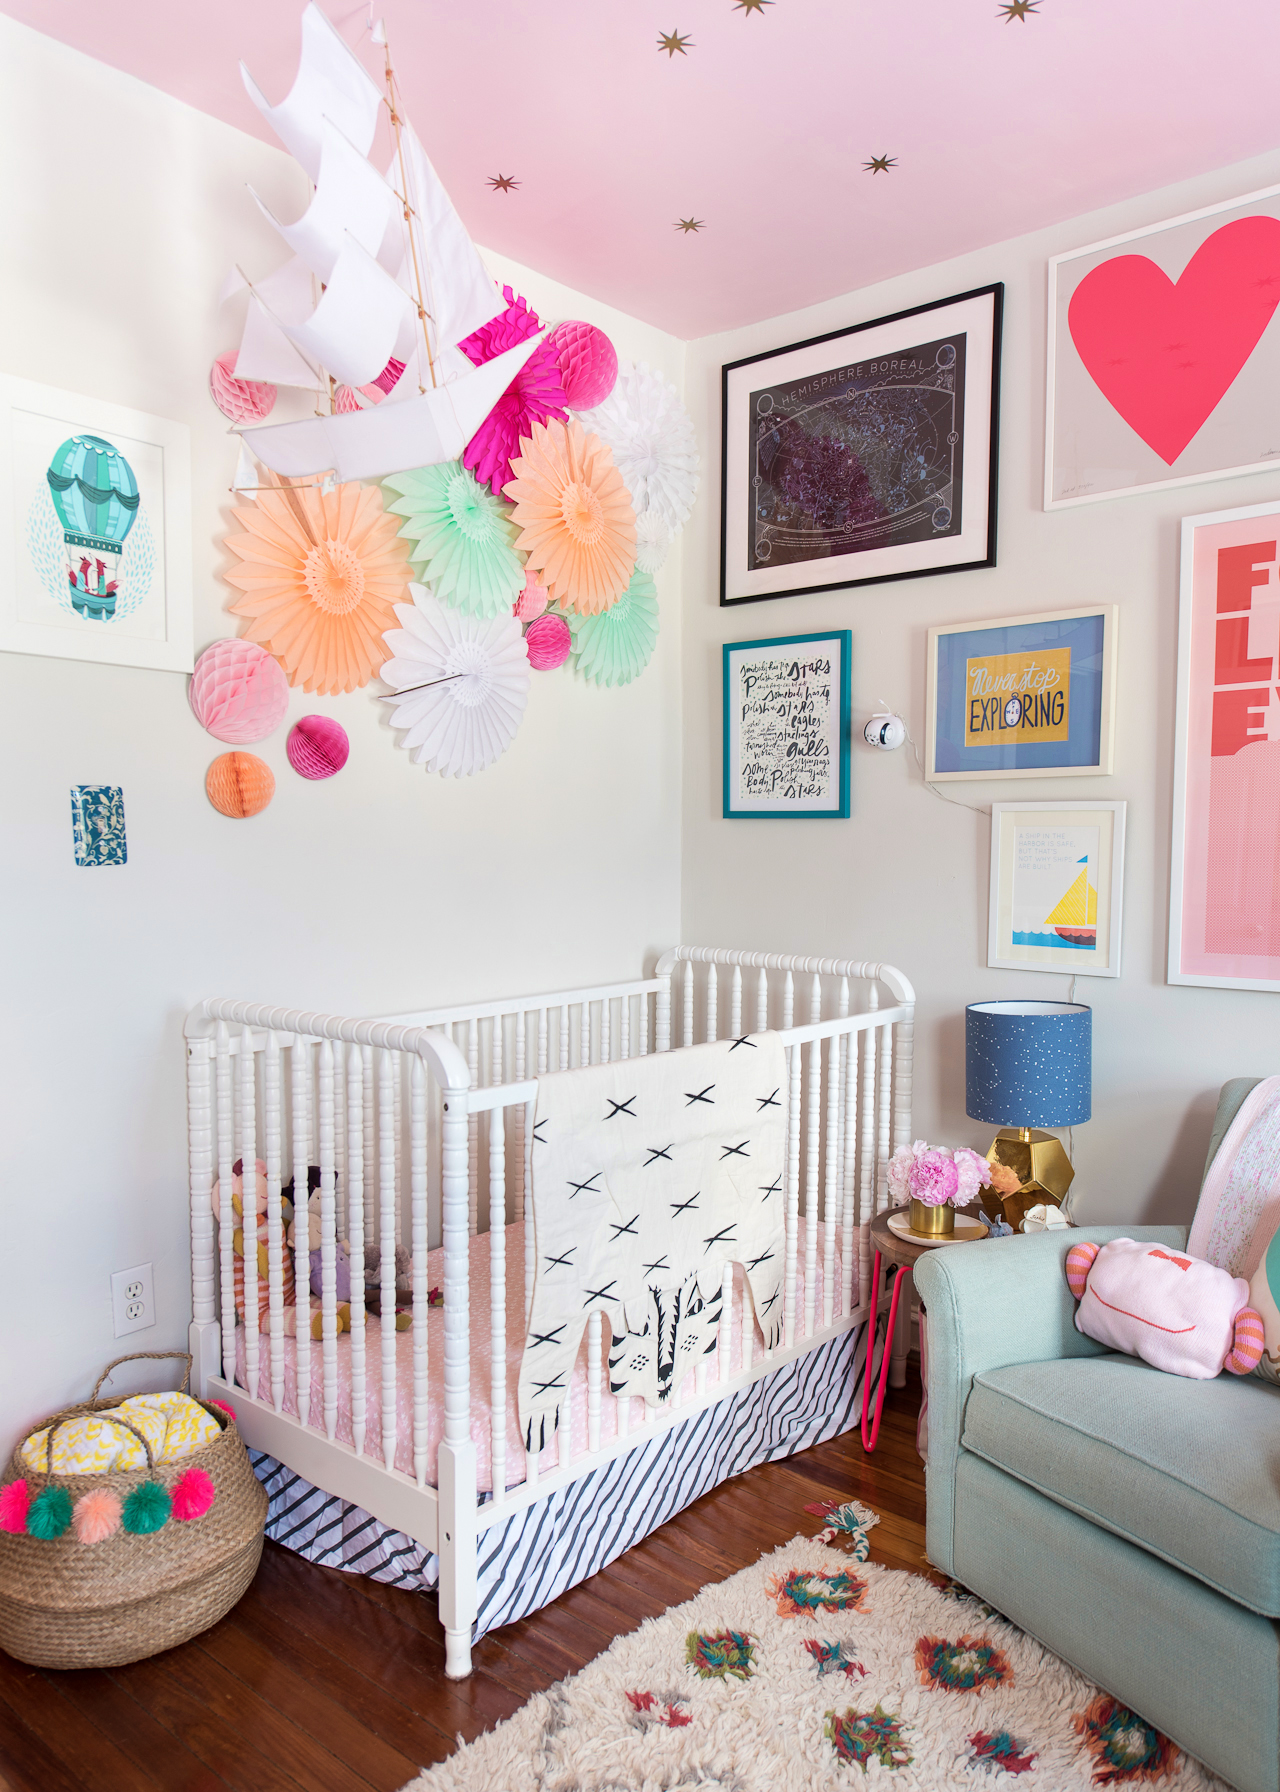
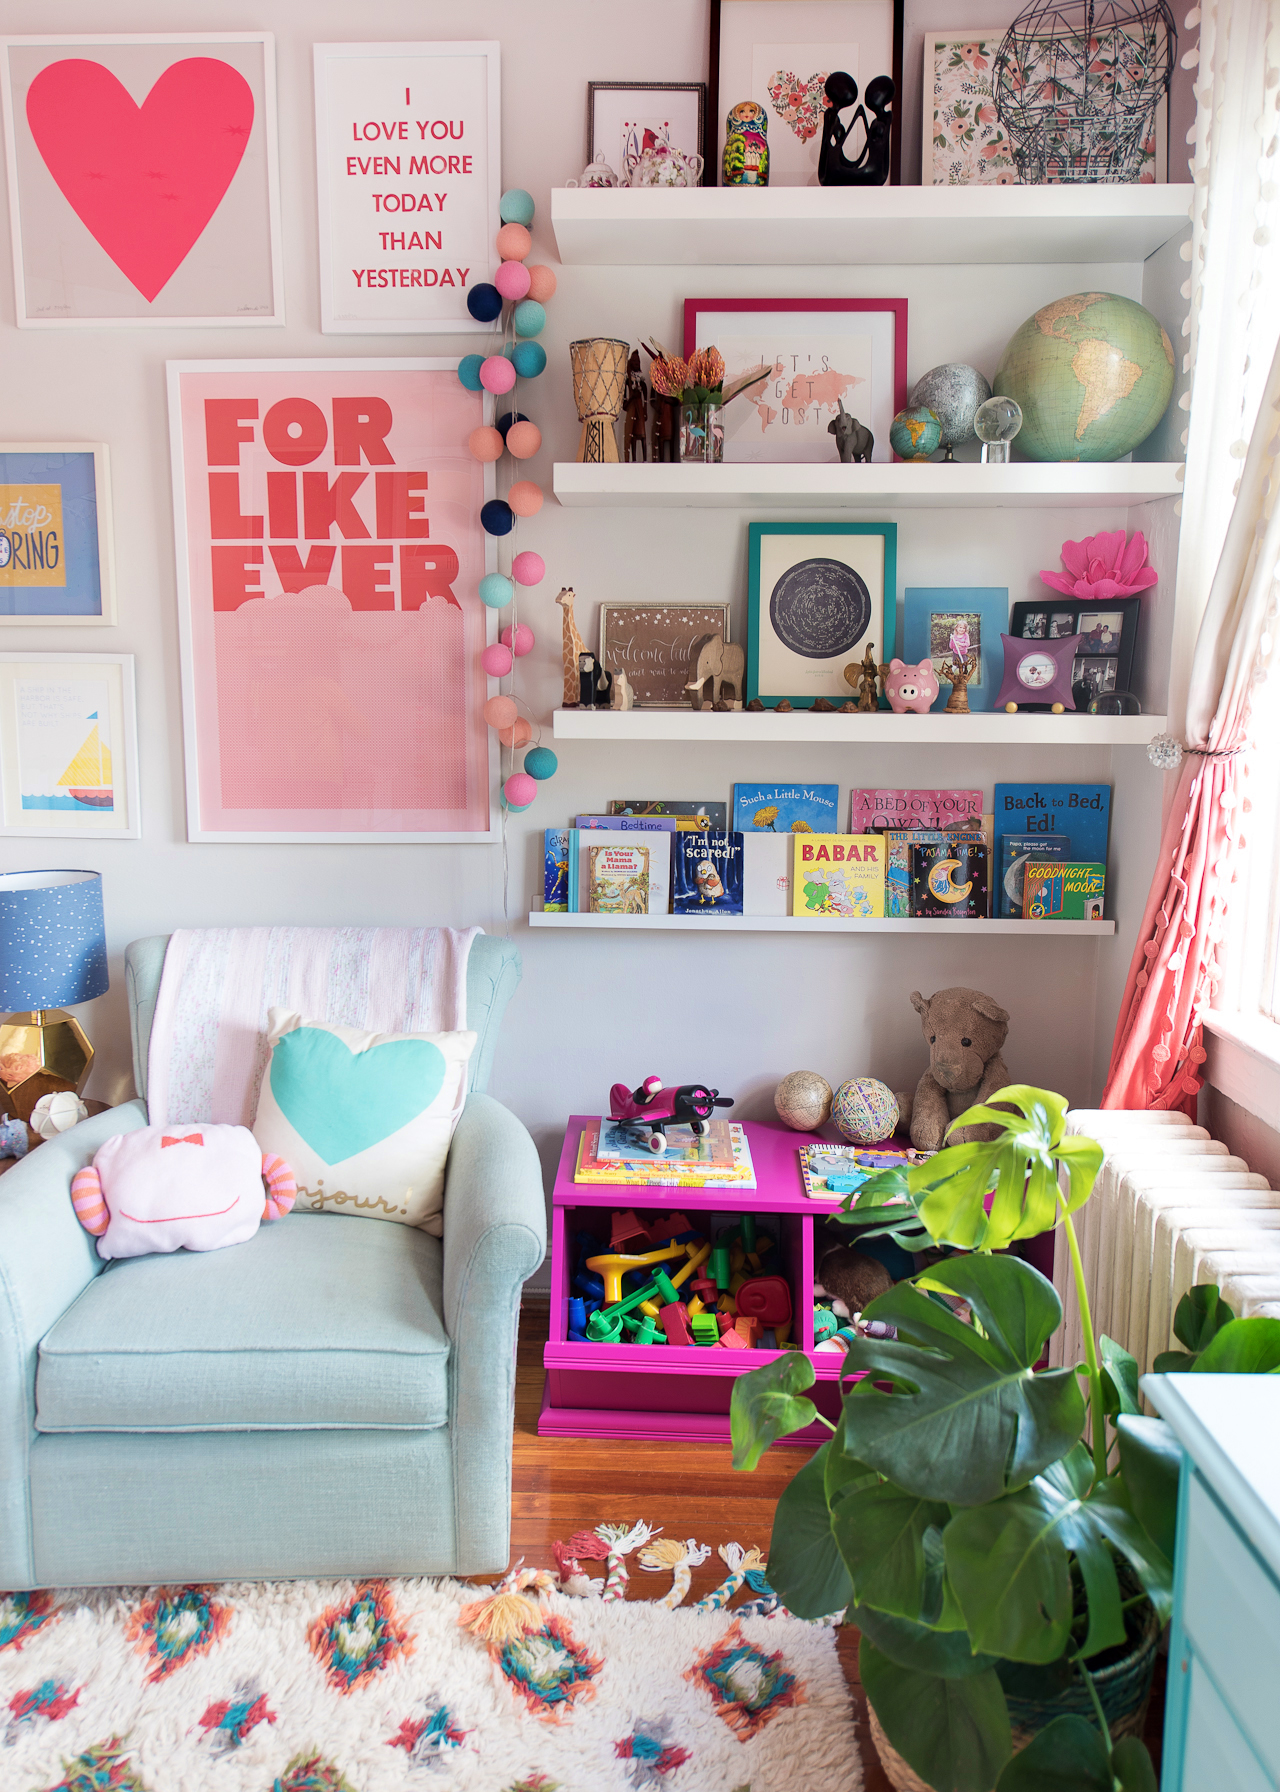
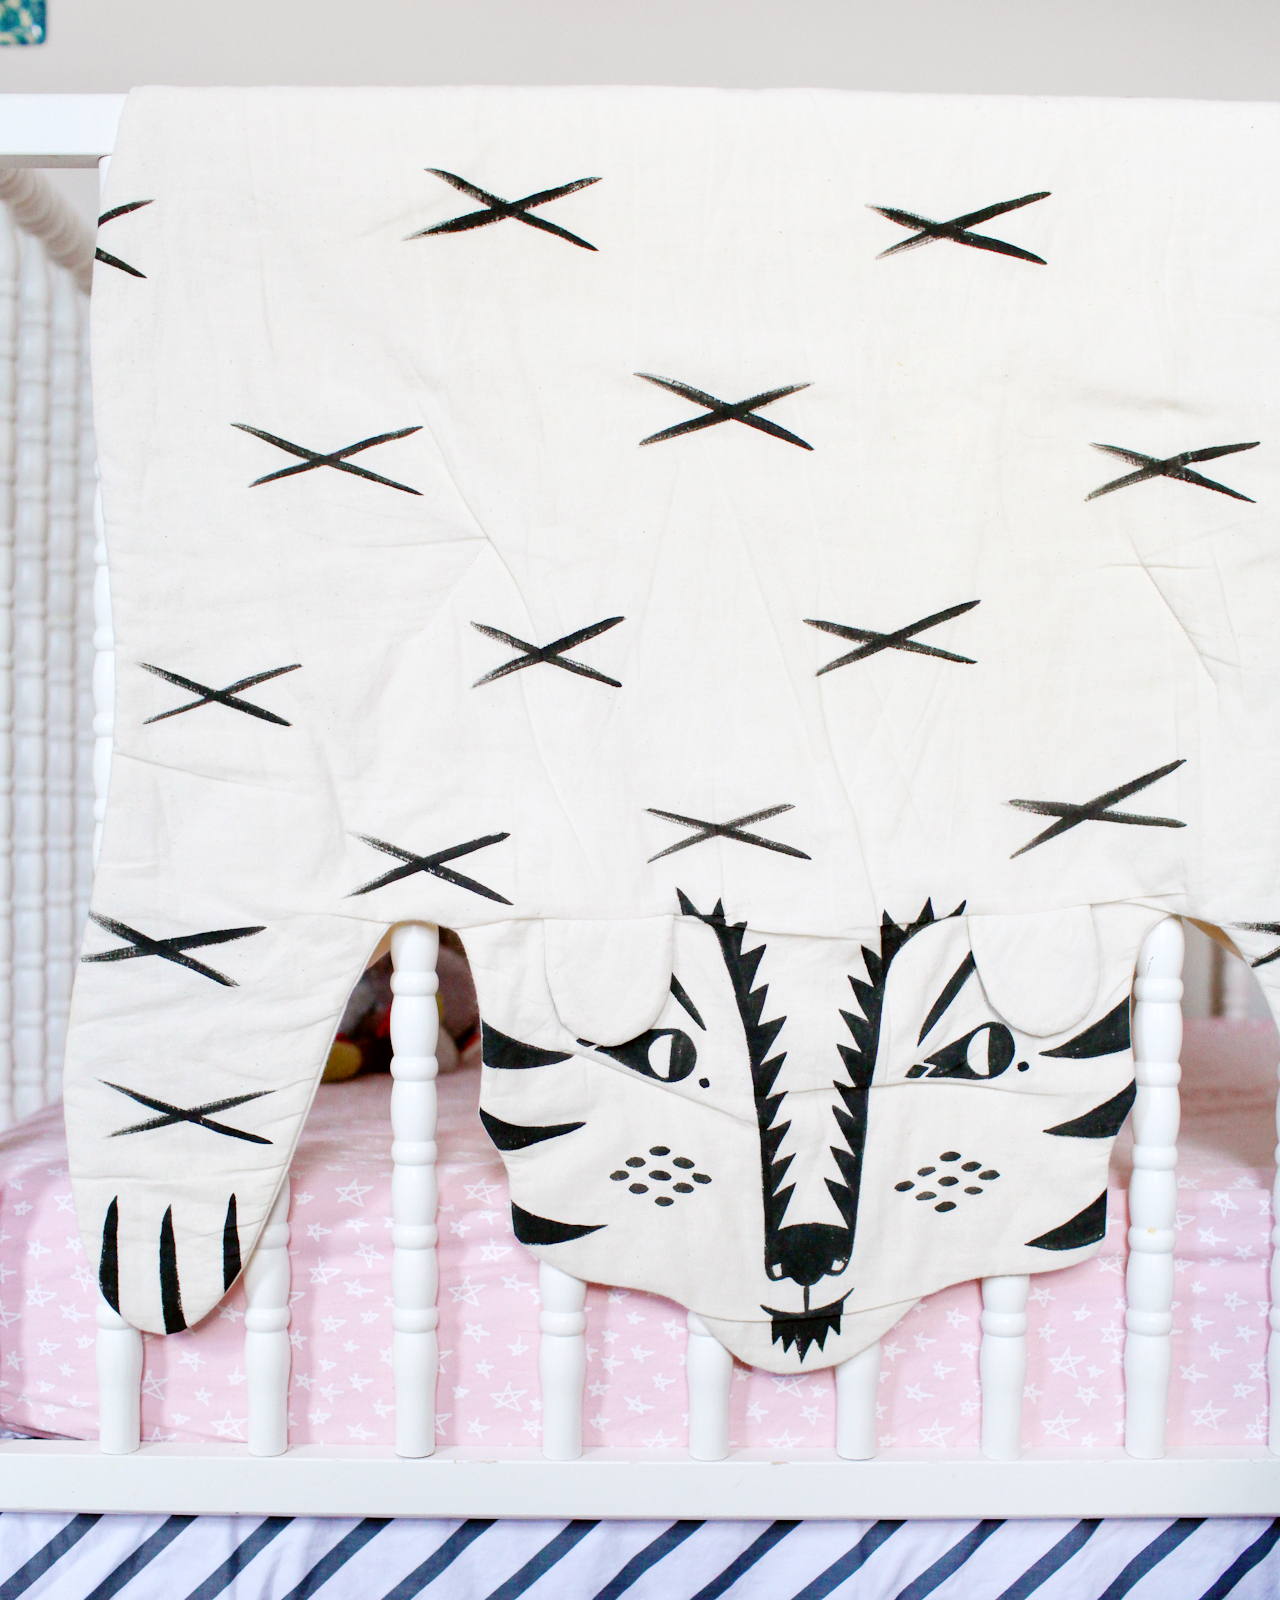
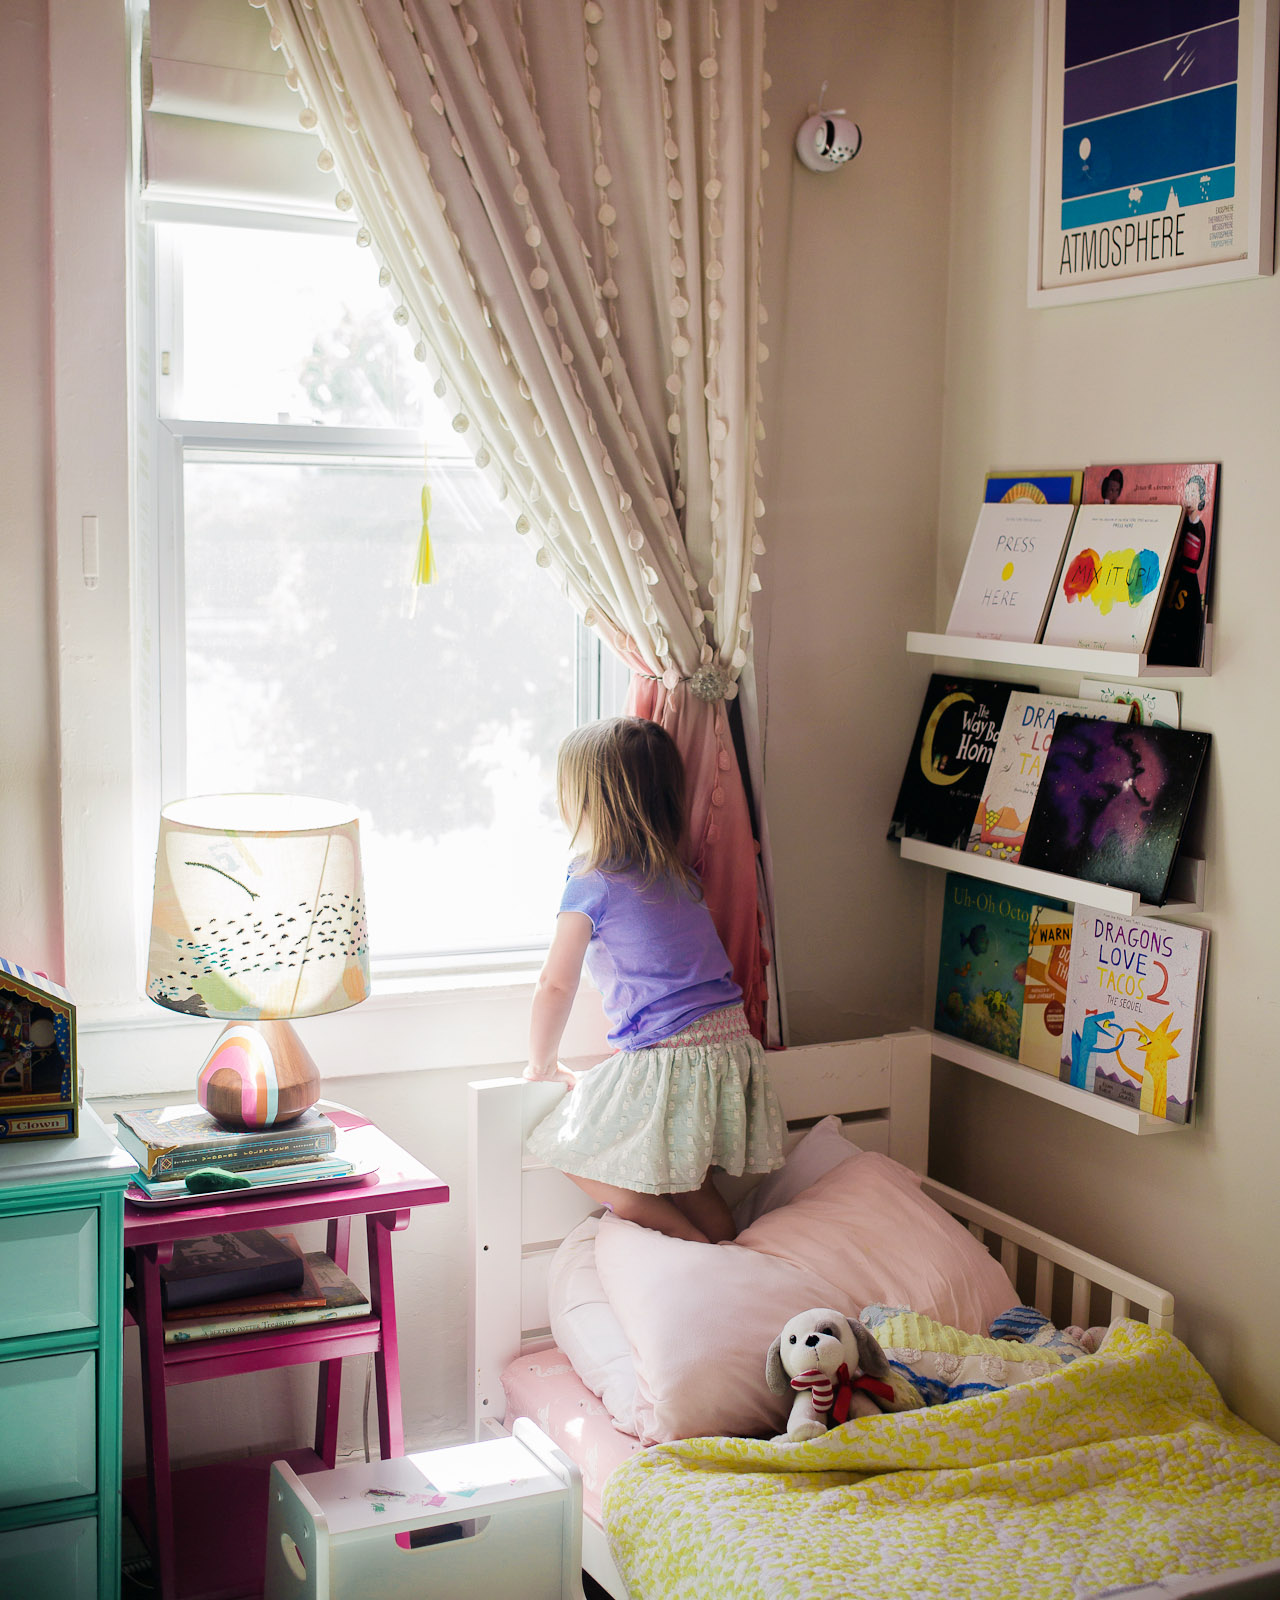
We’re getting ready to make some big changes in my daughters’ shared bedroom (no more toddler beds!), and I realized that I hadn’t shared photos of their existing room yet (oof). So today I’m finally giving you a peek into their colorful shared girls nursery, starting with photos from a couple years ago when Alice was still in a crib. Our home was built in the 1920s and fairly small at 1,200 square feet. We have only two bedrooms, so the girls share the larger bedroom towards the front of the house. It has two large windows and one very small closet, and it’s a tight squeeze – but we make it work!
The dresser between the two windows is what you see when you first walk into the room. It’s actually my husband’s dresser from when he was a kid – just painted a light teal. We lived in the house for just over a year before Alice was born, but this room didn’t really start to come together until Alice moved in, so we started with a crib on the left side of the room and a toddler bed on the right. Here’s the original mood board for Sophie’s nursery back in 2013!
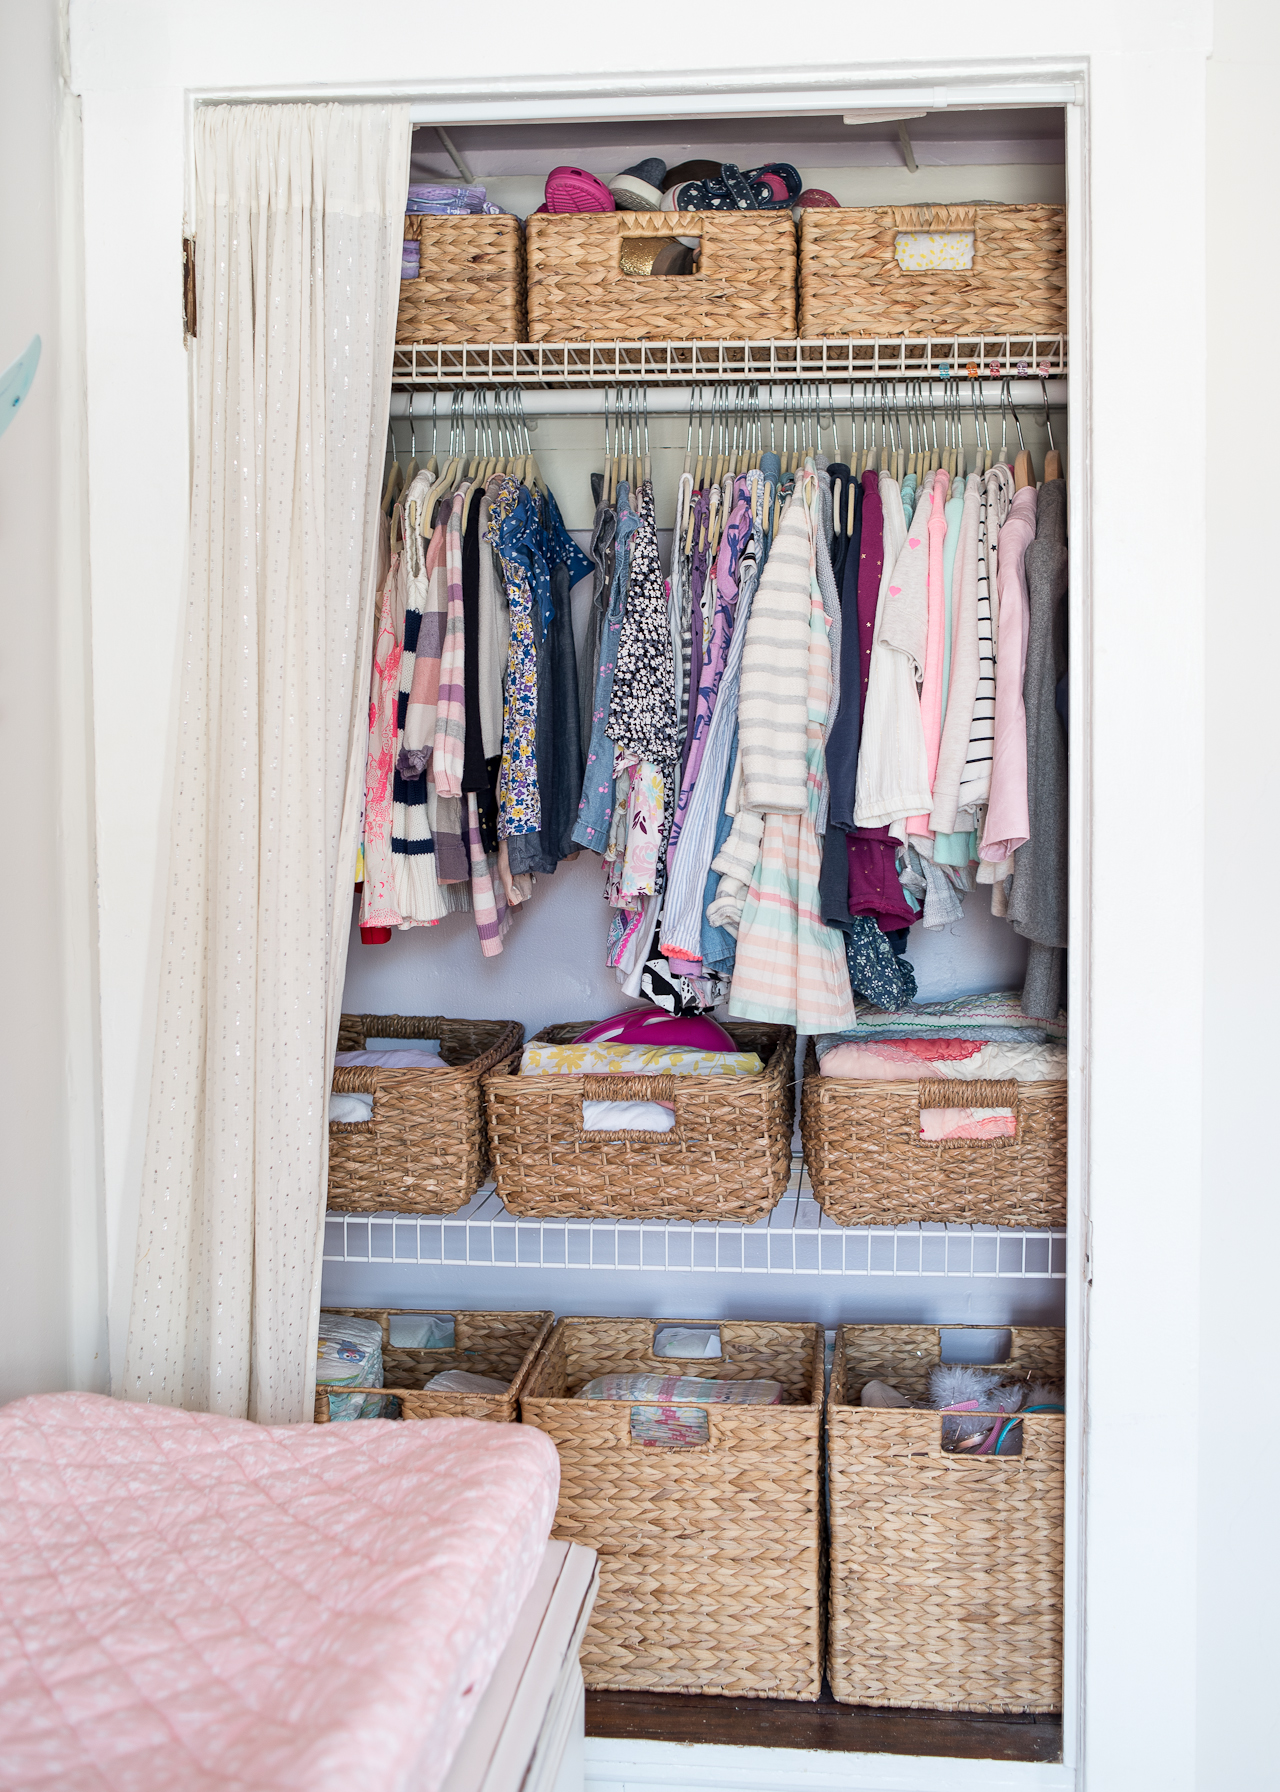
I’m always curious about how folks organize the closets in kid’s rooms – so here’s a peek at our closet! The large baskets on the bottom row used to hold diapers and wipes (and something else that totally escapes my mind), but now hold some extra blankets and a donation bin for clothing they grow out of. The middle row of baskets holds our sheets and waterproof mattress pads, along with some smaller crib blankets and quilts. Then we have clothing that requires hanging, mostly dresses and a few nicer shirts or sweaters. The top baskets used to hold out of season shoes, Alice’s old crib bumper, and some extra nighttime diapers, but now that we’re out of diapers that basket is used for more out of season shoes (essentially one basket for each girl). The crib bumper is now in storage until I decide what to do with it, so that basket now holds knee pads, goggles, and other assorted equipment. We store out of season clothing in bins under Sophie’s bed (previously under the crib), we have a few costumes hanging on the back of their door, and everything else (t-shirts, pants, PJs, skirts, tights, socks, undies) is folded and stored in the dressers Marie Kondo style. At some point we’ll probably have to redo our system once the girls’ dresses get too long to fit in the current space, but for now it works!
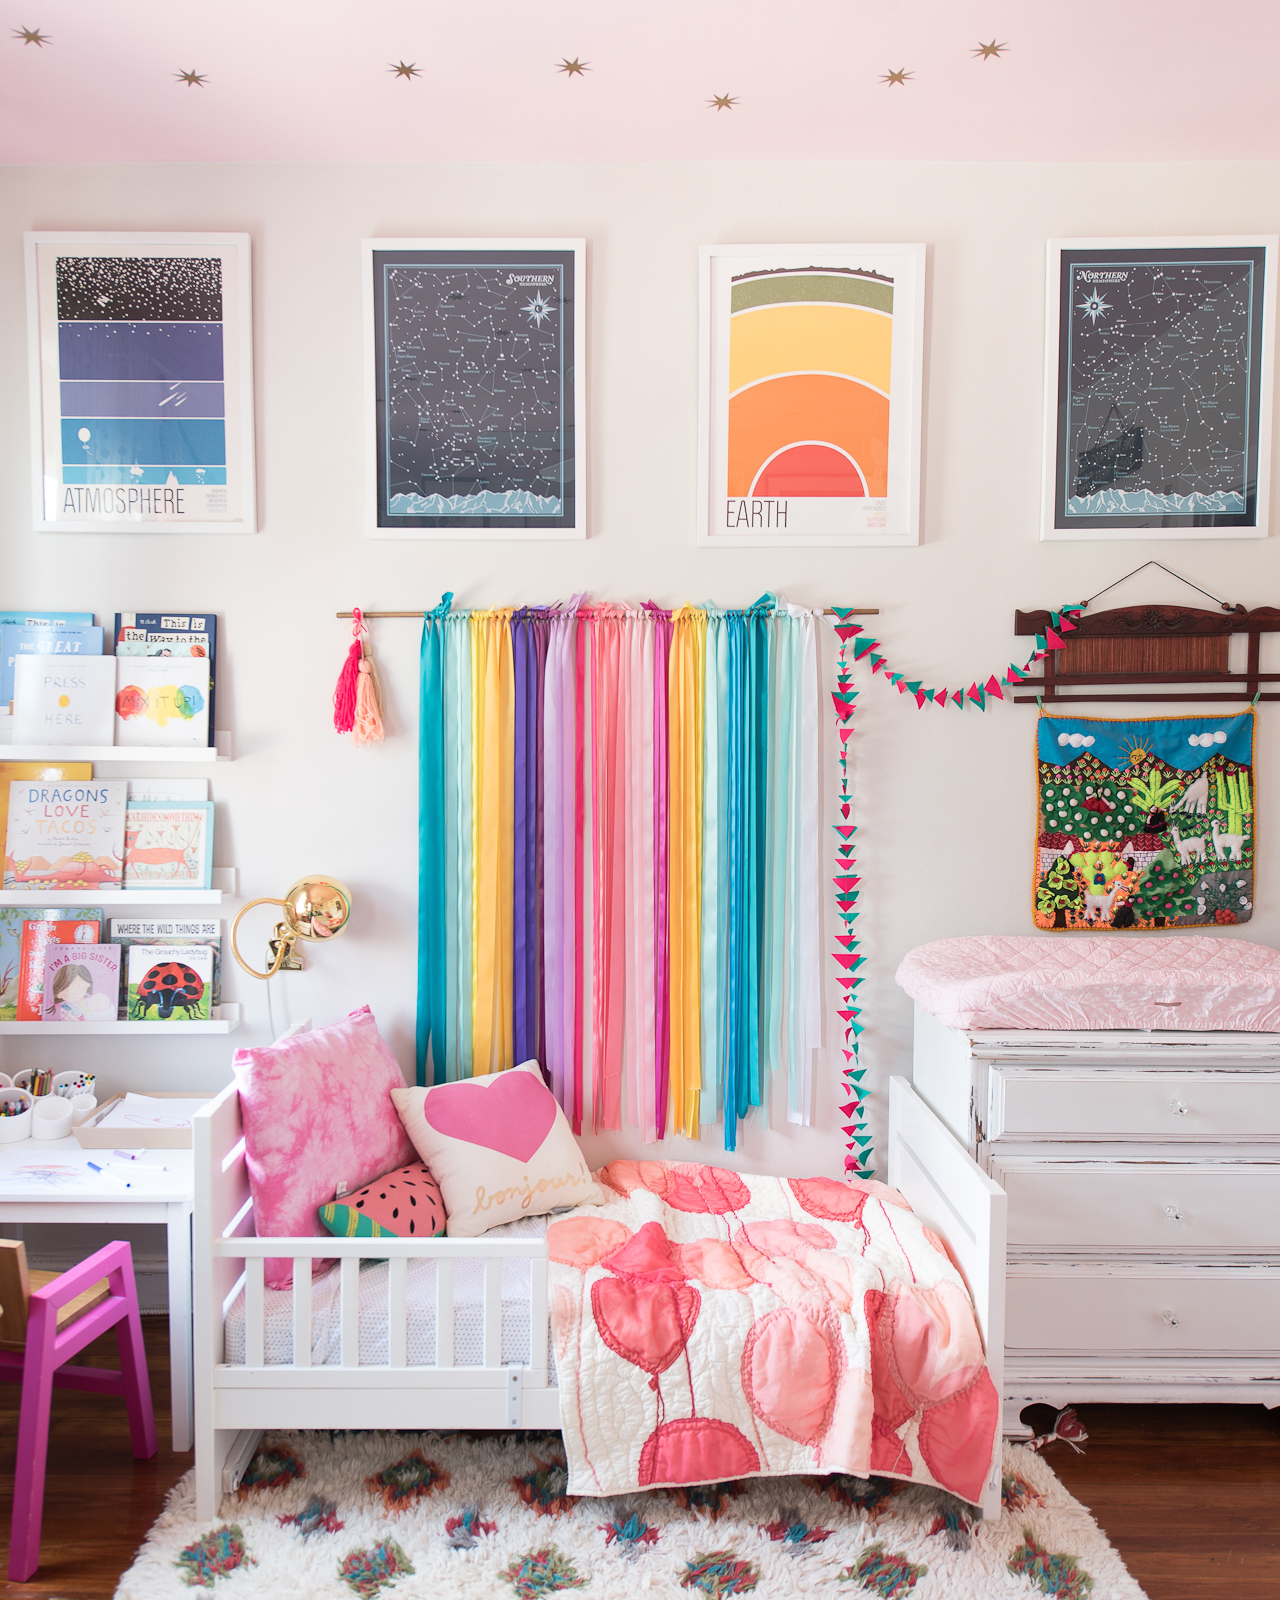
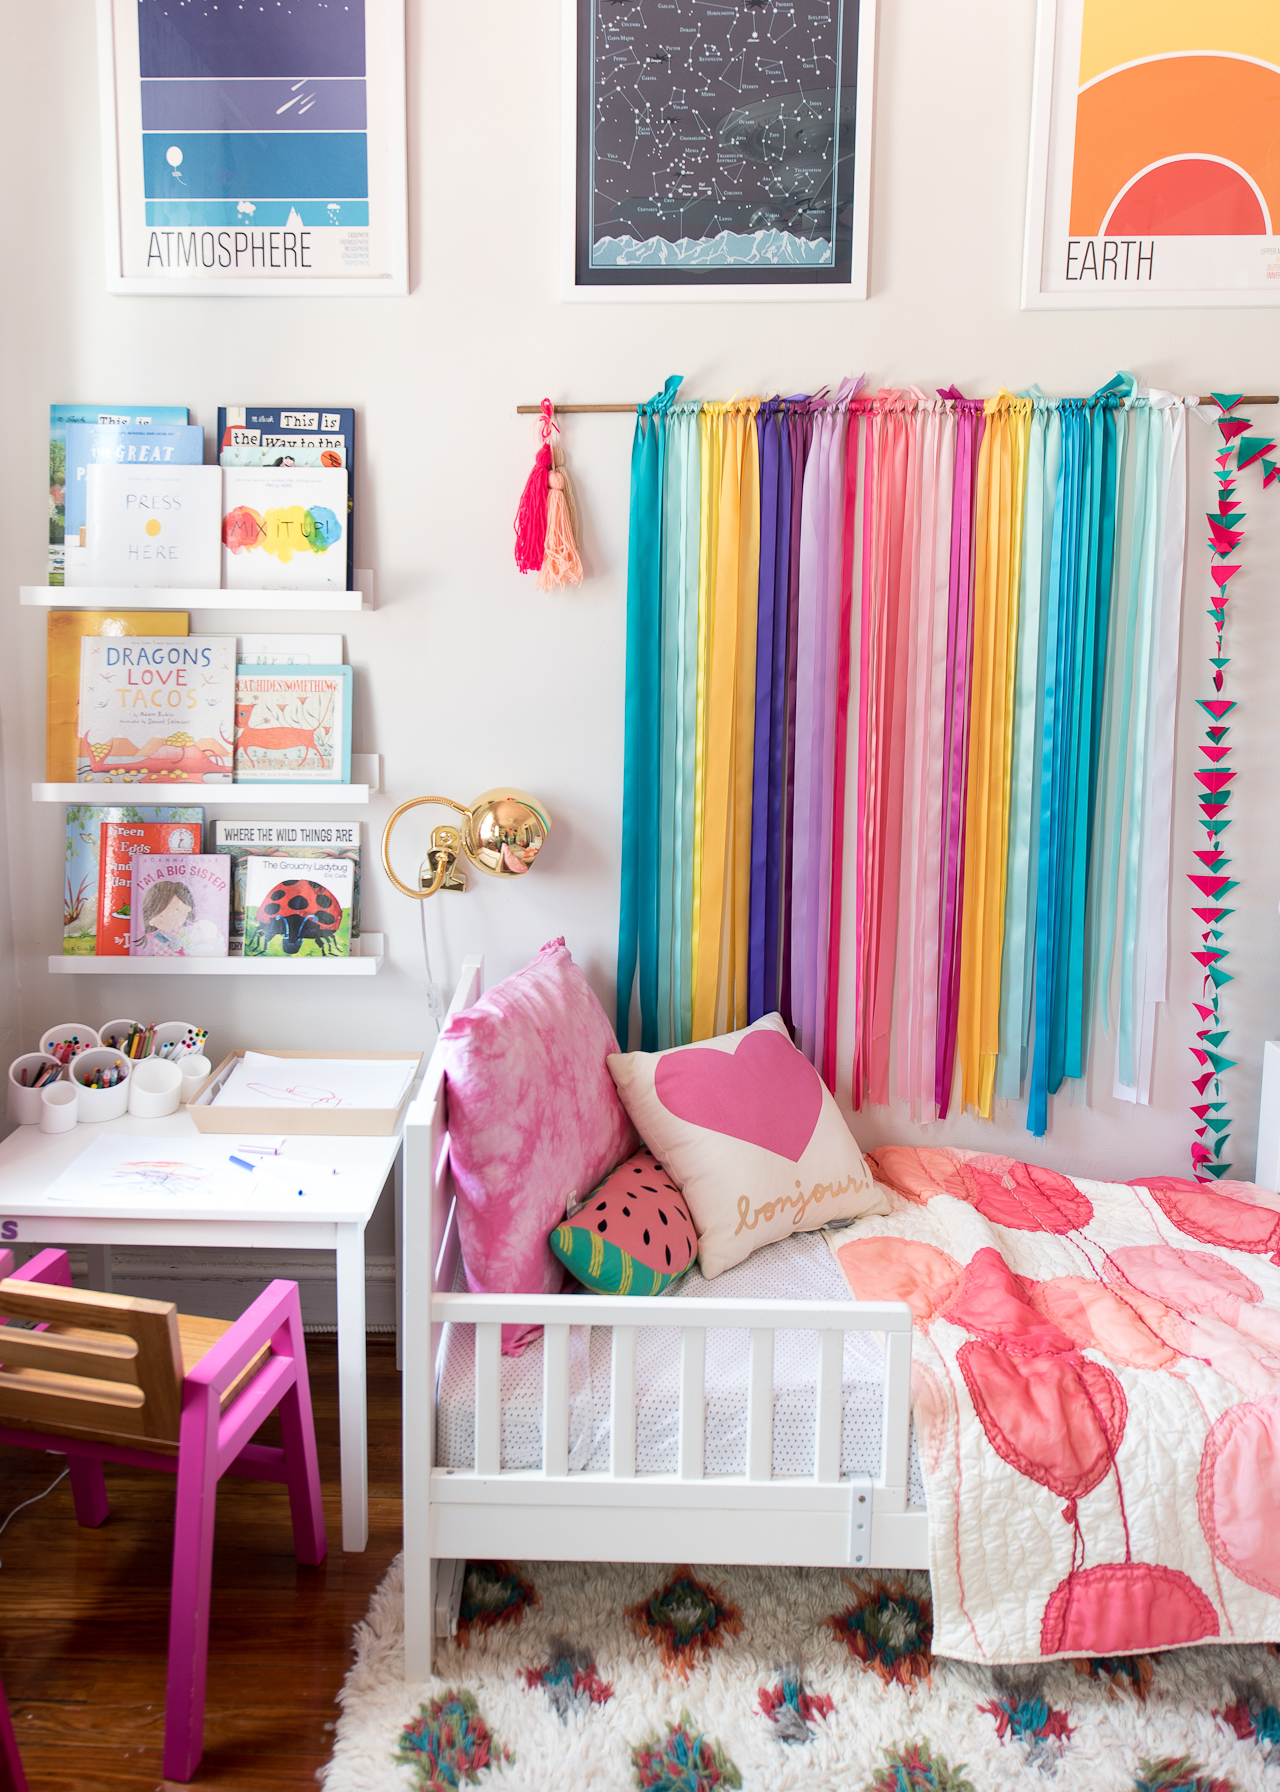
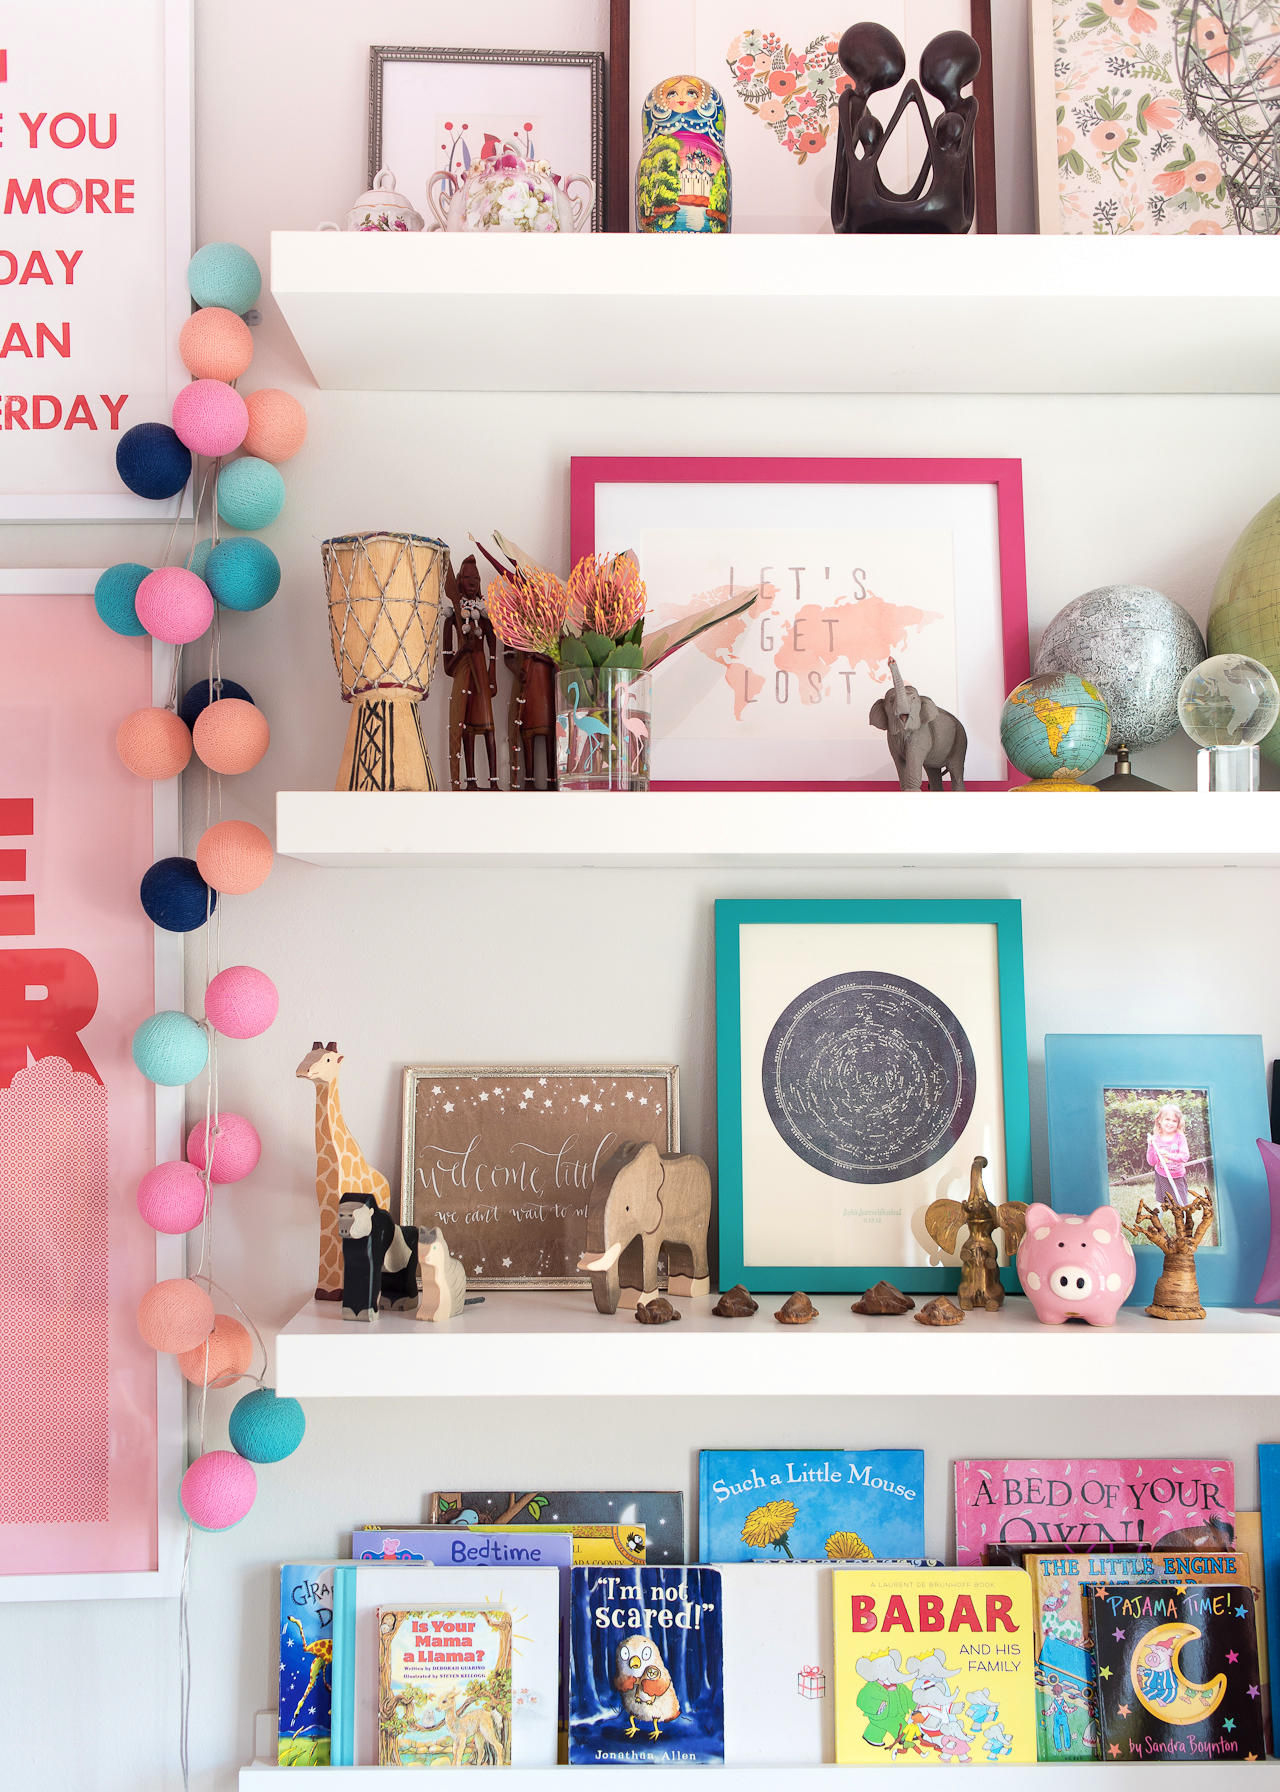
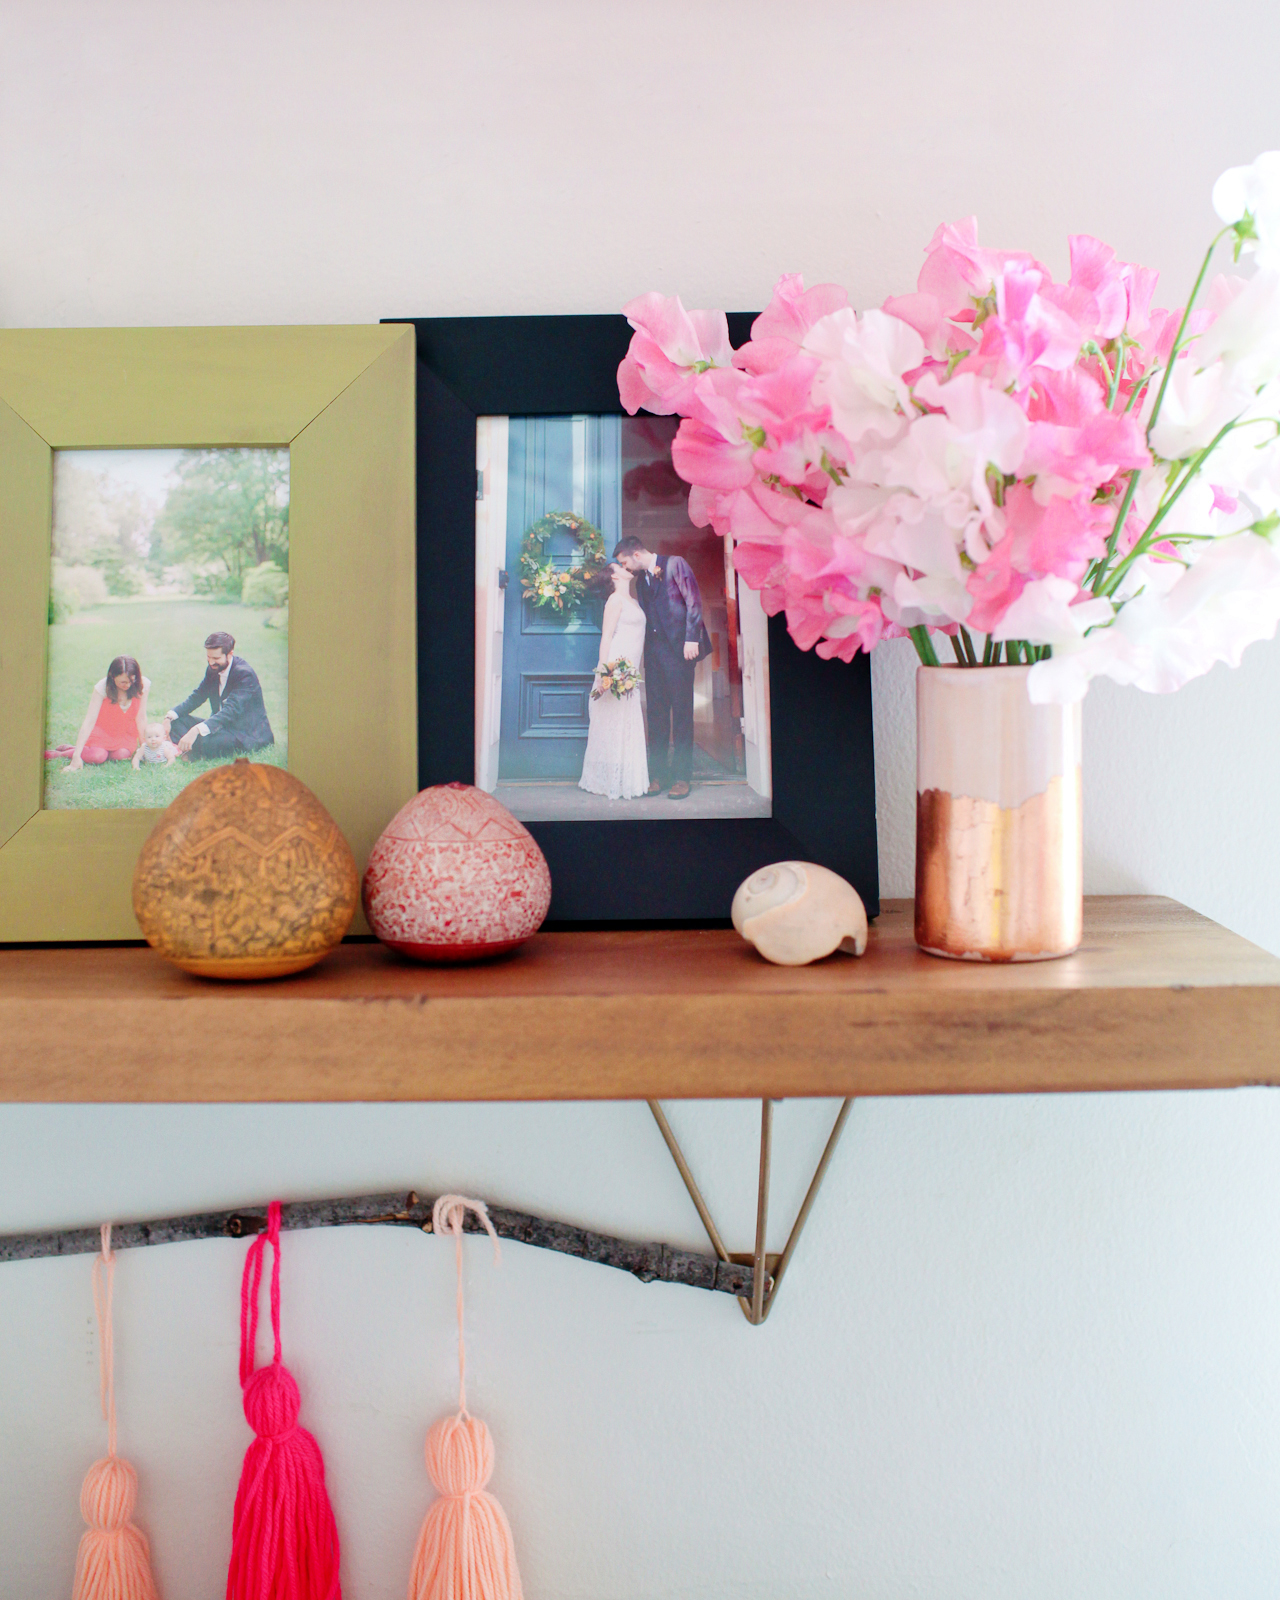
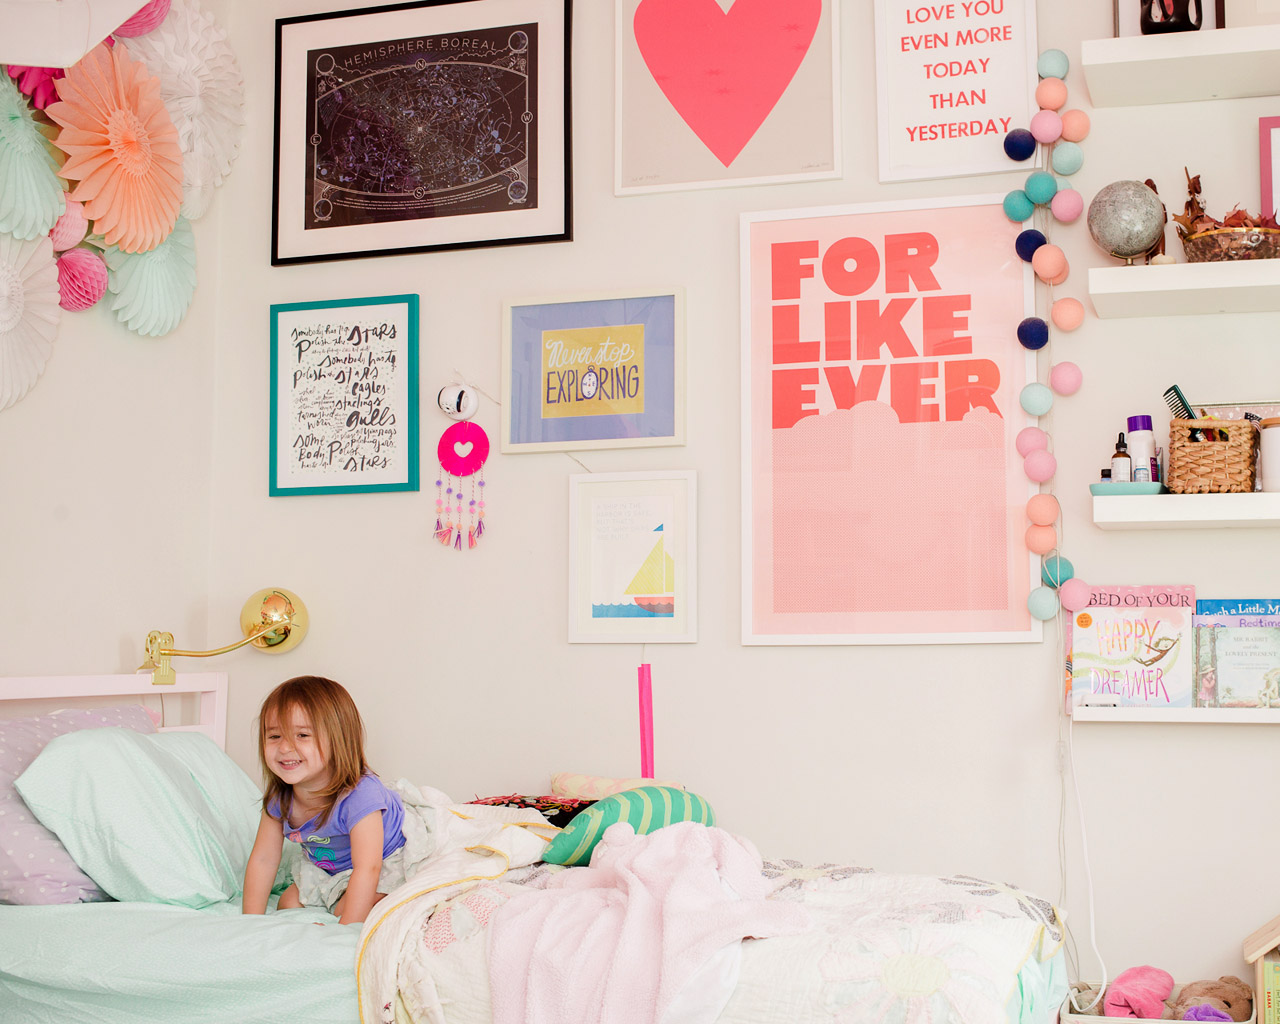
My husband and I love to travel and have been all over the world, so we wanted to pass that love along to our girls from the very beginning. The shelves contain a mix of globes, some travel trinkets, family photos, and art prints.
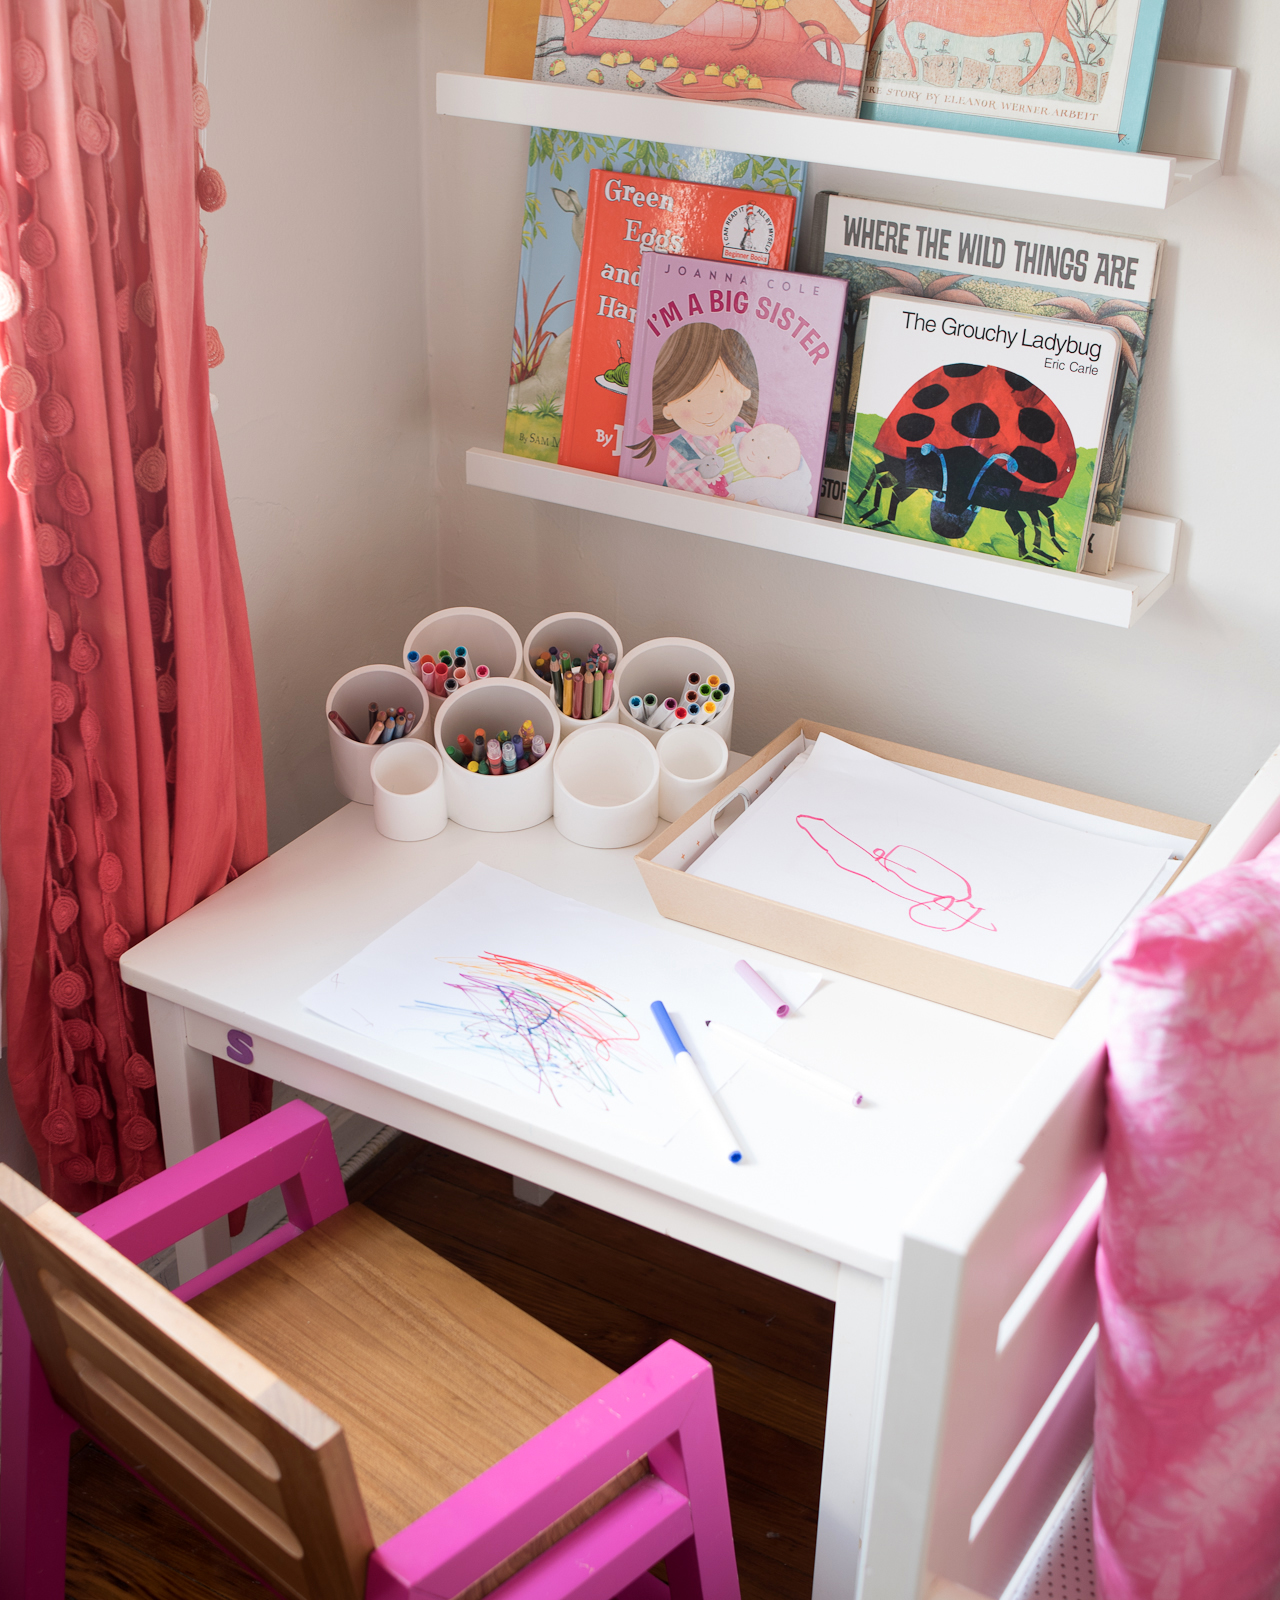
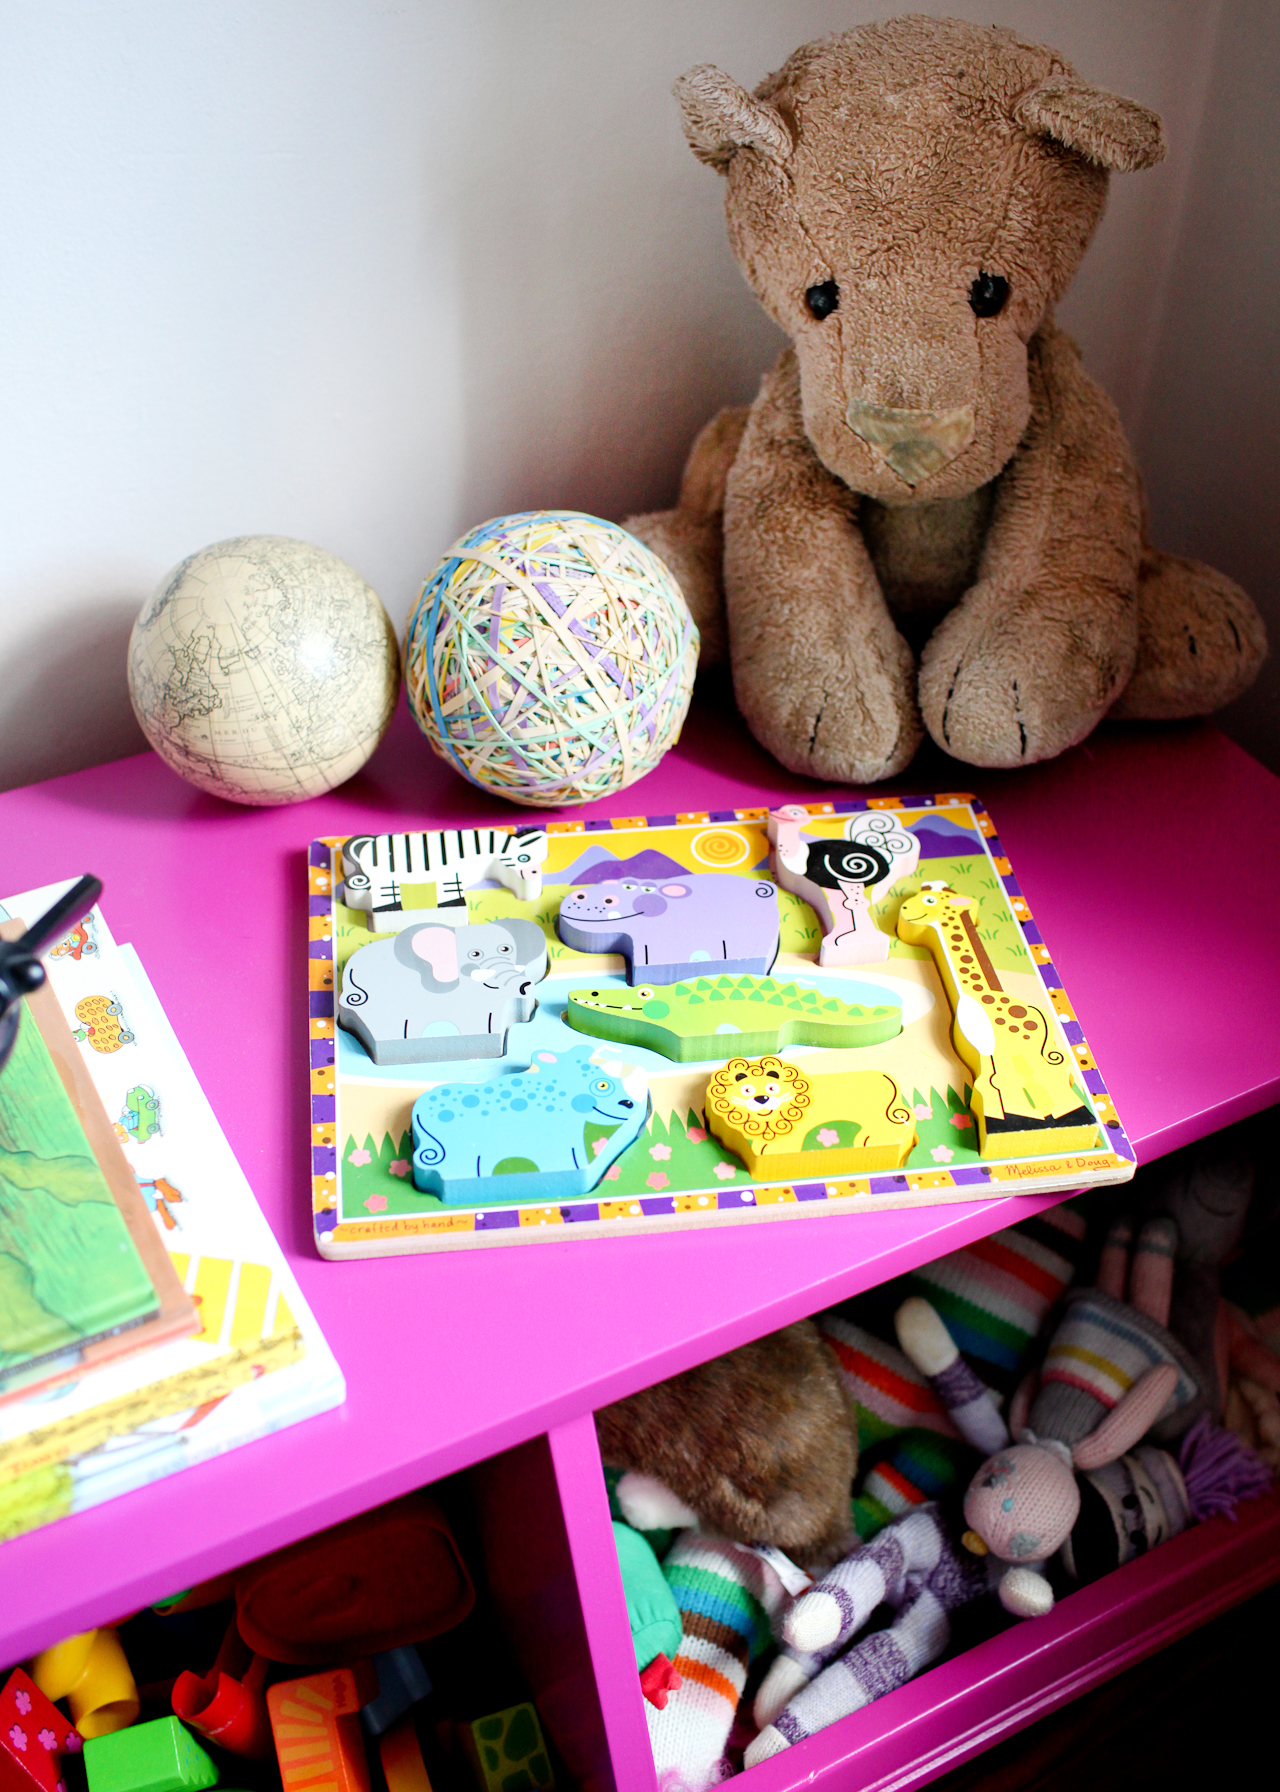
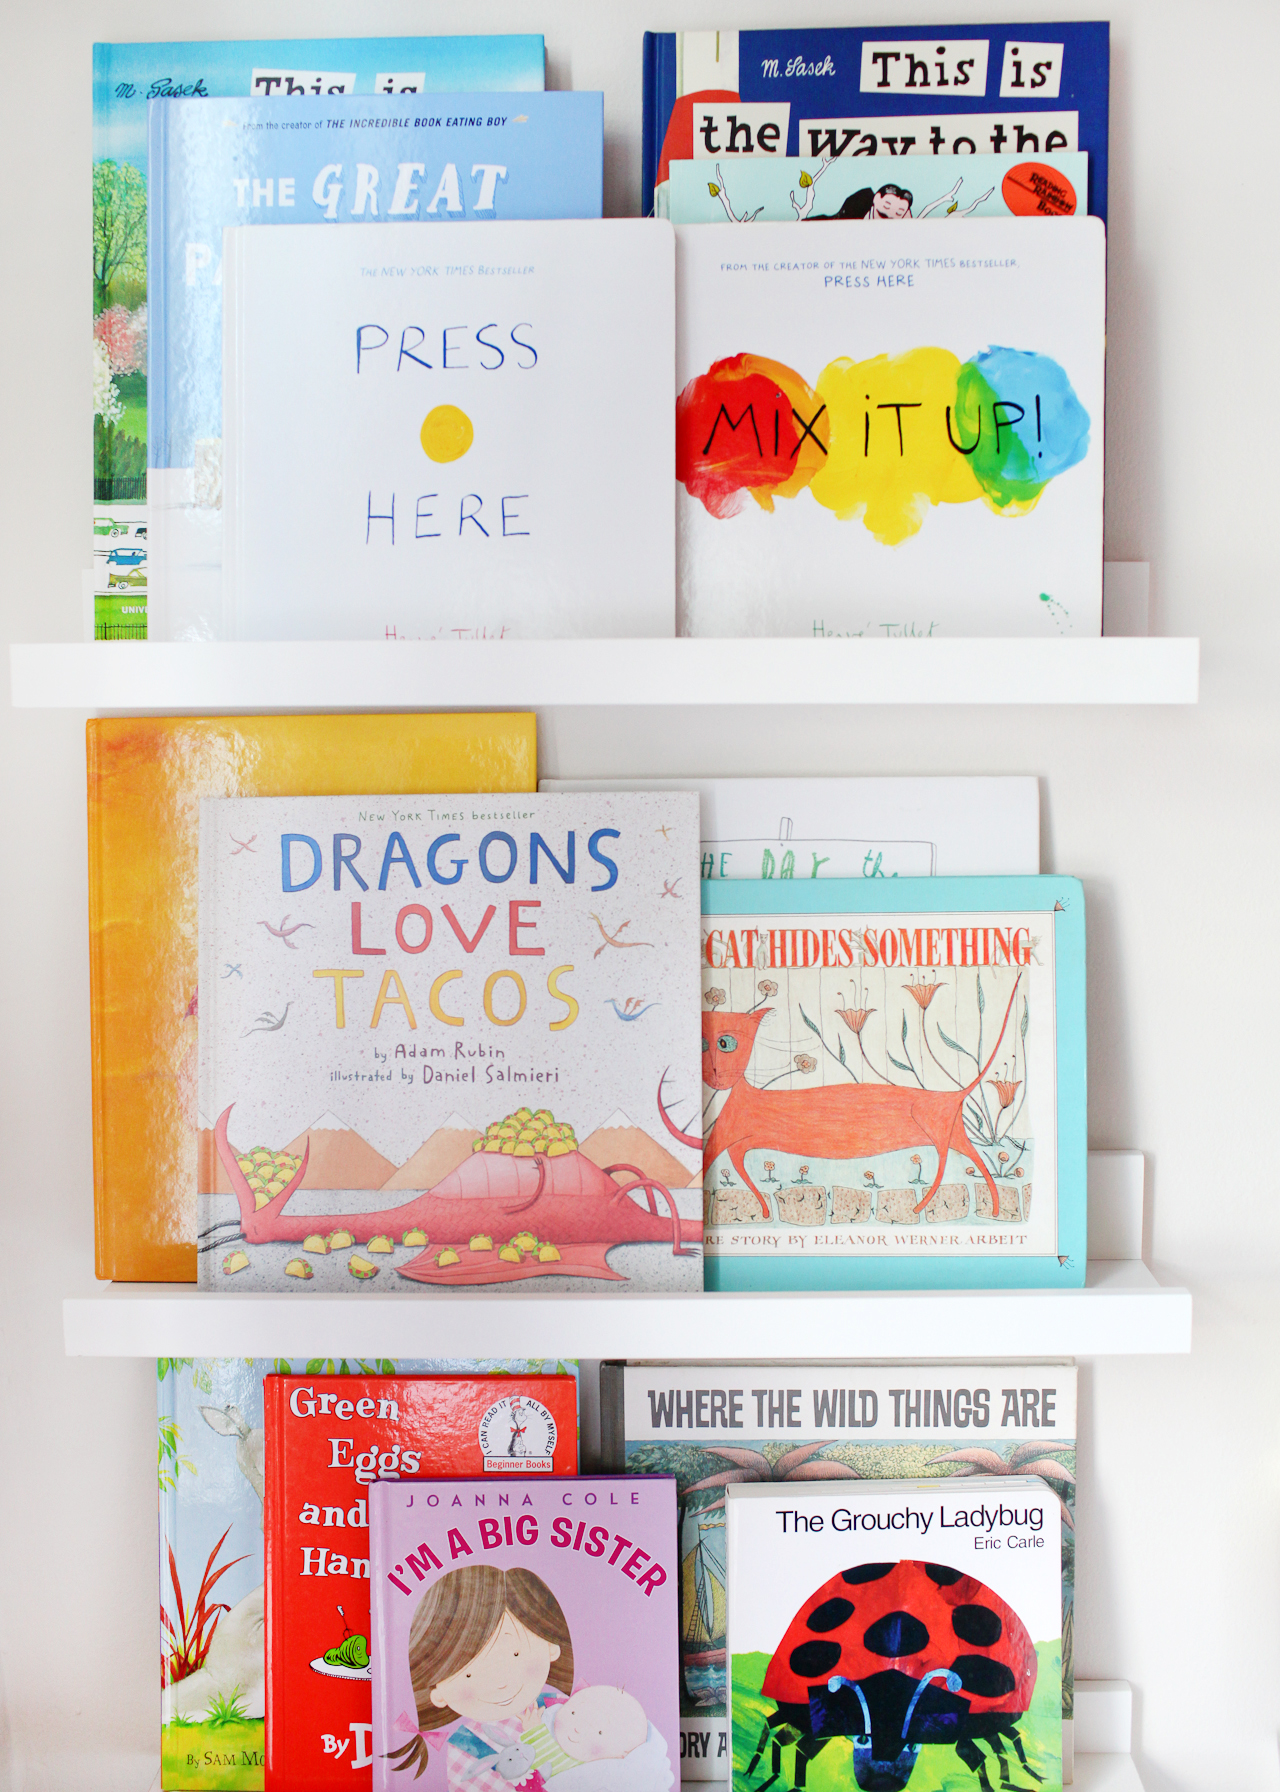
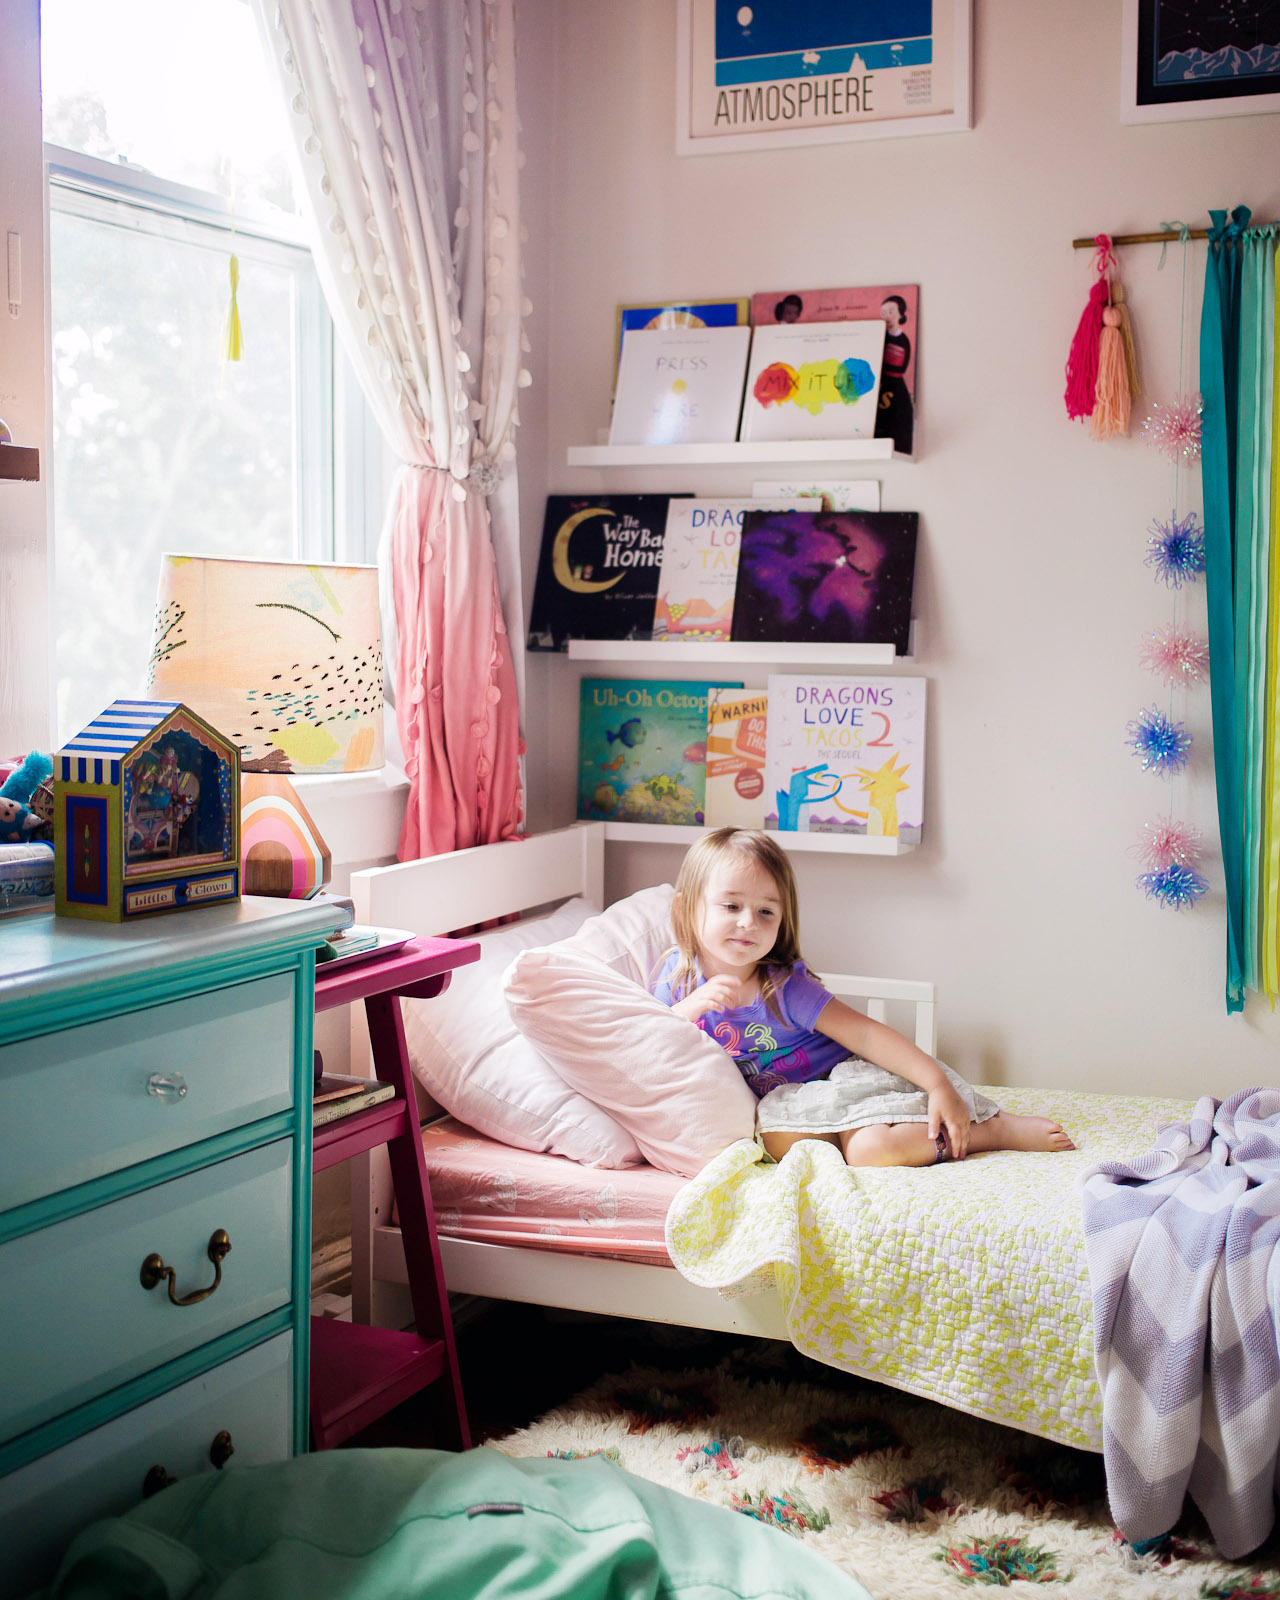
The girls have a separate play area downstairs, so we don’t keep many toys in the room – mostly just books, stuffed animals, and dolls. We moved the markers and drawing supplies downstairs once Sophie started preschool, so there’s now another little book cart in this corner.
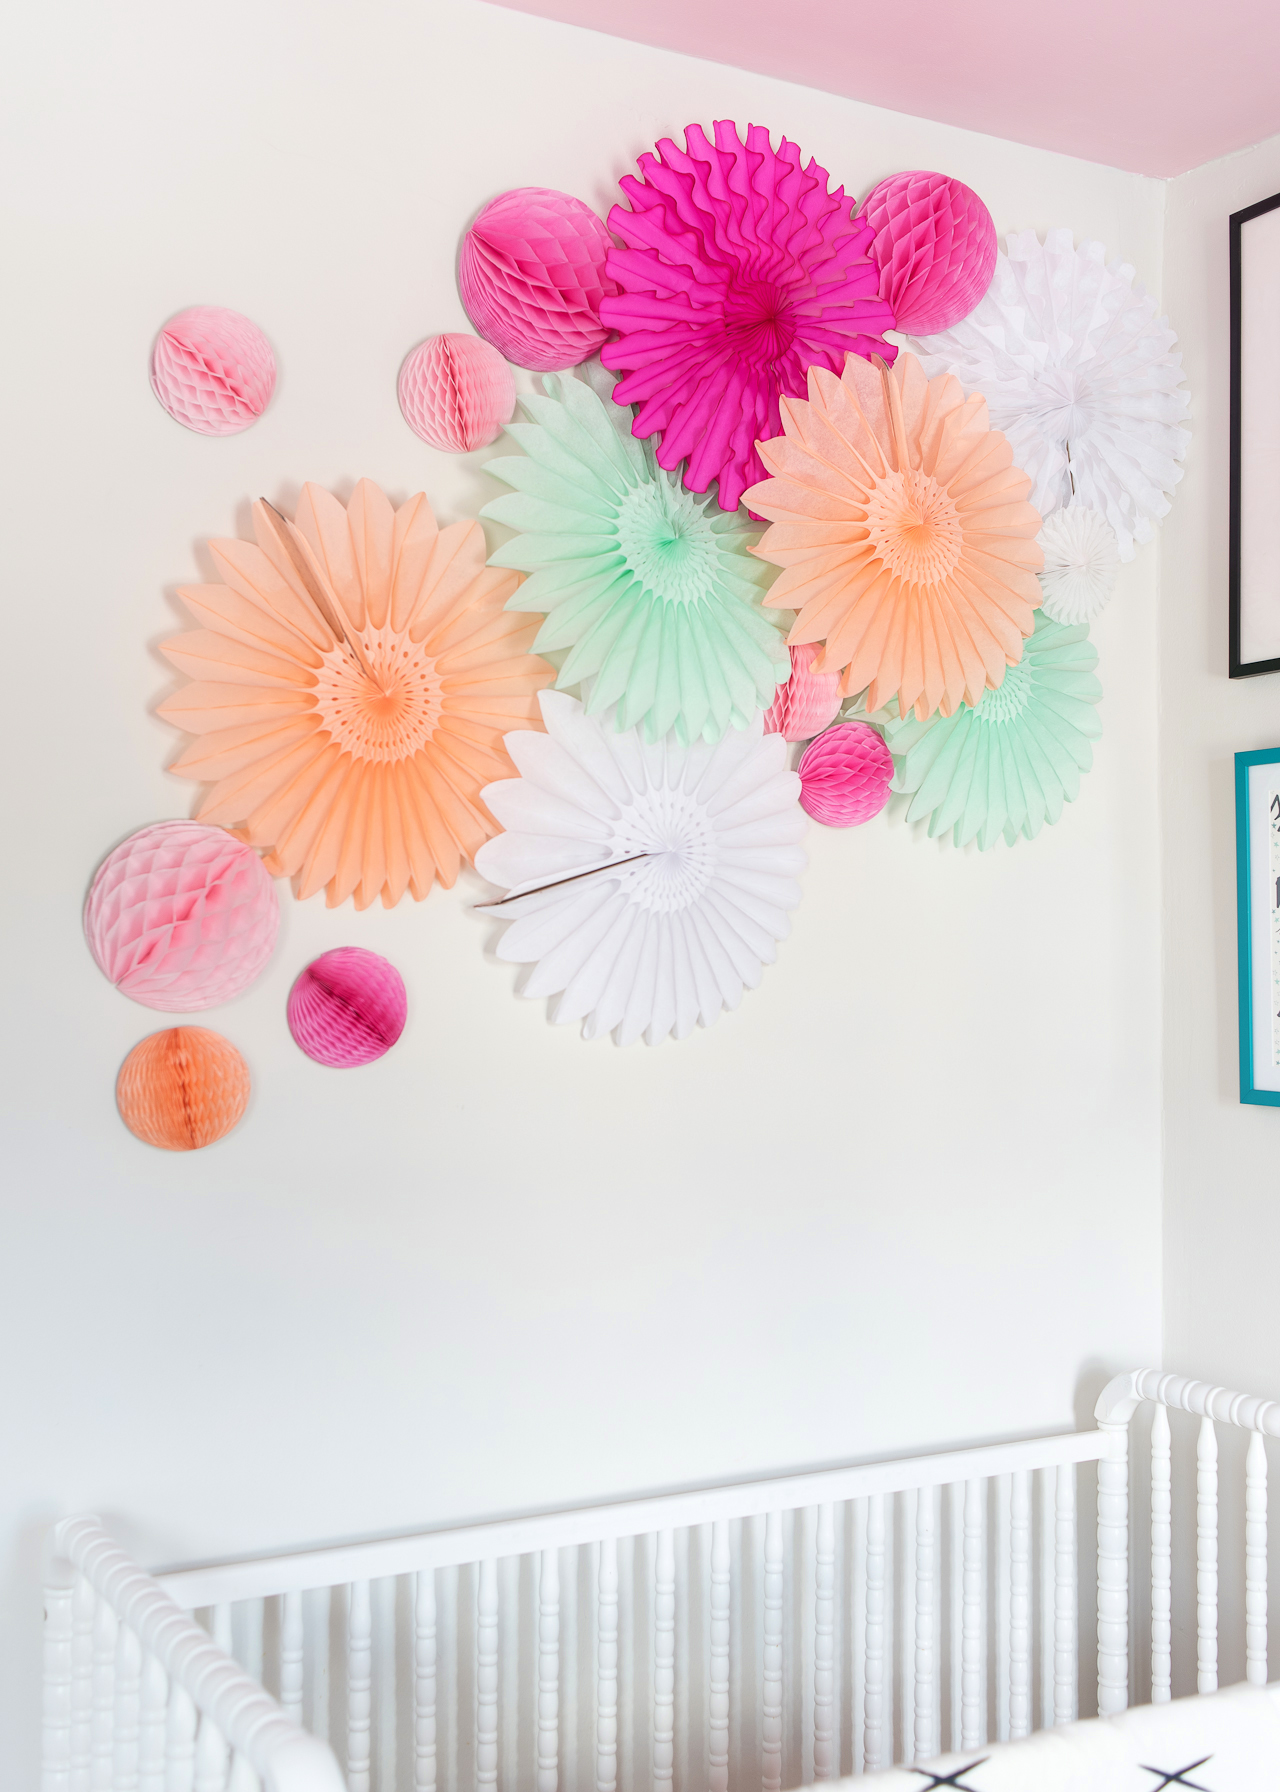
I wanted something above the crib that would provide color and visual interest – but would be lightweight enough that I didn’t have to worry about it falling down on the crib. Tissue paper fans to the rescue! I put them up using removable 3M velcro strips, and they’ve stayed up for 4+ years!
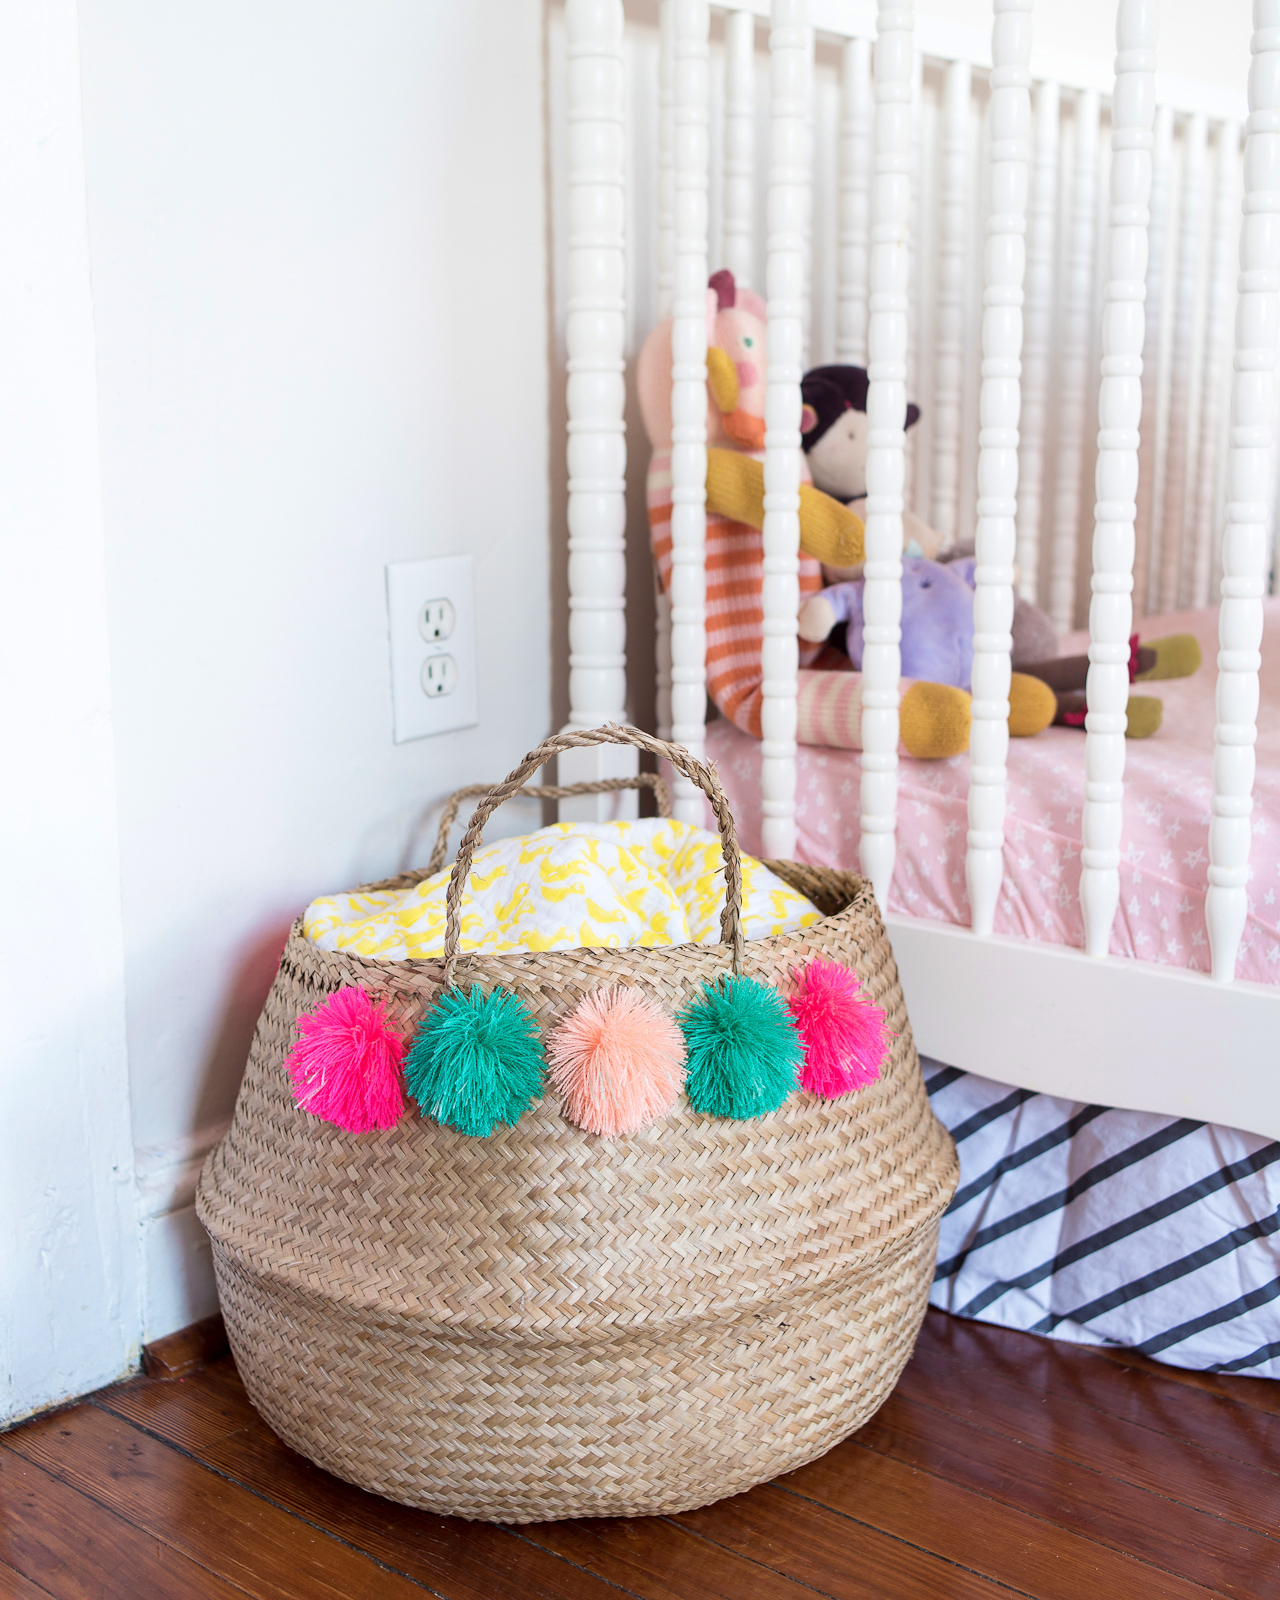
Our beloved pom pom basket is from Eliza Gran and helped inspire the color palette for the nursery! It sadly doesn’t look like her shop is open at the moment, but I’m going to put a couple alternatives into a slideshow at the bottom of the post with shopping links.
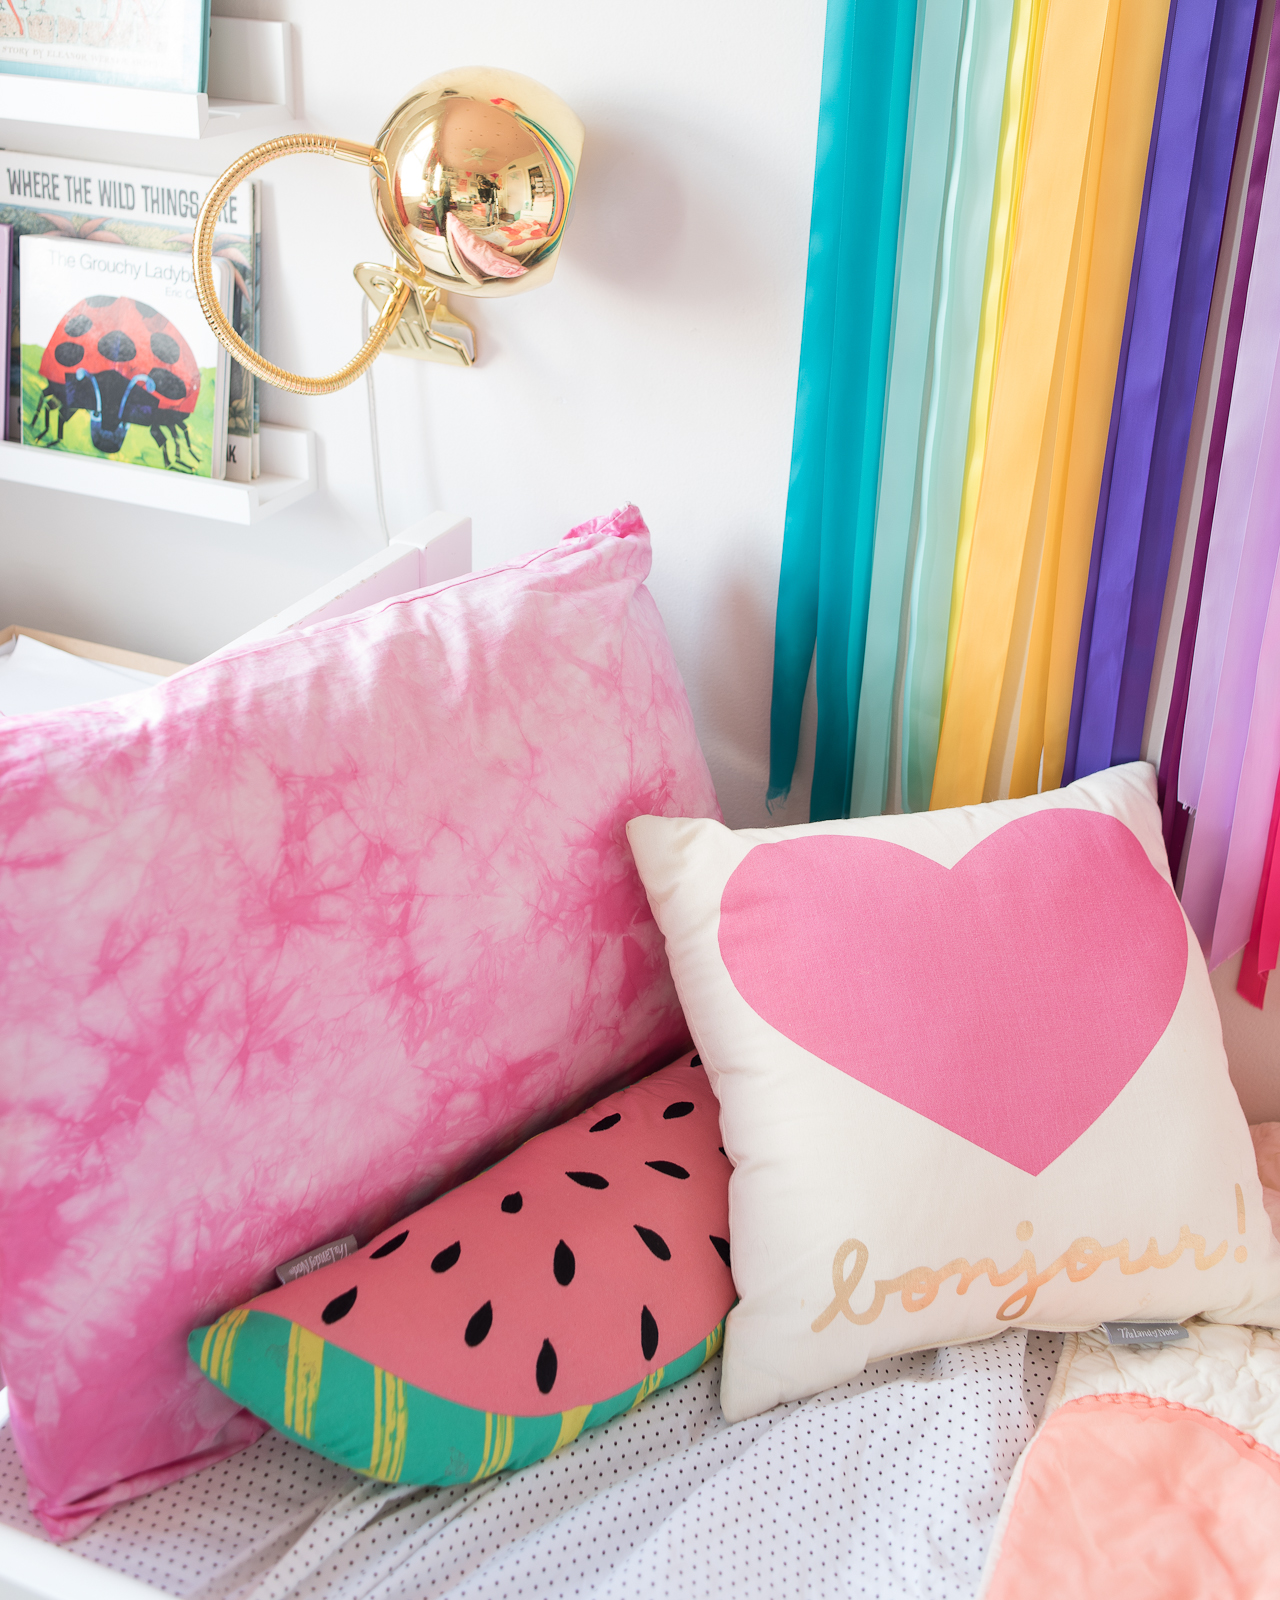
My favorite Roxy Marj blanket! She no longer sells handmade blankets, but you can find her lion blanket and bear blanket at Crate & Kids on super sale. The rest of our crib and toddler bed bedding was all from Land of Nod (RIP), but you can now find a good selection at Crate & Kids. And did you see that Anthropologie now offers kid bedding? Lots of great options there, too!
Eventually, especially once we were ready to potty train Alice, we moved Alice out of the crib and into Sophie’s toddler bed, then put a twin bed in the corner where the crib had been. Sadly I don’t seem to have a great photo of Sophie’s current twin bed, but it’s the very simple wood Tarva bed from IKEA painted a pale pink.
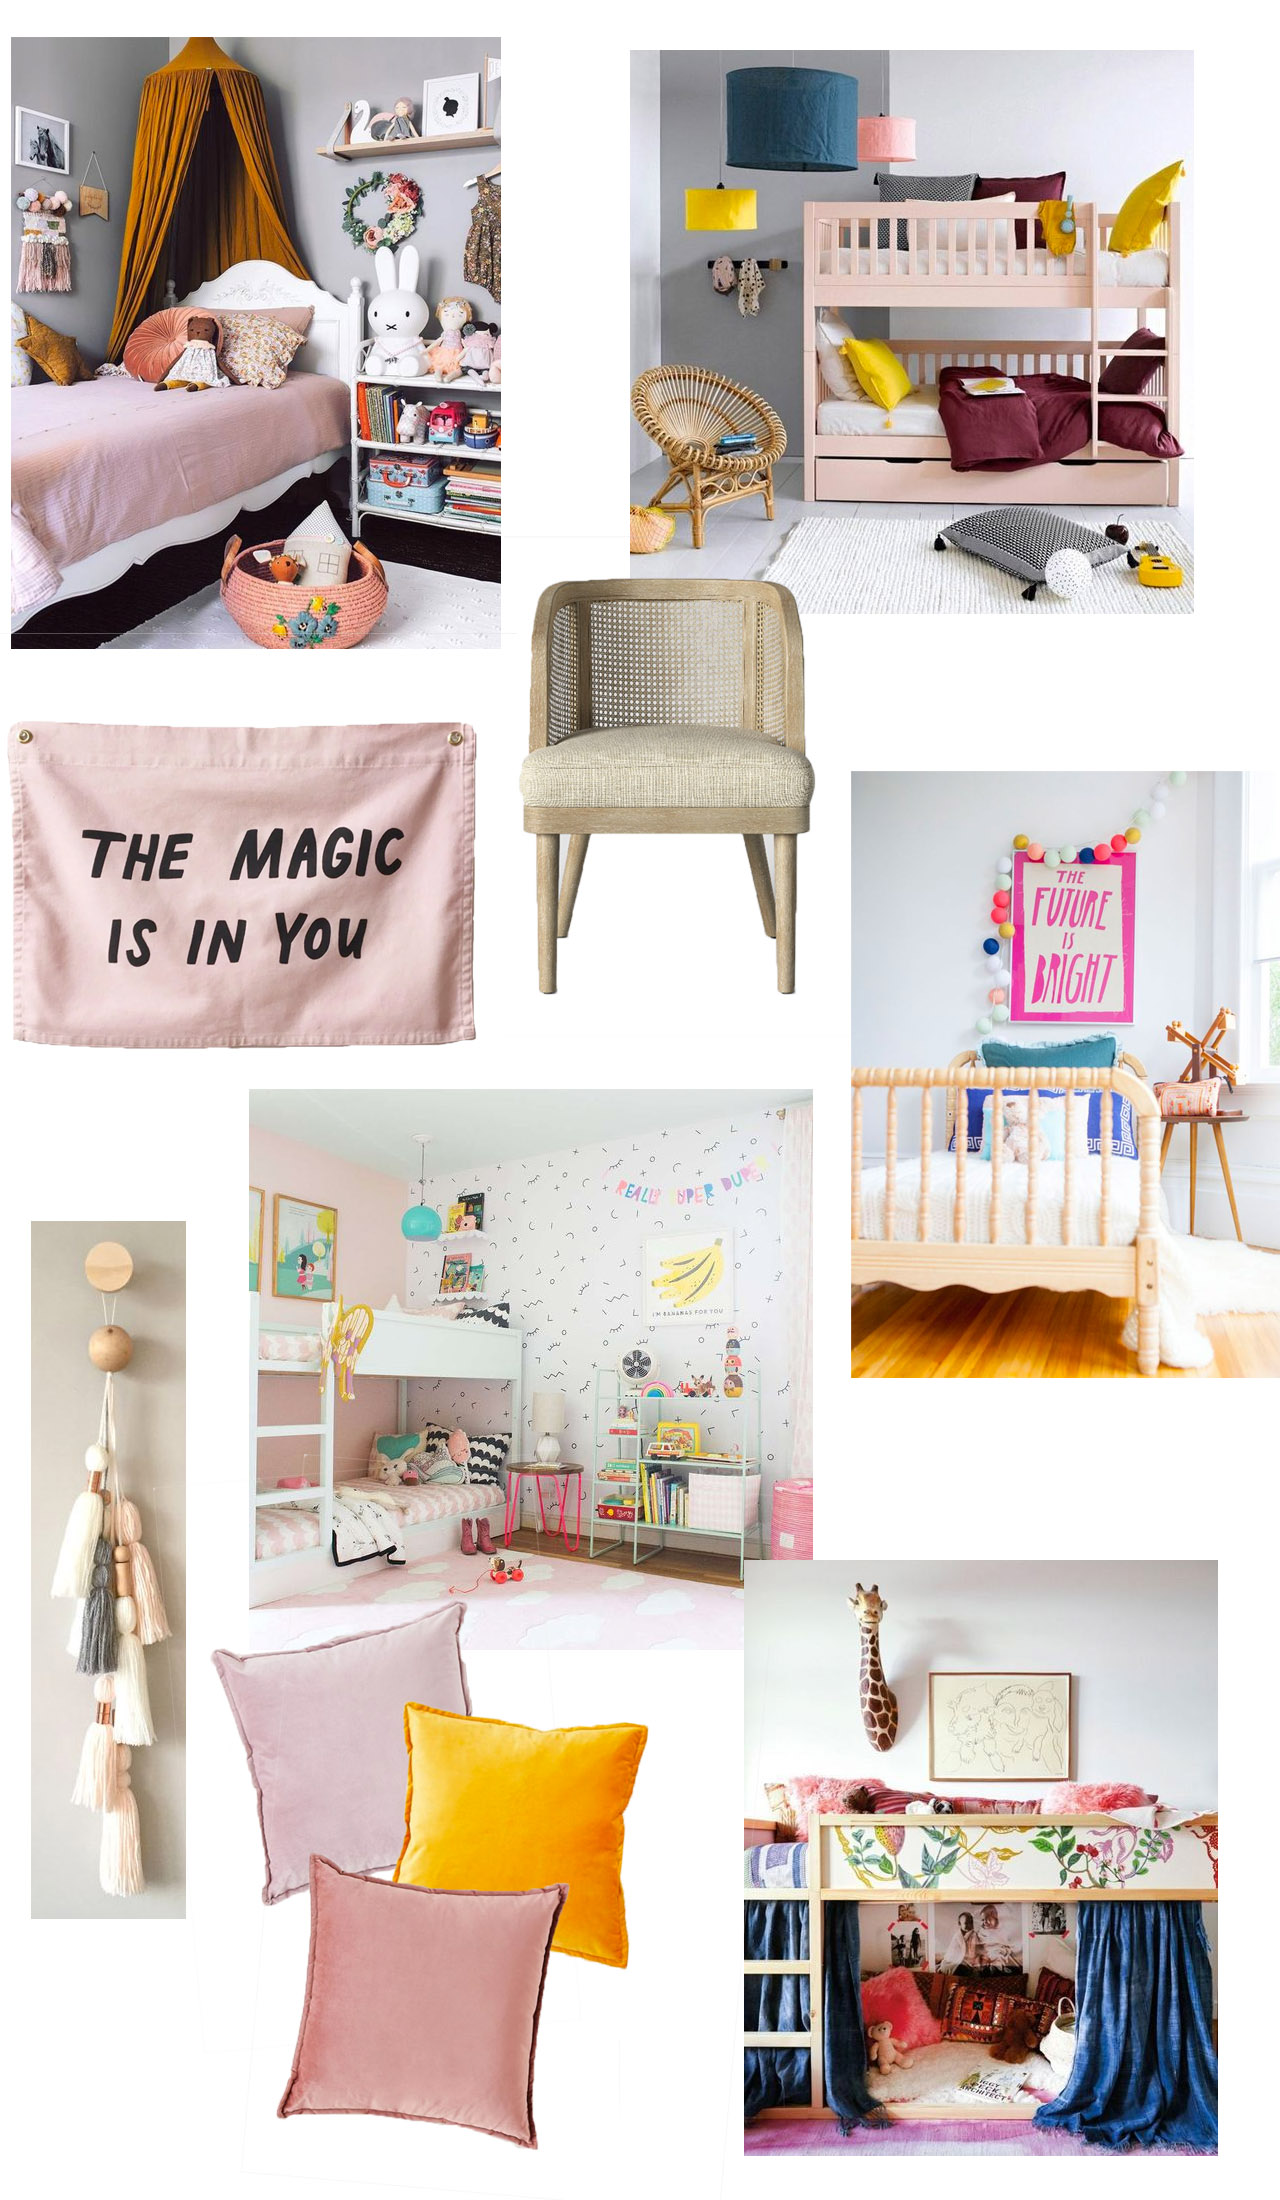
We’ve made even more changes since these photos were taken: the monitors, diaper pail, and changing pad are long gone, some of the furniture has been relocated to other parts of our house, and as of last weekend Alice is no longer in a toddler bed! So now we’re ready for an even bigger change – bunk beds! The girls have been begging us for bunk beds FOREVER, and over the holiday break we decided to just go for it. We passed Alice’s toddler bed on to another family in the neighborhood, ordered a new mattress and bunk bed, and the plan is to put the new bed together this weekend. It’s been a tight squeeze with a bed on each side of the room, so I’m looking forward to freeing up some floor space when we move to bunk beds. I’ll have to take down the tissue paper fans and gallery wall to fit the new bunk bed, so it’s also an opportunity to update the room in a way that makes sense for them at this stage in their lives. I’m still working out the details, but here’s what I’ve got for inspiration so far:
Okay, phew! That was a loooong post about our shared nursery and plans for a shared big girl bedroom. I think I covered everything, but let me know if you have any questions and I’ll do my best to answer them. Also – let me know if you guys would be interested in posts about our experience with a shared bedroom. I know I looked for resources on sleep training and potty training in a shared bedroom but didn’t find a lot out there, so if it’s helpful I’m happy to share our experiences.
Happy Monday everyone! Are we all starting to come out of our holiday fog? I spent a good part of the holiday break reflecting on 2018 and thinking about what I want from 2019 (and beyond), both personally and professionally (and I’m working on a post to share with you later this week). Did any of you do the same thing? This past year felt especially overwhelming, and I definitely felt like I needed the break to just slow down and think about things a bit. If you follow me on social media, it might look like I have everything together, but there is SO much going on behind the scenes that I don’t talk about in public – or at least I haven’t, yet. I’m sure the same is true for you, and it’s also true for everyone you look up to. We all have different circumstances that shape how we build our businesses in this particular season of life. The way I want to run my business now, as a mom of two young girls, is different than the way I was able to run my business before I had kids.
Anyway, if you’re a creative entrepreneur with the same feeling of overwhelm, I wanted to share a resource that has helped me figure out all the financial aspects of my business and eliminate some of the mental and business clutter that was holding me back. I talked about The Blueprint Model a bit last year, which is an amazing twelve week business coaching program for creative entrepreneurs. The Blueprint Model is only open ONCE a year, and the new session is coming up soon! But first, my friend Shanna (the mastermind behind The Blueprint Model) is hosting a FREE mini workshop called “Bringing Basics Back” – with two hours of online training – prior to reopening the doors to the longer coaching program.
When I started Oh So Beautiful Paper I had no idea what I was getting into. I never went to business school or design school, and the blog was just meant to be a creative hobby at the beginning! I never took the time to establish goals, define what success meant to me, or write out a business plan (oops). I had no idea how to price a sidebar ad, much less a sponsored post, and blogging was still so new that there wasn’t really enough data out there to use as a model. I relied on friends to help figure things out and honestly just made a lot of stuff up, but I was never really sure of what my prices should be and it was hard to feel confident in what I was charging. Once I found The Blueprint Model, it taught me to think about things differently and how to price things in a way that matched the kind of life that I want to lead.
I know there is a lot of education on the market today, and I’m honestly so glad that there are online resources that didn’t exist when I was first getting started. If you run a service-based business and are struggling to make ends meet, feel like you’re constantly spinning your wheels, and want to build something that will last the long haul – The Blueprint Model can help you SO much. Shanna taught me the fundamentals, like:
How to price for profit
How to be a steward of my finances (instead of wondering where it all went)
How to not emotionally price and stand up for the value of my work
How to create systems and routines to reduce chaos and use time wisely
So if you’ve got big plans for your business in 2019, I encourage you to start with Shanna’s Bringing Basics Back Mini Workshop, and she’s going to walk you through her Core Motivators assessment. The week-long (and totally free) workshop kicks off today, so don’t wait! Sign up right here.