
hi there! this is Alyson again with Unruly Things and I’m so happy to be here blogging for Nole while she’s out this week. on Unruly Things I’ve been talking about my newest venture called Postal Press. Postal Press is a little shop I’ve been working on stocked with letterpress stationery and packaging goodies.
last weekend, I participated in the Summer Social Sale, hosted by Abby of Abby Try Again, and debuted my collection of goods. one of the hottest sellers was this little scratch pad, letterpressed and assembled by me. and today is your lucky day because I’m here to share with you how you can make your very own scratch pad notebooks.

here are the supplies you’ll need:
- padding compound – the consistency of elmer’s glue and available in white or red.
- scratch pad covers – for mine I used Crane’s 110lb Lettra paper, letterpressed with my own design and cut to size.
- interior paper – unless you have a high power paper cutter, I’d suggest having it professionally trimmed.
- cardboard backing – I used a thin piece of kraft colored cardboard backing, also pre-cut to fit my pads.
- a small paint brush.
- a big working table with a good edge.
- something heavy like a small book, glass jar or that insanely huge quart of padding compound that you have.
1. start by gathering all of the paper together for the scratch pad, including the cover and backcover, and make sure that all of the sides match up evenly by striking it on your table or workspace.

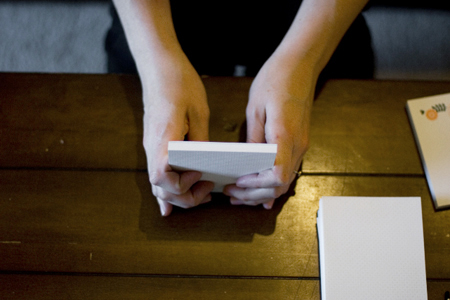
2. next, grip the paper with your pointer finger and thumb on one side and your other fingers on the back for support.
3. take a small amount of padding compound on your brush {seriously, this stuff will last you forever} and lightly brush it onto the edge of your scratch pad.

4. brush the padding compound on in a light layer. {you’ll do a second coat so don’t feel like you need to pile it on there}

5. wipe off any excess padding compound from the edges of the scratch pad.

6. set your scratch pads on the edge of your working surface, as close to the edge as you can get them without smearing the compound. place something heavy on top of them to keep the pages from popping up. make sure to keep the pressure even over the edge where you’ve brushed the compound. I like to stagger my scratch pads on top of one another so that I don’t use up too much of my workspace.
7. once the padding compound has dried, repeat with another light layer. allow to dry completely.
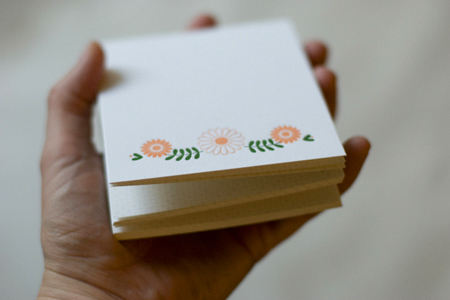
et voilà ! you have a handmade scratch pad, ready for use! and pretty darn cute scratch pad at that. I’m sold out of these scratch pads at the moment, but I hope to have more ready to put in the Summer Social online shop, which opens this Friday July 31 at 10am PST. the Postal Press online shop will open in August.
Alyson you are the cats pajamas!!! So adorable.
I love this tutorial and the design you have letter pressed is perfect! Thanks so much for sharing 🙂
I love this tutorial and the design you have letter pressed is perfect! Thanks so much for sharing 🙂
I love this tutorial and the design you have letter pressed is perfect! Thanks so much for sharing 🙂
awesome tutorial! i really want to try this sometime. thanks alyson 🙂
where can you get paper professionally cut?
holy crap, I just may need to make some. you are awesome!
I got my paper cut a Kinkos!
Fantastic idea. Thanks for sharing a little DYI action.
PS cover letterpress cover.
hey alyson! thanks so much for sharing… i may be making some for christmas gifts now! looks so simple to do.
This is such a great idea! These would make great wedding favors or gifts for bridesmaids or for out-of-town bags. Thanks so much for sharing, this seems like a really fun easy project!
these are adorable! what a fun + pretty idea
These are gorgeous! Thanks so much for sharing this! I’ll be linking.
I love this note pad. Hope you are going to offer it on-line!
These are stunning! Love your letterpressed cover – so pretty! And thanks for the inspiration. Off to go think of a few things I could make for myself 😉
These are stunning! Love your letterpressed cover – so pretty! And thanks for the inspiration. Off to go think of a few things I could make for myself 😉
These are stunning! Love your letterpressed cover – so pretty! And thanks for the inspiration. Off to go think of a few things I could make for myself 😉
this is brilliant! thanks so much for sharing!
this is great! Just what I needed! Thanks
I love your site