It’s the ladies of AntiÂquaria, back with another fabÂuÂlous and creÂative DIY project for you!  To celebrate the launch of their new custom wedding invitation design studio, this week they’re here with a tutorial for a full wedding invitation suite!
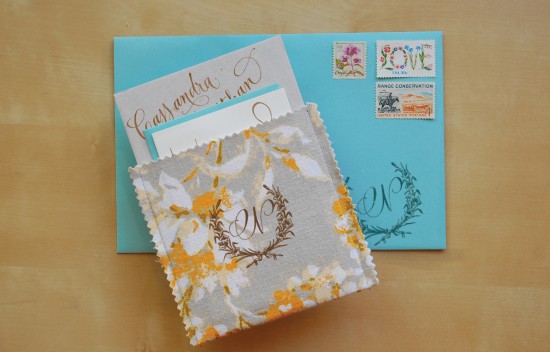
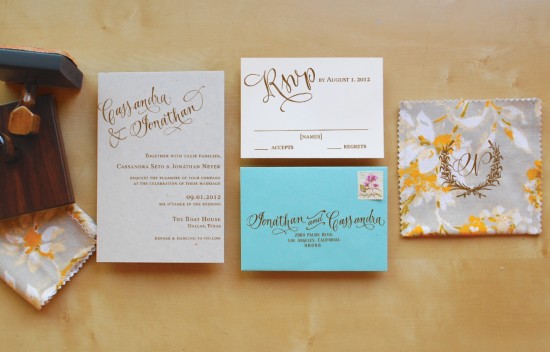
We are so excited for this DIY tutorial because this week, we’ve taken on an entire invitation suite!!!  When we are out and about shopping for vintage house-wares to stock our shop, we like to also pick up remnants of old curtains, sheets, and scarves when we can find them in patterns that we love.  We dug into our stash, using an old fitted sheet to create a lovely fabric pocket that holds all of our invitation suite components.  We love the idea of  using different patterns for each pocket!

Step One: Using pinking shears, cut pieces of fabric into 5″ x 9 3/4″ rectangles (for a finished pocket that fits into an A7 envelope).
Step Two: Fold each cut piece of fabric in half and stamp with a monogram stamp (we used our wreath monogram, size large).
Step Three: With the fabric folded, stitch up each side 1/8″ from the edge, creating a pocket that the invitation pieces will slide into. Â We suggest that you make one to test the size before you cut all of the pockets.
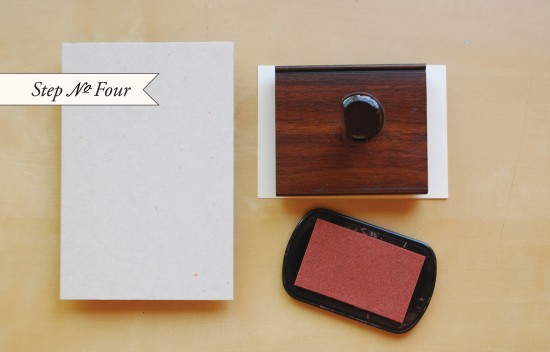
Step Four: For the invitations, cut chipboard to 4.5″ x 6.75″ to fit in the pouch. Â Cut the RSVP card to a standard 4 bar size, 3.5″ x 5″. Â Ink and print the invitation (we used our Calligraphy Accent Invitation Stamp) and RSVP (we used our Calligraphy Accent Reply Stamp) stamps using even pressure on a hard surface.
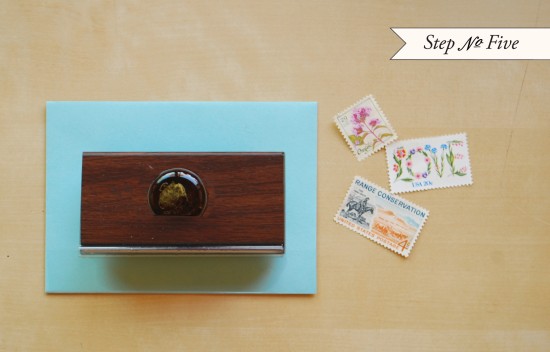
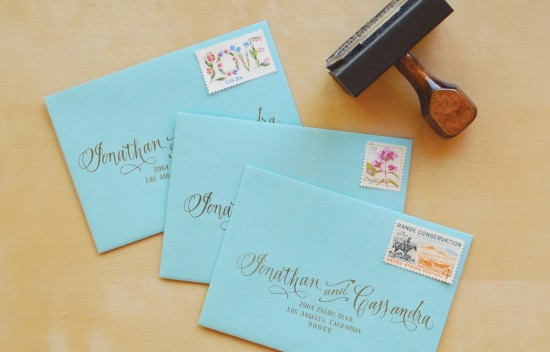
Step Five: Ink and print return address stamp (we used our Calligraphy Accent Return Address Stamp) on 4 bar envelopes to house your reply cards. Again, using even pressure on a hard surface. Â Vintage stamps throughout help complete the overall look!
Materials:
Stamps – Calligraphy Accent Collection (invitation, reply card and return address), wreath monogram, large
Fabric – Either use “found” fabric like we did, or , if you would prefer to buy yardage, we love the prints from Purl Soho.
Pinking shears, sewing machine & thread
Chipboard or Kraft paper – If needed, enlist a framing shop to help you cut chipboard.  Their cutting tools should be able to do the job if you can’t at home.
Stamp Pad – we used a chestnut brown color
AntiÂquaria is a memÂber of the Designer Rolodex – you can see more of their beauÂtiÂful work right here!
Photo Credits: Antiquaria
 p.s. Have you entered the custom journal giveaway from Paper + Cup?  The contest closes tomorrow!
Love the fabric pouch idea! Really ties everything together.
These are so beautiful! I love fabric in stationery, it definitely spices things up!
Beautiful!!! I love the invitation stamps! Miss you girls!
I really love invitation suites where you can make a part yourself. It makes the task of doing your own invitations less overwhelming but still maintains that personal touch. With that said, I think my favorite kind of DIY is stamping! It’s so easy but looks so great. Really love the fabric pouch too!